はじめに
私がいる部署(チーム)では、IoT.kyotoというセンサー等から送信されてくるデータを、簡単なグラフで可視化するという(基本)無料サービスを持っています。
AWSに環境を構築し、そのデータを取得してグラフ化しているのですが、そのAWS環境をお客様でもできるように、AWS環境の構築の仕方的なものを用意しています。
手順に沿ってコンソール画面でぽちぽちしていけば環境の構築ができるのですが、「コマンド一発で構築できたらもっと楽じゃない?」と感じたので、ServerlessFrameworkを使って、 コマンド一発で環境を構築できるようにしました。
あとは、チームの人間がこういうのにも興味持って欲しいなーという願望も含まれていますが…w
筆者のマシンスペック
念のため
マシン : MacBook Pro
OS : macOS Sierra
プロセッサ : 2.3GHz Intel Core i5
メモリ : 16GB
前提条件
- AWSのアカウントを持っている、またはIAMユーザーを作成することができる
- AWS-CLIインストール済み (参考ページ)
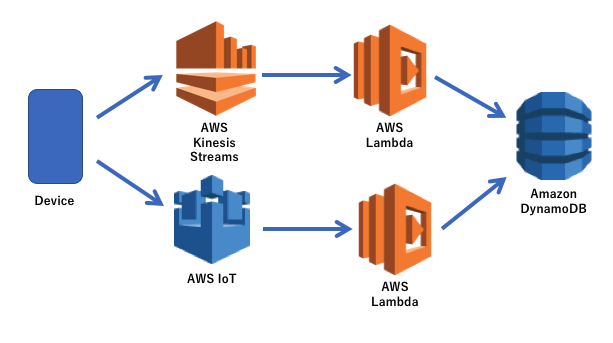
完成形
KinesisDataStreams経由とAWSIoT経由の2本立てでお送りいたします。
ソースコード
ここにあります。
ディレクトリ構成
ディレクトリはこんな感じです。
-- index.js
|
|- handlers
|   |
|   |- put_dynamo_form_kinesis.js
|    - put_dynamo_form_iot.js
|
|- serverless.yml
|- node_modules
 - package.json
デプロイで構築されるリソースたち
- Lambda
- DynamoDB
- KinesisDataStreams
- AWSIoT(ルールのみ)
Serverless Frameworkのインストール
正直ググれば出てきますが、npmで入れる方法は下記の通りです。
$ npm install -g severless
Credentialsの設定
デプロイするAWSのアカウントを作成して、そのKey情報を設定します。
$ aws configure
AWS Access Key ID [None]: IAMユーザーのアクセスキー
AWS Secret Access Key [None]: IAMユーザーのシークレットアクセスキー
Default region name [None]: ap-northeast-1
Default output format [None]:
必要なパッケージ類のインストール
package.jsonがなければinitして生成してください
$ npm init
$ npm install --save aws-sdk co
serverless.yml
どーん。
一応コメントで少し説明をしています。
また、serverless.yml 内の各種リソース名は適宜変更していただき、判別しやすいよう、運用しやすいようにしてください。
service: iot-serverless-sample

# 基本設定
# accountIDは適宜修正してください
custom:
  defaultStage: prod
  defaultRegion: ap-northeast-1
  accountID: xxxxxxxxxxxx

# LambdaのruntimeやiamRoleなどの設定
# iamRole
#   DynamoDB TableName:iot-serverless-sampleに対してGet/Query/Put/Updateを許可
#   Kinesis StreamName:iot-serverless-kinesisに対してDescribeStream/GetRecords/GetShardIterator/ListStreamsを許可
provider:
  name: aws
  runtime: nodejs6.10
  stage: ${opt:stage, self:custom.defaultStage}
  region: ${opt:region, self:custom.defaultRegion}
  iamRoleStatements:
    - Effect: "Allow"
      Resource: "arn:aws:dynamodb:${self:provider.region}:*:table/iot-serverless-dynamo"
      Action:
        - "dynamodb:GetItem"
        - "dynamodb:PutItem"
        - "dynamodb:UpdateItem"
        - "dynamodb:Query"
    - Effect: "Allow"
      Resource: "arn:aws:kinesis:${self:provider.region}:*:stream/iot-serverless-kinesis"
      Action:
        - "kinesis:DescribeStream"
        - "kinesis:GetRecords"
        - "kinesis:GetShardIterator"
        - "kinesis:ListStreams"

# Lambdaのhandlerやevent(トリガー)の設定
# LambdaFunctionName:putDynamoDBfromKinesisはkinesis経由でDynamoDBにPUTするLambda
# LambdaFunctionName:putDynamoDBfromIoTはAWSIoT経由でDynamoDBにPUTするLambda
# KinesisのARNにアカウント番号が入っているので、アカウントごとに修正する必要があります ※なんとかして直接書かずに済む方法が模索中
# KinesisかAWSIoTのどっちかだけ必要な場合が多いと思うのでコメントアウトしてください
functions:
  putDynamoDBfromKinesis:
    handler: index.put_dynamo_form_kinesis
    description: iot-serverless-sample LambdaFunction from Kinesis
    events:
      - stream:
          arn: "arn:aws:kinesis:${self:provider.region}:${self:custom.accountID}:stream/iot-serverless-kinesis"
          batchSize: 100
          startingPosition: LATEST
  putDynamoDBfromIoT:
    handler: index.put_dynamo_from_iot
    description: iot-serverless-sample LambdaFunction from IoT
    events:
      - iot:
          name: LambdaInvokeRole
          description: AWSIoTからLambdaをinvokeする
          sql: "SELECT * FROM 'iot-serverless-topic'"
          sqlVersion: beta

# その他各種サービスリソースの設定
# 初回デプロイ時にDynamoDBのテーブルとKinesisDataStreamsを作成している
# DynmoDB
#   TableName: iot-serverless-dynamo
#   HashKey: deviceID(string)
#   RangeKey: record_time(string)
#   Capacity: Read/Writeともに1 必要に応じて調整してください
# KinesisDataStreams
#   StreamName: iot-serverless-kinesis
#   Shard: 1
resources:
  Resources:
    DynamoDB:
      Type: "AWS::DynamoDB::Table"
      Properties:
        TableName: iot-serverless-dynamo
        AttributeDefinitions:
          - AttributeName: deviceID
            AttributeType: S
          - AttributeName: record_time
            AttributeType: S
        KeySchema:
          - AttributeName: deviceID
            KeyType: HASH
          - AttributeName: record_time
            KeyType: RANGE
        ProvisionedThroughput:
          ReadCapacityUnits: 1
          WriteCapacityUnits: 1
    KinesisDataStreams:
      Type: "AWS::Kinesis::Stream"
      Properties:
        Name: "iot-serverless-kinesis"
        ShardCount: 1
Lambda
少し特殊な呼び方をしています。
serverless.ymlのhandlerには index.put_dynamo_form_kinesis と書いていますが、これは index.js 内でexportされている put_dynamo_form_kinesis をhandlerとして扱うという意味になります。
各handlerはhandlersというディレクトリにまとめてます。
"use strict";

module.exports = {
  put_dynamo_form_kinesis: require("./handlers/put_dynamo_form_kinesis"),
  put_dynamo_from_iot: require("./handlers/put_dynamo_form_iot")
};
"use strict";
const AWS = require("aws-sdk");
const dynamoDB = new AWS.DynamoDB.DocumentClient({
  region: process.env.AWS_REGION
});

module.exports = (event, context, callback) => {
  console.log(`event: ${JSON.stringify(event)}`);

  co(function* () {
    const items = event["Records"];
    console.log(`items: ${JSON.stringify(items)}`);
    const promises = items.map(item => {
      const payload = new Buffer(item, "base64").toString();
      const data = JSON.parse(payload);
      const param = {
        TableName: "iot-serverless-dynamo",
        Item: data
      };
      return dynamoDB.put(param).promise();
    });
    return Promise.all(promises);
  }).then(() => {
    console.log("All done");
    callback(null);
  }).catch((err) => {
    console.error(err);
    callback(err);
  });
};
"use strict";
const co = require("co");
const AWS = require("aws-sdk");
const dynamoDB = new AWS.DynamoDB.DocumentClient({
  region: process.env.AWS_REGION
});

module.exports = (event, context, callback) => {
  console.log(`event: ${JSON.stringify(event)}`);
    const param = {
      TableName: "iot-serverless-dynamo",
      Item: event
    };
    return dynamoDB.put(param).promise()
  .then(() => {
    console.log("All done");
    callback(null);
  }).catch((err) => {
    console.error(err);
    callback(err);
  });
};
あとはデプロイ
deployコマンドでデプロイが行われます。 v オプションをつけると詳細のログ情報が表示されるようになります。
$ sls deploy -v
あとは試すだけ♫
サンプルのJSONファイルを作成します。
{"val_1": "testtesttest", "val_2": "1234567890", "val_3": "q2w3e4r5t6y7u8i", "deviceID": "sample0001", "record_time": "2018-03-13T00:00:00.000+0900"}
KinesisDataStreamsとAWSIoTにAWSCLI経由でテストデータを送信してみます。
KinesisDataStreams
$ aws kinesis put-record --stream-name iot-serverless-kinesis --data file://sample.json --partition-key "deviceID"
AWS IoT
$ aws iot-data publish --topic iot-serverless-topic --payload file://sample.json
無事DynamoDBまでデータがPUTされたらOKです。
後片付け
removeコマンドで一発です。
$ sls remove
まとめ
ServerlessFrameworkを使って、センサーデータがDynamoDBにPUTされる構成を簡単?に構築できました。
CloudFormationのラッパーということもあり、CloudFormationのymlファイルを書くよりかは、簡単に書くことができるのかなと実感しました。
ただ、CloudFormationでできることがServerlessFrameworkだとできないみたいなこともあるようなので、まだまだ模索中のところもあります。
まだ改善の余地は十分にあると思いますが、一旦まとめてチーム内に共有するものを作りました。
これでメンバーが興味持ってくれたらいいんですが…w
ではまた!