はじめに
先月個人でブログを作成した際に、Gatsby.jsのgatsby-starter-blogというテンプレートを使ったのですが、デフォルトではTypeScript化されてないのでその手順を紹介しようと思います。
ネット上の関連記事ではconfigファイルのts化で一工夫されているものがいくつかあったのですが、今ではconfigファイルのts化が公式サポートされ、より簡単にTS移行できるようになっており本記事ではそこを踏まえて紹介させていただきます。
コードは動作確認後、筆者のレポジトリにあげてあるのでもし動かない!ということがあれば参考にしてみてください
https://github.com/ironkicka/gatsby-starter-blog-typescript
gatsby-starter-blogって?
Gatsby.jsが提供しているStarterと呼ばれるテンプレートの1つです。
Starters are boilerplate Gatsby sites maintained officially, or by the community.****
Working with Starters | Gatsby
Starterはgatsby-starter-blog以外にも多くの種類があり、以下のページでデモサイトを見ることができます
gatsby-starter-blogの特徴としては、以下があります
-
個人ブログ向けのレイアウト
かなりシンプルなレイアウトになってます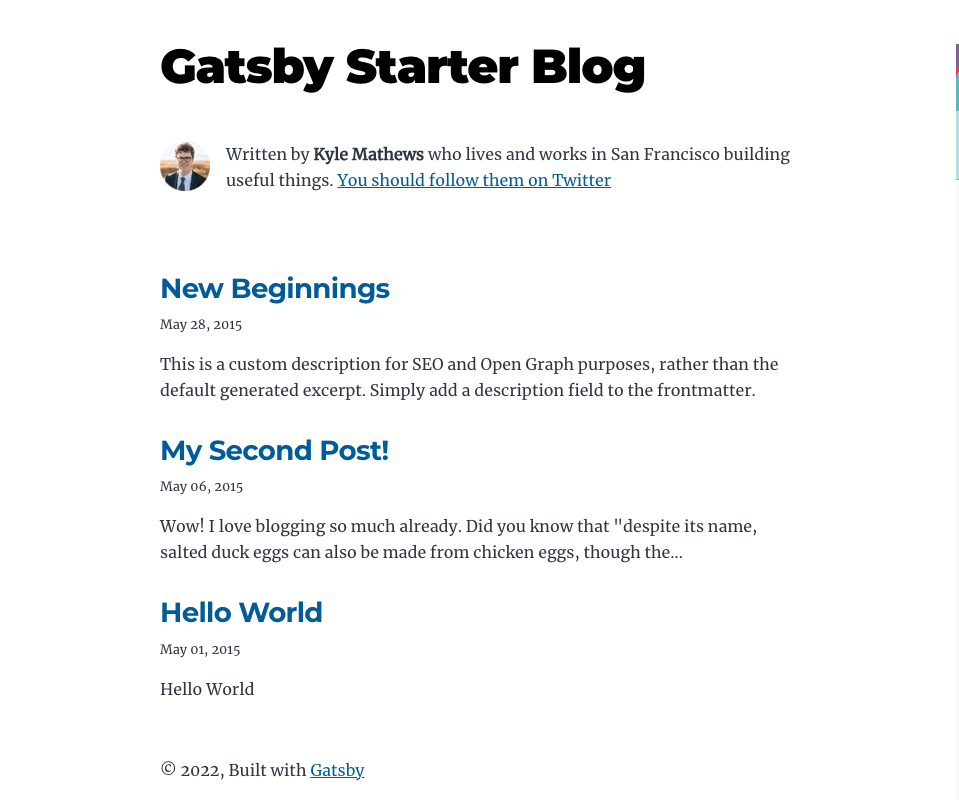
-
コンテンツはMarkdownファイルで記述し、それをHTML化して利用する
自動生成される雛形は以下のような構造をしており、基本的にはcontent/blog/配下に記事ごとにディレクトリを作成し、その中に記事本体や埋め込む画像を配置します.この記事ディレクトリの名称がそのままページのパスになります。
例. new-beginningsコンテンツのページURL:http://localhost:8000/new-beginnings/. ├── LICENSE ├── README.md ├── content │ └── blog │ ├── hello-world │ │ ├── index.md │ │ └── salty_egg.jpg │ ├── my-second-post │ │ └── index.md │ └── new-beginnings │ └── index.md ├── gatsby-browser.js ├── gatsby-config.js ├── gatsby-node.js ├── gatsby-ssr.js ├── package-lock.json ├── package.json ├── public ├── src │ ├── components │ │ ├── bio.js │ │ ├── layout.js │ │ └── seo.js │ ├── images │ │ ├── gatsby-icon.png │ │ └── profile-pic.png │ ├── normalize.css │ ├── pages │ │ ├── 404.js │ │ ├── index.js │ │ └── using-typescript.tsx │ ├── style.css │ └── templates │ └── blog-post.js └── static ├── favicon.ico └── robots.txt
自分は普段からマークダウンで色々なメモを取ることが多いのでこのgatsbyjs/gatsby-starter-blogを使うことにしました!同じようにマークダウンコンテンツをそのまま記事にしたい方にはおすすめです!
手順
スターターをもとに雛形を作成する
下記コマンドを実行して雛形を作成して下さい。
npx gatsby new myBlog https://github.com/gatsbyjs/gatsby-starter-blog
Configファイルをts化する
gatsby-config.js
下記2つの変更を行ってください
-
拡張子をtsにする
-
エクスポートの記述をESモジュール形式にする(これ自体は行わなくてもエラーは出ないです)
変更前
module.exports = {
  siteMetadata: {
    title: `Gatsby Starter Blog`,
    author: {
      name: `Kyle Mathews`,
      summary: `who lives and works in San Francisco building useful things.`,
    },
    description: `A starter blog demonstrating what Gatsby can do.`,
    siteUrl: `https://gatsbystarterblogsource.gatsbyjs.io/`,
    social: {
      twitter: `kylemathews`,
    },
  },
  ...
}
変更後
import type { GatsbyConfig } from "gatsby"

const config: GatsbyConfig = {
  siteMetadata: {
    title: `Gatsby Starter Blog`,
    author: {
      name: `Kyle Mathews`,
      summary: `who lives and works in San Francisco building useful things.`,
    },
    description: `A starter blog demonstrating what Gatsby can do.`,
    siteUrl: `https://gatsbystarterblogsource.gatsbyjs.io/`,
    social: {
      twitter: `kylemathews`,
    },
  },
  ...
}

export default config
この時点では、graphQLのクエリ結果に型を設定していないのでエラーが出ていますが、ビルド自体は成功するはずです。GraphQLへの型付けは後述するこちらで説明しています。
gatsby-node.js
-
tsconfig.jsを作成する
CommonJSのモジュールであるpathをimportできるようにtsconfigを作成し、esModuleInteropをtrueにします。ただし、デフォルトでtrueなので以下のコマンドでtsconfig.jsonを作るだけで大丈夫です。npx tsc -init -
拡張子をtsにする
-
エクスポートの記述をESモジュール形式にする(これ自体は行わなくてもエラーは出ないです)
変更前
const path = require(`path`)
const { createFilePath } = require(`gatsby-source-filesystem`)

...

exports.createPages = async ({ graphql, actions, reporter }) => {
...
}

exports.onCreateNode = ({ node, actions, getNode }) => {
...
}

exports.createSchemaCustomization = ({ actions }) => {
...
}
変更後
import { Actions, GatsbyNode } from "gatsby"
import path from "path"
import { createFilePath } from "gatsby-source-filesystem"

export const createPages: GatsbyNode["createPages"] = async ({ graphql, actions, reporter }) => {
...
}

export const onCreateNode: GatsbyNode["onCreateNode"] = ({ node, actions, getNode }) => {
...
}

export const createSchemaCustomization: GatsbyNode["createSchemaCustomization"] = async ({ actions }: { actions: Actions}) => {
...
}
gatsby-config.tsと同様に、この時点ではgraphQLのクエリ結果に型を設定していないのでエラーが出ていますが、ビルド自体は成功するはずです。GraphQLへの型付けは後述するこちらで説明しています。
gatsby-broweser.js
拡張子をtsxにします。
デフォルトではtsで問題ないのですが、ここではwrapRootElementなどJSX.Elementを返す関数を exportすることもあるのでその際にエラーが出ないようにtsxにしておきます.
今回は使いませんが例えばRecoilを使うときは以下のように使ったりします
export const wrapRootElement = ({element,props}:any)=>{
  return <RecoilRoot {...props} >{element}</RecoilRoot>
}
gatsby-ssr.js
- 拡張子をtsにする
- エクスポートの記述をESモジュール形式にする(これ自体は行わなくてもエラーは出ないです)
変更前
exports.onRenderBody = ({ setHtmlAttributes }) => {
  setHtmlAttributes({ lang: `en` })
}
変更後
export const onRenderBody = ({ setHtmlAttributes }:any) => {
  setHtmlAttributes({ lang: `en` })
}
GraphQLの結果に型を付ける
-
プラグインをインストール
gatsby-plugin-typegenというプラグインが用意されているのでインストールしますnpm i gatsby-plugin-typegen -
gatsby-config.tsに以下を追加します
const config: GatsbyConfig = {
...
{
      resolve: "gatsby-plugin-typegen",
      options: {
        emitSchema: {
          "src/__generated__/gatsby-schema.graphql": true,
          "src/__generated__/gatsby-introspection.json": true
        },
        emitPluginDocuments: {
          "src/__generated__/gatsby-plugin-documents.graphql": true
        }
      }
    },
  ],
}
追加後に
gatsby developをし直してください
次のようなログが出て、ファイルが作成されていれば成功です。success [typegen] emit schema into src/__generated__/gatsby-schema.graphql - 0.462s success [typegen] emit 3rd-party documents into src/__generated__/gatsby-plugin-documents.graphql - 0.276s success [typegen] generate type definitions to src/__generated__/gatsby-types.d.ts. (language: TypeScript) - 0.278s success [typegen] emit schema into src/__generated__/gatsby-introspection.json - 0.366s出力ファイル
__generated__ ├── gatsby-introspection.json ├── gatsby-plugin-documents.graphql ├── gatsby-schema.graphql └── gatsby-types.d.ts -
型を適用していく
-
gatsby-node.ts
変更前const result = await graphql(` { allMarkdownRemark(sort: { frontmatter: { date: ASC } }, limit: 1000) { nodes { id fields { slug } } } } `) const posts = result.data.allMarkdownRemark.nodes // Create blog posts pages // But only if there's at least one markdown file found at "content/blog" (defined in gatsby-config.js) // `context` is available in the template as a prop and as a variable in GraphQL if (posts.length > 0) { posts.forEach((post, index) => { const previousPostId = index === 0 ? null : posts[index - 1].id const nextPostId = index === posts.length - 1 ? null : posts[index + 1].id createPage({ path: post.fields.slug, component: blogPost, context: { id: post.id, previousPostId, nextPostId, }, }) }) }変更後
const result = await graphql<{ allMarkdownRemark: GatsbyTypes.Query["allMarkdownRemark"]}>(` { allMarkdownRemark(sort: { frontmatter: { date: ASC } }, limit: 1000) { nodes { id fields { slug } } } } `) const posts = result.data?.allMarkdownRemark.nodes // Create blog posts pages // But only if there's at least one markdown file found at "content/blog" (defined in gatsby-config.js) // `context` is available in the template as a prop and as a variable in GraphQL if(!posts) return; if (posts.length > 0) { posts.forEach((post, index) => { const previousPostId = index === 0 ? null : posts[index - 1].id const nextPostId = index === posts.length - 1 ? null : posts[index + 1].id createPage({ path: post.fields?.slug!, component: blogPost, context: { id: post.id, previousPostId, nextPostId, }, }) }) } -
gatsby-config.ts
変更前{ resolve: `gatsby-plugin-feed`, options: { ... feeds: [ { serialize: ({ query: { site, allMarkdownRemark }}) => { return allMarkdownRemark.nodes.map(node => { return Object.assign({}, node.frontmatter, { description: node.excerpt, date: node.frontmatter.date, url: site.siteMetadata.siteUrl + node.fields.slug, guid: site.siteMetadata.siteUrl + node.fields.slug, custom_elements: [{ "content:encoded": node.html }], }) }) }, ... ] } }変更後
{
      resolve: `gatsby-plugin-feed`,
			options: {
			...
				feeds: [
          {
            serialize: ({ query: { site, allMarkdownRemark } }:{query:{site:GatsbyTypes.Query['site'],allMarkdownRemark:GatsbyTypes.Query["allMarkdownRemark"]}}) => {
              return allMarkdownRemark.nodes.map(node => {
                return Object.assign({}, node.frontmatter, {
                  description: node.excerpt,
                  date: node.frontmatter?.date,
                  url: site?.siteMetadata?.siteUrl! + node.fields?.slug,
                  guid: site?.siteMetadata?.siteUrl! + node.fields?.slug,
                  custom_elements: [{ "content:encoded": node.html }],
                })
              })
            },
					...
				]
			}

}
-
これでconfigファイル内のGraphQL周りのエラーは解消されたはずです!
コンポーネントをtsxにする
次にページの表示に使っている種々のコンポーネントをTS化していきます。
src/pages配下のコンポーネントをtsxにする
-
拡張子の変更
まず以下のようにusing-typescript.tsx削除し、残ったファイルの拡張子をtsxに変更します
変更前のsrc/pages
.
├── 404.js ←拡張子をtsxに変更
├── index.js ←拡張子をtsxに変更
└── using-typescript.tsx ←削除
変更後
. ├── 404.tsx └── index.tsxこの時点で、http://localhost:8000/ にアクセスして以下が表示されていれば成功です.
反映されない場合は、gatsby-developをし直すか、.cacheを消してみてください
-
index.tsxの型エラーを解消する
現時点では、propsとpostsをmapする部分でエラーが出ているのでそれを解消します。
以下のようにpropsに型を追加します
変更前import { Link, graphql } from "gatsby" const BlogIndex = ({ data, location }) => { ... }変更後
import { Link, graphql, PageProps } from "gatsby" const BlogIndex = ({ data, location }:PageProps<GatsbyTypes.Query>) => { ... }posts周りでもエラーが出ますが詳細はレポジトリのこちらをご覧ください
-
404.tsxの型エラーを解消する
index.tsx同様にpropsに型を定義します
変更前import { graphql } from "gatsby" const NotFoundPage = ({ data, location }) => { const siteTitle = data.site.siteMetadata.title ... }変更後
import { graphql, PageProps } from "gatsby"

const NotFoundPage = ({ data, location }:PageProps<GatsbyTypes.Query>) => {
const siteTitle = data.site?.siteMetadata?.title||''
...
}
以上でsrc/pages配下のTS化は一旦終了です!
components配下のコンポーネントをtsxにする
この時点でもページ自体は表示されますが、index.tsxや404.tsxでは以下のようなエラーが出ていると思います。
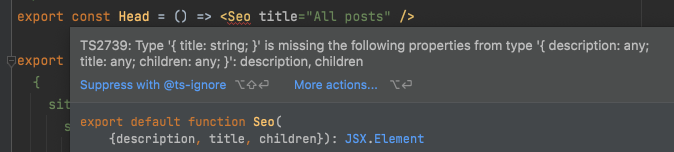
これはSeoコンポーネントがtsx化されておらずpropsの型がないためです。なので、このセクションでSeoコンポーネント含む componentsディレクトリ配下のコンポーネントをtsx化します
まずは準備としてtsconfig.jsonのcompilerOptionsに以下を追加します
"jsx": "react"
これをしないと以下のようなエラーが出て怒られます。
Cannot use JSX unless the '--jsx' flag is provided
それでは各コンポーネントをtsx化していきましょう。
-
Seoコンポーネントをtsx化する
-
ファイル拡張子を変更してseo.tsxにする
-
型をつける
下記ように型を定義してあげます。これでindex.tsx,404.tsx内のエラーは消えるはずです。type Props = Readonly<{ description?:string; title:string; children?:React.ReactNode }> const Seo = ({ description, title, children }:Props) => { ... }
-
-
Layoutコンポーネントをtsx化する
-
ファイル拡張子を変更してlayout.tsxにする
-
型をつける
import { WindowLocation } from "@reach/router" type Props = Readonly<{ location: WindowLocation; title: string; children?: React.ReactNode }> export const Layout = ({ location, title, children }: Props) => { ... } -
Gatsbyグローバル変数の型定義ファイルを作成する
ステップ2までの状態では以下のようにGatsbyのグローバル変数ではる’__PATH_PREFIX__が存在しない’とエラーが出ます
これを解消するため、global.d.tsファイルをsrc配下に置き、以下を記述します
declare const __PATH_PREFIX__: string以下を参考にしました
• Gatsby’s global variable like
__PATH_PREFIX__can be handled by declaring this code somewhere:
-
-
Bioコンポーネントをtsx化する
Bioコンポーネントはpropsを受け取らないのでファイル拡張子をtsxに変更するだけで完了です。
templates配下のblog-post.jsをtsxにする
最後に、記事の詳細ページ用のコンポーネントを記述しているblog-post.jsをtsx化します。
手順は以下2つです
- ファイル拡張子をtsxにする
- 型をつける
ファイル内のBlogPostTemplateとHeadの2つのコンポーネントに対して以下のように型をつけてあげます。この際、BlogPostTemplateではstringを期待する箇所にstring|undefinedを渡しているためにエラーが起きる箇所がいくつかあるのですが、細かい話になるので詳しくはレポジトリのこちらをご覧ください。const BlogPostTemplate = ({ data: { previous, next, site, markdownRemark: post }, location, }:PageProps<GatsbyTypes.Query&{previous:GatsbyTypes.Query['markdownRemark'],next:GatsbyTypes.Query['markdownRemark']}>) => { ... } export const Head = ({ data: { markdownRemark: post } }:PageProps<GatsbyTypes.Query>) => { return ( <Seo title={post?.frontmatter?.title||''} description={post?.frontmatter?.description || post?.excerpt||''} /> ) } - gatsby-node.tsでblog-post.jsを参照している部分を修正する
最後にgatsby-node.tsを参照します。以下のように参照するテンプレートのパスを指定する部分を./src/templates/blog-post.jsから./src/templates/blog-post.tsxにして完了です!const blogPost = path.resolve(`./src/templates/blog-post.tsx`)
以上でgatsby-starter-blogのTS化は終了です。最終的には以下のような構造になっているかと思います。
.
├── LICENSE
├── README.md
├── content
│   └── blog
│       ├── hello-world
│       │   ├── index.md
│       │   └── salty_egg.jpg
│       ├── my-second-post
│       │   └── index.md
│       └── new-beginnings
│           └── index.md
├── gatsby-browser.tsx
├── gatsby-config.ts
├── gatsby-node.ts
├── gatsby-ssr.ts
├── package-lock.json
├── package.json
├── public
├── node_modules
├── src
│   ├── __generated__
│   │   ├── gatsby-introspection.json
│   │   ├── gatsby-plugin-documents.graphql
│   │   ├── gatsby-schema.graphql
│   │   └── gatsby-types.d.ts
│   ├── components
│   │   ├── bio.tsx
│   │   ├── layout.tsx
│   │   └── seo.tsx
│   ├── global.d.ts
│   ├── images
│   │   ├── gatsby-icon.png
│   │   └── profile-pic.png
│   ├── normalize.css
│   ├── pages
│   │   ├── 404.tsx
│   │   └── index.tsx
│   ├── style.css
│   └── templates
│       └── blog-post.tsx
├── static
│   ├── favicon.ico
│   └── robots.txt
└── tsconfig.json
Tips
TS化する過程で、加えた変更は正しいはずのにgatsby developするとエラーになる/うまく反映されない場合は、.cacheディレクトリを削除してみてください。これをしないとts/tsxファイルで作り直しても、gatsbyが変更前の状態を参照してしまうことがあるためです。
おわりに
いかがでしたでしょうか。ほぼ作業だけで特に難しいことはしなくてよかったかと思います。皆さんの個人ブログ作成の助けになれば幸いです。ちなみに自分はデザイン・機能ともにいい感じにならずなかなか公開できずにいます。。笑。