はじめに
Nuxt.jsとWordpressを使用して私のポートフォリオサイトをリニューアルした際の備忘録です。
もともとWordpressを使用して作成したポートフォリオサイトがありましたが、表示速度の向上や自身の学習を目的にNuxt.jsで作り直しました。
ただ、サイト内のコンテンツの管理はそのまま行いたかったので、WordpressをHeadlessCMSとして利用しました。
この記事では、Nuxt.jsの使い方やWordpressとの連携方法などをご紹介します。
環境
リニューアル前
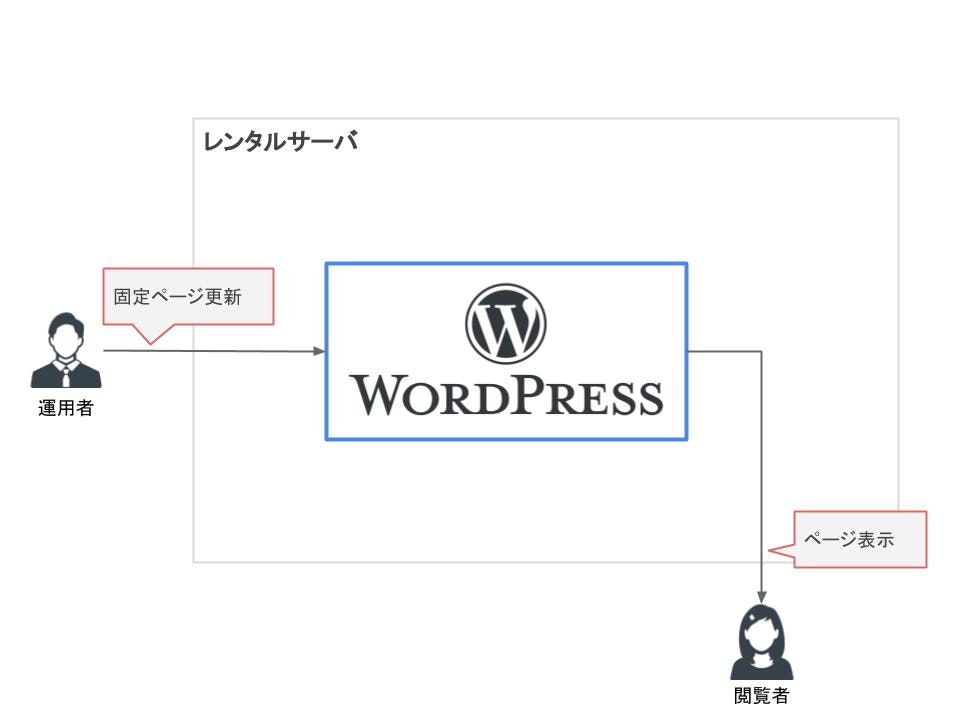
リニューアル前は下図のような環境構成となっていました。
よくあるWordpressのみで作成したサイトです。
コンテンツ管理が楽な反面、表示速度が遅いなどの問題がありました。
リニューアル後
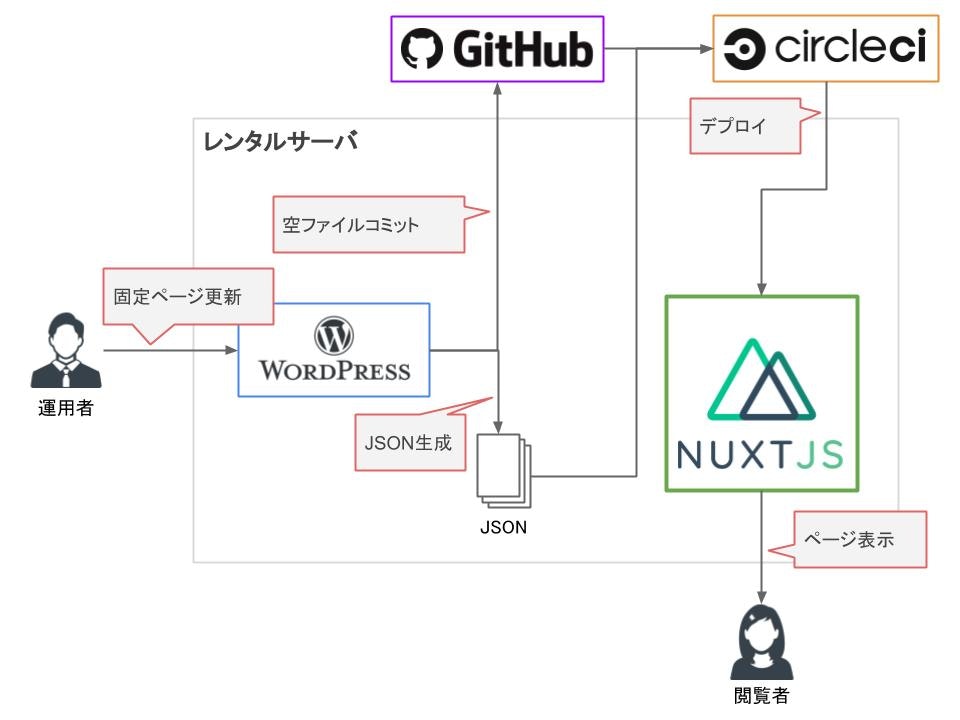
リニューアル後は下図のような環境構成になりました。
Wordpressで固定ページを更新した際にJSONデータが出力されます。
更新時にCircle CIを利用して自動的にデプロイを行わせるようにしました。
この仕組みにより、つねに最新のデータがページに反映されるようになります。
Wordpress
WordpressをHeadlessCMSとして利用する場合、デフォルトで用意されているWP REST APIを利用するのが楽です。
ただ、今回は以下のような理由からJSONデータを出力する仕組みを自作しました。
- ブログ機能を利用しない
- コンテンツの更新頻度が低い
- WP REST APIを利用した場合に表示速度の低下が懸念される
テーマファイル
今回、作成したWordpressのテーマファイルのディレクリ構成は下記のような形になります。
aw_rest
 ├ functions.php
 ├ index.php
 ├ screenshot.png
 ├ style.css
 └ sh
    └ deploy.sh
Wordpress側はJSONを出力するだけなので、必要最低限のファイルしか用意していません。
JSONを出力する処理はfunctions.phpで行います。
<?php
// 固定ページ投稿時の処理
function createJsonPage($post_id) {
// ドキュメントルート
$DOCUMENT_ROOT = $_SERVER['DOCUMENT_ROOT'];
// JSON格納ディレクトリ
$JSON_DIR = $DOCUMENT_ROOT . 'json/page/';
// JSONを出力するページのタイトル
$PAGE_TITLE_ARRAY = array(
'INDEX',
'ABOUT',
'WORKS'
);
$PAGE_TITLE_ARRAY_LENGTH = count($PAGE_TITLE_ARRAY);
// JSON出力ディレクトリ
$outputDir = '';
// JSON出力判定
$isOutput = false;
// 配列データ
$dataArray = '';
// JSONデータ
$dataJson = '';
// データを取得
$post = get_post($post_id);
// タイトル
$title = $post->post_title;
for($i = 0; $i < $PAGE_TITLE_ARRAY_LENGTH; $i++) {
// JSON出力を行うページの場合
if($PAGE_TITLE_ARRAY[$i] == $title) {
// カスタムフィールドを取得
$smartCustomFields = getCustomFields($_POST['smart-custom-fields']);
$dataArray = array(
'id' => $post_id,
'title' => $title,
'createDate' => mysql2date('Y/m/d H:i:s', $post->post_date),
'updateDate' => mysql2date('Y/m/d H:i:s', $post->post_modified),
'contents' => $smartCustomFields
);
// JSON出力ディレクトリを設定
$outputUrl = $JSON_DIR . mb_strtolower($title) . '.json';
$isOutput = true;
break;
}
}
// JSON出力を行う場合
if($isOutput) {
// JSON生成
$dataJson = json_encode($dataArray, JSON_UNESCAPED_UNICODE | JSON_UNESCAPED_SLASHES);
// JSON出力
file_put_contents($outputUrl, $dataJson);
// ビルド実行
while(true){
if(is_readable($outputUrl)) {
shell_exec('nohup sh /xxx/xxx/xxx/deploy.sh > /xxx/xxx/xxx/deploy.log 2>&1 &');
break;
}
}
}
}
// カスタムフィールドを加工する処理
function getCustomFields($customFields) {

 foreach($customFields as $key => $value) {
  // 末尾が「Img」の場合
  if(mb_substr($key, -3) == 'Img') {
   // 画像IDをパスに変換
   foreach($customFields[$key] as $subKey => $subValue) {
    $imageId = $customFields[$key][$subKey];
    $imageSrc = wp_get_attachment_image_src($imageId, 'full');
    if($imageSrc) {
     $customFields[$key][$subKey] = $imageSrc[0];
    }
   }
  } else {
   // 末尾が「Img」以外の場合
   // ダブルクォーテーションをエスケープ
   foreach($customFields[$key] as $subKey => $subValue) {
    $value = $customFields[$key][$subKey];
    $value = str_replace('"', """, $value);
    $value = str_replace('\\', "", $value);
    $customFields[$key][$subKey] = $value;
   }
  }
 }

 return $customFields;

}
// 固定ページ更新時
add_action('publish_page', 'createJsonPage');
?>
固定ページ更新時に何か処理を行いたい場合は、アクションフックのpublish_pageを利用することで実現可能です。
add_action('publish_page', 'createJsonPage');
上記のように記述することで、固定ページ更新時にcreateJsonPageというメソッドが実行されます。
createJsonPageでは、ページのタイトルが「INDEX」、「ABOUT」、「WORKS」のいずれかだった場合にJSONを出力する処理が実行されます。
出力されるJSONには以下のような情報を含めました。
- ページID
- ページタイトル
- 作成日
- 更新日
- コンテンツ情報(カスタムフィールド)
カスタムフィールドはSmart Custom Fieldsを利用し、カスタマイズしました。
カスタムフィールドの繰り返し機能が無料枠で用意されているので、カスタムフィールドを拡張したい時には重宝します。
また、カスタムフィールドに画像を登録すると画像のIDが保存されるので、そのままではNuxtで利用することはできません。
そこで、画像の場合はカスタムフィールド名の末尾に「Img」を付けることで、JSON生成時に画像IDからパスを取得する処理を実装しています。
// カスタムフィールドを加工する処理
function getCustomFields($customFields) {
foreach($customFields as $key => $value) {
// 末尾が「Img」の場合
if(mb_substr($key, -3) == 'Img') {
// 画像IDをパスに変換
foreach($customFields[$key] as $subKey => $subValue) {
$imageId = $customFields[$key][$subKey];
$imageSrc = wp_get_attachment_image_src($imageId, 'full');
if($imageSrc) {
$customFields[$key][$subKey] = $imageSrc[0];
}
}
} else {
// 末尾が「Img」以外の場合
// ダブルクォーテーションをエスケープ
foreach($customFields[$key] as $subKey => $subValue) {
$value = $customFields[$key][$subKey];
$value = str_replace('"', """, $value);
$value = str_replace('\\', "", $value);
$customFields[$key][$subKey] = $value;
}
}
}
return $customFields;
}
Wordpressで固定ページを更新した後は、Circle CIを動作させページを新たに生成する必要があります。
Circle CIはGitHubに何かしらファイルをコミットすれば動作するので、シェルスクリプトを使いGitHubに空ファイルをコミットすることで実現しました。
// ビルド実行
while(true){
 if(is_readable($outputUrl)) {
  shell_exec('nohup sh /xxx/xxx/xxx/deploy.sh > /xxx/xxx/xxx/deploy.log 2>&1 &');
  break;
 }
}
固定ページ更新時に上記処理でシェルスクプリトを実行します。
実行された下記シェルスクリプトで空ファイル(deploy.txt)をGitHubにコミットしています。
# !/usr/local/bin/bash

CLIENT_ID="XXX"
CLIENT_SECRET="XXX"
CODE="XXX"
TOKEN="XXX"
AUTH_HDR="Authorization: bearer $TOKEN"
CONTENT=`cat /xxx/xxx/xxx/deploy.txt`
REPO="api.github.com/repos/xxx/xxx"

BLOB_SHA=`curl -H "$AUTH_HDR" -X POST \
         -d "{\"content\":\"$CONTENT\",\"encoding\":\"utf-8\"}" \
         https://$REPO/git/blobs | /xxx/xxx/xxx/local/rbenv/versions/2.6.3/bin/ruby -r 'json' -e 'puts JSON.parse(STDIN.read)["sha"]'`

BASE_TREE=`curl -H "$AUTH_HDR" https://$REPO/git/trees/master?recursive=1 | /xxx/xxx/xxx/local/rbenv/versions/2.6.3/bin/ruby -r 'json' -e 'puts JSON.parse(STDIN.read)["sha"]'`

TREE_SHA=`curl -H "$AUTH_HDR" -X POST \
         -d "{\"base_tree\": \"$BASE_TREE\",
         \"tree\":[
           {\"path\":\"deploy.txt\",\"mode\":\"100644\",\"type\":\"blob\",\"sha\":\"$BLOB_SHA\"}
          ]}" \
         https://$REPO/git/trees | /xxx/xxx/xxx/local/rbenv/versions/2.6.3/bin/ruby -r 'json' -e 'puts JSON.parse(STDIN.read)["sha"]'`

PARENT_SHA=`curl -H "$AUTH_HDR" https://$REPO/branches/master | /xxx/xxx/xxx/local/rbenv/versions/2.6.3/bin/ruby -r 'json' -e 'puts JSON.parse(STDIN.read)["commit"]["sha"]'`

COMMIT_SHA=`curl -H "$AUTH_HDR" -X POST \
           -d "{\"message\":\"deploy\", \"tree\":\"$TREE_SHA\", \"parents\":[\"$PARENT_SHA\"] }" \
           https://$REPO/git/commits | /xxx/xxx/xxx/local/rbenv/versions/2.6.3/bin/ruby -r 'json' -e 'puts JSON.parse(STDIN.read)["sha"]'`

curl -H "$AUTH_HDR" -X PATCH \
     -d "{\"force\":false, \"sha\":\"$COMMIT_SHA\"}" \
     https://$REPO/git/refs/heads/master
Nuxt.js
プロジェクト作成
まず、下記手順でNuxtのプロジェクトを作成します。
※Node.jsをインストールしている必要があります。
プロジェクトを作成したいディレクトリに移動する
cd xxx/xxxx/xxxx
Nextプロジェクトの作成
npx create-nuxt-app 【プロジェクト名】
プロジェクト名の設定
? Project name (【プロジェクト名】)
プロジェクトの説明
? Project description (My shining Nuxt.js project)
サーバフレームワークの設定
? Use a custom server framework (Use arrow keys)
❯ none
  express
  koa
  adonis
  hapi
  feathers
  micro
※今回は「none」を選択
モジュールの選択
? Choose features to install (Press <space> to select, <a> to toggle all, <i> to
 invert selection)
❯◯ Progressive Web App (PWA) Support
 ◯ Linter / Formatter
 ◯ Prettier
 ◯ Axios
※今回は「Axios」を選択
UIフレームワークの選択
? Use a custom UI framework (Use arrow keys)
❯ none
  bootstrap
  vuetify
  bulma
  tailwind
  element-ui
  buefy
※今回は「none」を選択
テストモジュールの選択
? Use a custom test framework (Use arrow keys)
❯ none
  jest
  ava
※今回は「none」を選択
レンダリングモードの選択
? Choose rendering mode (Use arrow keys)
❯ Universal
  Single Page App
※今回は「Universal」を選択
作者名の入力
? Author name (【作者名】)
パッケージ管理ツールの選択
? Choose a package manager (Use arrow keys)
❯ npm
  yarn
※今回は「npm」を選択
node-sass および sass-loader パッケージをインストール
npm install --save-dev node-sass sass-loader
開発モードで実行
ここまでくればNuxtのプロジェクトが作成されているハズなので、下記コマンドでNuxtを実行します。
npm run dev
確認用のURLがコンソール上に表示されるので、ブラウザからアクセスし画面が表示されていればプロジェクトの作成は完了です。
ディレクトリ構成
今回、作成したNuxtのディレクトリ構成は下記のような形になります。
全てのファイルを記述すると量が多くなるので、詳細はGitHubをご覧ください。
afterWorks_v.4.0.0
 ├ assets
 │  └ css
 ├ components
 │  └ common
 ├ layouts
 ├ pages
 │  └ contact
 ├ plugins
 ├ static
 │  ├ api
 │  ├ img
 │  └ js
 ├ store
 ├ .editorconfig
 ├ .gitignore
 ├ app.html
 ├ nuxt.config.js
 ├ package-lock.json
 └ package.json
生成ファイル名を固定
Nuxt.jsで生成されたJSなどは基本的にファイル名が乱数で設定されます。
再生成した場合は別の乱数がファイル名として設定されるので、リリースした時にキャッシュが残ってしまうなどの問題を回避できるのだと思います。
ただ、再生成するたびに新規ファイルを作るとリリース時に古いファイルを削除したりしないといけないので、今回はファイル名を固定でつけるようにしました。
nuxt.config.jsのbuildプロパティに下記のように記述することで、生成されるファイル名を固定させることができます。
※下記例の変数cashBusterについては後述します。
build: {
 filenames: {
  app: () => 'js/[name].js' + cashBuster,
  chunk: () => 'js/[name].js' + cashBuster,
  css: () => 'css/[name].css' + cashBuster,
  img: () => 'img/[name].[ext]' + cashBuster,
  font: () => 'font/[name].[ext]' + cashBuster,
  video: () => 'video/[name].[ext]' + cashBuster
 }
}
キャッシュバスターを導入
生成するファイルの名前を固定化しましたが、このままではリリース時にキャッシュが残ってしまい古いファイルが参照される恐れがあります。
そこでnuxt.config.js内に下記のように記述し、キャッシュバスターを導入しました。
const now = new Date()
let year = now.getFullYear()
let month = now.getMonth() + 1
month = ('0' + month).slice(-2)
let day = now.getDate()
day = ('0' + day).slice(-2)
let hour = now.getHours()
hour = ('0' + hour).slice(-2)
let minute = now.getMinutes()
minute = ('0' + minute).slice(-2)
let second = now.getSeconds()
second = ('0' + second).slice(-2)
const cashBuster = '?ver=' + year + month + day + hour + minute + second

export default {
 mode: 'universal',
 env: {
  cashBuster: cashBuster
 },

〜 中略 〜

}
nuxt.config.js内でキャッシュバスターを利用する場合は、そのまま変数cashBusterを使用できます。
単一ファイルコンポーネントなどで使用したい場合は、process.env.cashBusterと記述することで利用できます。
リリース後
Lighthouse
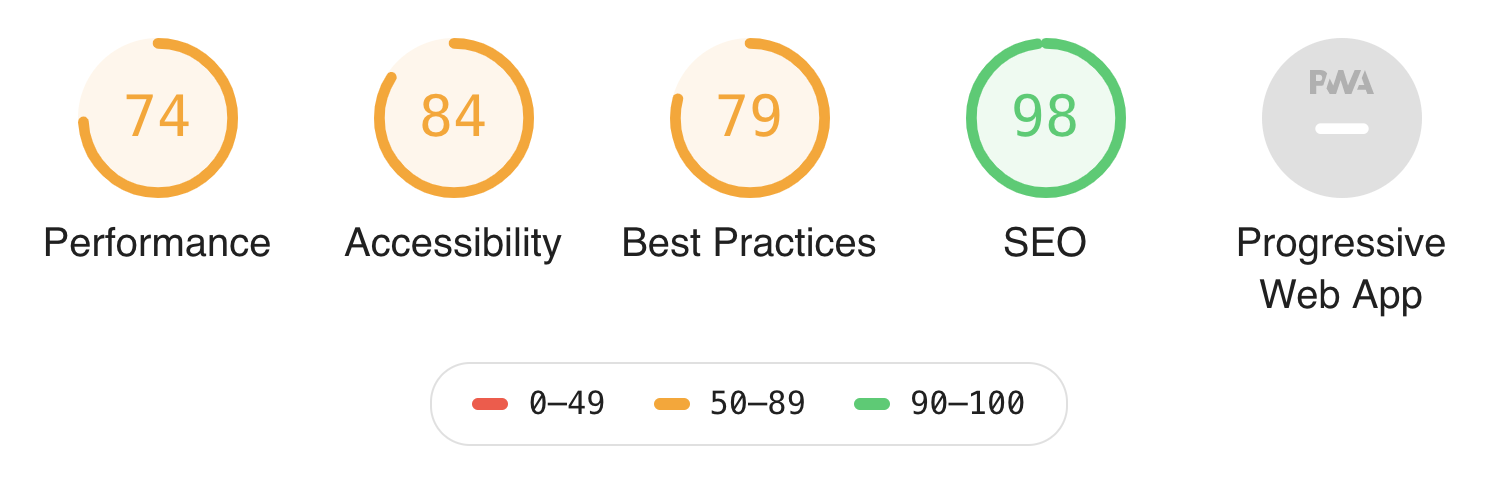
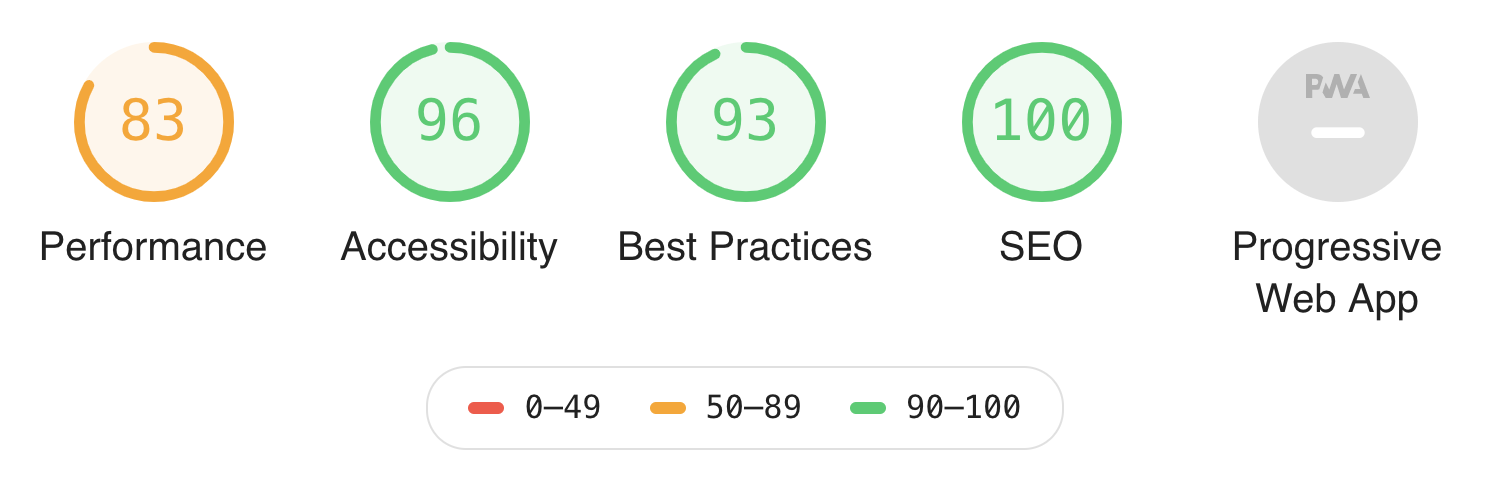
リリース前後にLighthouseでサイトの測定を実施しました。
まだまだ課題はありますが、点数を向上させることができました。
Before
After
今後やりたいこと
- ページ遷移時のアニメーションをもっとCoolにする
- ページ遷移時に取得した情報をStoreに保持しておくようにする
参考
サイトの制作にあたり、下記情報を参考にさせていただきました。