シェルスクリプトからGitHub APIを使って、GitHubのデータにアクセスする方法を紹介します。
GitHub APIの認証方法はいろいろありますが、今回はセキュアかつシェルスクリプトでも扱いやすい、Personal access tokenを使います。Personal access tokenはシンプルな認証方法です。トークンをGitHub上で発行し、クライアント側は発行されたトークン利用して認証します。流出した恐れのあるトークンを無効化したり、発行したトークンごとに権限を設定できるので、安全な認証がで簡単に実装できます。
Personal access tokenの発行
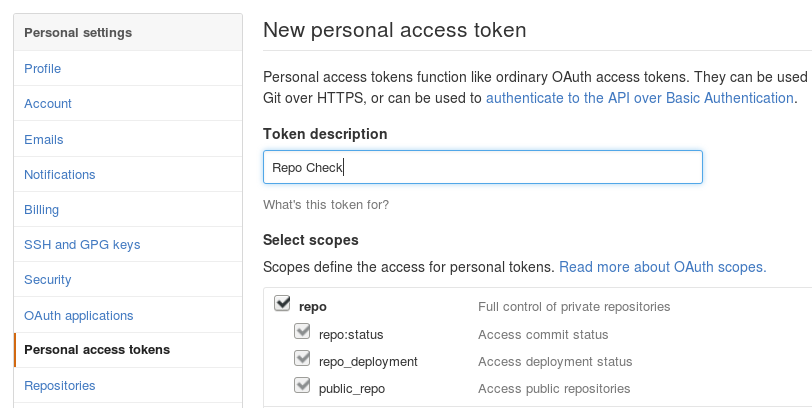
まずGitHubのPersonal settingsからPersonal access tokensを開き、Generate new tokenをクリックします。今回はプライベートリポジトリにもアクセスしたいので、Select scopesのrepoにチェックを入れます。
設定が完了したら Generate token を押し、表示されるトークンをコピーします。
APIでリポジトリ一覧の取得してみる
先ほど発行したPersonal access tokenを使い、GitHub APIにアクセスしてみましょう。次の例は、cURLでAPIにアクセスし、リポジトリ一覧を取得する例です。cURLで認証するには、ホスト名の直前に @ をつけて : 区切りでGitHubのログイン名とPersonal access tokenを指定します1。GitHub APIはJSONで返ってくるので、jqにパイプしてパースします。リポジトリ名のみを改行区切りで出力し、更にパイプして行ごとにechoしています。
# !/bin/sh

# 発行したトークン
GITHUB_TOKEN='xxxxxxxxxxxxxxxxxxxxxxxxxxxxxxxxxxxxxxxx'
# ログイン名
LOGIN_NAME='xxxxxx'

curl https://${LOGIN_NAME}:${GITHUB_TOKEN}@api.github.com/user/repos?per_page=1000 |
jq -r '.[].full_name' |
while read -r repo; do
  echo "You have '$repo'"
done
リポジトリの取得
Personal access tokenを使うと、プライベートリポジトリにもアクセスもできます。ログイン名とPersonal access tokenを、リポジトリURLに指定するだけです。
git clone "https://${LOGIN_NAME}:${GITHUB_TOKEN}@github.com/path_to/your_repository"
GitHub APIはGitのデータだけでなく、Pull RequestやIssueにもアクセスできるので、いろいろと試してみてはいかがでしょうか。
-
-uオプションでもユーザ名・パスワードを指定できます。 ↩

