趣味でiOSアプリ開発をかじっていた自分が、改めてiOS開発を勉強し始めた際に、曖昧に理解していたところや知らなかったところをメモしています。いつか書き直します。
参考文献
この記事は以下の書籍の情報を参考にして執筆しました。5章を読んでの内容になります。
#コードによる制約の追加
3つの方法がある。
・NSLayoutConstraintのイニシャライザ
・VisualFormatLanguage
・NSLayoutAnchor(iOS9~)
##NSLayoutConstraintのイニシャライザ
メリット : 最も基本的な方法なのでわかりやすい。
デメリット : 制約1つを定義するのに1つイニシャライザを呼び出さないといけない。
    let view1 = UIView.init(frame: CGRect.init(x: 0, y: 0, width: 300, height: 250))
    view1.backgroundColor = .red
    view1.translatesAutoresizingMaskIntoConstraints = false
    view.addSubview(view1)

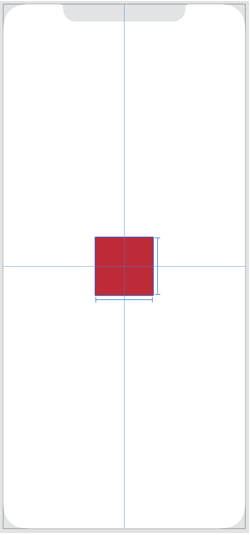
    /*constraint1 : viewとview1のcenterXを等しくする
     constraint2 : viewとview1のcenterYを等しくする
     constraint3 : view1の幅を設定
     constraint4 : view1の高さを設定*/

    // 制約を設定。幅と高さも必要。
    let constraint1 = NSLayoutConstraint(item: view1, attribute: .centerX, relatedBy: .equal, toItem: view, attribute: .centerX, multiplier: 1.0, constant: 0.0)
    let constraint2 = NSLayoutConstraint(item: view1, attribute: .centerY, relatedBy: .equal, toItem: view, attribute: .centerY, multiplier: 1.0, constant: 0.0)
    let constraint3 = NSLayoutConstraint(item: view1, attribute: .width, relatedBy: .equal, toItem: nil, attribute: .notAnAttribute, multiplier: 0.0, constant: 100)
    let constraint4 = NSLayoutConstraint(item: view1, attribute: .height, relatedBy: .equal, toItem: nil, attribute: .notAnAttribute, multiplier: 0.0, constant: 100)
    view.addConstraints([constraint1, constraint2, constraint3, constraint4])
| 引数名 | 渡す値 |
|---|---|
| item | 制約を追加する部品 |
| attribute | 制約を追加する要素 |
| relatedBy | 追加する部品と基準となる部品の関係性 |
| toItem | 制約の基準となる部品 |
| attribute | 制約の基準となる要素(toItemの要素) |
| multiplier | 制約の割合の数値 |
| constant | 制約で追加する数値 |
relatedByがequalとして式で表すと
item.attribute = toItem.attribute * multiplier + constant
##VisualFormatLanguage
VSLと略されたり、視覚的書式言語と呼ばれることもある。
NSLayoutConstraintクラスのconstraintsメソッドを使う。戻り値は配列で帰ってくる。
メリット : 1つの処理で複数の制約を作成することができる。
デメリット : 制約を決める部分が文字列なので実行時エラーが出ない。
  let view1 = UIView.init(frame: CGRect.init(x: 0, y: 0, width: 300, height: 250))
  view1.backgroundColor = .red
  view1.translatesAutoresizingMaskIntoConstraints = false
  view.addSubview(view1)

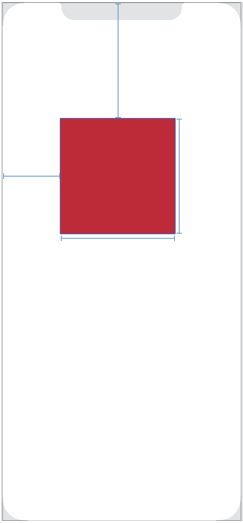
  /*constraint1 : 水平方向の制約。親viewから100ptスペースを空けて幅を指定(metricsで値を指定したパターン)
   constraint2 : 垂直方向の制約。親viewから200ptスペースを空けて高さを指定*/

  let constraints1 = NSLayoutConstraint.constraints(withVisualFormat: "H:|-100-[view1(width)]", options: .alignAllCenterX, metrics: ["width" : 200], views: ["view1" : view1])
  let constraints2 = NSLayoutConstraint.constraints(withVisualFormat: "V:|-200-[view1(200)]", options: .alignAllCenterY, metrics: nil, views: ["view1" : view1])

  // 2つの配列を1つの配列にするためにflatmapを使っている。
  view.addConstraints([constraints1, constraints2].flatMap{ $0 })
###withVisualFormat
VHLフォーマットで制約を記述する
####レイアウトの方向
| 記法 | 意味 |
|---|---|
| V: | 垂直方向の制約を追加 |
| H: | 水平方向の制約を追加 |
####対象オブジェクト
| 記法 | 意味 |
|---|---|
| [view] | viewオブジェクト |
| | | 親ビュー |
####オブジェクト間のスペース
| 記法 | 意味 |
|---|---|
| |-20-[view] | 親とviewの距離20pt |
| |-(-20)-[view] | 親とviewの距離-20pt |
| |-[view] | 親とviewの距離デフォルト(8pt) |
| |[view] | 親とviewの距離0pt |
####オブジェクトのサイズ
| 記法 | 意味 |
|---|---|
| H:[view(100)] | viewの幅は100pt |
| H:[view1(==view2)]view1の幅はview2に等しい |
####関係性 - Relationship
| 記法 | 意味 |
|---|---|
| [view1]-(>=50)-[view2] | view1とview2の距離は50pt以上 |
| H:[view(>= 50, <=100)] | viewの幅は50pt以上、100pt以下 |
| ####優先度 | |
| 記法 | 意味 |
| ------ | ---- |
| H:[view(100@750)] | viewの幅は優先度750で100pt |
###options
複数のオブジェクトに対して揃え方を指定する。
例えば、V:[view1]-[view2]のように垂直方向の制約を定義する際は下記のオプションを選択する。
| 値 | 意味 |
|---|---|
| .alignAllLeft | 全てのビューを左寄せ |
| .alignAllRight | 全てのビューを右寄せ |
| .alignAllLeading | 全てのビューをLeading寄せ |
| .alignAllTrailing | 全てのビューをTrailing寄せ |
| .alignAllCenterX | 全てのビューをx方向中央に揃える |
水平方向の場合
| 値 | 意味 |
|---|---|
| .alignAllTop | 全てのビューを上部寄せ |
| .alignAllBottom | 全てのビューを下部寄せ |
| .alignAllCenterY | 全てのビューをy方向中央に揃える |
| .alignAllBaseline | 全てのビューをベースラインに揃える |
またVFlで記述したレイアウトを左右どちらから並べるか指定するオプションもある。
基本はLeadingからTrailing方向に並べられる。
| 値 | 意味 |
|---|---|
| .directionLeadingtoTrailing | LeadingからTrailing方向に並べる |
| .directionLeftToRight | 左から右に並べる。 |
| .directionRightToLeft | 右から左に並べる。 |
###metrics
変数を代入するのに使う。
let constraints1 = NSLayoutConstraint.constraints(withVisualFormat: "H:[view1(width)]", options: .directionRightToLeft, metrics: ["width" : 200], views: ["view1" : view1])
##NSLayoutAnchor
メリット : 処理が読みやすい。比較的コードを書く量が少ない。
デメリット : iOS9以降からなのでiOS9以前では使えない。
    let view1 = UIView.init(frame: CGRect.init(x: 0, y: 0, width: 300, height: 250))
    view1.backgroundColor = .red
    view1.translatesAutoresizingMaskIntoConstraints = false
    view.addSubview(view1)

    view1.topAnchor.constraint(equalTo: view.topAnchor, constant: 200).isActive = true
    view1.leadingAnchor.constraint(equalTo: view.leadingAnchor, constant: 100).isActive = true
    view1.widthAnchor.constraint(equalToConstant: 200).isActive = true
    view1.heightAnchor.constraint(equalToConstant: 200).isActive = true
##制約を編集する
IBOutletで制約を紐づけることができ、コードでプロパティを変更できる。
  @IBOutlet weak var blueViewTopConstraint: NSLayoutConstraint!
  @IBAction func tapButton(_ sender: Any) {
    blueViewTopConstraint.constant += 50
  }
##空間を定義する - UILayoutGuide(iOS9.0~)
空間を定義して、その空間をもとに制約をつけることができる。
空のUIViewを用いるよりも、レンダリングコストが発生しない。余計なビューの階層が増えないというメリットがある。
class ViewController3: UIViewController {


  override func viewDidLoad() {
    super.viewDidLoad()

    let view1 = UIView.init(frame: CGRect.init(x: 0, y: 0, width: 300, height: 250))
    view1.backgroundColor = .red
    view1.translatesAutoresizingMaskIntoConstraints = false
    view.addSubview(view1)

    // 空間を定義する
    let space = makeLayoutSpace()

    // spaceを基準に制約をつけることができる
    view1.topAnchor.constraint(equalTo: space.bottomAnchor, constant: 10).isActive = true
    view1.leadingAnchor.constraint(equalTo: view.leadingAnchor, constant: 100).isActive = true
    view1.widthAnchor.constraint(equalToConstant: 200).isActive = true
    view1.heightAnchor.constraint(equalToConstant: 200).isActive = true
  }

  func makeLayoutSpace() -> UILayoutGuide{
    let activeFlag = true
    view.addLayoutGuide(space)
    space.centerXAnchor.constraint(equalTo: view.centerXAnchor).isActive = activeFlag
    space.centerYAnchor.constraint(equalTo: view.centerYAnchor).isActive = activeFlag
    space.widthAnchor.constraint(equalToConstant: 200).isActive = activeFlag
    space.heightAnchor.constraint(equalToConstant: 200).isActive = activeFlag

    return space
  }
デバッグ画面で確認すると定義した空間からの制約は見えず、viewの階層にも空間は存在しないが、確かに定義した空間からの制約をもとにviewを表示できている。


