この記事で説明すること
この記事では、Pythonスクリプトが実行されるまでの中間生成物のイメージについて説明します。
知っていたところで特にメリットはありませんが、Pythonに詳しくなれた気分になれます。
例えば、Qiita - Pythonのリスト内包表記の速度みたいな話をするときには役立ちます。
C言語の構造体レベルの話はしないので、あくまでもイメージです。
Python環境としては、PythonのC言語による実装であるCPythonを想定しています。
要するにみんなが使っているPythonです。
この記事で説明しないこと
実際のC言語の構造体レベルの話や実際の実行までのプロセスについては説明しません。
CFGについてもこの記事では説明しません。
参考記事やソースコードを見てください。
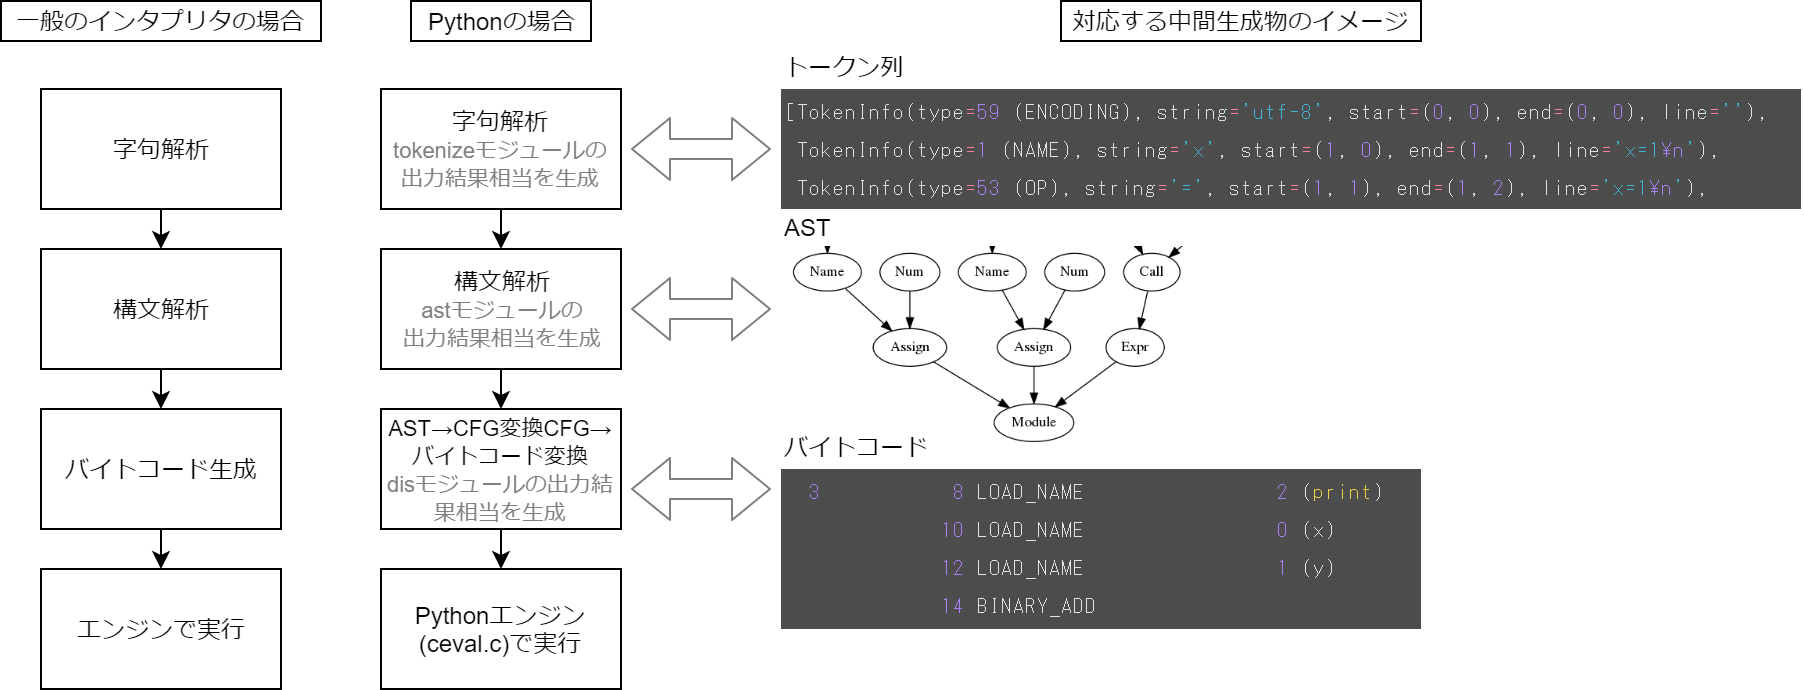
Pythonスクリプトが実行されるまで
Pythonはスクリプト言語なので、Pythonスクリプトは下記のステップを踏んで実行されます。
- 字句解析
- 構文解析
- バイトコード生成
- エンジンで実行
上記はあまりに一般的すぎるのでもう少しPythonらしさを込めて具体的にするとこんな感じでしょうか。
- 字句解析(tokenizeモジュールの出力結果相当を生成)
- 構文解析(astモジュールの出力結果相当を生成)
- AST→CFG変換およびCFG→バイトコード変換(disモジュールの出力結果相当を生成)
- Pythonエンジン(ceval.c)で実行
上記のステップにおいてはいろいろな中間生成物がありますが、この記事では下記の中間生成物についてイメージできるように説明します。
- 字句解析結果であるトークン列
- 構文解析結果であるAST
- バイトコード
それぞれの関係はこんな感じになります。
前提
下記のソースコードを実行するとします。
x=1
y=1
print(x+y)
言い換えると、以下のコードがPythonインタプリタで評価されているとします。
src="""x=1
y=1
print(x+y)
"""
1. 字句解析
ソースコードをトークン(字句)単位に区切り、意味を付与するのが字句解析です。
字句解析結果を確認するには、標準ライブラリのtokenizeモジュールを使います。
tokenizeモジュールはちょっと癖があって、ioモジュールも駆使する必要があります。
tokenize.tokenize関数を使えば、字句解析結果のトークン列を確認できます。
>>> import tokenize
>>> import io
>>> tokenize.tokenize(io.BytesIO(bytes(src, encoding="utf-8")).readline)
<generator object _tokenize at 0x7f3d29981db0>
>>> list(tokenize.tokenize(io.BytesIO(bytes(src, encoding="utf-8")).readline))
[TokenInfo(type=59 (ENCODING), string='utf-8', start=(0, 0), end=(0, 0), line=''), TokenInfo(type=1 (NAME), string='x', start=(1, 0), end=(1, 1), line='x=1\n'), TokenInfo(type=53 (OP), string='=', start=(1, 1), end=(1, 2), line='x=1\n'), TokenInfo(type=2 (NUMBER), string='1', start=(1, 2), end=(1, 3), line='x=1\n'), TokenInfo(type=4 (NEWLINE), string='\n', start=(1, 3), end=(1, 4), line='x=1\n'), TokenInfo(type=1 (NAME), string='y', start=(2, 0), end=(2, 1), line='y=1\n'), TokenInfo(type=53 (OP), string='=', start=(2, 1), end=(2, 2), line='y=1\n'), TokenInfo(type=2 (NUMBER), string='1', start=(2, 2), end=(2, 3), line='y=1\n'), TokenInfo(type=4 (NEWLINE), string='\n', start=(2, 3), end=(2, 4), line='y=1\n'), TokenInfo(type=1 (NAME), string='print', start=(3, 0), end=(3, 5), line='print(x+y)\n'), TokenInfo(type=53 (OP), string='(', start=(3, 5), end=(3, 6), line='print(x+y)\n'), TokenInfo(type=1 (NAME), string='x', start=(3, 6), end=(3, 7), line='print(x+y)\n'), TokenInfo(type=53 (OP), string='+', start=(3, 7), end=(3, 8), line='print(x+y)\n'), TokenInfo(type=1 (NAME), string='y', start=(3, 8), end=(3, 9), line='print(x+y)\n'), TokenInfo(type=53 (OP), string=')', start=(3, 9), end=(3, 10), line='print(x+y)\n'), TokenInfo(type=4 (NEWLINE), string='\n', start=(3, 10), end=(3, 11), line='print(x+y)\n'), TokenInfo(type=0 (ENDMARKER), string='', start=(4, 0), end=(4, 0), line='')]
このままだとちょっと見にくいので、pprintモジュールも使います。
>>> import pprint
>>> pprint.pprint(list(tokenize.tokenize(io.BytesIO(bytes(src, encoding="utf-8")).readline)))
[TokenInfo(type=59 (ENCODING), string='utf-8', start=(0, 0), end=(0, 0), line=''),
 TokenInfo(type=1 (NAME), string='x', start=(1, 0), end=(1, 1), line='x=1\n'),
 TokenInfo(type=53 (OP), string='=', start=(1, 1), end=(1, 2), line='x=1\n'),
 TokenInfo(type=2 (NUMBER), string='1', start=(1, 2), end=(1, 3), line='x=1\n'),
 TokenInfo(type=4 (NEWLINE), string='\n', start=(1, 3), end=(1, 4), line='x=1\n'),
 TokenInfo(type=1 (NAME), string='y', start=(2, 0), end=(2, 1), line='y=1\n'),
 TokenInfo(type=53 (OP), string='=', start=(2, 1), end=(2, 2), line='y=1\n'),
 TokenInfo(type=2 (NUMBER), string='1', start=(2, 2), end=(2, 3), line='y=1\n'),
 TokenInfo(type=4 (NEWLINE), string='\n', start=(2, 3), end=(2, 4), line='y=1\n'),
 TokenInfo(type=1 (NAME), string='print', start=(3, 0), end=(3, 5), line='print(x+y)\n'),
 TokenInfo(type=53 (OP), string='(', start=(3, 5), end=(3, 6), line='print(x+y)\n'),
 TokenInfo(type=1 (NAME), string='x', start=(3, 6), end=(3, 7), line='print(x+y)\n'),
 TokenInfo(type=53 (OP), string='+', start=(3, 7), end=(3, 8), line='print(x+y)\n'),
 TokenInfo(type=1 (NAME), string='y', start=(3, 8), end=(3, 9), line='print(x+y)\n'),
 TokenInfo(type=53 (OP), string=')', start=(3, 9), end=(3, 10), line='print(x+y)\n'),
 TokenInfo(type=4 (NEWLINE), string='\n', start=(3, 10), end=(3, 11), line='print(x+y)\n'),
 TokenInfo(type=0 (ENDMARKER), string='', start=(4, 0), end=(4, 0), line='')]
TokenInfoのstringに対象とするトークンが、それ以外のフィールドにトークンのタイプや出現位置が表現されています。
リストの9番目(1スタートなら10番目)にあるTokenInfo(type=1 (NAME), string='print', start=(3, 0), end=(3, 5), line='print(x+y)\n')は、9番目のトークンが
-
printという名前である -
typeはNAMEである → 変数名か関数名かなどはわからないが何らかの名前である - 3行目の0文字目から4文字目までに出現している
- 3行目は
print(x+y)\n
ことを表しています。
2. 構文解析
字句解析結果から、AST(Abstract Syntax Tree)を構築するのが構文解析です。
字句解析結果はトークンの羅列でしたが、ASTではトークンの関係を木構造で表現することで、プログラムで処理しやすいようにします。
ASTを確認するには、標準ライブラリのparserモジュールかastモジュールを使います。
astモジュールのほうが使いやすいので、以下ではastモジュールを使った説明を行います。
ASTを見やすくするために、CUBE SUGAR CONTAINER - Python: ast (Abstract Syntax Tree: 抽象構文木) モジュールについてにあるwalkという関数を定義します。
def walk(node, indent=0):
    # 入れ子構造をインデントで表現する
    print(' ' * indent, end='')
    # クラス名を表示する
    print(node.__class__, end='')
    # 行数の情報があれば表示する
    if hasattr(node, 'lineno'):
        msg = ': {lineno}'.format(lineno=node.lineno)
        print(msg, end='')
    # 改行を入れる
    print()
    # 再帰的に実行する
    for child in ast.iter_child_nodes(node):
        walk(child, indent=indent+4)
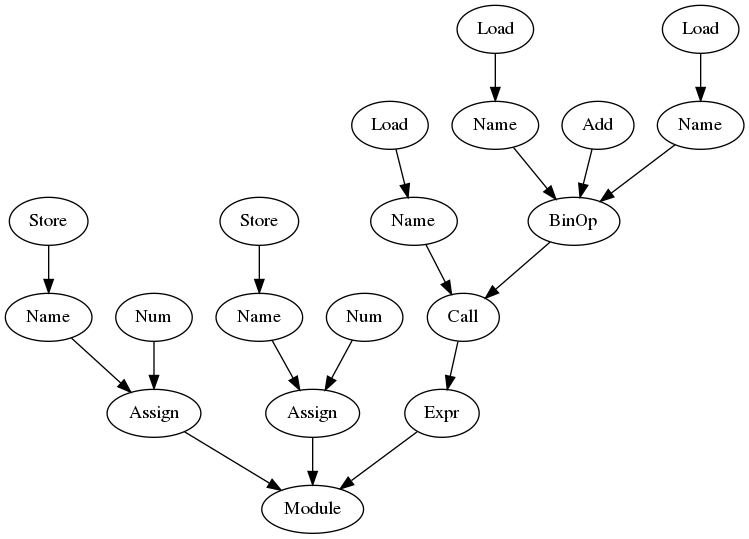
walk関数とast.parse関数を組み合わせて使えば、構文解析結果であるASTを見ることができます。
>>> import ast
>>> walk(ast.parse(src))
<class '_ast.Module'>
    <class '_ast.Assign'>: 1
        <class '_ast.Name'>: 1
            <class '_ast.Store'>
        <class '_ast.Num'>: 1
    <class '_ast.Assign'>: 2
        <class '_ast.Name'>: 2
            <class '_ast.Store'>
        <class '_ast.Num'>: 2
    <class '_ast.Expr'>: 3
        <class '_ast.Call'>: 3
            <class '_ast.Name'>: 3
                <class '_ast.Load'>
            <class '_ast.BinOp'>: 3
                <class '_ast.Name'>: 3
                    <class '_ast.Load'>
                <class '_ast.Add'>
                <class '_ast.Name'>: 3
                    <class '_ast.Load'>
もうすこし見やすくする
@kaityo256 さんの記事(Qiita - Pythonの抽象構文木をGraphvizで可視化する)にあるvisit関数を使えば、木構造を可視化することもできます。
標準ライブラリではないgraphvizモジュールを追加する必要があります。
def visit(node, nodes, pindex, g):
    name = str(type(node).__name__)
    index = len(nodes)
    nodes.append(index)
    g.node(str(index), name)
    if index != pindex:
        g.edge(str(index), str(pindex))
    for n in ast.iter_child_nodes(node):
        visit(n, nodes, index, g)
ast.pngという名前で出力してみましょう。
>>> from graphviz import Digraph
>>> import ast
>>> graph = Digraph(format="png")
>>> visit(ast.parse(src), [], 0, graph)
>>> graph.render("ast")
出力したast.pngを開いて確認します。
木の上下を反転させたければ、visit関数内のg.edge(str(index), str(pindex))をg.edge(str(pindex), str(index))に変えてください。
3. バイトコード生成
構文解析結果(AST)から、バイトコードを生成します。
Pythonでは、ASTをそのままバイトコードに変換するのではなく、**CFG(Control Flow Diagram)**というものに一度変換してから、CFGをバイトコードに変換します。
中間生成物であるCFGをPythonから確認する方法はよくわかりませんでした。
バイトコードを確認するには、標準ライブラリのdisモジュールを使います。
>>> import dis
>>> dis.dis(src)
  1           0 LOAD_CONST               0 (1)
              2 STORE_NAME               0 (x)

  2           4 LOAD_CONST               0 (1)
              6 STORE_NAME               1 (y)

  3           8 LOAD_NAME                2 (print)
             10 LOAD_NAME                0 (x)
             12 LOAD_NAME                1 (y)
             14 BINARY_ADD
             16 CALL_FUNCTION            1
             18 POP_TOP
             20 LOAD_CONST               1 (None)
             22 RETURN_VALUE
4. エンジンで実行
バイトコードができてしまえば、あとはPythonエンジンが評価して実行してくれます。
Pythonエンジンの主処理部は、github - cpython/Python/ceval.cです。
バイトコードに応じて処理を分けるのは、Python 3.7.4では1064行目のswitchです。
disモジュールの結果に基づいてswitchの先のcaseを探せば、ソースコードを追っていくことができます。
Appendix: 実行環境
この記事のスクリプトはWSL(Windows Subsystem for Linux)のUbuntu 18.0.4で確認しています。
Pythonのバージョンは3.6.8です。
intermezzo-fr@DESKTOP:~$ cat /etc/os-release
NAME="Ubuntu"
VERSION="18.04.3 LTS (Bionic Beaver)"
ID=ubuntu
ID_LIKE=debian
PRETTY_NAME="Ubuntu 18.04.3 LTS"
VERSION_ID="18.04"
HOME_URL="https://www.ubuntu.com/"
SUPPORT_URL="https://help.ubuntu.com/"
BUG_REPORT_URL="https://bugs.launchpad.net/ubuntu/"
PRIVACY_POLICY_URL="https://www.ubuntu.com/legal/terms-and-policies/privacy-policy"
VERSION_CODENAME=bionic
UBUNTU_CODENAME=bionic
intermezzo-fr@DESKTOP:~$ uname -a
Linux DESKTOP 4.4.0-18362-Microsoft #1-Microsoft Mon Mar 18 12:02:00 PST 2019 x86_64 x86_64 x86_64 GNU/Linux
intermezzo-fr@DESKTOP:~$ python3
Python 3.6.8 (default, Jan 14 2019, 11:02:34)
[GCC 8.0.1 20180414 (experimental) [trunk revision 259383]] on linux
Type "help", "copyright", "credits" or "license" for more information.
Appendix: References
参考にしたサイト
この記事を書くにあたって、下記サイトを参考にしました。
- つれづれ日記 - Pythonのバイトコードまで
- dis/inspect モジュールと ceval.c を使った Python のハッキング
- SlideShare - Pythonの処理系はどのように実装され,どのように動いているのか? 我々はその実態を調査すべくアマゾンへと飛んだ.
- Python Developer's Guide - 25. Design of CPython’s Compiler
関数を流用したサイト
補助関数は下記サイトから流用しました。
- Qiita - Pythonの抽象構文木をGraphvizで可視化する
- CUBE SUGAR CONTAINER - Python: ast (Abstract Syntax Tree: 抽象構文木) モジュールについて
もっと詳しく知りたい方へ
C言語のソースコードや構造体まで手を出すなら下記サイトが参考になります。
- Philip J. Guo -
CPython internals: A ten-hour codewalk through the Python interpreter source code - YouTube - Allison Kaptur - Bytes in the Machine: Inside the CPython interpreter - PyCon 2015
- github - cpython
バイトコードの実行について
バイトコードの実行については、下記サイトが参考になります。