はじめに
Pythonには抽象構文木を扱うastというモジュールがある。これを使って抽象構文木を可視化してみる。
スクリプト
parse.py
import ast
import sys

from graphviz import Digraph


def visit(node, nodes, pindex, g):
    name = str(type(node).__name__)
    index = len(nodes)
    nodes.append(index)
    g.node(str(index), name)
    if index != pindex:
        g.edge(str(index), str(pindex))
    for n in ast.iter_child_nodes(node):
        visit(n, nodes, index, g)


filename = sys.argv[0]
if len(sys.argv) > 1:
    filename = sys.argv[1]

with open(filename) as f:
    graph = Digraph(format="png")
    tree = ast.parse(f.read())
    visit(tree, [], 0, graph)
    graph.render("test")
実行
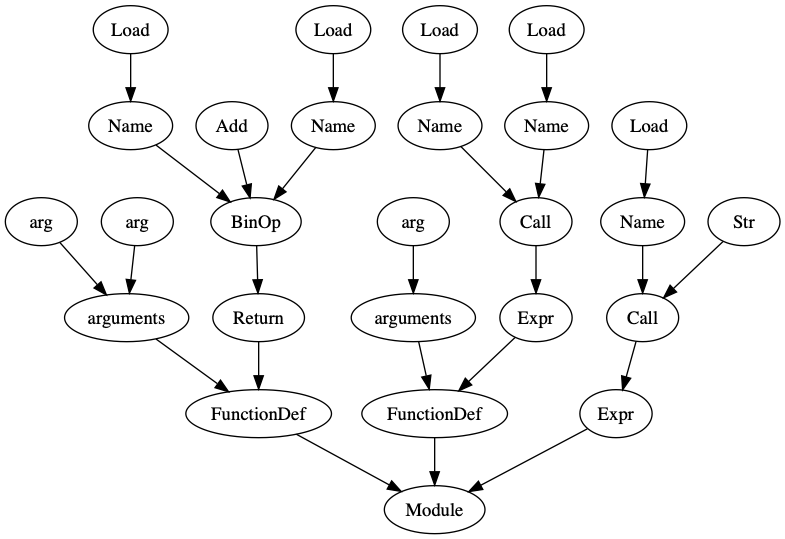
例えばこんなファイルを食わせる。
test.py
def func(a, b):
    return a + b


def func2(a):
    print(a)

print("Hello")
$ python parse.py test.py
すると、こんな構文木が得られる。
ちなみに引数を指定しないと自分自身をパースする。
$ python parse.py
得られる結果はこんな感じ。

動作原理
基本的にはast.parseで得られた木から再帰的にたどっていくだけ。ast.iter_child_nodes(node)でnodeにぶら下がるノードのイテレータが得られるので、それに対してforを回す。
Graphivzのノードのキャプションはtype(node).__name__としたが、そのままg.edgeでつないでしまうと同じ名前が同じノードとみなされてしまうので、一工夫が必要。
そこで、ノードをリストに追加することで、それぞれに一意な通し番号をふる。
    name = str(type(node).__name__)
    index = len(nodes)
    nodes.append(index)
    g.node(str(index), name)
で、この通し番号をGraphvizのノード番号として、繋げば良い。
g.edge(str(index), str(pindex))
最初は、オブジェクトをリストではなくハッシュに登録してたんだけど、抽象構文オブジェクト、例えばast.Loadはなぜか同じオブジェクトが使い回されているようで、同じノードとみなされてしまう。上記のように一意な通し番号を振れば大丈夫。