はじめに
この記事は NTT テクノクロス Advent Calendar 2021 の 3日目の記事です。
NTT テクノクロスの井上です。
普段は AWS 関連の業務をしています。
この記事では、
AWS の利用料金通知システム の作成についてご紹介します。
元々、AWS の利用料金を通知する Lambda を動かしていたのですが、
「今月の費用、予算内におさまりそう?」と尋ねられたり、
「どのサービスにいくら費用がかかっているのかも通知してほしい!」
などの要望があり、拡張機能を作成しました。
また、
最近 AWS へ移行するプロジェクトも増えてきたので、
これを機に料金通知システム作成の 自動化 を含めて、記事にまとめることにしました。
概要
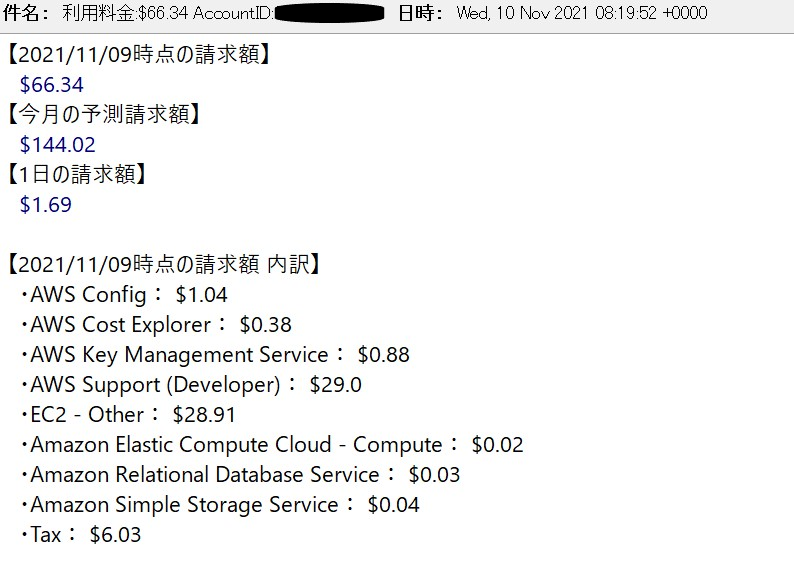
通知内容は下記の4つです。
・ 今月1日から前日までの請求額
・ 今月1日から前日までの請求額の内訳(サービスごとの請求額)
・ 今月の予測請求額
・ 前日1日分の利用額
通知内容は、今月1日から前日までの請求額 をデフォルトとして、
他3つは必要に応じて拡張ができるよう作成します。
拡張機能を使うと、
予算内におさまりそうか であったり、どのサービスに費用が集中しているのか が
可視化され、把握しやすくなるので、ぜひ取り入れてみてください。
目次
1. 前提条件
- Cost Explorer が有効化されている
- SNS トピック、サブスクリプションの設定が完了している
2. 構成
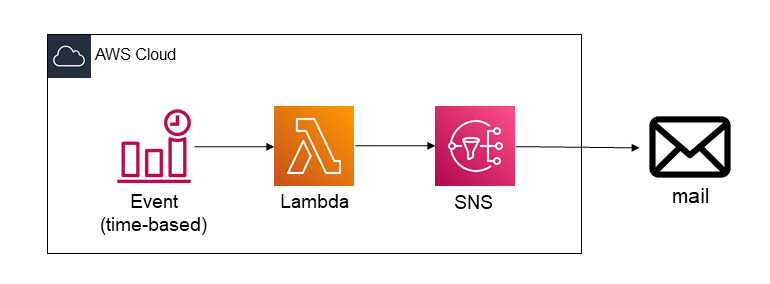
今回作成する機能の アーキテクチャ図 はこちらです。
CloudWatch Events で設定した cron をトリガーに、AWS 利用料金を取得・加工する Lambda を実行させ、SNS でメールを送信する流れとなります。

3. Lambda 関数のコード
コードは、前日までの請求額を通知するメインファイル(index.py)と、その他拡張機能を持ったファイル(detail.py)の2つを作成します。
Lambda 関数は、後ほど CloudFormation で作成します。
index.py
- 前日までの請求額を通知する基本的なコード
import boto3
import os
import time
from datetime import datetime, timedelta, date
import detail

# 設定日時
def billing_date():
    # 月初の日付取得
    first_date = date.today().replace(day=1).isoformat()
    # 当日の日付取得
    last_date = date.today().isoformat()

    # 今日が1日なら「先月1日から今月1日(今日)」までの範囲にする
    if first_date == last_date:
        last_month_last_date = datetime.strptime(first_date, '%Y-%m-%d') - timedelta(days=1)
        last_month_first_date = last_month_last_date.replace(day=1)
        first_date = last_month_first_date.strftime('%Y-%m-%d')
    return first_date, last_date

# 請求額取得
def get_billing(ce):
    first_date, last_date = billing_date()

    response = ce.get_cost_and_usage(
        TimePeriod={
            'Start': first_date,
            'End': last_date
        },
        Granularity='MONTHLY',
        Metrics=[
            'AmortizedCost'
        ]
    )
    return {
        'start': response['ResultsByTime'][0]['TimePeriod']['Start'],
        'end': response['ResultsByTime'][0]['TimePeriod']['End'],
        'billing': response['ResultsByTime'][0]['Total']['AmortizedCost']['Amount'],
    }

# メッセージ作成
def create_message(total_billing):
    total = round(float(total_billing['billing']), 2)
    sts = boto3.client('sts')
    id_info = sts.get_caller_identity()
    account_id = id_info['Account']
    subject = f'利用料金:${total} AccountID:{account_id}'

    today = datetime.strptime(total_billing['end'], '%Y-%m-%d')
    yesterday = (today - timedelta(days=1)).strftime('%Y/%m/%d')
    message = []
    message.append(f'【{yesterday}時点の請求額】\n  ${total:.2f}')
    return subject, message

# メッセージ送信
def send_message(subject, message_list):
    sns = boto3.client('sns')
    message = '\n'.join(message_list)

    retry_num = 3
    for i in range(retry_num):
        try:
            response = sns.publish(
                TopicArn = os.environ['Topic'],
                Subject = subject,
                Message = message
            )
            break
        # 送信失敗時は2秒後リトライ
        except Exception as e:
            print("送信に失敗しました。リトライ{}/{}".format(i+1, retry_num))
            time.sleep(2)
    return response

# main
def lambda_handler(event, context):
    ce = boto3.client('ce')
    # 請求額取得
    total_billing = get_billing(ce)
    # メッセージ作成
    subject, message = create_message(total_billing)

    ## 拡張用
    ## 今月の予測請求額取得
    # message = detail.get_estimated_billing(ce, message)
    ## 1日の請求額(前日からの増加額)
    # message = detail.get_daily_billing(ce, total_billing, message)
    ## サービス毎の請求額
    # message = detail.get_service_billings(ce, message)

    # メッセージ送信
    send_message(subject, message)
detail.py
- 請求額の内訳(サービスごとの請求額)、今月の予測請求額、前日1日分の利用額を通知する拡張用コード
※ 拡張機能を使用する場合は、下記に注意してください。- 拡張する機能に応じて index.py の lambda_handler 内 対応箇所をコメントインする。
import index
from datetime import timedelta, date
from dateutil.relativedelta import relativedelta

# 今月の予測請求額
def get_estimated_billing(ce, message):
    # 翌日から来月1日までを設定し予測請求額を取得
    next_date = date.today() + timedelta(days=1)
    next_month = date.today() + relativedelta(months=1)
    next_month_first_date = next_month.replace(day=1)

    response = ce.get_cost_forecast(
        TimePeriod={
        'Start': str(next_date),
        'End': str(next_month_first_date)
        },
        Granularity='MONTHLY',
        Metric='UNBLENDED_COST'
    )
    estimated_billing = round(float(response['Total']['Amount']), 2)

    # メッセージ追加
    message.append(f'【今月の予測請求額】\n  ${estimated_billing}')
    return message

# 1日の請求額(前日からの増加額)
def get_daily_billing(ce, today_billing, message):
    first_date = date.today().replace(day=1).isoformat()
    last_date = (date.today() - timedelta(days=1)).isoformat()

    # x月3日~月末のみ前日までの請求額を取得
    if first_date < last_date:
        response = ce.get_cost_and_usage(
            TimePeriod={
                'Start': first_date,
                'End': last_date
            },
            Granularity='MONTHLY',
            Metrics=[
                'AmortizedCost'
            ]
        )
        yesterday_billing = {
            'start': response['ResultsByTime'][0]['TimePeriod']['Start'],
            'end': response['ResultsByTime'][0]['TimePeriod']['End'],
            'billing': response['ResultsByTime'][0]['Total']['AmortizedCost']['Amount'],
        }

        # 1日の請求額算出
        daily_billing = round(float(today_billing['billing']) - float(yesterday_billing['billing']), 2)

        # メッセージ追加
        message.append(f'【1日の請求額】\n  ${daily_billing}')
    return message

# サービス毎の請求額
def get_service_billings(ce, message):
    first_date, last_date = index.billing_date()

    response = ce.get_cost_and_usage(
        TimePeriod={
            'Start': first_date,
            'End': last_date
        },
        Granularity='MONTHLY',
        Metrics=[
            'AmortizedCost'
        ],
        GroupBy=[
            {
                'Type': 'DIMENSION',
                'Key': 'SERVICE'
            }
        ]
    )

    # サービス名とその請求額を取得
    service_billings = []
    for item in response['ResultsByTime'][0]['Groups']:
        service_billings.append({
            'service_name': item['Keys'][0],
            'billing': item['Metrics']['AmortizedCost']['Amount']
        })

    # メッセージ追加
    yesterday = (date.today() - timedelta(days=1)).strftime('%Y/%m/%d')
    message.append(f'\n【{yesterday}時点の請求額 内訳】')
    for item in service_billings:
        service_name = item['service_name']
        billing = round(float(item['billing']), 2)

        # 請求額が$0の場合は内訳を表示しない
        if billing == 0.0:
            continue
        message.append(f'  ・{service_name}: ${billing}')
    return message
※ 作成が完了したら、2ファイルを圧縮(zip化)し、S3 の任意のバケットに格納してください。
4. CloudFormation
テンプレート
- IAM ロール、Lambda 関数、CloudWatch Events を作成するテンプレート
AWSTemplateFormatVersion: '2010-09-09'
Description: "Create Lambda to send billing information."
Parameters:
  Bucketname:
    Type: String
    Description: S3Bucketname
  Filepass:
    Type: String
    Description: S3Filepass
  Topicarn:
    Type: String
    Description: SNSTopicarn
Resources:
  BillingIamRole:
    Type: AWS::IAM::Role
    Properties:
      RoleName: Lambda-send-billing-role
      AssumeRolePolicyDocument:
        Version: '2012-10-17'
        Statement:
        - Effect: Allow
          Principal:
            Service:
            - lambda.amazonaws.com
          Action:
          - sts:AssumeRole
      ManagedPolicyArns:
        - "arn:aws:iam::aws:policy/service-role/AWSLambdaBasicExecutionRole"
      Path: /
      Policies:
      - PolicyName: Lambda-send-billing-policy
        PolicyDocument:
          Version: '2012-10-17'
          Statement:
          - Effect: Allow
            Action:
            - ce:*
            - sns:CreateTopic
            - sns:Publish
            Resource: '*'
  BillingFunction:
    Type: AWS::Lambda::Function
    Properties:
      Code:
        S3Bucket: !Ref Bucketname
        S3Key: !Ref Filepass
      Description: 'send billing information'
      FunctionName: 'send-billing-info'
      Handler: 'index.lambda_handler'
      Runtime: 'python3.8'
      Timeout: 30
      Environment:
        Variables:
          Topic: !Ref Topicarn
      Role: !GetAtt
        - BillingIamRole
        - Arn
  ScheduledRule:
    Type: AWS::Events::Rule
    Properties:
      Description: "ScheduledRule"
      ScheduleExpression: 'cron(0 0 * * ? *)'
      State: ENABLED
      Targets:
      - Arn: !GetAtt
        - 'BillingFunction'
        - 'Arn'
        Id: 'TargetFunctionV1'
  PermissionForEventsToInvokeLambda:
    Type: AWS::Lambda::Permission
    Properties:
      FunctionName: !Ref "BillingFunction"
      Action: "lambda:InvokeFunction"
      Principal: "events.amazonaws.com"
      SourceArn:
        Fn::GetAtt:
          - "ScheduledRule"
          - "Arn"
スタック作成
- AWS マネジメントコンソールから CloudFormation を選択
- [スタックの作成] から [新しいリソースを使用(標準)] を選択
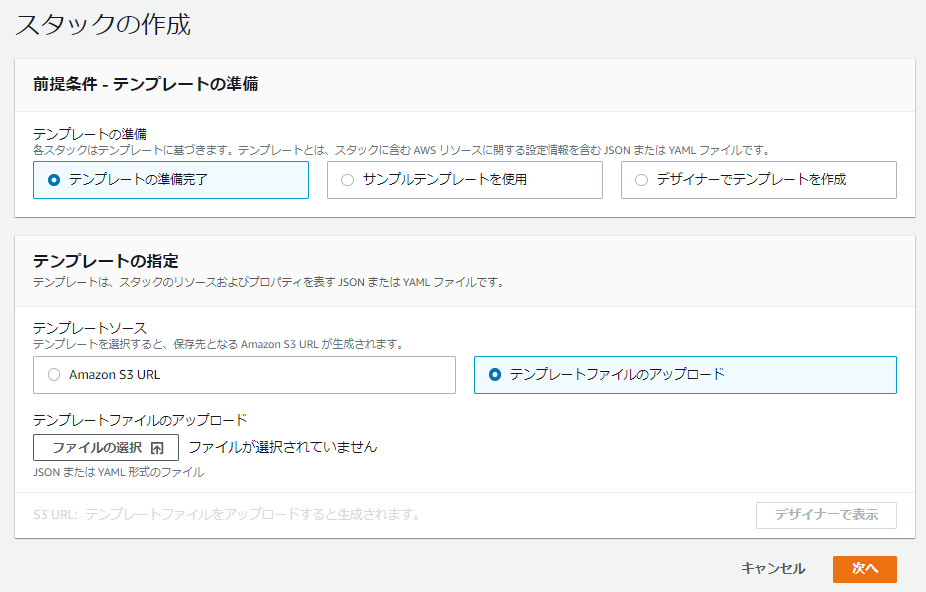
- テンプレートの指定
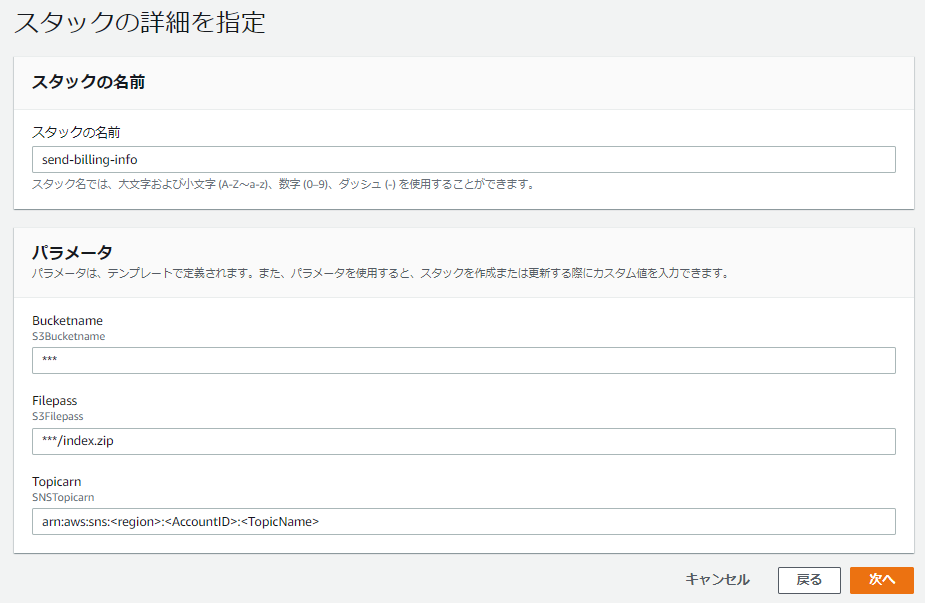
- スタックの詳細を指定
- スタックオプションは特に設定せず、[次へ] を押下
- レビュー(最終確認)
※ スタックが作成されるまでに数分かかります。
これで、CloudFormation を使った、AWS 利用料金通知機構の作成は完了です。
5. 通知の確認
CloudFormation テンプレート内の cron 設定日時に 00:00(GMT) を設定した場合、 日本時間 09:00 にメールが届きます。
※ 変更を加えていなければ 00:00(GMT) です。
さいごに
料金通知自体はすでにされている方も多いと思います。
実際、サービスごとの請求額も今月の予測請求額も、マネコンからぽちぽちしていくと確認できます。
なので、今回紹介した方法は、
毎日料金の詳細を確認したい方におすすめできる内容となります。
少しでも参考にしていただけたら嬉しいです。
では、NTTテクノクロス Advent Calendar 2021 の 4日目も、お楽しみください!


