はじめに
今回はLambdaでget_cost_and_usage(),get_cost_forecast()
のメソッドを使ってAWS利用金額と予測請求金額を取得しSNSで通知するLambdaを作成しました。
各メソッドは以下のように動作します。
-
get_cost_and_usage()
AWSの利用額を取得するメソッドです。
2019年8月24日に8月に利用した金額を知りたい場合は、
STARTを2019年8月1日にしてENDを2019年8月24日にします。
すると2019年8月1日 00:00 ~ 2019年8月24日 00:00 (8月23日 24:00)の間に取得した金額が取得できます。
なので2019年8月全体の金額を知りたい場合は、STARTを2019年8月1日にしてENDを2019年9月1日 -
get_cost_forecast()
AWSの予測金額を取得するメソッドです。
2019年8月24日に2019年8月の予測金額を知りたい場合は、
STARTを2019年8月25日にしてENDを2019年9月1日(8月31日 24:00)にします。
すると2019年8月の予測金額を取得できます。
注意として予測なのでSTARTは明日以降の日付しか設定できません。
本日より前の日付を指定すると以下のようなエラーメッセージが返されます。
メソッドの詳細はこちらの公式サイト
[ERROR] ClientError: An error occurred (ValidationException) when calling the GetCostForecast operation: Earliest supported Start is 2019-08-25
APIで取得可能な請求情報(通知する金額)
1日・・・前月の金額の通知と。当月の予測金額
最終日・・・それまでに利用した金額(最終日は明日が無いので当月予測金額の取得ができない)
その間・・・当月の利用金額と当月の予測請求金額
表にすると以下のような形(逆に解り難いかな???)
| 日程 | get_cost_and_usage()の範囲 | get_cost_forecast()の範囲 |
|---|---|---|
| 1日 | 前月の1日から当月の1日(前月最終の 24:00)で前月の用金額 | 明日から来月初め(月末24:00)まで利用した場合の予測金額 |
| 最終日 | 当月の1日から本日までの利用金額 | 月末最終日=当月の明日が無いので使わない(使えない) |
| その間 | 当月の1日から本日までの利用金額 | 明日から来月初め(月末24:00)まで利用した場合の予測金額 |
事前準備
事前準備1. boto3のバージョンアップ
get_cost_forecast()を使うにはLambdaデフォルトのランタイムPython3.7のboto3のバージョンを上げる必要があります。
今回はLambda Layerを用いてboto3のバージョンを上げた状態で実行します。
※上げないとこのようなメソッド対応してないので使えませんエラーが出るなのでboto3のバージョンを上げます。
"errorMessage": "'CostExplorer' object has no attribute 'get_cost_forecast'",
- Cloud9(が楽だったので)で以下のコマンドを実行しzipファイルをローカルにダウンロード
$ mkdir python
$ pip install -t ./python boto3
$ zip -r boto3.zip python
 2. Lambdaコンソールの画面でLayersを押下
 3. レイヤーの作成を押下
 4. 名前の入力/先ほどCloud9からダウンロードしたzipファイルをアップロード/ランタイムを入力し作成を押下
 5. 作成されたことを確認
 6. LambdaのLayersを選択しレイヤーの追加を押下
 7. 先ほど作成したレイヤーを選択し追加を押下

こちらの記事を参考にさせていただきました。すごくわかりやすかったです。
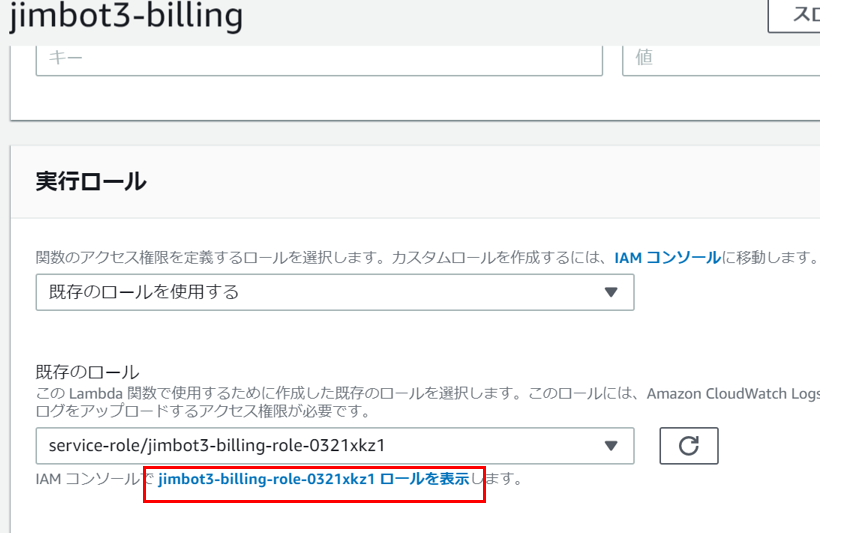
事前準備2. Lambdaにロールの作成と付与
- Lambda関数でロールを表示を押下
- ポリシーを押下
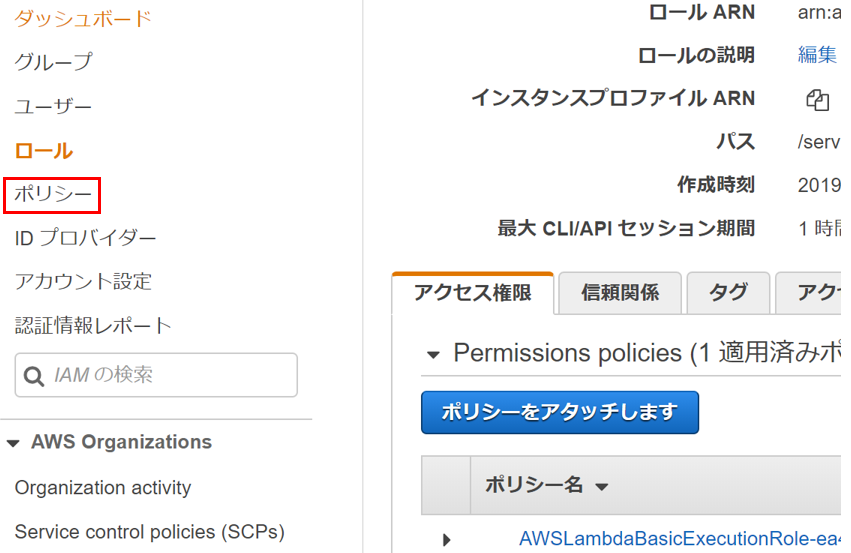
- ポリシーの作成を押下

- Cost Explorer Service と SNSのポリシーを選択し以下の設定でポリシーの確認を押下

- 名前を入力しポリシーの作成を押下

- 最初の画面でポリシーをアタッチしますを押下

- 先ほど作成したポリシーをチェックしポリシーのアタッチを押下

- policyが付与されていることを確認

LambdaのソースコードとCloudWatchのスケジュール
Lambdaのコードの中身は以下のようになっております。
import boto3
from datetime import date
from dateutil.relativedelta import relativedelta
ce = boto3.client('ce')
sns = boto3.client('sns')

def lambda_handler(event, context):
    today = date.today() #今日
    tomorrow = today + relativedelta(days=1) #明日
    lastmonth_first = today + relativedelta(day=1, months=-1) #先月1日
    lastmonth_end = today + relativedelta(day=1, days=-1) #先月最終
    thismonth_first = today + relativedelta(day=1) #今月1日
    thismonth_end = today + relativedelta(day=1,months=1, days=-1) #今月最後
    nextmonth_first = today + relativedelta(day=1, months=1) #来月最初

    cost_end = str(today)
    forecast_start = str(tomorrow)
    forecast_end = str(nextmonth_first)

    if today == thismonth_first:#1日
        cost_start = str(lastmonth_first)
        message_cost = get_cost(cost_start,cost_end)
        message_forecast = get_forecast(forecast_start,forecast_end)
        message = ('先月の利用金額は $'+message_cost+' で今月の利用予測金額は $'+message_forecast+' です!!')

    elif today == thismonth_end:#最終日
        cost_start = str(thismonth_first)
        message_cost = get_cost(cost_start,cost_end)
        message = ('今月の現在までの利用金額は $'+message_cost+' です!!')

    else:#他の日
        cost_start = str(thismonth_first)
        message_cost = get_cost(cost_start,cost_end)
        message_forecast = get_forecast(forecast_start,forecast_end)
        message = ('今月の現在までの利用金額は $'+message_cost+' で今月の利用予測金額は $'+message_forecast+' です!!')

    topic = 'arn:aws:sns:ap-northeast-1:xxxxxxxxxxxx:Myaddress' #送付したいARNを入力
    subject = 'AWS利用料金'
    region = '{ap-northeast-1}'
    sns_response = sns.publish(
        TopicArn=topic,
        Message=message,
        Subject=subject,
        MessageStructure='raw'
    )

def get_cost(cost_start,cost_end):
    cost = ce.get_cost_and_usage(
        TimePeriod={
            'Start': cost_start,
            'End': cost_end
        },
        Granularity='MONTHLY',
        Metrics=['UnblendedCost',],
    )
    format_cost = round(float(cost['ResultsByTime'][0]['Total']['UnblendedCost']['Amount']),2)
    return str(format_cost)

def get_forecast(forecast_start,forecast_end):
    forecast = ce.get_cost_forecast(
        TimePeriod={
            'Start': forecast_start,
            'End': forecast_end
        },
        Granularity='MONTHLY',
        Metric='UNBLENDED_COST',
    )
    format_forecast = round(float(forecast['Total']['Amount']),2)
    return str(format_forecast)
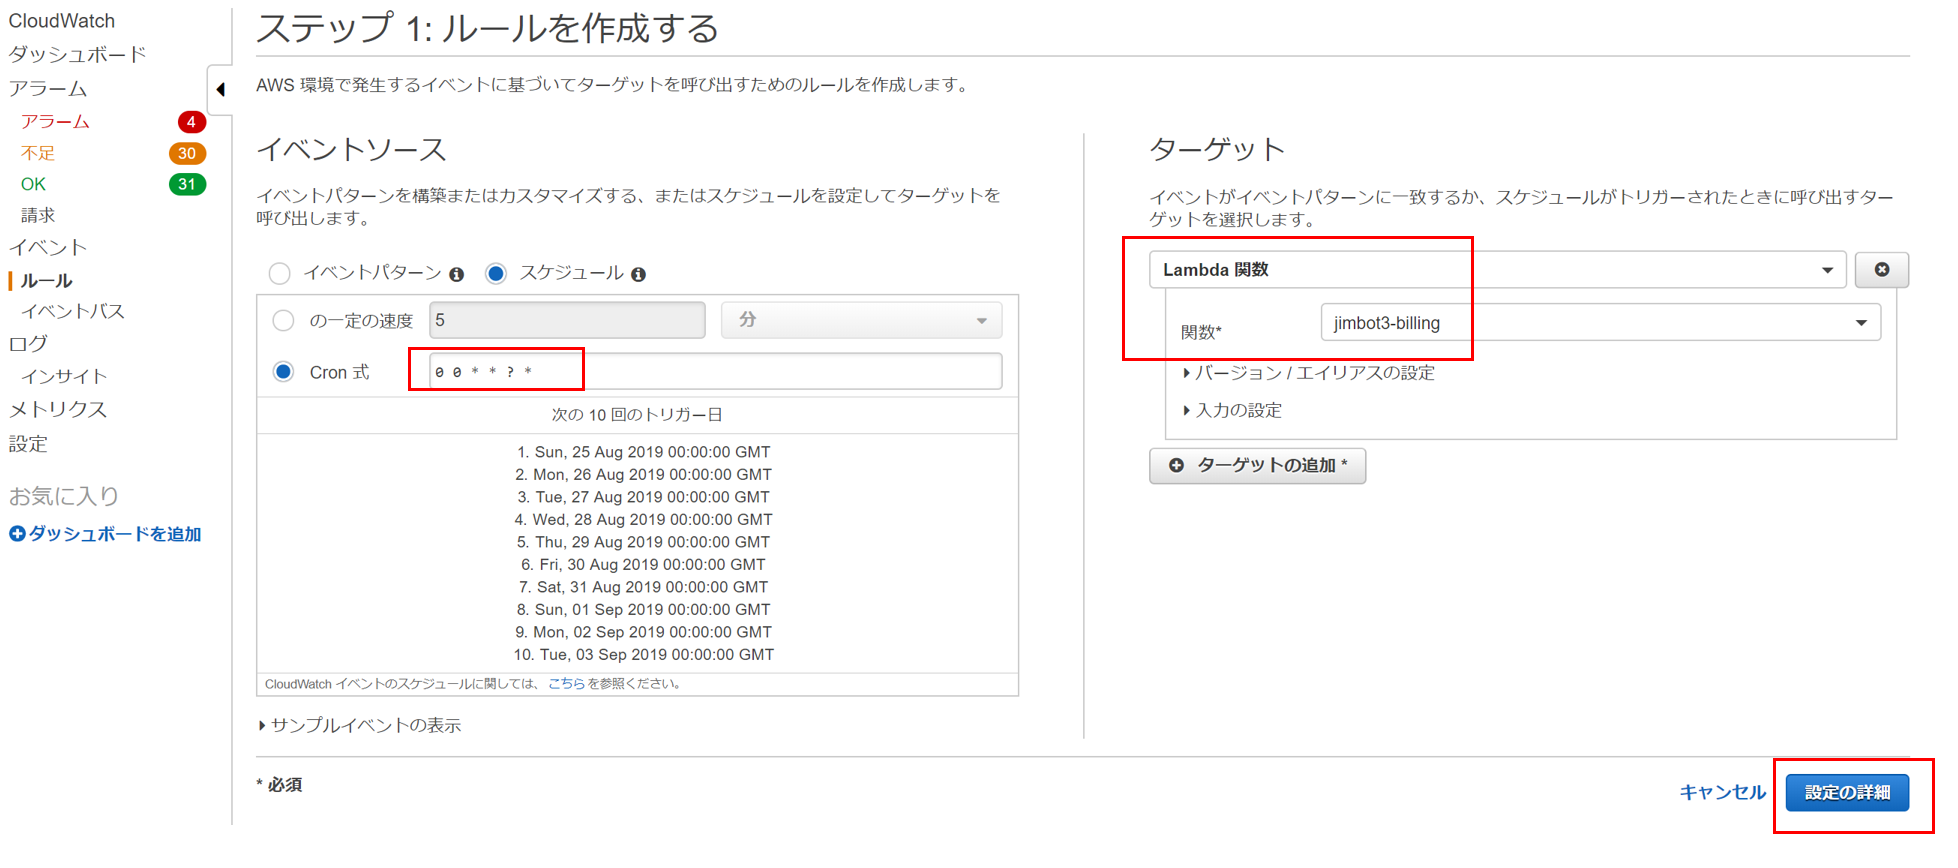
CloudWatchは以下のような設定です。
CloudWatch EventはUTCのため日次で日本時間のAM09:00に通知が来ます。
届いたメール
届いたメールはこんな感じです。
1日

最終日
 #### その間
