前回の続きです。 > CentOS7でPlayframeworkを導入する
今回はCentOSにMariaDBをインストールしてPlayframeworkでデータを取得してきたいと思います。
MariaDBの導入
# yum install mariadb mariadb-server
ここは問題なくいくと思います。次は対話形式でMariaDBの初期設定を行っていきます。
パスワードの設定以外はとりあえずEnterを押し続けましょう!
# mysql_secure_installation
これでMariaDBにアクセスできるはずです。
アクセスしたら適当にデータベースを作っちゃいましょう!
# mysql -u root -p
Enter password:
Welcome to the MariaDB monitor.  Commands end with ; or \g.
Your MariaDB connection id is 74
Server version: 5.5.50-MariaDB MariaDB Server

Copyright (c) 2000, 2016, Oracle, MariaDB Corporation Ab and others.

Type 'help;' or '\h' for help. Type '\c' to clear the current input statement.

MariaDB [(none)]>
MariaDB [(none)]> create database sample_db
プロジェクトのセットアップ
データベースの作成ができたら、前回作ったプロジェクトの設定ファイルの類をちょっといじります笑
build.sbt
build.sbtを以下を追加します。
- PlayEbean
- "org.mariadb.jdbc" % "mariadb-java-client" % "1.4.4"
"build.sbt" 13L, 200C
name := """sample"""

version := "1.0-SNAPSHOT"

lazy val root = (project in file(".")).enablePlugins(PlayJava,PlayEbean)

scalaVersion := "2.11.7"

libraryDependencies ++= Seq(
  javaJdbc,
  cache,
  javaWs,
  "org.mariadb.jdbc" % "mariadb-java-client" % "1.4.4"
)
conf/application.conf
application.confに以下を追加します。
default.driver = org.mariadb.jdbc.Driver
default.url = "jdbc:mariadb://localhost:3306/sample_db"
default.username = USER_NAME
default.password = PASSWORD
dafault.urlには先ほど作成したdbを記述します。
またusernameやpassword設定したものです。(今回はuser設定はしていないのでrootです。)
ebean {
default = ["models.entity.*"]
}
上記がなければ追加です。
db {
  # You can declare as many datasources as you want.
  # By convention, the default datasource is named `default`

  # https://www.playframework.com/documentation/latest/Developing-with-the-H2-Database
  default.driver = org.mariadb.jdbc.Driver
  default.url = "jdbc:mariadb://localhost:3306/sample_db"
  default.username = USER_NAME
  default.password = PASSWORD

  # You can turn on SQL logging for any datasource
  # https://www.playframework.com/documentation/latest/Highlights25#Logging-SQL-statements
  #default.logSql=true
}

ebean {
  default = ["models.entity.*"]
}
project/plugins.sbt
plugins.sbtに以下を追加します。(コメントアウト)
addSbtPlugin("com.typesafe.sbt" % "sbt-play-ebean" % "3.0.2")
ここまできたら、一度activatorを立ち上げて見ましょう。
もろもろ反映されるはずです。。。
Userを取得するだけのappを作る...
まず、名前とメールアドレスのみを保持するUserクラスを作成します。
app以下のにmodels.entityパッケージを作成し、Userクラスを作成します。
app/models/entity/User.javaの作成
package models.entity;

import javax.persistence.Column;
import javax.persistence.Entity;
import javax.persistence.GeneratedValue;
import javax.persistence.GenerationType;
import javax.persistence.Id;
import javax.persistence.Table;

import com.avaje.ebean.Model;

@Entity
@Table(name = "users")
public class User extends Model {

	@Id
	@GeneratedValue(strategy = GenerationType.IDENTITY)
	public Long id;

	@Column(name = "name")
	public String name; // 名前

	@Column(name = "mail_address", nullable = false)
	public String mailAddress; // メールアドレス

	public static Find<Long, User> find = new Find<Long, User>() {
	};
}
細かい説明は次回といこうことで。。。
とりあえず先に進みます。
Userクラスを作成したら、一度activatorを起動してみましょう!
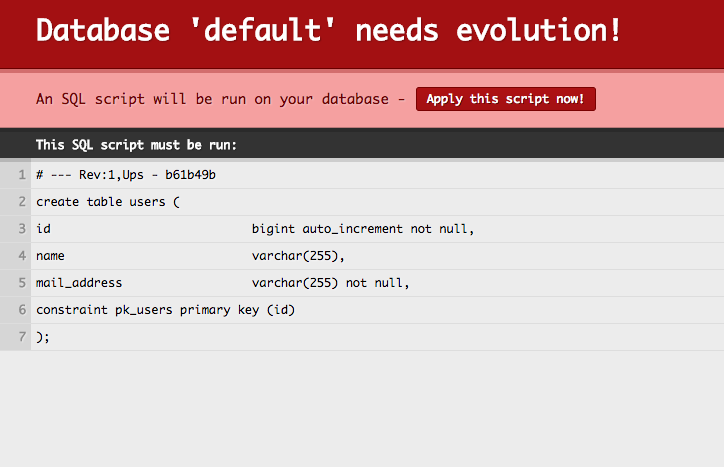
(一瞬エラーかと思います。。。)
"Apply this script now!"を選択するとUserクラスで定義したテーブルを作成してくれます。
今回は作成されたテーブルに適当なユーザーを追加しておきましょう!
app/controllers/HomeController.javaへ追記
appの作成に戻ります。
既にHomeControllerというクラスがあると思うので、そこに以下を追記します。
import models.entity.User;
import java.util.List;


public Result showUser(){
        List<User> user  = User.find.findList();
        return ok(userList.render(user));
}
ここではUserクラスからユーザー一覧を取得し、viewへ渡しています。
app/views/userList.scala.htmlの作成
続いてviewの作成をします。
@(users: List[models.entity.User])

@main("UserList") {
    <ul>
    @for(user <- users){
        <li>@user.name : @user.mailAddress</li>
    }
    </ul>
}
ここではHomeControllerで渡されたList型のUserをfor文で回して名前とアドレスを表示しています。
conf/routesの設定
最後にルーティングです
以下を追加
GET /users controllers.HomeController.showUser
applicationの起動
ここまできたらactivatorを起動してrunを実行し、
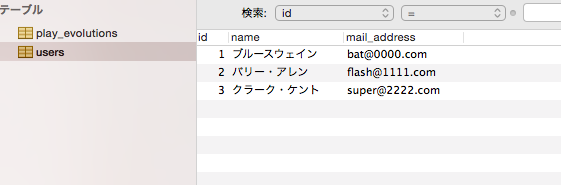
http://192.168.33.10:9000/users
へアクセスしてみてください。
わーかんたんにヒーローたちが表示されました。

今回はこんな感じで終わりです。
また次回もうすこしDBからの出し入れをしていきたいと思います。