概要
VSCodeでCMakeを用いてFortranのプログラムをコンパイルする方法をまとめました.
以前の記事において,Visual Studio CodeでFortranプログラムをコンパイルする方法をまとめましたが,そこでコンパイルできるのは一つのファイルのみでした.
第1回モダンFortran勉強会において,CMakeを用いればビルドを省力化できるという情報を入手し,またその情報が記事にまとめられていたので,試してみました.
環境はWindowsで,cmakeの出力ファイルとして,MakefileおよびMSBuildのソリューションファイルの2通りを取り扱います.
使用環境
| コンパイラ | バージョン |
|---|---|
| Intel Fortran for Windows | 17.0.4.210 |
| PGI Fortran for Windows | 18.7 |
| gfortran for Windows | 4.10.0 |
| PGI Fortran for Linux | 19.4 (Ubuntu on WSL) |
| gfortran for Linux | 7.3.0 (Ubuntu on WSL) |
| ビルドツール | バージョン |
|---|---|
| GNU Make for x86_64-pc-linux-gnu | 4.1 (Ubuntu on WSL) |
| GNU Make for Windows | 3.81 |
| devenv(Visual Studio Community 2017) | 15.0.28010.2016 |
超重要事項
Windowsのコマンドプロンプトで,中にファイルが存在するディレクトリを削除するコマンドはrmdir /Sです.
CMakeとは
CMakeとは,ビルドの自動化ツールです.
ビルド環境としては,Linuxの場合はmake,Windowsの場合はMSBuildが有名かと思います.CMakeは,それらビルド環境に読み込ませるファイルを出力してくれます.
手足のように使いこなすには依然としてハードルが高そうですが,下記の利点があります.特に,VSCodeにとって4番目は大きな意味があります.
- 依存関係を自動で解決してくれる
- 並列ビルドができる
- ビルド結果を一つのフォルダ/ディレクトリにまとめられるので,後片付けが楽
- コンパイル対象のファイルも含めて,コンパイルの設定をCMakeの設定ファイルに書くので,VSCodeの設定ファイル(tasks.json)の設定項目が減る(結果tasks.jsonを共通化できる)
CMakeのインストール
CMakeのインストーラは公式ページからダウンロードできます.トップページの右上のDownloadもしくは中程左のDownload Latest Releaseをクリックし,飛び先のページでWindows win64-x64 Installerをダウンロードします.
ここではRelease CandidateではなくLatest Release (3.14.5)をダウンロードしました.
インストールは簡単で,特に注意することはありませんが,CMakeをPATHに追加するかのオプションがあるので,必ず追加してください.
CMakeの使い方
CMakeの使い方については,この記事がとてもためになりました.
FortranプログラムのビルドにCMakeを使う方法については,先に挙げた記事以外に,この記事(コメント含む),Qiita外の記事,おなじみのFortran Wikiの項目などがあります.
以下で,我々が理解した最低限の使い方をまとめます.
設定ファイルの作成
cmakeを使うには,まずCMakeLists.txtを作ります.CMakeLists.txtはcmakeを用いたビルドの設定を記述するファイルです.
CMakeLists.txtには,最低限3個の項目(Fortranの場合は1項目増えて4項目)を記述します.
- CMakeのバージョン
- Fortranの有効化
- プロジェクト名
- コンパイルするファイルと作成される実行ファイル名
実際に例を見てみましょう.
cmake_minimum_required(VERSION 3.10)
# CMakeのバージョン

enable_language(Fortran)
# Fortran向け設定の有効化

project(hello Fortran)
# プロジェクト名と使用する言語

add_executable(${PROJECT_NAME}
    module_hello.f90
    main.f90
)
# 実行ファイル名(hello)とコンパイルするソースファイル(スペースもしくは改行で列挙)
ソースファイルは以下のように作成されています.
program main
    use mod_hello
    implicit none

    call hello()
end program main
module mod_hello
    implicit none
    contains
    subroutine hello()
        implicit none
        print *,"hello"
    end subroutine
end module mod_hello
main.f90はmodule_hello.f90に書かれているモジュールmod_helloをuseしているので,依存関係があります.
手動でコンパイルするには,先にオブジェクトファイルを作成し,リンクする必要があります.今回は簡単な例ですが,ファイル数が多くなり,参照関係が複雑になると,手動でコンパイル順序を決めるのは困難です.CMakeは自動でそれを解決してくれます.
CMakeを用いた設定ファイルの作成
今,Fortranのソースファイル(main.f90, module_hello.f90)とCMakeの設定ファイル(CMakeLists.txt)が同じディレクトリに置かれています.CMakeでは,プログラムをビルドする際に専用のビルドディレクトリを作ります.
buildというディレクトリ名にすることが多いようですが,ターゲットによってディレクトリ名を変更することもよく行われているようです.その際でもbuildという名前は含めるようです.
Windowsでは,GUI版のCMakeを利用できますが,VSCodeから用いる事を想定し,コマンドラインでの使い方を見てみます.
Unix Makefileを作成する場合
フォルダ構成
まず,フォルダ内の構造を見ておきましょう.
hello> dir
..中略..
           164 CMakeLists.txt
            88 main.f90
           163 module_hello.f90
..中略..
次に,buildを作成し,そこへ移動します.
hello> mkdir build
hello> cd build
hello\build> dir
..中略..
<DIR>          .
<DIR>          ..
..中略..
CMakeによるMakefileの作成
makeでプログラムをビルドするためにMakefileを作成するには,-Gオプションに続いて"Unix Makefiles"を指定します.
hello\build> cmake .. -G "Unix Makefiles"
-- The Fortran compiler identification is GNU 4.10.0
-- Check for working Fortran compiler: C:/Program Files (x86)/gfortran/bin/gfortran.exe
-- Check for working Fortran compiler: C:/Program Files (x86)/gfortran/bin/gfortran.exe  -- works
-- Detecting Fortran compiler ABI info
-- Detecting Fortran compiler ABI info - done
-- Checking whether C:/Program Files (x86)/gfortran/bin/gfortran.exe supports Fortran 90
-- Checking whether C:/Program Files (x86)/gfortran/bin/gfortran.exe supports Fortran 90 -- yes
-- Configuring done
-- Generating done
-- Build files have been written to: hello/build

hello\build> dir
..中略..
        13,766 CMakeCache.txt
<DIR>          CMakeFiles
         1,407 cmake_install.cmake
         5,787 Makefile
..中略..
出力は少し編集しています.
makeによるビルドとプログラムの実行
CMakeが正常に終了し,Makefileが作成されたら,makeを実行します.
hello\build> make
[ 33%] Building Fortran object CMakeFiles/hello.dir/module_hello.f90.obj
[ 66%] Building Fortran object CMakeFiles/hello.dir/main.f90.obj
[100%] Linking Fortran executable hello.exe
[100%] Built target hello

hello\build> dir
..中略..
        13,766 CMakeCache.txt
<DIR>          CMakeFiles
         1,407 cmake_install.cmake
        98,971 hello.exe
         5,787 Makefile
           237 mod_hello.mod
..中略..
dirでファイル一覧を見ると,hello.exeが作成されており,プログラムがビルドされたようなので,それを実行してみると,無事に画面にhelloと表示され,依存関係を解決した上でビルドが行われた事がわかります.
hello\build> hello
 hello
コンパイラの変更
CMakeで用いるコンパイラを変更するには,コンパイルオプション-DCMAKE_Fortran_COMPILER=で指定します.
基本的にはコンパイラの実行ファイル名を指定します.指定するコンパイラの実行ファイルがあるフォルダにパスが通っていなければなりません.
| コンパイラ | オプション指定 |
|---|---|
| gfortran | gfortran |
| Intel Fortran | ifort |
| PGI Fortran | pgfortran もしくは pgf95 |
hello\build> cmake .. -G "Unix Makefiles" -DCMAKE_Fortran_COMPILER=pgfortran
-- The Fortran compiler identification is PGI 18.7.0
-- Check for working Fortran compiler: C:/Program Files/PGI/win64/18.7/bin/pgfortran.exe
-- Check for working Fortran compiler: C:/Program Files/PGI/win64/18.7/bin/pgfortran.exe  -- works
-- Detecting Fortran compiler ABI info
-- Detecting Fortran compiler ABI info - done
-- Checking whether C:/Program Files/PGI/win64/18.7/bin/pgfortran.exe supports Fortran 90
-- Checking whether C:/Program Files/PGI/win64/18.7/bin/pgfortran.exe supports Fortran 90 -- yes
-- Configuring done
-- Generating done
-- Build files have been written to: hello/build
この作業をUbuntu on WSLでも行い,gfortranとpgi fortranで動作を確認しています.
Visual Studioのソリューションファイルを作成する場合
CMakeによるソリューションファイルの作成
Visual Studio用のソリューションファイルを作成する場合は,-Gオプションに続いて"Visual Studio [バージョン] [年次] [ターゲットのアーキテクチャ]"を指定します.
-Gオプションに続けて何を書くべきかは,-GオプションのみでCMakeを実行したときの出力から確認できます.
Visual Studio 2017用のソリューションファイル(ターゲットが64ビットOS)を作成する場合は,"Visual Studio 15 2017 Win64"とします.
"Win64"指定によって作られるソリューションプラットフォームの名前はx64となります.
hello\build> cmake .. -G "Visual Studio 15 2017 Win64"
-- Selecting Windows SDK version 10.0.17134.0 to target Windows 10.0.17763.
-- The Fortran compiler identification is Intel 19.0.0.20180804
-- Check for working Fortran compiler: C:/Program Files (x86)/IntelSWTools/compilers_and_libraries_2019/windows/bin/intel64/ifort.exe
-- Check for working Fortran compiler: C:/Program Files (x86)/IntelSWTools/compilers_and_libraries_2019/windows/bin/intel64/ifort.exe  -- works
-- Detecting Fortran compiler ABI info
-- Detecting Fortran compiler ABI info - done
-- Determine Intel Fortran Compiler Implicit Link Path
-- Determine Intel Fortran Compiler Implicit Link Path -- done
-- Checking whether C:/Program Files (x86)/IntelSWTools/compilers_and_libraries_2019/windows/bin/intel64/ifort.exe supports Fortran 90
-- Checking whether C:/Program Files (x86)/IntelSWTools/compilers_and_libraries_2019/windows/bin/intel64/ifort.exe supports Fortran 90 -- yes
-- Configuring done
-- Generating done
-- Build files have been written to: hello/build

hello\build> dir
..中略..
        21,619 ALL_BUILD.vcxproj
           274 ALL_BUILD.vcxproj.filters
        12,132 CMakeCache.txt
<DIR>          CMakeFiles
         1,408 cmake_install.cmake
         3,096 hello.sln
        25,127 hello.vfproj
        21,491 ZERO_CHECK.vcxproj
           517 ZERO_CHECK.vcxproj.filters
..中略..
オプション付きでCMakeを実行すると,Windows SDKとIntel Fortranを自動で見つけてくれます.Intel Fortranはパスを通すのも一苦労なのに,自動で見つけて使ってくれました.パス設定で詰まるんだろうと思っていたところ,うれしい誤算でした.
devenvによるビルドとプログラムの実行
dirの出力を見ると,hello.slnおよびIntel Fortranのプロジェクトファイルhello.vfprojが出力されています.これをVisual Studioで開いてビルドしてもいいのですが,本記事ではコマンドラインからビルドします.
ソリューションファイルのビルドはMSBuildを使うのが基本ですが,Intel Fortranのリリースノート(pdf)によると,Visula Studio 2017のビルドツールでは,ビルドできないようです.
現在、インテル® Fortran プロジェクト (.vfproj) は MSBuild をサポートしていないため、Visual Studio* 2017 Build Tools 内でビルドすることはできません。ビルドするには、サポートされている Visual Studio* バージョンか、Visual Studio* 2015 Shell をインストールしてください。
ではVisual Studio *と統合されたIntel Fortranがどうやってビルドしているのかというと,devenv.comを使っているようです.従って,ここでもMSBuildではなくdevenvを使ってビルドします.
devenvはVisual StudioのIDEなので,Visual Studioをインストールすれば自動でインストールされます.devenv.exeがIDE本体で,devenv.comがコマンドラインツールでしょうか?検証環境では,Visual Studio 2017 Communityがインストールされています.この環境では,devenv.comはC:\Program Files (x86)\Microsoft Visual Studio\2017\Community\Common7\IDEにあります.基本的にパスは通されていないので,フルパスで入力するか,当該フォルダへのパスを通します.
devenvの使い方を見ると,コマンドラインからの呼び方は以下のようになっています.
devenv solutionfile.sln /build [ solutionconfig ] [ /project projectnameorfile [ /projectconfig name ] ]
必須なのはソリューションファイルとビルドのオプションなので,特に難しくはなさそうです./buildを/rebuildにすると,プロジェクトがクリーンされてからビルドが行われます.Makeを使うとmake一発でビルドが行われることに比べると,少し面倒ですね.
hello\build> "C:\Program Files (x86)\Microsoft Visual Studio\2017\Community\Common7\IDE\devenv.com" hello.sln /rebuild
1>------ すべてのリビルド開始: プロジェクト:ZERO_CHECK, 構成: Debug x64 ------
..中略..
3>------ [すべてリビルド] のスキップ: プロジェクト:ALL_BUILD, 構成: Debug x64 ------
3>プロジェクトはこのソリューション構成に対してビルドするように選択されていません。
========== すべてリビルド: 2 正常終了、0 失敗、1 スキップ ==========

hello\build> dir
..中略..
        21,619 ALL_BUILD.vcxproj
           274 ALL_BUILD.vcxproj.filters
        12,132 CMakeCache.txt
<DIR>          CMakeFiles
         1,408 cmake_install.cmake
<DIR>          Debug
<DIR>          hello.dir
         3,096 hello.sln
        22,832 hello.vfproj
<DIR>          x64
        21,491 ZERO_CHECK.vcxproj
           517 ZERO_CHECK.vcxproj.filters
..中略..
Makeと比較して出力が大量ですが,失敗はないのでビルドできています.今回はオプションを付けなかったので,Debugの構成でビルドされています.そのため,出力ファイルはDebugフォルダに出力されています.
hello\build> dir Debug
..中略..
        65,536 hello.exe
       479,392 hello.ilk
       413,696 hello.pdb
           331 mod_hello.mod
..中略..
Debugフォルダ内にhello.exeが無事作成されているので,それを実行してみると,Makeの場合と同様にhelloと表示されました.
hello\build> Debug\hello.exe
 hello
VSCode用のCMake拡張
VSCodeでCMakeを利用するにあたり,CMakeに関係した拡張を二つインストールしました.
- CMake by twxs
- CMake Tools by vector-of-bool
前者はCMakeLists.txt作成時の補完を有効にしてくれます.
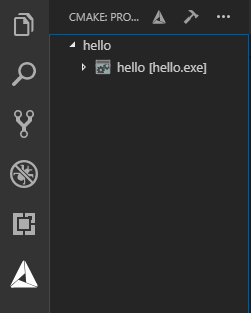
後者は,CMakeLists.txtがあるフォルダを読み込むと依存関係を解析し,GUIでビルドできるようにしてくれます.サイドバーにCMakeのアイコンが追加されます.アイコンをクリックして開くウィンドウの上部に,CMakeと金槌のアイコンがあります.CMakeのアイコンをクリックすることでConfigure, 金槌のアイコンでBluidが実行されます.

まだ完全に条件を切り分けられていませんが,devenvを利用する場合,Ctrl+Shift+Pでのビルド時にcmakeの処理が始まらないことがあります.その場合,CMake Toolsで一度Configureすると,以降ではCtrl+Shift+Pでのビルド時に,cmakeが問題なく実行されるようになります.
VSCodeでの利用
ようやく本題です.VSCodeでのビルド時にCMakeを使うようにtasks.jsonを作成します.
CMakeを用いてビルドするには,CMakeで一度Makefileもしくはソリューションファイルを作り,その後makeあるいはdevenvでビルドしなければなりません.VSCodeにおいて,ビルド時の複数コマンド実行には,"dependsOn"プロパティが利用できます.(https://qiita.com/__cooper/items/9517addaaf1e77215848)
デフォルトのタスクとして"make"あるいは"devenv"を作り,そのタスクが実行される前に,"dependsOn"プロパティで"cmake"が実行されるようにします.
makeを利用する場合
makeを利用する場合のtasks.jsonは以下のようになりました.
各タスクにおいて,"cwd"でのworking directoryの明記を忘れると,ソースファイルと同じディレクトリでビルドをしようとして,cmake ..との間で不整合が出てしまいます.
このworking directoryも複数箇所で指定しなければならないので,GUI等で一括設定できるとよいのですが.
{
    // See https://go.microsoft.com/fwlink/?LinkId=733558
    // for the documentation about the tasks.json format
    "version": "2.0.0",
    "tasks": [
        {
            "label": "cmake",
            "type": "shell",
            "options": {
                "cwd": "${workspaceRoot}/build"
            },
            "command": "cmake.exe",
            "args": [
                "..",
                "-G",
                "\"Unix Makefiles\"",
                "-DCMAKE_Fortran_COMPILER=gfortran"
            ],
        },
        {
            "label": "make",
            "type": "shell",
            "options": {
                "cwd": "${workspaceRoot}/build"
            },
            "command": "make.exe",
            "args": [
            ],
            "group": {
                "kind": "build",
                "isDefault": true
            },
            "dependsOn":[
                "cmake"
            ],
        },
    ]
}
devenvを利用する場合
devenvを利用する場合でも,構成は変わりません.CMakeのオプションが変更され,makeがdevenvに変わっているだけです.最終的にtasks.jsonは以下のようになりました.
{
    // See https://go.microsoft.com/fwlink/?LinkId=733558
    // for the documentation about the tasks.json format
    "version": "2.0.0",
    "tasks": [
        {
            "label": "cmake",
            "type": "shell",
            "options": {
                "cwd": "${workspaceRoot}/build"
            },
            "command": "cmake.exe",
            "args": [
                "..",
                "-G",
                "\"Visual Studio 15 2017 Win64\"",
                "-DCMAKE_Fortran_COMPILER=ifort"
            ],
        },
        {
            "label": "devenv",
            "type": "shell",
            "options": {
                "cwd": "${workspaceRoot}/build"
            },
            "command": "\"C:\\Program Files (x86)\\Microsoft Visual Studio\\2017\\Community\\Common7\\IDE\\devenv.com\"",
            "args": [
                "hello.sln",
                "/Rebuild"
            ],
            "group": {
                "kind": "build",
                "isDefault": true
            },
            "dependsOn":[
                "cmake"
            ],
        },
    ]
}
"command"がややこしいことになっています.パスにスペースが含まれているので,ダブルクオートで囲む必要があり,加えてダブルクオートをエスケープする必要があるからです.セパレータもエスケープが必要で,もうめちゃくちゃです.
実行結果
VSCodeでmain.f90,module_hello.f90,CMakeLists.txtのあるディレクトリを読み込み,tasks.jsonを編集し,ビルドを行いました.
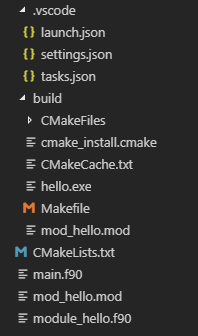
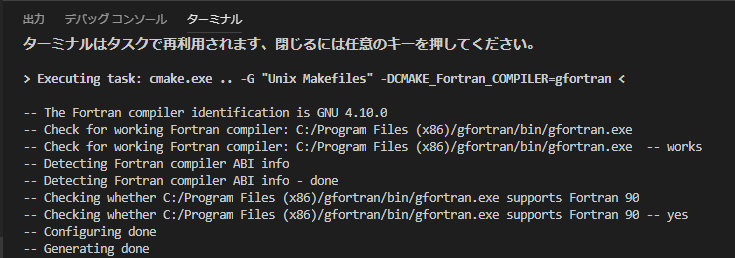
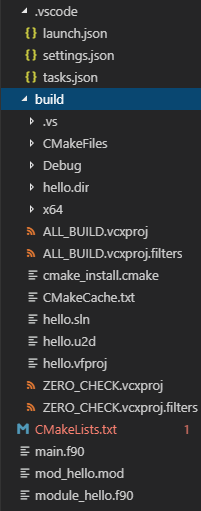
その結果,buildディレクトリ以下にMakefileやソリューションファイルが作られています.また,ターミナルにも上で見たような出力が現れており,問題なく動作している様子が確認できます.
まとめ
CMakeを用い,複数ファイルからなるプロジェクトをショートカット1発でコンパイルできるようになりました.
ここまで来ると,コンパイルオプションをGUIで設定できるようにしたいですね.


