はじめに
Clovaスキルを普段、自作のSDKを使ってLambdaで開発している私ですが、ハンズオンの講師をするにあたって公式SDKを使おうと思いコードをみているとLambdaで実行できるようなメソッドが追加されていました。
公式ドキュメントなどで使い方などを書いていなかったので参考になればと思います🎵
とりあえず、コードをみたい!という方は以下。
Lambdaのコード(検証なし、lambda()メドッド使用)
Lambdaのコード(検証あり、lambda()メソッド使用しない)
対象者
公式SDKをHerokuなどのサーバーで使ったことあるがLambdaで使ってみたい方を対象としています。
Clovaスキルの作成方法(インテント、スロットなどの登録)はこの記事では書いていません。
入門者向けには以前記事を書いています。
[入門]Clovaスキル(CEK)は作りながら覚えて行く(前提知識編)
構成と環境
言語はNode.jsを使用しています。
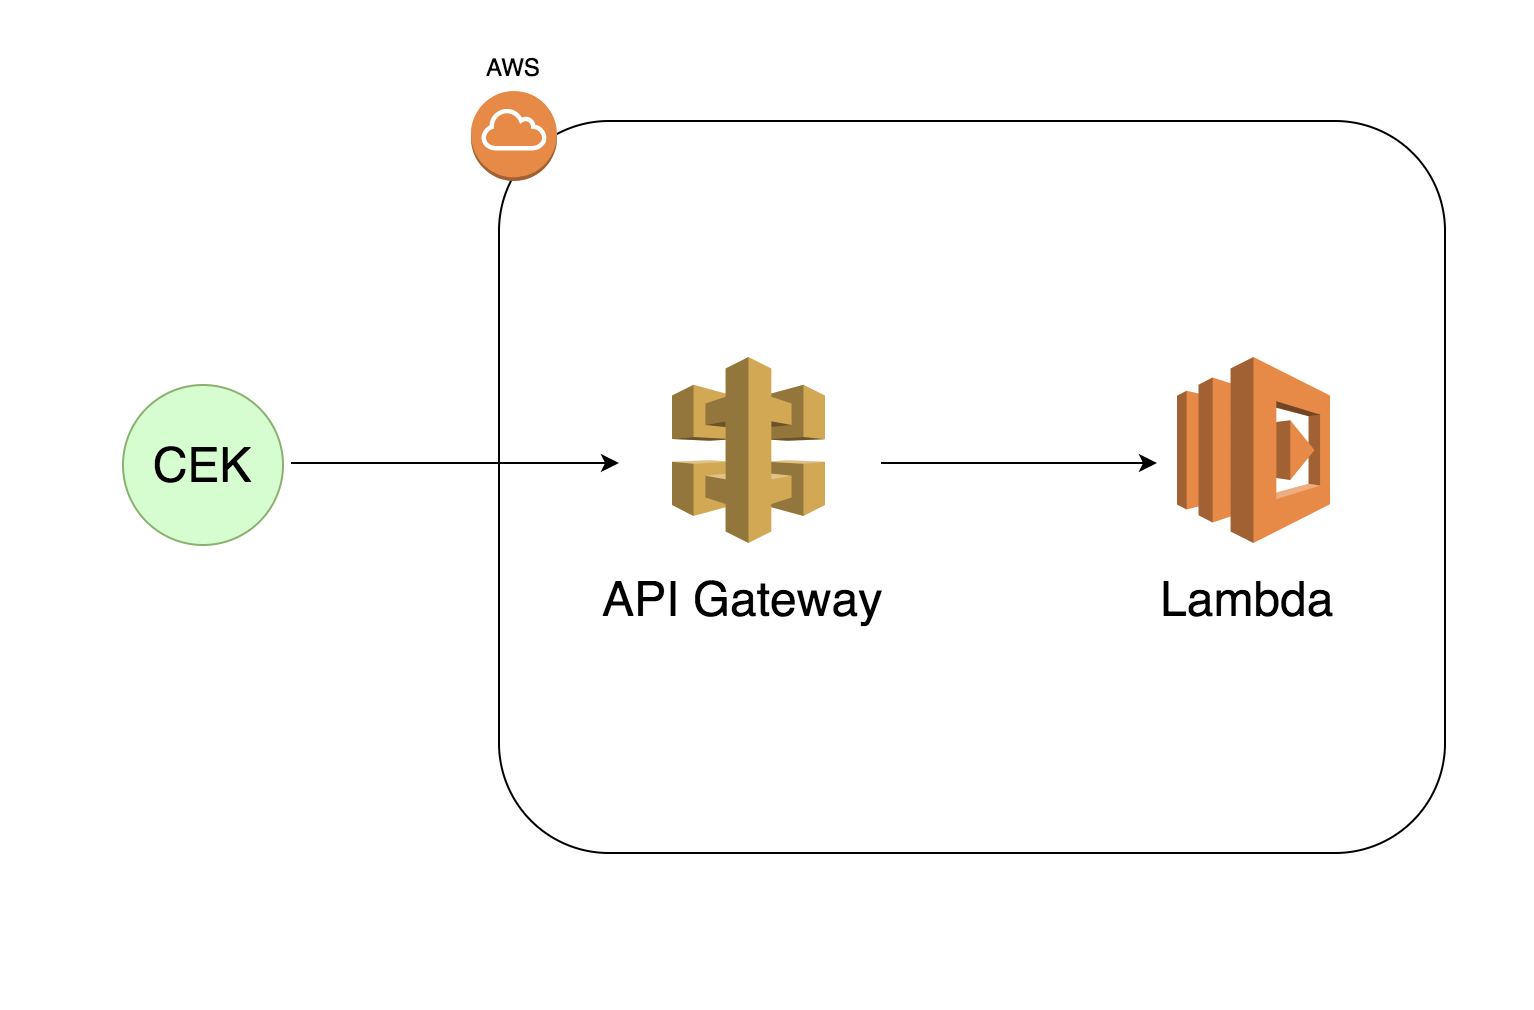
LambdaをCEK(Clovaスキル)から直接叩くことはできないです。
CEKとLambdaの間にAPI Gatewayを挟むことになります。
以下がそのアーキテクチャです。
Lambdaの作成
とりあえず、Lambdaを作成しましょう。
まあ、関数名はなんでもいいんですが適当に作成します。

API Gatewayの設定
次にAPI Gatewayの作成をしていきます。
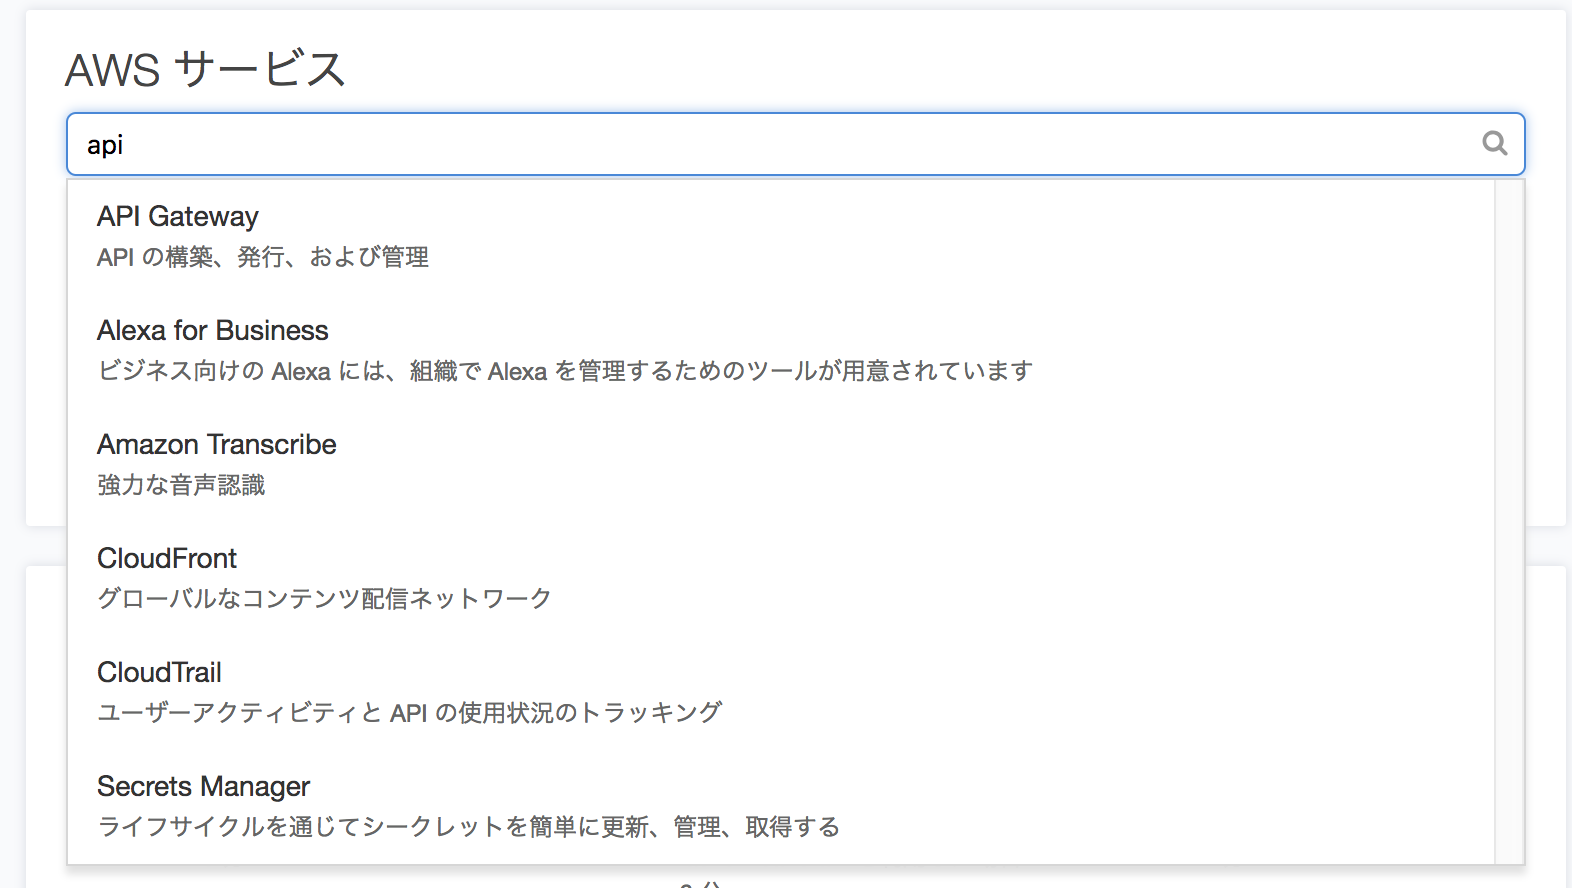
以下のように「api」と検索するとAPI Gatewayが出てくるのでクリックします。
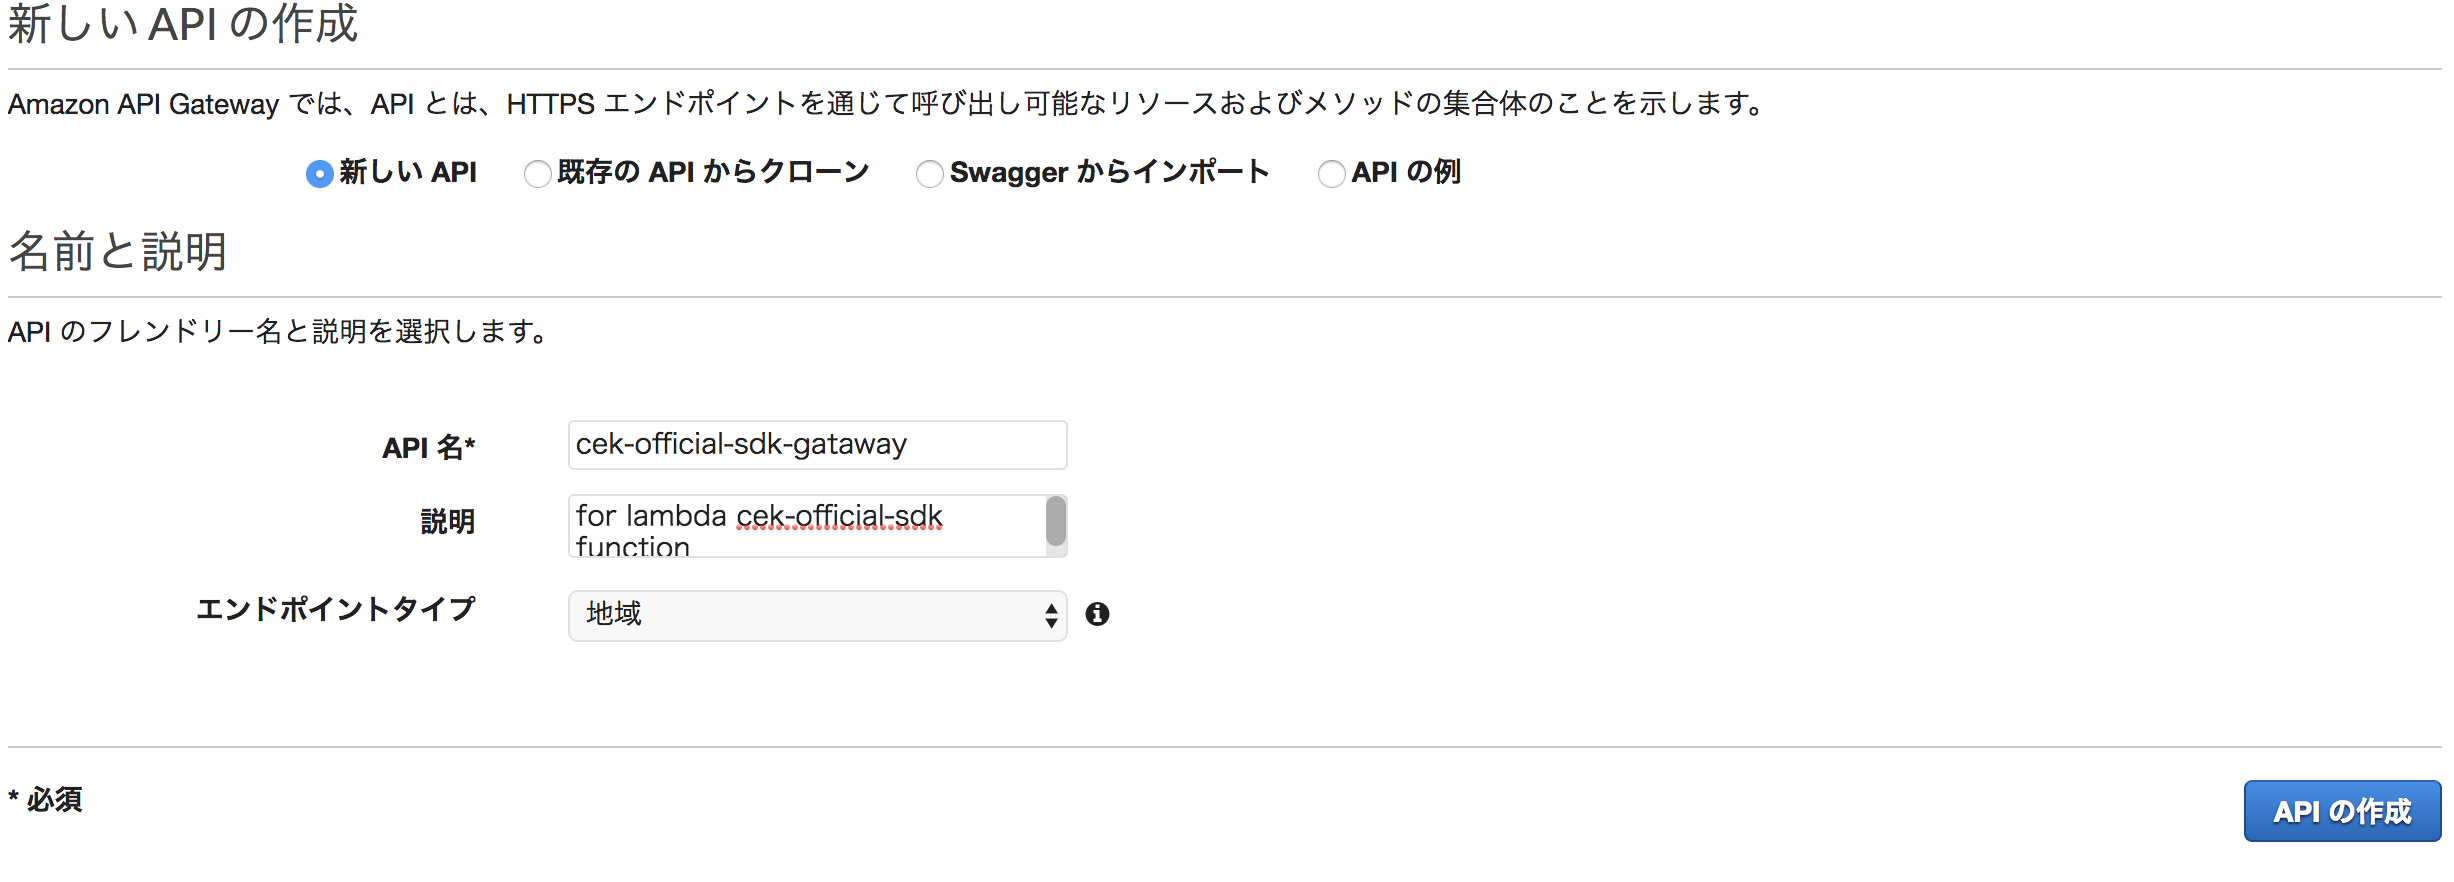
API Gatewayのダッシュボードに移動するので「APIの作成」をクリックします。
これも名前は適当でいいんですが、今回は以下のように作成します。
| 項目 | 値 |
|---|---|
| API 名 | cek-official-sdk-gataway |
| 説明 | for lambda cek-official-sdk function |
次にリソースを作成します。
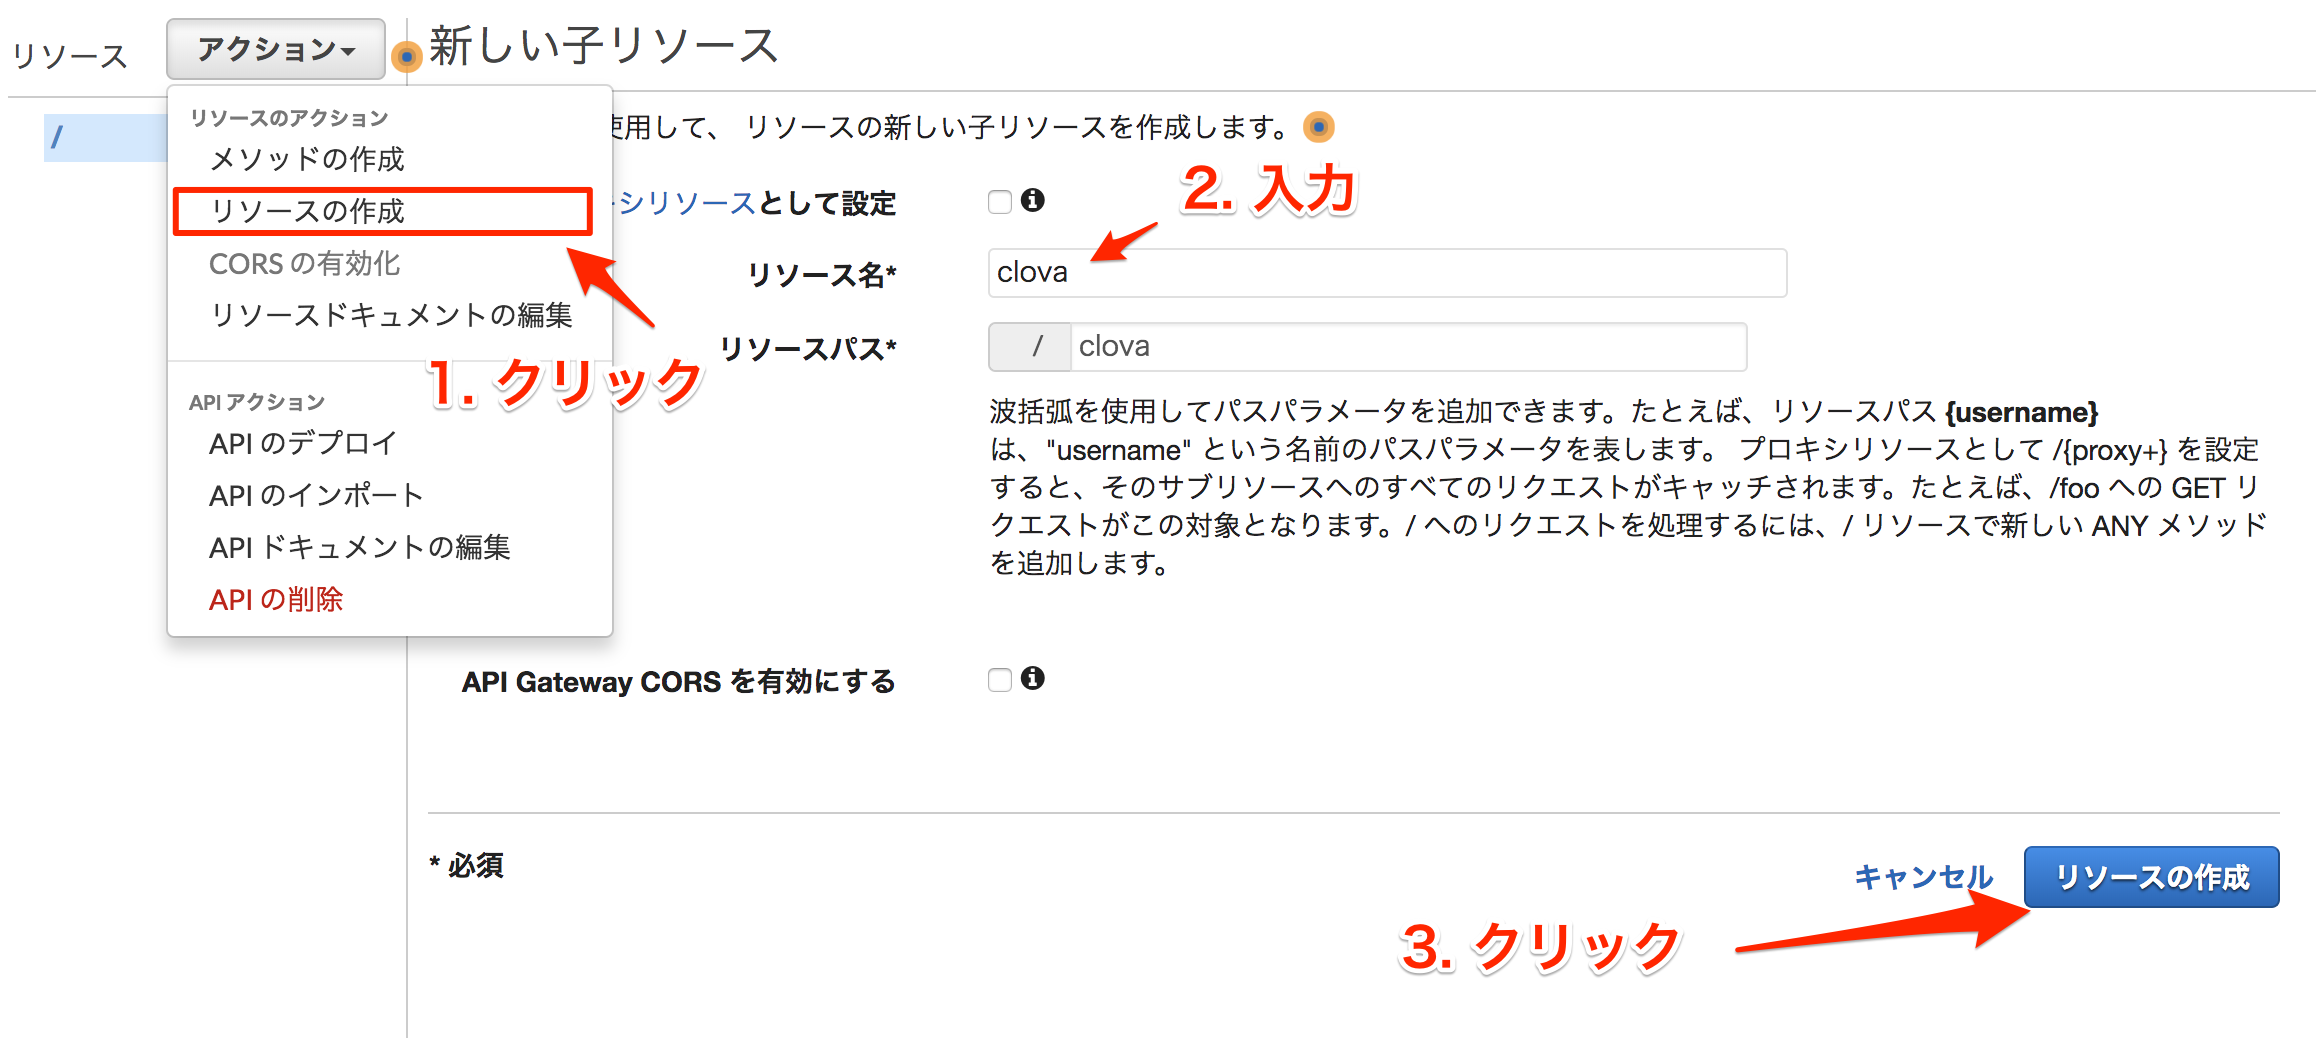
画面左上の「アクション」からリソースの作成を選択します。
リソース名には「clova」と入力して作成します。
次にメソッドを作成します。
「リソースの作成」ボタンの上の「メソッドの作成」をクリックします。
メソッドは「POST」を選択します。

先ほど作成したLambdaの関数名を入力します。

次にAPIのデプロイをします。
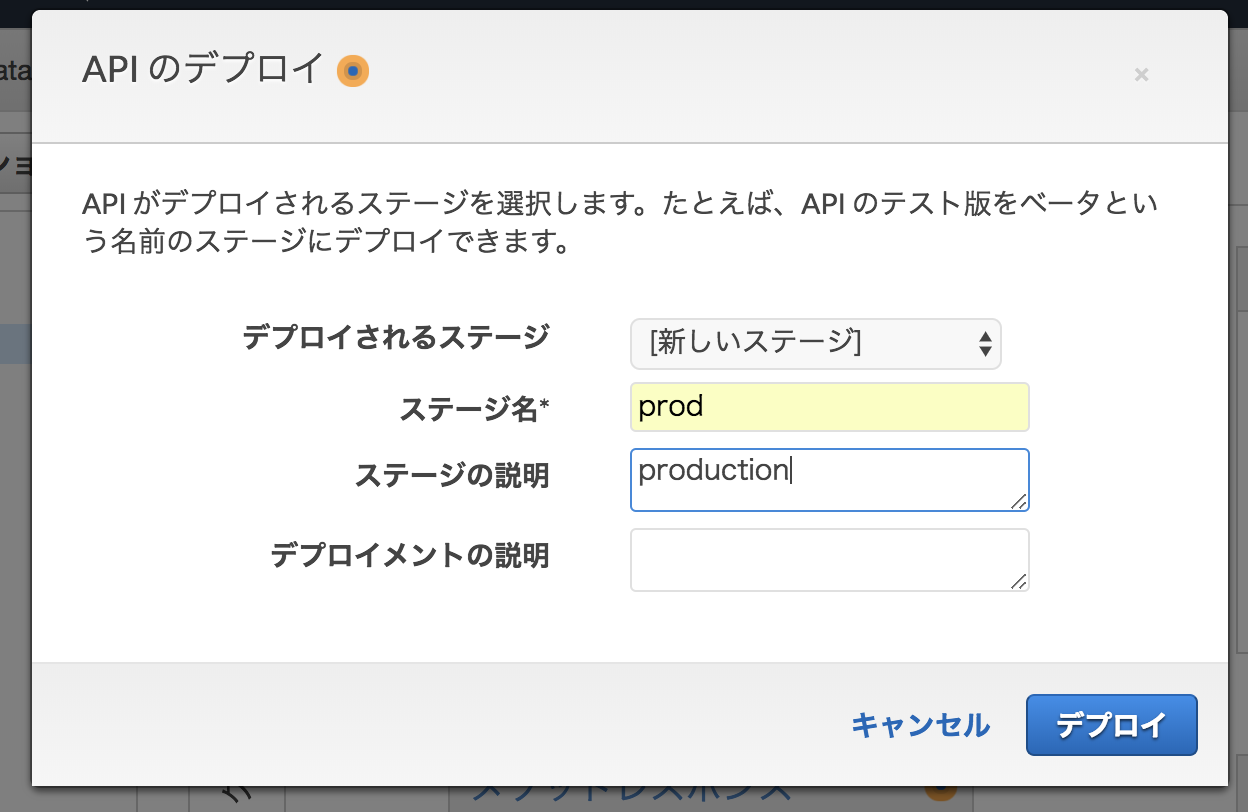
以下の画像のようにAPIのデプロイをクリックします。

デプロイのステージの選択が出てくるので以下のように入力してデプロイします。
| 項目 | 値 |
|---|---|
| デプロイされるステージ | 新しいステージ |
| ステージ名* | prod |
| ステージの説明 | production |
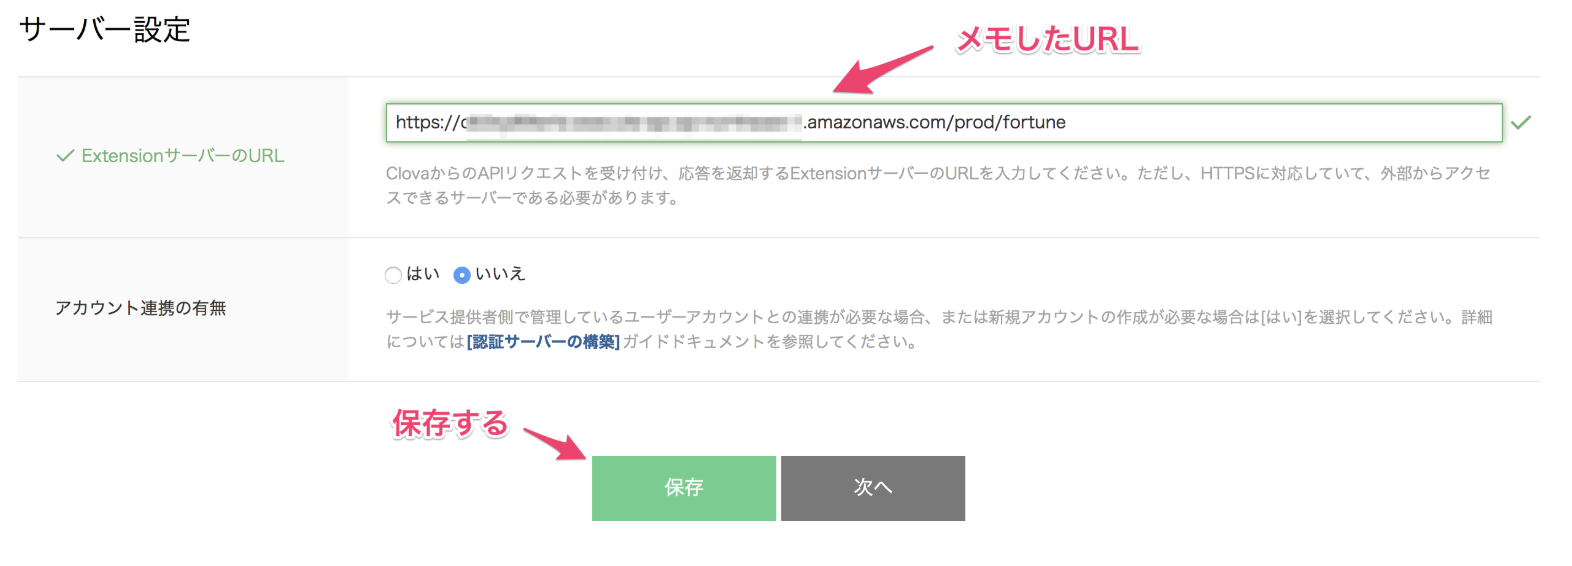
URLが発行されるのでメモします。
画面左からclova/POSTをクリックした後の画面のURLです

メモしたURLをClovaのサーバーの設定に入力します。
Lambdaのコード
よし、これでLambdaとCEKの紐付けはできました!!!
あとは、コードを書いて行くのみです!!(実はそんなこともないのですが、それについては後述します)
必要なモジュールをインストールしていきます。
$ npm init
$ npm install --save @line/clova-cek-sdk-nodejs
まず、Lambdaのコードを説明する前に公式のGitHubのサンプルコードをみてみます。
const clova = require('@line/clova-cek-sdk-nodejs');
const express = require('express');
const bodyParser = require('body-parser');

const clovaSkillHandler = clova.Client
  .configureSkill()
  .onLaunchRequest(responseHelper => {
    responseHelper.setSimpleSpeech({
      lang: 'ja',
      type: 'PlainText',
      value: 'おはよう',
    });
  })
  .onIntentRequest(async responseHelper => {
    const intent = responseHelper.getIntentName();
    const sessionId = responseHelper.getSessionId();

    switch (intent) {
      case 'Clova.YesIntent':
        // Build speechObject directly for response
        responseHelper.setSimpleSpeech({
          lang: 'ja',
          type: 'PlainText',
          value: 'はいはい',
        });
        break;
      case 'Clova.NoIntent':
        // Or build speechObject with SpeechBuilder for response
        responseHelper.setSimpleSpeech(
          clova.SpeechBuilder.createSpeechText('いえいえ')
        );
        break;
    }
  })
  .onSessionEndedRequest(responseHelper => {
    const sessionId = responseHelper.getSessionId();

    // Do something on session end
  })
  .handle();

const app = new express();
const clovaMiddleware = clova.Middleware({ applicationId: "YOUR_APPLICATION_ID" });

app.post('/clova', clovaMiddleware, clovaSkillHandler);

app.post('/clova', bodyParser.json(), clovaSkillHandler);
これだと、Herokuなどのサーバーで実行する用のコードなのでLambda用に変更します。
不必要なところはコメントアウトしていくつかコードを足しています。
const clova = require('@line/clova-cek-sdk-nodejs');
//const express = require('express');
//const bodyParser = require('body-parser');

//const clovaSkillHandler = clova.Client
exports.handler = clova.Client
  .configureSkill()
  .onLaunchRequest(responseHelper => {
    responseHelper.setSimpleSpeech({
      lang: 'ja',
      type: 'PlainText',
      value: 'おはよう',
    });
  })
  .onIntentRequest(async responseHelper => {
    const intent = responseHelper.getIntentName();
    const sessionId = responseHelper.getSessionId();

    switch (intent) {
      case 'Clova.YesIntent':
        // Build speechObject directly for response
        responseHelper.setSimpleSpeech({
          lang: 'ja',
          type: 'PlainText',
          value: 'はいはい',
        });
        break;
      case 'Clova.NoIntent':
        // Or build speechObject with SpeechBuilder for response
        responseHelper.setSimpleSpeech(
          clova.SpeechBuilder.createSpeechText('いえいえ')
        );
        break;
    }
  })
  .onSessionEndedRequest(responseHelper => {
    const sessionId = responseHelper.getSessionId();

    // Do something on session end
  })
  .lambda()
  //.handle();

//const app = new express();
//const clovaMiddleware = clova.Middleware({ applicationId: "YOUR_APPLICATION_ID" });
//app.post('/clova', clovaMiddleware, clovaSkillHandler);
//
//app.post('/clova', bodyParser.json(), clovaSkillHandler);
変更した部分を少し説明します。
まずは、コードの上の方の部分です。
Lambdaはexports.handlerに指定した関数を実行するのでclovaSkillHandlerとして変数で持っていたのをexports.handlerに変更します。
... 省略 ...

//const clovaSkillHandler = clova.Client
exports.handler = clova.Client
... 省略 ...
次にはコードの下の方です。handle()関数をLambda用にlambda()に変えます。
  .lambda()
  //.handle();
最後にexpress周りをコメントアウトします。
//const app = new express();
//const clovaMiddleware = clova.Middleware({ applicationId: "YOUR_APPLICATION_ID" });
//app.post('/clova', clovaMiddleware, clovaSkillHandler);
//
//app.post('/clova', bodyParser.json(), clovaSkillHandler);
他のコードの部分の説明はここではしません。
田中みそ氏の記事が参考になります。
Clova公式SDK(Node.js)の使い方まとめ
しかーし!検証をしていない
ここであることに気がつきます。
検証をしていません。
検証?なにそれ?という方はこちら
実際に検証をしなくても動くことは動くのでしなくてもいいやって方はこの先を読む必要はありません。(いや、本当はしたほうがいいです)
SDKの中をみなくても検証をしていないことがわかるんですが、なぜわかるかというと今まではLambdaでHeaderを取得できていないからです。
HeaderのSignatureCEKの値を検証に使うのでしていないことがわかります。
API Gateway再設定(Headerを取得できるように)
まずはHeaderを取得できるようにAPI Gatewayの設定をします。
先ほど作成したAPIの「結合リクエスト」をクリックします。

次に「Lambda プロキシ統合の使用」にチェックを入れます。
これでHeader(+もろもろ)取得することができます。

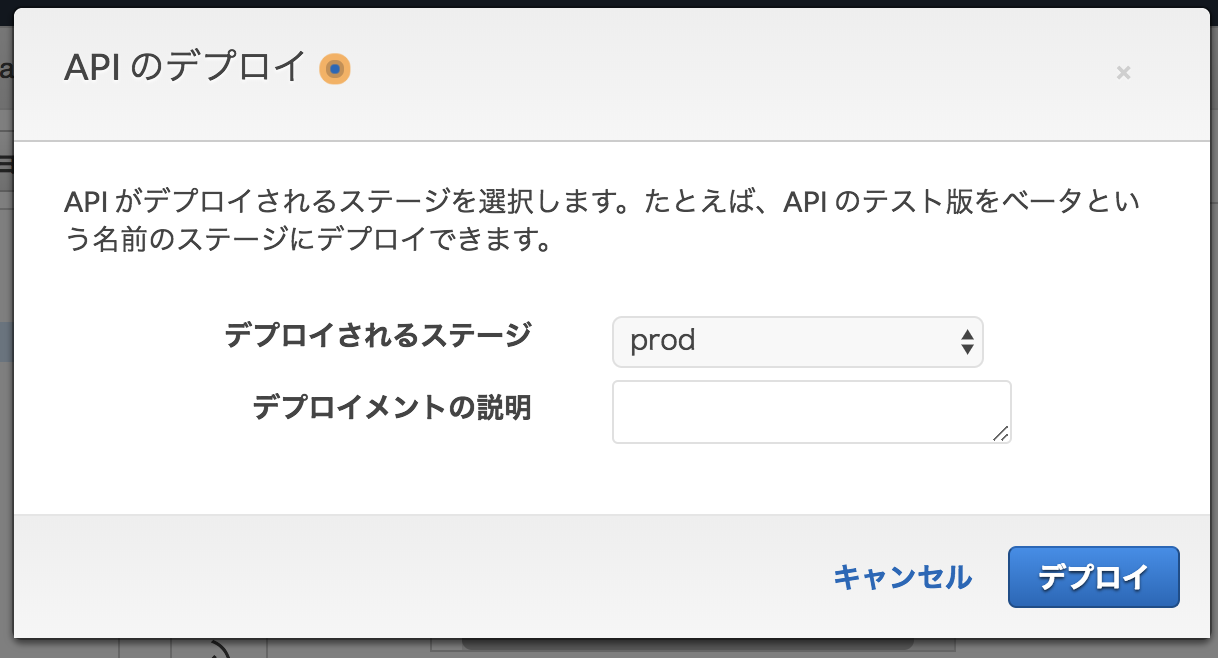
そして、先ほど同じようにデプロイします。
今回はすでに作成されている「pord」を選択します。
Lambdaのコード
Lambdaで取得できるデータの形が変わるので先ほどのコードではエラーがおきます。
ですので、コードを書き換えていきたいと思います。
さらには、検証も行なっていきます。
いかがそのコードになります。
注目は最後の方のexports.handlerの中です。
const clova = require('@line/clova-cek-sdk-nodejs');

const clovaSkillHandler = clova.Client
  .configureSkill()
  .onLaunchRequest(responseHelper => {
    responseHelper.setSimpleSpeech({
      lang: 'ja',
      type: 'PlainText',
      value: 'おはよう',
    });
  })
  .onIntentRequest(async responseHelper => {
    const intent = responseHelper.getIntentName();
    const sessionId = responseHelper.getSessionId();

    switch (intent) {
      case 'MenuIntent':
      case 'Clova.YesIntent':
        // Build speechObject directly for response
        responseHelper.setSimpleSpeech({
          lang: 'ja',
          type: 'PlainText',
          value: 'はいはい',
        });
        break;
      case 'Clova.NoIntent':
        // Or build speechObject with SpeechBuilder for response
        responseHelper.setSimpleSpeech(
          clova.SpeechBuilder.createSpeechText('いえいえ')
        );
        break;
    }
  })
  .onSessionEndedRequest(responseHelper => {
    const sessionId = responseHelper.getSessionId();

  })
  //.lambda()

exports.handler = async (event, content) => {


  const signature = event.headers.signaturecek || event.headers.SignatureCEK;
  const applicationId = process.env["applicationId"];
  const requestBody = event.body;
  // ヘッダーとスキルのExtensionIdとリクエストボディで検証
  await clova.verifier(signature, applicationId, requestBody);

  // 「Lambdaプロキシの結合」を有効にするとCEKからのJSONの中身は「event.body」で文字列で取得できる。
  var ctx = new clova.Context(JSON.parse(event.body));
  const requestType = ctx.requestObject.request.type;
  const requestHandler = clovaSkillHandler.config.requestHandlers[requestType];

  if (requestHandler) {
    await requestHandler.call(ctx, ctx);

    console.log("--- responseObject ---");
    console.log(ctx.responseObject);
    console.log("--- responseObject end ---");

    // CEKに返すレスポンス
    const response =  {
        "isBase64Encoded": false,
        "statusCode": 200,
        "headers": {},
        "body": JSON.stringify(ctx.responseObject),
    }
    console.log(response);
    return response;
  } else {
    throw new Error(`Unable to find requestHandler for '${requestType}'`);
  }
}
次にLambdaの環境変数にExtensionIDをセットします。
キーはapplicationIdです。

これで検証もしたコードになりました。(長い!!)
exports.handlerの中身はそのままコピペでどのスキルもいけると思います。(環境変数のapplicationIdを変更する必要はあり)
注意する点は、LambdaからCEKへのレスポンスの形も変えないといけないということです。
以下のように返さないといけないみたいです。
{
    "isBase64Encoded": true|false,
    "statusCode": httpStatusCode,
    "headers": { "headerName": "headerValue", ... },
    "body": "..."
}
以下などを参照していただけるとわかると思います。
https://www.uzumax.org/2018/07/aws-lambda-502-internal-server-error.html