はじめに
筆者は Ultra96/Ultra96-V2(ZynqMP) 向けに Debian GNU/Linux を提供しています1。提供している Debian GNU/Linux は CUI ベースですが、今回 GUI に対応するために X Window Systemを Ultra96/Ultra96-V2 で動くようにしました。
そこで Ultra96/Ultra96-V2 で X Window System を動かすための手順を幾つかのパートに分けて説明します。
- 概要編
- Video Driver 編(この記事)
- Mali Driver 編
- LibMali 編
- fbdev 編
- glmark2 編
この記事では、Video Driver(xserver-xorg-video-armsoc-xilinx) の Debian Package をビルドして ZynqMP-FPGA-Linux にインストールする手順を説明します。
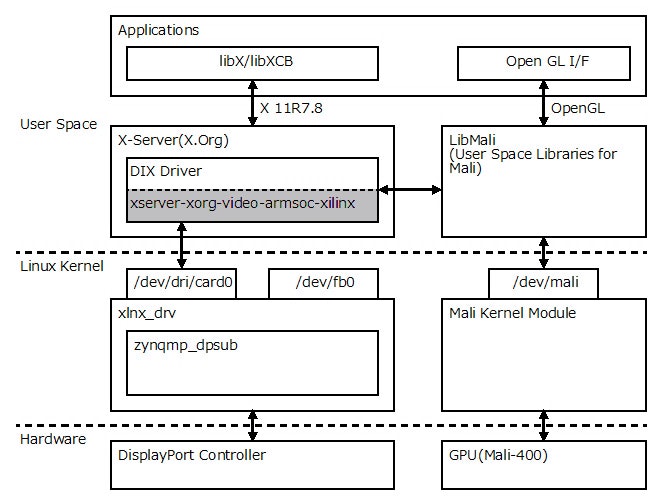
xserver-xorg-video-armsoc-xilinxとは
ZynqMP に対応したX Window Serverの DDX Driver(Video Driver) のことです。Xilinx が提供する Kernel Module(xlnx_drv) のDRM/KMS(Kernel Module Setting) を通じてディスプレイの情報を得たりディスプレイの設定を行うことが出来ます。
Fig.1 xserver-xorg-video-armsoc-xilinx
Debian Package のビルド手順
この章では、xserver-xorg-video-armsoc-xilinx の Debian Package を作るための手順を説明します。
なお、ここで説明する手順で生成したリポジトリを以下の URL に用意しています。 リポジトリを作るのが面倒な人は以下のリポジトリを使ってください。
また、ビルド済みのxserver-xorg-video-armsoc-xilinx Debian Package を以下のリポジトリに用意しています。ビルドが面倒な人はこちらをお使いください。
-
https://github.com/ikwzm/ZynqMP-FPGA-Xserver
- xserver-xorg-video-armsoc-xilinx_1.4-1_arm64.deb
ビルド環境
ビルドする環境には一つ注意点があります。それは、xserver-xorg-video-armsoc-xilinx は xserver-xorg-core のプラグインモジュールとしてビルドしなければなりません。そのためには、xserver-xorg-core をビルドした環境が必要になります。その際、ターゲットとなる環境(この場合は Debian10(ARM64))とビルド用の環境(例えばUbuntu(amd64)など)が違っていると、正常にビルド出来ないなどの問題が起こることがあります。
この問題を解決するには、 Ultra96/Ultra96-V2 で動く Debian 10 の上で xserver-xorg-video-armsoc を(セルフ)ビルドしてしまうのが一番手っ取り早いです。この記事では Ultra96/Ultra96-V2 で動く Debian 10 の上でビルドする手順を説明します。
元になるソースを得る
xserver-xorg-video-armsoc-xilinxは xf86-video-armsoc を元にしています。しかし、実はxf86-video-armsoc はいくつものバージョンが存在します。github でサーチしただけでも32のリポジトリがみつかります。github 以外にも Linaro.org や freedesktop.org にも git のリポジトリが存在します。まさに百花繚乱、玉石混淆です。以下にざっと見つかったリポジトリを紹介します。
- https://git.linaro.org/arm/xorg/driver/xf86-video-armsoc.git
- https://anongit.freedesktop.org/git/xorg/driver/xf86-video-armsoc.git
- https://github.com/endlessm/xf86-video-armsoc.git
- https://github.com/paolosabatino/xf86-video-armsoc.git
- https://github.com/prahal/xf86-video-armsoc.git
- https://github.com/tmarques/xf86-video-armsoc.git
上であげたリポジトリのうち、xserver-xorg-video-armsoc-xilinx では freedesktop.org が提供しているものを使います。このリポジトリを選んだ理由は、Xilinx 社が提供している PetaLinux で採用している(と思われる)からです。他のリポジトリも試してみましたが、いずれもうまくビルドできなかったり、表示出来なかったりしました。
freedesktop.org のリポジトリは github ではないので fork できません。そこで以下の手順でローカルリポジトリを作ります。
shell$ mkdir xserver-xorg-video-armsoc-xilinx
shell$ cd xserver-xorg-video-armsoc-xilinx
shell$ git init
shell$ git remote add freedesktop https://anongit.freedesktop.org/git/xorg/driver/xf86-video-armsoc.git
shell$ git fetch freedesktop
shell$ git merge freedesktop/master
Xilinx 用のパッチをあてる
Xilinx 社の PetaLinux では freedesktop.org が提供しているリポジトリにパッチをあててビルドしています。パッチのファイルは以下のURL にあります。
このパッチファイルをダウンロードしてリポジトリにパッチをあてます。ついでに git commit もしてしまいます。
shell$ git clone https://github.com/Xilinx/meta-xilinx/
Cloning into 'meta-xilinx'...
remote: Enumerating objects: 1209, done.
remote: Counting objects: 100% (1209/1209), done.
remote: Compressing objects: 100% (605/605), done.
remote: Total 11725 (delta 678), reused 1045 (delta 551), pack-reused 10516
Receiving objects: 100% (11725/11725), 8.88 MiB | 6.21 MiB/s, done.
Resolving deltas: 100% (6448/6448), done.
shell$
shell$ patch -p1 < meta-xilinx/meta-xilinx-bsp/recipes-graphics/xorg-driver/xf86-video-armsoc/0001-src-drmmode_xilinx-Add-the-dumb-gem-support-for-Xili.patch
patching file src/Makefile.am
patching file src/armsoc_driver.c
patching file src/drmmode_driver.h
patching file src/drmmode_xilinx/drmmode_xilinx.c
shell$
shell$ git add --update
shell$ git add src/drmmode_xilinx
shell$ git commit -m "[add] src/drmmode_xilinx"
[master 84e3cef] [add] src/drmmode_xilinx
 4 files changed, 80 insertions(+), 1 deletion(-)
 create mode 100644 src/drmmode_xilinx/drmmode_xilinx.c
Debian Package を作るためのファイルを追加する
debian ディレクトリを作って、以下のファイルを追加します。
-
debian/
- README.Debian
- README.source
- changelog
- compat
- control
- copyright
- rules
- xserver-xorg-video-armsoc-xilinx.docs
- xserver-xorg-video-armsoc-xilinx.install
ここではこれらのファイルの説明はしません。詳細はhttps://github.com/ikwzm/xf86-video-armsoc-xilinx を参照してください。
ファイルを追加したら git commit します。
shell$ git add debian/
shell$ git commit -m "[add] debian/"
[master 3961b1d] [add] debian/
 8 files changed, 68 insertions(+)
 create mode 100644 debian/README.Debian
 create mode 100644 debian/README.source
 create mode 100644 debian/changelog
 create mode 100644 debian/compat
 create mode 100644 debian/control
 create mode 100644 debian/copyright
 create mode 100755 debian/rules
 create mode 100644 debian/xserver-xorg-video-armsoc-xilinx.docs
 create mode 100644 debian/xserver-xorg-video-armsoc-xilinx.install
ビルドに必要なパッケージ
xserver-xorg-video-armsoc の Debian Package をビルドするためには以下のパッケージが必要です。 apt install でインストールしてください。
- drm-dev
- libudev-dev
- libxext-dev
- pkg-config
- x11proto-core-dev
- x11proto-fonts-dev
- x11proto-gl-dev
- x11proto-xf86dri-dev
- xutils-dev xserver-xorg-dev
- quilt
- dh-autoreconf
- debhelper
configure と Makefile を生成
最初に autogen.sh を実行して configure と Makefile を生成します。その後、make distclean を実行して autogen.sh が生成した中間ファイルを消去しておかなければなりません。
shell$ autogen.sh
	:
	中略
	:
shell$ make distclean
	:
	後略
Debian Package をビルドする
debian/rule binary を実行して xserver-xorg-video-armsoc-xilinx の Debian Package をビルドします。ビルドしたパッケージは一つ上のディレクトリに作られます。
shell$ sudo debian/rule binary
	:
	中略
	:
shell$ dpkg --info ../xserver-xorg-video-armsoc-xilinx_1.4-1_arm64.deb
 new Debian package, version 2.0.
 size 32924 bytes: control archive=856 bytes.
     540 bytes,    12 lines      control
     611 bytes,     7 lines      md5sums
 Package: xserver-xorg-video-armsoc-xilinx
 Source: xf86-video-armsoc-xilinx
 Version: 1.4-1
 Architecture: arm64
 Maintainer: ikwzm <ichiro_k@ca2.so-net.ne.jp>
 Installed-Size: 100
 Depends: libc6 (>= 2.17), libdrm2 (>= 2.4.36), libpixman-1-0, xorg-video-abi-24, xserver-xorg-core (>= 2:1.18.99.901)
 Provides: xorg-driver-video
 Section: x11
 Priority: optional
 Homepage: <https://github.com/ikwzm/xf86-video-armsoc-xilinx>
 Description: X.Org X Server -- ARM SoC display driver for rockchip, amlogic, sunxi and Xilinx(ZynqMP) DRM (mainline kernel)
インストール
Debian Packageの紹介
この節では、前章でビルドした xserver-xorg-video-armsoc-xilinx の Debian Package を ZynqMP-FPGA-Linux にインストールする手順を説明します。
なお、ビルド済みのDebian Package を以下のリポジトリに用意しています。こちらをインストールしてもかまいません。
-
https://github.com/ikwzm/ZynqMP-FPGA-Xserver
- xserver-xorg-video-armsoc-xilinx_1.4-1_arm64.deb
注意
ここでインストールする手順は、GPU(Mali-400) によるレンダリングを行わない場合です。GPU によるレンダリングを行う場合は、libMali や Mali Kernel ドライバのインストールが必要ですが、その場合、インストールする手順が複雑になります。詳細は以下の記事を参照してください。
Debian Package のインストール
まずは X Window System をインストールします。
shell$  apt install x-window-system-core
	:
	後略
次にxserver-xorg-video-armsoc-xilinx_1.4-1_arm64.deb をインストールします。
shell$ sudo dpkg -i xserver-xorg-video-armsoc-xilinx_1.4-1_arm64.deb
[sudo] password for fpga:
(Reading database ... 66644 files and directories currently installed.)
Preparing to unpack xserver-xorg-video-armsoc-xilinx_1.4-1_arm64.deb ...
Unpacking xserver-xorg-video-armsoc-xilinx (1.4-1) over (1.4-1) ...
Setting up xserver-xorg-video-armsoc-xilinx (1.4-1) ...
Processing triggers for man-db (2.8.5-2) ...
お好みのウィンドウマネージャーをインストールします。
shell$  apt install jwm
	:
	後略
xorg.conf の設定
/etc/X11/xorg.conf の Device セクションの Driver プロパティに armsocを指定する必要があります。
Section "Device"
	Identifier	"ZynqMP"
	Driver		"armsoc"
	Option		"DEBUG"	"true"
EndSection
Section "Screen"
	Identifier	"DefaultScreen"
	Device		"ZynqMP"
EndSection
起動
root でログインしてstartx で起動してみます。
shell# startx &
	:
	後略
ディスプレイに X Windows が映れば成功です。
