はじめに
livedoorのapi お天気Webサービス(Livedoor Weather Web Service / LWWS)を利用し、LINEで天気予報を受け取ります。
処理としてはタイトル通りのことしかしませんがひとつだけ練習がてらに、
スプレッドシートを読みにいき、どの都市の天気かを任意に設定できるようにします。
なお、LINE連携の設定に関しては割愛します。前回の記事を参考にしていただければ。
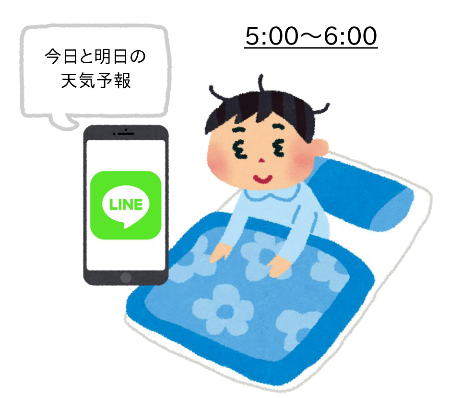
完成イメージ
 |
|---|
毎朝、今日と明日の天気予報をLINEで受け取る。
※都市はスプレッドシートで選択する。
<送る内容>
・日付
・天気
・最高気温
・最低気温
コード
ということで早速書いていきます。
天気予報の取得処理
function getMessage() {
var today = new Date();
var tomorrow = new Date();
var strToday = _formatDate(today);
tomorrow.setDate(today.getDate() + 1);
var strTomorrow = _formatDate(tomorrow);
var cityId = '130010'; // 一旦東京の天気とします。
var response = UrlFetchApp.fetch('http://weather.livedoor.com/forecast/webservice/json/v1?city=' + cityId);
var json = JSON.parse(response.getContentText());
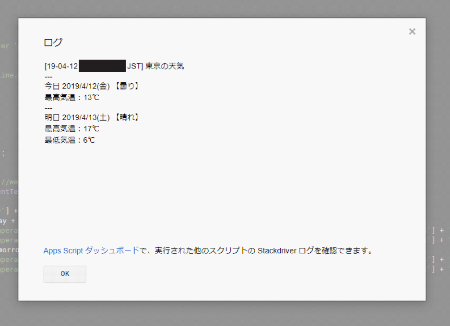
var strMessage = json['location']['city'] + 'の天気' + '\n';
strMessage +='---\n' + '今日 ' + strToday + ' 【' + json['forecasts'][0]['telop'] + '】\n';
if ( !_isNull(json['forecasts'][0]['temperature']['max']) ) strMessage += '最高気温:' + json['forecasts'][0]['temperature']['max']['celsius'] + '℃\n';
if ( !_isNull(json['forecasts'][0]['temperature']['min']) ) strMessage += '最低気温:' + json['forecasts'][0]['temperature']['min']['celsius'] + '℃\n';
strMessage += '---\n' + '明日 ' + strTomorrow + ' 【' + json['forecasts'][1]['telop'] + '】\n';
if ( !_isNull(json['forecasts'][1]['temperature']['max']) ) strMessage += '最高気温:' + json['forecasts'][1]['temperature']['max']['celsius'] + '℃\n';
if ( !_isNull(json['forecasts'][1]['temperature']['min']) ) strMessage += '最低気温:' + json['forecasts'][1]['temperature']['min']['celsius'] + '℃';
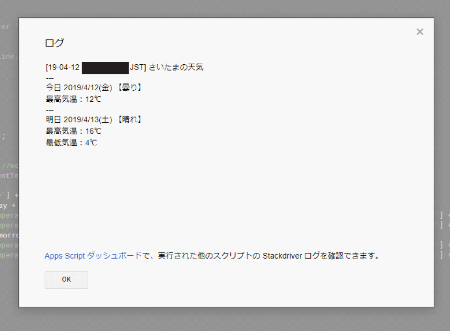
Logger.log(strMessage);
return strMessage;
}
function _formatDate(dt) {
const dow = ['日','月','火','水','木','金','土'];
return Utilities.formatDate(dt,'JST','yyyy/M/d') + '(' + dow[dt.getDay()] + ')';
}
function _isNull(prm) {
if ( prm=='' || prm===null || prm===undefined ) {
return true;
} else {
return false;
}
}
JSONのプロパティについてはこちらを参照ください。
getMessage()を実行して、ログを確認してみましょう。
 |
|---|
スプレッドシートの読み込み処理
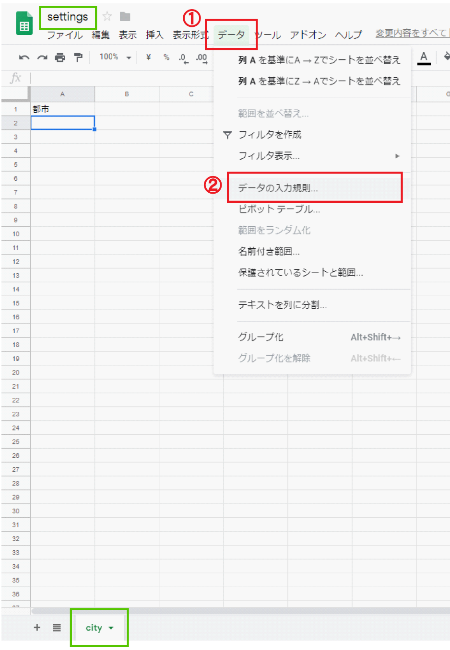
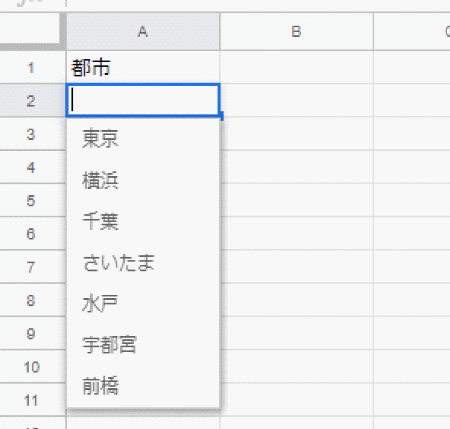
スプレッドシート(ドキュメント名:settings、シート名:city)を作成します。
出来たら ①データ > ②データの入力規則 をクリック。
 |
|---|
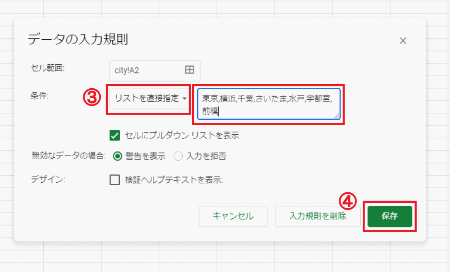
③条件 を設定 > ④保存 します。
 |
|---|
こんな感じで都市をリスト選択できるようになりました。
 |
|---|
スプレッドシートID( https://docs.google.com/spreadsheets/d/********************/edit#gid=0 の*部分)をコピーしてGASに戻り、都市のID取得処理を書いていきます。
function getCityId() {
  var cityId = '130010'; // 既定値=東京
  var ssId = '************************************';
  var ss = SpreadsheetApp.openById(ssId);
  var sheet = ss.getSheetByName('city');
  var values = sheet.getRange('A2').getValue();
  switch ( values ) {
    case '東京': cityId = '130010'; break;
    case '横浜': cityId = '140010'; break;
    case '千葉': cityId = '120010'; break;
    case 'さいたま': cityId = '110010'; break;
    case '水戸': cityId = '080010'; break;
    case '宇都宮': cityId = '090010'; break;
    case '前橋': cityId = '100010'; break;
  }
  return cityId;
}
getMessage()に戻り、ここ var cityId = '130010'; // 一旦東京の天気とします。 を変えます。
var cityId = getCityId();
スプレッドシートの都市リストを東京以外にして、getMessage()を実行してみましょう。
 |
|---|
あとはメイン処理を書いていきます。
メイン処理
前回とほぼ同じですね。
function sendWeather() {
  var accessToken = PropertiesService.getScriptProperties().getProperty('LINE_TOKEN');
  var message = getMessage();
  var options =
   {
     'method'  : 'post'
    ,'payload' : 'message=' + message
    ,'headers' : {'Authorization' : 'Bearer '+ accessToken}
    ,muteHttpExceptions:true
   };
  UrlFetchApp.fetch('https://notify-api.line.me/api/notify',options);
}
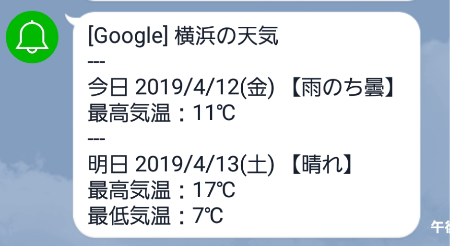
一通り書けたのでsendWeather()を実行してみましょう。
 |
|---|
以上でコーディングが完了です。
自動送信の設定
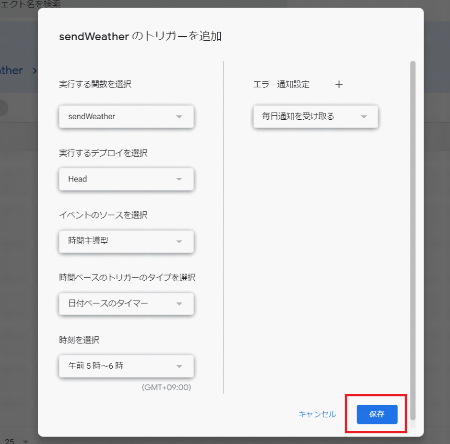
編集 > 現在のプロジェクトのトリガー > トリガーを追加
実行する関数:sendWeather
イベントのソース:時間主導型
時間ベースのトリガーのタイプ:日付ベースのタイマー
時刻:午前5時~午前6時
とし、「保存」をクリックします。
 |
|---|
以上で自動送信の設定が完了です。
まとめ
コード
function sendWeather() {
  var accessToken = PropertiesService.getScriptProperties().getProperty('LINE_TOKEN');
  var message = getMessage();
  var options =
   {
     'method'  : 'post'
    ,'payload' : 'message=' + message
    ,'headers' : {'Authorization' : 'Bearer '+ accessToken}
    ,muteHttpExceptions:true
   };
  UrlFetchApp.fetch('https://notify-api.line.me/api/notify',options);
}

function getMessage() {
  var today = new Date();
  var tomorrow = new Date();
  var strToday = _formatDate(today);
  tomorrow.setDate(today.getDate() + 1);
  var strTomorrow = _formatDate(tomorrow);
  var cityId = getCityId();

  var response = UrlFetchApp.fetch('http://weather.livedoor.com/forecast/webservice/json/v1?city=' + cityId);
  var json = JSON.parse(response.getContentText());

  var strMessage = json['location']['city'] + 'の天気' + '\n';
  strMessage +='---\n' + '今日 ' + strToday + ' 【' + json['forecasts'][0]['telop'] + '】\n';
  if ( !_isNull(json['forecasts'][0]['temperature']['max']) ) strMessage += '最高気温:' + json['forecasts'][0]['temperature']['max']['celsius'] + '℃\n';
  if ( !_isNull(json['forecasts'][0]['temperature']['min']) ) strMessage += '最低気温:' + json['forecasts'][0]['temperature']['min']['celsius'] + '℃\n';
  strMessage += '---\n' + '明日 ' + strTomorrow + ' 【' + json['forecasts'][1]['telop'] + '】\n';
  if ( !_isNull(json['forecasts'][1]['temperature']['max']) ) strMessage += '最高気温:' + json['forecasts'][1]['temperature']['max']['celsius'] + '℃\n';
  if ( !_isNull(json['forecasts'][1]['temperature']['min']) ) strMessage += '最低気温:' + json['forecasts'][1]['temperature']['min']['celsius'] + '℃';

  return strMessage;
}

function getCityId() {
  var cityId = '130010'; // 既定値=東京
  var ssId = '******************************';
  var ss = SpreadsheetApp.openById(ssId);
  var sheet = ss.getSheetByName('city');
  var values = sheet.getRange('A2').getValues();
  switch (values[0][0]) {
    case '東京': cityId = '130010'; break;
    case '横浜': cityId = '140010'; break;
    case '千葉': cityId = '120010'; break;
    case 'さいたま': cityId = '110010'; break;
    case '水戸': cityId = '080010'; break;
    case '宇都宮': cityId = '090010'; break;
    case '前橋': cityId = '100010'; break;
  }
  return cityId;
}

function _formatDate(dt) {
  const dow = ['日','月','火','水','木','金','土'];
  return Utilities.formatDate(dt,'JST','yyyy/M/d') + '(' + dow[dt.getDay()] + ')';
}

function _isNull(prm) {
  if ( prm=='' || prm===null || prm===undefined ) {
    return true;
  } else {
    return false;
  }
}
本当に色々できますね。
とはいっても正直毎日チェックするのがメールとLINEくらいなので、あまりぱっとこれほしいというのが無いんですが……。
今回はlivedoorのAPIを使いましたが、降水確率もほしいので気が向いたら別バージョンもつくろうかと思います。
Twitterでごにょごにょと翻訳も楽しそうなのでいつかやりたい。
次はFusion Tablesの記事を書こうかと思っていたのですが廃止になるんですね……結構ショックです。
参考サイト
【GAS】JSON形式のデータを取り出してチャットワークに天気予報を送る
【Google Apps Script入門】セルの取得・変更をする _ UX MILK
ありがとうございました。