今回は、プロジェクトにGoogleMap APIを導入し、マップをフラグメント上に実装する手順をまとめていきます。Activityに実装するコードはいくつもあったのですが、Fragmentに実装するコードがあまり見当たらなかったので是非参考にしていただけたらと思います。
完成図

Google Maps APIキーの取得
プロジェクト作成時にGoogle Maps Activityを選択しプロジェクトを作成します。そうするとgoogle_maps_api.xmlが作成されると思います。
<resources>
    <!--
    TODO: Before you run your application, you need a Google Maps API key.

    To get one, follow this link, follow the directions and press "Create" at the end:

    https://console.developers.google.com/flows/enableapi?apiid=maps_android_backend&keyType=CLIENT_SIDE_ANDROID&r=5F:28:A4:CD:C1:9D:A8:5A:98:1F:29:B2:4A:7A:96:0F:43:D6:3E:96%3Bcom.google.codelab.usemap

    You can also add your credentials to an existing key, using these values:

    Package name:
    com.google.codelab.usemap

    SHA-1 certificate fingerprint:
    5F:28:A4:CD:C1:9D:A8:5A:98:1F:29:B2:4A:7A:96:0F:43:D6:3E:96

    Alternatively, follow the directions here:
    https://developers.google.com/maps/documentation/android/start#get-key

    Once you have your key (it starts with "AIza"), replace the "google_maps_key"
    string in this file.
    -->
    <string name="google_maps_key" templateMergeStrategy="preserve" translatable="false">YOUR_KEY_HERE</string>
</resources>
https://console.developers.google.com/flows/enableapi?apiid=maps_android_backend&keyType=CLIENT_SIDE_ANDROID&r=5F:28:A4:CD:C1:9D:A8:5A:98:1F:29:B2:4A:7A:96:0F:43:D6:3E:96%3Bcom.google.codelab.usemap
にアクセスしてAPIキーを取得します。(Googleアカウント必須です)
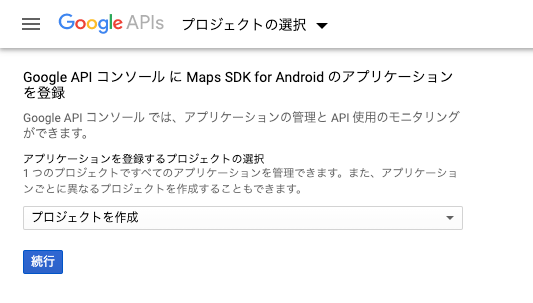
ここで今回作成するプロジェクトを追加します。

その後、左のメニューから認証情報を選択し、認証情報を作成します。以上でキーが作成されるので、作成したキーを先ほど作成したgoogle_maps_api.xmlのYOUR_KEY_HEREに貼り付けます。
ライブラリの導入
キーの作成と設定が完了したら、ライブラリを導入します。
gradleの
implementation 'com.google.android.gms:play-services-maps:17.0.0'
をdependenciesに追加します。
マップの設定
- Activityの作成
フラグメントを呼び出すActivityを作成します。
class MainActivity : AppCompatActivity() {
    override fun onCreate(savedInstanceState: Bundle?) {
        super.onCreate(savedInstanceState)
        setContentView(R.layout.activity_main)

        supportFragmentManager
            .beginTransaction()
            .replace(R.id.activity_main, MapFragment())
            .commit()
    }
}
2.Fragmentの作成
class MapFragment : Fragment(), OnMapReadyCallback {
    private lateinit var mMap: GoogleMap

    override fun onCreate(savedInstanceState: Bundle?) {
        super.onCreate(savedInstanceState)
        requireActivity().setTitle(R.string.map_list)
    }

    override fun onCreateView(
        inflater: LayoutInflater, container: ViewGroup?,
        savedInstanceState: Bundle?
    ): View? {
        return inflater.inflate(R.layout.fragment_map, container, false)
    }

    override fun onViewCreated(view: View, savedInstanceState: Bundle?) {
        val mapFragment =
            childFragmentManager.findFragmentById(R.id.fragment_map) as SupportMapFragment
        mapFragment.getMapAsync(this)
    }

    override fun onMapReady(googleMap: GoogleMap) {
        mMap = googleMap
    }
}
<?xml version="1.0" encoding="utf-8"?>
<FrameLayout xmlns:android="http://schemas.android.com/apk/res/android"
    xmlns:tools="http://schemas.android.com/tools"
    android:layout_width="match_parent"
    android:layout_height="match_parent"
    tools:context=".fragment.MapFragment">

    <androidx.fragment.app.FragmentContainerView xmlns:map="http://schemas.android.com/apk/res-auto"
        android:id="@+id/fragment_map"
        android:name="com.google.android.gms.maps.SupportMapFragment"
        android:layout_width="match_parent"
        android:layout_height="match_parent"
        tools:context=".fragment.MapFragment"
        map:cameraZoom="15.0"
        map:layout_constraintTop_toTopOf="parent"
        map:layout_constraintBottom_toBottomOf="parent"
        map:layout_constraintEnd_toEndOf="parent"
        map:layout_constraintEnd_toStartOf="parent"/>

</FrameLayout>
基本的な実装はActivityと変わらないです。
Activityでの実装時との違いとしては、FragmentではonViewCreated()を用意し、その中でmapのFragmentを呼び出してあげる必要があります。onCreateView()で呼び出すFragmentのViewを描画してから、Fragment内に設定されているmapのFragment("@+id/fragment_map")を生成する必要があります。
参考記事
https://qiita.com/unpi/items/07592c2643d655ec51a2
https://teratail.com/questions/265715
位置情報の取得までまとめようかと思いましたが、長くなりそうなのでやめます。。。