はじめに
最近Flutterを勉強しているのですが、UIを作る際に画面上の色を取得したいときがままあります。
そんなとき、手軽に色情報を取得できるソフトがほしくて作りました。
もしほしい方がいらっしゃいましたら本記事下部からダウンロードできますのでぜひ。
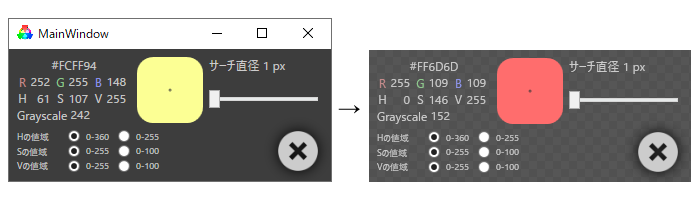
以下どんなアプリかのイメージ
Qiita埋込み用動画
— いか (@ika_kk) August 10, 2022
C#で余計な機能ゼロのカラーピッカーつくりました pic.twitter.com/joM0DQqq9P
経緯
色々な方法で色取得を試していたのですが、なかなか自分に合うものが見つからず……。
-
スクショ+Photoshop
最初これでやってたけどあまりにもめんどくさい -
ペイント3D
やりたいことはできるけどやっぱり予備動作が多い -
Just Color Picker
優秀なソフト。機能としてはこれ以上ないんじゃないでしょうか。
ただウインドウサイズがやや大きく、たまに邪魔に思うことがあるのが玉に瑕でした。
他にも色々ありそうでしたが、勉強がてら自作してみることにしました。
このアプリの特徴
非常にシンプルです。
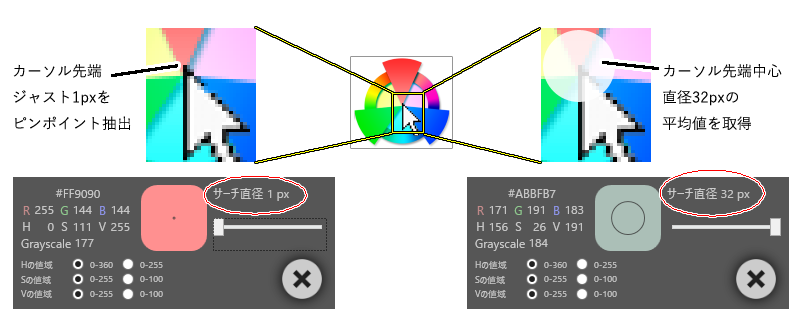
①抽出サイズを指定できる
今回の目玉機能です。
ピンポイント画素の色を抽出すると、ノイズの影響でわりとばらついてしまうので、抽出範囲を指定できるようにしました。
つまり抽出範囲を大きくすると、範囲内の平均色の情報を取得するようにしています。
これにより、ノイズの影響をある程度キャンセルできます。
ただしモニタの領域外は黒色(#000000)となっているようで、抽出サイズが大きい状態でディスプレイ端付近を抽出すると少し暗い色になったりします。そのときは抽出サイズを絞って対策してください。
②カラーコード/RGB/HSB/グレースケール値を取得できる
よく使うであろうカラーコード(#RRGGBB)とRGB値のほか、HSV値とグレースケール変換したときのグレー値を取得します。
HSVに関しては使うシーンによってほしい値域が異なるので、指定できるようにしています。
Hは0~360もしくは0~255、SとVは0~255もしくは0~100。
使うシーンに合わせてラジオボタンで指定します。
グレースケール値は自分がよく使う標準テレビジョン放送規格にのっとり、0.3R+0.59G+0.11Bとしています。
③その他特徴
いつでも色情報が見られたら便利かなと思い、常時画面最前面に表示するようにしました。
あと、見た目かっこよくしたくてタイトルバーを消してみました。
位置は適当な位置をドラッグして調整できます。
(WPF) オシャレな半透明ウィンドウを実装してみる - まめ - たんたんめん
技術的な話
画面上の画素値取得方法
今回のアプリのキモとなる部分です。下記のように画素抽出を実装しました。
8~11行目 graphic.CopyFromScreen(...) にてスクリーンの任意の位置・サイズ抽出を実施しています。
- 引数1:抽出範囲の左上の座標。現在のカーソル位置から直径/2=半径だけ引いた箇所を指定。
- 引数2:bitmapへ書き込むときの開始座標。bitmapの左上=(0,0)を指定。
- 引数3:抽出範囲のサイズ。直径を指定。
// サーチ直径
int _diam;

while (true)
{
    // 現在のカーソル位置周辺の画像取得
    var bitmap = new Bitmap(_diam, _diam);
    var currentPos = System.Windows.Forms.Cursor.Position;
    using (var graphic = Graphics.FromImage(bitmap))
    {
        graphic.CopyFromScreen(
            new System.Drawing.Point(currentPos.X - _diam / 2, currentPos.Y - _diam / 2),
            new System.Drawing.Point(0, 0),
            new System.Drawing.Size(_diam, _diam));
    }
    // 変数bitmapには、現在のカーソル周辺をキャプチャした画像が入ります。
    // 以降その画像をよしなにして平均値を取得し、画面に表示しています。
}
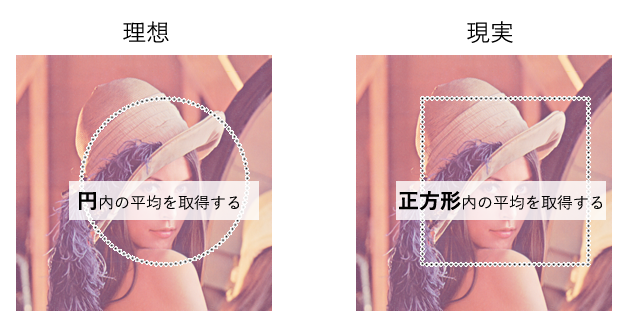
お気づきの方もいると思いますので白状します。
さも円の内側の平均値を取っているように謳っていましたが、実際は正方形の内側の平均値を取っています。
円内判定がめんどくさかった 優しい嘘ってやつですね。
おそらく円でも正方形でも結果はたいして変わらないので許してください。
抽出サイズと処理時間について
抽出サイズを大きくすると平均値を取得するのに時間がかかるんじゃないかと思い計測してみました。
- 実験環境
- Windows10, Core i7-6700(x64), RAM16GB, GeForceGTX960, 60fpsのモニタ
- 実験条件
- 抽出範囲の水準を振りつつ1,000回計測する。
- その平均値から色々考察してみる。
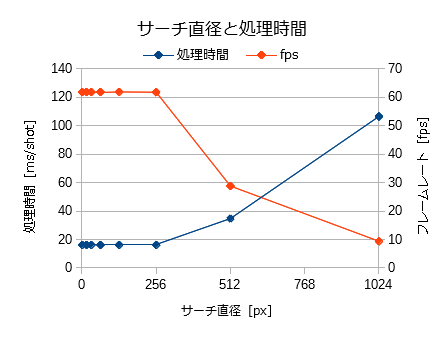
サーチ直径$N$に対して処理時間は$O(N^2)$で増大すると予測していましたが、直径256pxまでは60fpsをキープしてくれています。
512px以上になると二次関数的に増大していきますが、実際こんなに大きい半径で使わないので問題ないでしょう。
(今回は上限32pxで実装しているのでなおさら)
CPU使用率とメモリについてはデバッグモニタで確認しました。
CPU使用率は目に見える変化なし、メモリは32pxの場合で最大100MB程度でした。
コード全容
GitHubに上げていますが一応。
- 言語 C# / .NET Framework 4.8
- エディタ Visual Studio Community 2017 Version 15.7.4
- 特別なライブラリは使わず基本ネイティブで書いてます
コードビハインド
using System;
using System.Collections.Generic;
using System.Linq;
using System.Text;
using System.Threading.Tasks;
using System.Windows;
using System.Windows.Controls;
using System.Windows.Data;
using System.Windows.Documents;
using System.Windows.Input;
using System.Windows.Media;
using System.Windows.Media.Imaging;
using System.Windows.Navigation;
using System.Windows.Shapes;

using System.Drawing;
using System.Drawing.Imaging;
using System.Diagnostics;
using System.Runtime.InteropServices;

namespace ColorPickerPj
{
    /// <summary>
    /// MainWindow.xaml の相互作用ロジック
    /// </summary>
    public partial class MainWindow : Window
    {
        /// <summary>サーチ半径を保持する変数</summary>
        private int _diam = 1;

        /// <summary>
        /// コンストラクタ。
        /// プログラム実行と同時に色取得処理を開始する。
        /// </summary>
        public MainWindow()
        {
            InitializeComponent();

            // ウインドウ半透明にしたときにドラッグできるようにする
            // 以下参考URL
            // https://p4j4.hatenablog.com/entry/2018/03/31/170251
            MouseLeftButtonDown += (_,__) => { DragMove(); };

            // メインループ
            var task = new Task(MainLoop);
            task.Start();
        }

        /// <summary>
        /// プログラム実行中まわりつづけるループ。
        /// 常に現在のカーソル周辺の画素値を分析しつづける。
        /// タスクとして使用。
        /// </summary>
        private void MainLoop()
        {
            while (true)
            {
                // 現在のカーソル位置周辺の画像取得
                var bitmap = new Bitmap(_diam, _diam);
                var currentPos = System.Windows.Forms.Cursor.Position;
                using (var graphic = Graphics.FromImage(bitmap))
                {
                    graphic.CopyFromScreen(
                        new System.Drawing.Point(currentPos.X - _diam / 2, currentPos.Y - _diam / 2),
                        new System.Drawing.Point(0, 0),
                        new System.Drawing.Size(_diam, _diam));
                }
                // デバッグ用
                //bitmap.Save("temp.bmp");

                // 画素値(RGB)取得
                byte r, g, b;
                GetMeanValueFromBitmap(bitmap, out r, out g, out b);

                // HSVへ変換
                double h, s, v;
                RgbToHsv(r, g, b, out h, out s, out v);

                // グレースケール値
                byte gray = (byte)(0.30 * r + 0.59 * g + 0.11 * b);

                // 表示更新
                // 実際にはHSVも同時に計算して表示する
                var msg = new Action<byte, byte, byte, double, double, double, byte>(UpdateValue);
                Dispatcher.Invoke(msg, r, g, b, h, s, v, gray);

            }
        }

        /// <summary>
        /// 画像の各チャンネルの平均画素値を取得する。
        /// 下記参考URL
        /// https://www.84kure.com/blog/2014/07/13/c-%E3%83%93%E3%83%83%E3%83%88%E3%83%9E%E3%83%83%E3%83%97%E3%81%AB%E3%83%94%E3%82%AF%E3%82%BB%E3%83%AB%E5%8D%98%E4%BD%8D%E3%81%A7%E9%AB%98%E9%80%9F%E3%81%AB%E3%82%A2%E3%82%AF%E3%82%BB%E3%82%B9/
        /// </summary>
        /// <param name="bitmap">入力画像。デフォルトは32bitARGBのはず。</param>
        /// <param name="r">Rチャンネルの平均画素値</param>
        /// <param name="g">Gチャンネルの平均画素値</param>
        /// <param name="b">Bチャンネルの平均画素値</param>
        private void GetMeanValueFromBitmap(Bitmap bitmap, out byte r, out byte g, out byte b)
        {
            BitmapData data = bitmap.LockBits(
                new System.Drawing.Rectangle(0, 0, bitmap.Width, bitmap.Height),
                ImageLockMode.ReadWrite,
                System.Drawing.Imaging.PixelFormat.Format32bppArgb);

            // リストに画素値を格納していく。byte型だと平均が出せないのでdouble型でやる。
            var rValues = new List<double>();
            var gValues = new List<double>();
            var bValues = new List<double>();
            int bytes = bitmap.Width * bitmap.Height * 4;
            for (int i = 0; i < bytes; i += 4)
            {
                bValues.Add(Marshal.ReadByte(data.Scan0, i));
                gValues.Add(Marshal.ReadByte(data.Scan0, i + 1));
                rValues.Add(Marshal.ReadByte(data.Scan0, i + 2));
            }
            bitmap.UnlockBits(data);

            // なんかの拍子に格納されてなかったら怖いので一応条件分岐
            if (rValues.Count > 0 && gValues.Count > 0 && bValues.Count > 0)
            {
                r = (byte)rValues.Average();
                g = (byte)gValues.Average();
                b = (byte)bValues.Average();
            }
            else
            {
                r = g = b = 0;
            }
        }

        /// <summary>
        /// RGBをHSVに変換する。
        /// Hは0~360、sとvは0~255で取得する。
        /// </summary>
        /// <param name="r">R値</param>
        /// <param name="g">G値</param>
        /// <param name="b">B値</param>
        /// <param name="h">H値。0~360</param>
        /// <param name="s">S値。0~255</param>
        /// <param name="v">V値。0~255</param>
        private void RgbToHsv(byte r, byte g, byte b, out double h, out double s, out double v)
        {
            double max = Math.Max(r, Math.Max(g, b));
            double min = Math.Min(r, Math.Min(g, b));

            // 色相
            if (r == g && g == b)
            {
                h = 0;
            }
            else if (r >= g && r >= b)
            {
                h = 60.0 * ((double)(g - b) / (max - min));
            }
            else if (g >= r && g >= b)
            {
                h = 60.0 * ((double)(b - r) / (max - min)) + 120;
            }
            else
            {
                h = 60.0 * ((double)(r - g) / (max - min)) + 240;
            }
            if (h < 0)
            {
                h += 360;
            }

            // 彩度
            if (max == 0)
            {
                s = 0;
            }
            else
            {
                s = (max - min) / max;
                s *= 255;
            }

            // 明度
            v = max;
        }

        /// <summary>
        /// RGB値とHSV値をもとに画面表示を更新する。
        /// HSVに関しては画面の設定をもとに値域を変換する。
        /// </summary>
        /// <param name="r">R値</param>
        /// <param name="g">G値</param>
        /// <param name="b">B値</param>
        /// <param name="h">H値。0~360</param>
        /// <param name="s">S値。0~255</param>
        /// <param name="v">V値。0~255</param>
        /// <param name="gray">グレースケール値</param>
        private void UpdateValue(byte r, byte g, byte b, double h, double s, double v, byte gray)
        {
            // サーチ直径の表示色を見えやすい色に設定
            brushEllipse.Stroke = v < 128 ?
                new SolidColorBrush(System.Windows.Media.Color.FromArgb(200, 200, 200, 200)):   // 背景が暗い場合は白線
                new SolidColorBrush(System.Windows.Media.Color.FromArgb(200,  55,  55,  55));   // 背景が明るい場合は黒線

            // hsvの値域を調整
            if (h255RadioButton.IsChecked == true) h = (byte)(h * 255.0 / 360.0);
            if (s100RadioButton.IsChecked == true) s = (byte)(s * 100.0 / 255.0);
            if (v100RadioButton.IsChecked == true) v = (byte)(v * 100.0 / 255.0);

            // 値更新
            string code = $"#{r.ToString("X2")}{g.ToString("X2")}{b.ToString("X2")}";
            colorCodeTextBox.Text = code;
            rTextBox.Text = r.ToString();
            gTextBox.Text = g.ToString();
            bTextBox.Text = b.ToString();
            hTextBox.Text = ((int)h).ToString();
            sTextBox.Text = ((int)s).ToString();
            vTextBox.Text = ((int)v).ToString();
            grayTextBox.Text = gray.ToString();
            colorRectangle.Fill = new System.Windows.Media.SolidColorBrush(System.Windows.Media.Color.FromRgb(r, g, b));
        }


        /// <summary>
        /// マウスホイールでスライダーを制御するイベント。
        /// </summary>
        /// <param name="sender"></param>
        /// <param name="e"></param>
        private void diamSlider_MouseWheel(object sender, MouseWheelEventArgs e)
        {
            if (e.Delta > 0)
            {
                diamSlider.Value++;
            }
            else if (e.Delta < 0)
            {
                diamSlider.Value--;
            }
        }

        /// <summary>
        /// スライダーの値をもとにサーチ半径表示を更新
        /// </summary>
        /// <param name="sender"></param>
        /// <param name="e"></param>
        private void diamSlider_ValueChanged(object sender, RoutedPropertyChangedEventArgs<double> e)
        {
            _diam = (int)diamSlider.Value;
            diamTextBlock.Text = $"{_diam} px";
            brushEllipse.Width = brushEllipse.Height = _diam + 2;
        }

        /// <summary>
        /// 終了イベント
        /// </summary>
        /// <param name="sender"></param>
        /// <param name="e"></param>
        private void closeButton_Click(object sender, RoutedEventArgs e)
        {
            Close();
        }

    }
}
UI(XAML)
<Window x:Class="ColorPickerPj.MainWindow"
        xmlns:system="clr-namespace:System;assembly=mscorlib"
        xmlns="http://schemas.microsoft.com/winfx/2006/xaml/presentation"
        xmlns:x="http://schemas.microsoft.com/winfx/2006/xaml"
        xmlns:d="http://schemas.microsoft.com/expression/blend/2008"
        xmlns:mc="http://schemas.openxmlformats.org/markup-compatibility/2006"
        xmlns:local="clr-namespace:ColorPickerPj"
        mc:Ignorable="d"
        Title="MainWindow" Height="165.201" Width="363.467" Topmost="True" SizeToContent="WidthAndHeight" Background="#E6444444"
        x:Name="mainWindow" WindowStyle="None" AllowsTransparency="True">


    <Window.Resources>

        <Style TargetType="TextBlock" x:Key="normalTextBlock">
            <Setter Property="Foreground" Value="#FFCCCCCC"/>
        </Style>

        <Style TargetType="TextBlock" x:Key="valueTextBlock">
            <Setter Property="Foreground" Value="#FFCCCCCC"/>
            <Setter Property="HorizontalAlignment" Value="Right"/>
            <Setter Property="Margin" Value="0,0,5,0"/>
        </Style>

        <Style TargetType="RadioButton">
            <Setter Property="Foreground" Value="#FFCCCCCC"/>
            <Setter Property="FontSize" Value="9"/>
            <Setter Property="VerticalAlignment" Value="Center"/>
            <Setter Property="VerticalContentAlignment" Value="Center"/>
        </Style>

        <!-- 通常時のボタンの色 -->
        <SolidColorBrush x:Key="NormalButtonBrush" Color="Transparent"/>
        <!-- 通常時のボタンの背景色 -->
        <SolidColorBrush x:Key="NormalBackgroundBrush" Color="Transparent"/>
        <!-- マウスオーバー時のボタンの色 -->
        <SolidColorBrush x:Key="HoverButtonBrush" Color="Transparent"/>
        <!-- マウスオーバー時のボタンの背景色 -->
        <SolidColorBrush x:Key="HoverBackgroundBrush" Color="Transparent"/>
        <!-- カスタムボタンのスタイル -->
        <Style x:Key="HoverButtonStyle" TargetType="{x:Type Button}">
            <Setter Property="Foreground" Value="{StaticResource NormalButtonBrush}"/>
            <Setter Property="Template">
                <Setter.Value>
                    <ControlTemplate TargetType="{x:Type Button}">
                        <Border Name="HoverButtonBorder" BorderThickness="2" BorderBrush="{StaticResource NormalButtonBrush}" Background="{StaticResource NormalBackgroundBrush}">
                            <ContentPresenter HorizontalAlignment="Center" VerticalAlignment="Center"/>
                        </Border>
                        <ControlTemplate.Triggers>
                            <!-- マウスオーバー -->
                            <Trigger Property="IsMouseOver" Value="True">
                                <Setter TargetName="HoverButtonBorder" Property="BorderBrush" Value="{StaticResource HoverButtonBrush}" />
                                <Setter TargetName="HoverButtonBorder" Property="Background" Value="{StaticResource HoverBackgroundBrush}" />
                                <Setter Property="Foreground" Value="{StaticResource HoverButtonBrush}"/>
                            </Trigger>
                            <!-- ボタンを押した時に、背景色を透過 -->
                            <Trigger Property="IsPressed" Value="True">
                                <Setter TargetName="HoverButtonBorder" Property="Background" Value="{StaticResource NormalBackgroundBrush}" />
                            </Trigger>
                        </ControlTemplate.Triggers>
                    </ControlTemplate>
                </Setter.Value>
            </Setter>
        </Style>


    </Window.Resources>

    <Grid Margin="5">

        <Grid>
            <Grid.RowDefinitions>
                <RowDefinition Height="72"/>
                <RowDefinition Height="50"/>
            </Grid.RowDefinitions>

            <!-- 中段 -->
            <Grid Grid.Row="0">
                <Grid.ColumnDefinitions>
                    <ColumnDefinition Width="120px"/>
                    <ColumnDefinition Width="72px"/>
                    <ColumnDefinition Width="120px"/>
                </Grid.ColumnDefinitions>

                <!-- 色情報表示部(文字) -->
                <Grid Grid.Column="0" Margin="3">
                    <Grid.RowDefinitions>
                        <RowDefinition/>
                        <RowDefinition/>
                        <RowDefinition/>
                        <RowDefinition/>
                    </Grid.RowDefinitions>
                    <Grid.ColumnDefinitions>
                        <ColumnDefinition Width="1*"/>
                        <ColumnDefinition Width="2.5*"/>
                        <ColumnDefinition Width="1*"/>
                        <ColumnDefinition Width="2.5*"/>
                        <ColumnDefinition Width="1*"/>
                        <ColumnDefinition Width="2.5*"/>
                    </Grid.ColumnDefinitions>

                    <TextBlock Style="{StaticResource normalTextBlock}" x:Name="colorCodeTextBox" Grid.Row="0" Grid.Column="0" Grid.ColumnSpan="6" Text="#xxxxxx" TextAlignment="Center"/>
                    <TextBlock Style="{StaticResource normalTextBlock}" Grid.Row="1" Grid.Column="0" Text="R" VerticalAlignment="Center" HorizontalAlignment="Center" Foreground="#FFCC8F8F"/>
                    <TextBlock Style="{StaticResource normalTextBlock}" Grid.Row="1" Grid.Column="2" Text="G" VerticalAlignment="Center" HorizontalAlignment="Center" Foreground="#FF90CC8F"/>
                    <TextBlock Style="{StaticResource normalTextBlock}" Grid.Row="1" Grid.Column="4" Text="B" VerticalAlignment="Center" HorizontalAlignment="Center" Foreground="#FF8F96EE"/>
                    <TextBlock Style="{StaticResource valueTextBlock}" x:Name="rTextBox" Grid.Row="1" Grid.Column="1"/>
                    <TextBlock Style="{StaticResource valueTextBlock}" x:Name="gTextBox" Grid.Row="1" Grid.Column="3"/>
                    <TextBlock Style="{StaticResource valueTextBlock}" x:Name="bTextBox" Grid.Row="1" Grid.Column="5"/>
                    <TextBlock Style="{StaticResource normalTextBlock}" Grid.Row="2" Grid.Column="0" Text="H" VerticalAlignment="Center" HorizontalAlignment="Center"/>
                    <TextBlock Style="{StaticResource normalTextBlock}" Grid.Row="2" Grid.Column="2" Text="S" VerticalAlignment="Center" HorizontalAlignment="Center"/>
                    <TextBlock Style="{StaticResource normalTextBlock}" Grid.Row="2" Grid.Column="4" Text="V" VerticalAlignment="Center" HorizontalAlignment="Center"/>
                    <TextBlock Style="{StaticResource valueTextBlock}" x:Name="hTextBox" Grid.Row="2" Grid.Column="1"/>
                    <TextBlock Style="{StaticResource valueTextBlock}" x:Name="sTextBox" Grid.Row="2" Grid.Column="3"/>
                    <TextBlock Style="{StaticResource valueTextBlock}" x:Name="vTextBox" Grid.Row="2" Grid.Column="5"/>

                    <StackPanel Grid.Row="3" Grid.Column="0" Grid.ColumnSpan="6" Orientation="Horizontal">
                        <TextBlock Style="{StaticResource normalTextBlock}" Text="Grayscale " VerticalAlignment="Center"/>
                        <TextBlock Style="{StaticResource valueTextBlock}" x:Name="grayTextBox"/>
                    </StackPanel>

                </Grid>

                <!-- 色情報表示部(色) -->
                <Grid Grid.Column="1" Margin="3">
                    <Rectangle x:Name="colorRectangle" Fill="#FF123456" RadiusX="16" RadiusY="16"/>
                    <Ellipse x:Name="brushEllipse" Stroke="Black"/>
                </Grid>

                <!-- サーチ直径調整部 -->
                <Grid Grid.Column="2" Margin="3">
                    <Grid.RowDefinitions>
                        <RowDefinition/>
                        <RowDefinition/>
                    </Grid.RowDefinitions>
                    <StackPanel Orientation="Horizontal" Grid.Row="0">
                        <TextBlock Style="{StaticResource normalTextBlock}" Text="サーチ直径 "/>
                        <TextBlock Style="{StaticResource normalTextBlock}" x:Name="diamTextBlock" Text="diam px"/>
                    </StackPanel>
                    <Slider x:Name="diamSlider" Grid.Row="2" Minimum="1" Maximum="32"
                    IsSnapToTickEnabled="True" TickFrequency="1" LargeChange="8"
                        ValueChanged="diamSlider_ValueChanged" MouseWheel="diamSlider_MouseWheel" Value="1"/>

                </Grid>
            </Grid>

            <!-- 下段 -->
            <Grid Grid.Row="1" Margin="3" Width="150" HorizontalAlignment="Left">
                <Grid.RowDefinitions>
                    <RowDefinition/>
                    <RowDefinition/>
                    <RowDefinition/>
                </Grid.RowDefinitions>
                <Grid.ColumnDefinitions>
                    <ColumnDefinition/>
                    <ColumnDefinition/>
                    <ColumnDefinition/>
                </Grid.ColumnDefinitions>

                <TextBlock Grid.Row="0" Grid.Column="0" Text="Hの値域" Style="{StaticResource normalTextBlock}" FontSize="9" VerticalAlignment="Center"/>
                <TextBlock Grid.Row="1" Grid.Column="0" Text="Sの値域" Style="{StaticResource normalTextBlock}" FontSize="9" VerticalAlignment="Center"/>
                <TextBlock Grid.Row="2" Grid.Column="0" Text="Vの値域" Style="{StaticResource normalTextBlock}" FontSize="9" VerticalAlignment="Center"/>

                <RadioButton x:Name="h360RadioButton" Grid.Row="0" Grid.Column="1" Content="0-360" GroupName="groupH" IsChecked="True"/>
                <RadioButton x:Name="h255RadioButton" Grid.Row="0" Grid.Column="2" Content="0-255" GroupName="groupH"/>

                <RadioButton x:Name="s255RadioButton" Grid.Row="1" Grid.Column="1" Content="0-255" GroupName="groupS" IsChecked="True"/>
                <RadioButton x:Name="s100RadioButton" Grid.Row="1" Grid.Column="2" Content="0-100" GroupName="groupS"/>

                <RadioButton x:Name="v255RadioButton" Grid.Row="2" Grid.Column="1" Content="0-255" GroupName="groupV" IsChecked="True"/>
                <RadioButton x:Name="v100RadioButton" Grid.Row="2" Grid.Column="2" Content="0-100" GroupName="groupV"/>


            </Grid>

            <!-- 終了ボタン -->
            <!-- マウスオーバー時透明 参考 http://gootara.org/library/2016/07/wpf-hvr.html -->
            <Button x:Name="closeButton" Grid.Row="2" HorizontalAlignment="Right" Width="50" Margin="3" Cursor="Hand"
                    Click="closeButton_Click" Style="{StaticResource HoverButtonStyle}">
                <Image Source="Resource/close_icon.png" RenderOptions.BitmapScalingMode="HighQuality">
                    <Image.Effect>
                        <DropShadowEffect BlurRadius="20" RenderingBias="Quality" ShadowDepth="0"/>
                    </Image.Effect>
                </Image>
                <ToolTipService.ToolTip>
                    <ToolTip Content="カラーピッカーを終了します"/>
                </ToolTipService.ToolTip>
            </Button>

        </Grid>
    </Grid>

</Window>
ダウンロード
GitHubにソースとexe(ソフト本体)をアップしました。
- GitHub https://github.com/ika-kk/ColorPickerPj
- exeダウンロードリンク https://github.com/ika-kk/ColorPickerPj/raw/master/ColorPickerPj/bin/Release/ColorPickerPj.exe
自分の環境でしかデバッグしていませんが、ネイティブで実装したのでWindows10以降なら問題なく使えるはずです。
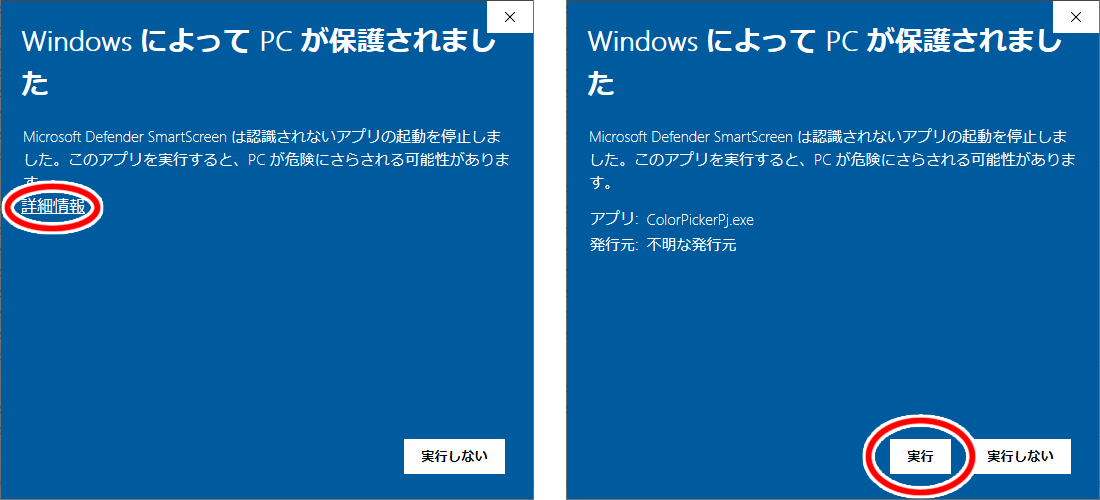
ただし何も設定せず書き出したので警告が出ると思いますが、下記方法で実行できます。
もちろん悪意のあるコードは書いていませんが、一応自己責任にてお願いします。
(誰かデジタル署名のやりかた教えてください……。)
おわりに
本当はもっと多機能にしても良かったかもしれませんが、シンプルなものを作る、と決めていましたので色々諦めました。
- カラーコードコピー機能 … ショートカットとかで実現できそう?
- カラーパレット提案機能 … 同じ彩度でいい感じの色を提案してくれたり
- XY座標表示 … たまに座標値が欲しくなるときがある。これは実装してもよかったかも?
結果的に、結構使い勝手のいいカラーピッカーができたと思いますし、
だいたいの色情報を手軽に見たい、という当初の目的は達成できたので良しとします。
もしよければみなさんお使いください。
以上