はじめに
本記事は、以前の Delphi のフォームを Python から使う方法 とその後の Delphi で作った複数のフォームを Python で呼び出す方法 の続きとなります。
今回は、Delphi で作ったフォームを Python で使い、そこから Delphi のメソッドを呼び画像データを取得し、Python 上で Delphi の Image に画像を表示させてみます。
前提条件
Delphi で作った複数のフォームを Python で呼び出す方法 の記事の前提条件と同様です。
詳細はそちらの記事をご確認ください。
補足
基本的に情報が少ないため、模索しながら実施してますので、本来の想定された実装の仕方かどうかは分かりません。また、Python についての知識が乏しいため、使い方が正しいかどうか分かりませんので、その点はご了承ください。
Python for Delphi の導入
Python for Delphiは、Delphi で Python を使えるようにするコンポーネントのセットです。Delphi のフォームを Python から使う場合は Delphi FMX(VCL) for Python を使いますが、Python から Delphi のメソッドを使えるようにする際に必要になります。
(後述の Python から Delphi のメソッドを使えるようにする を参照)
以下にコード一式があります。
実際の導入は Delphi IDE の GetItパッケージマネージャー から Python4Delphi 1.0 をインストールします。(絞り込みで Python にチェックを入れると直ぐにでます)

デフォルトだと以下のディレクトリに入ります
C:\Users\ユーザー名\Documents\Embarcadero\Studio\22.0\CatalogRepository\Python4Delphi-1.0
Delphi でフォームを作成
フォームを作成
まず Delphi で以下のようなアプリを作りました。画像は何でもよいです。
(ここでは いらすとや から拝借しました)

アプリは単純で、Button1 ボタンと Button2 ボタン押下で画像が切り替わるものです。
(これを Python で同じ動きになるようにしていきます)
デザインはこんな感じです。

※ここでは Image に画像の読込みはしてません。
また、MyImage ユニットファイルで画像のデータを取得するメソッドを作りました。今回は手抜きで予め sample1, sample2 と2つ用意しておき、ボタン押下時に読込んで使うようにしました。
(このファイルは後に流用します)
────────────────────┐
作成コード: Unit1.pas, MyImage.pas
└────────────────────┘
unit Unit1;

interface

uses
  System.SysUtils, System.Types, System.UITypes, System.Classes, System.Variants,
  FMX.Types, FMX.Controls, FMX.Forms, FMX.Graphics, FMX.Dialogs,
  FMX.Controls.Presentation, FMX.StdCtrls, FMX.Objects, FMX.Layouts,
  MyImage;

type
  TForm1 = class(TForm)
    Layout1: TLayout;
    Image1: TImage;
    Button1: TButton;
    Button2: TButton;
    procedure Button1Click(Sender: TObject);
    procedure Button2Click(Sender: TObject);
  private
    { private 宣言 }
  public
    { public 宣言 }
  end;

var
  Form1: TForm1;

implementation

{$R *.fmx}

procedure TForm1.Button1Click(Sender: TObject);
begin
  var MyImage := TMyImage.Create;
  try
    var Bitmap := MyImage.GetBitmapLoadFromFile(1);
    Image1.Bitmap.Assign(Bitmap);
    Bitmap.Free;
  finally
    MyImage.Free;
  end;
end;

procedure TForm1.Button2Click(Sender: TObject);
begin
  var MyImage := TMyImage.Create;
  try
    var Bitmap := MyImage.GetBitmapLoadFromFile(2);
    Image1.Bitmap.Assign(Bitmap);
    Bitmap.Free;
  finally
    MyImage.Free;
  end;
end;

end.
unit MyImage;

interface
uses
  System.SysUtils
  , System.Classes
  , FMX.Graphics
  ;

type
  TMyImage = class
  public
    function GetBitmapBytes(const AVal: Integer): TBytes;
    function GetBitmapLoadFromFile(const AVal: Integer): TBitmap;
  end;

implementation

{ TMyImage }

// 指定のファイルを読み込みBitmapを返す
function TMyImage.GetBitmapLoadFromFile(const AVal: Integer): TBitmap;
begin
  var Name := 'sample1.png';
  if AVal <> 1 then
    Name := 'sample2.png';
  Result := TBitmap.Create;
  Result.LoadFromFile(Name);
end;

// 指定ファイルのBytesデータを返す
function TMyImage.GetBitmapBytes(const AVal: Integer): TBytes;
var
  Buffer: TBytes;
begin
  Result := nil;

  var Bitmap := GetBitmapLoadFromFile(AVal);
  try
    var Stream := TMemoryStream.Create;
    try
      Bitmap.SaveToStream(Stream);
      SetLength(Buffer, Stream.Size);
      Stream.Position := 0;
      Stream.Read(Buffer[0], Stream.Size);
      Result := Buffer;
    finally
      Stream.Free;
    end;
  finally
    Bitmap.Free;
  end;
end;

end.
Python 用に出力
これをツールの「Export to Python」→ 「Export Entire Current Project」で Python 用のコードを生成します。
以下のファイルができます

──────────────────┐
出力コード: Project1.py, Unsit1.py
└──────────────────┘
from delphifmx import *
from Unit1 import Form1

def main():
    Application.Initialize()
    Application.Title = 'Sample App'
    Application.MainForm = Form1(Application)
    Application.MainForm.Show()
    Application.Run()
    Application.MainForm.Destroy()

if __name__ == '__main__':
    main()
import os
from delphifmx import *

class Form1(Form):

    def __init__(self, owner):
        self.Layout1 = None
        self.Image1 = None
        self.Button2 = None
        self.Button1 = None
        self.LoadProps(os.path.join(os.path.dirname(os.path.abspath(__file__)), "Unit1.pyfmx"))

    def Button2Click(self, Sender):
        pass

    def Button1Click(self, Sender):
        pass
Python から Delphi のメソッドを使えるようにする
Python から Delphi のメソッドを呼び出すためには、pyd ファイルを作成する必要があります。
(Windows で言うところの dll ファイル)
上方で入れた Python for Delphi のフォルダ内にサンプルがあり、それをスケルトンとしてコードを変えて作成します。
Python4Delphi-1.0\Modules
・DemoModule
・RttiModule
それぞれのプロジェクトでビルドすると「DemoModule.pyd」ファイルが生成され、test.py を実行するとデフォルトのサンプルが試せます。
※プロジェクトをそのままビルドして実行すると Python のバージョンエラーが出る場合があります。その際は下方の実装を参考に編集して試してください。
pyd ファイルを作成
今回は RttiModule フォルダのプロジェクトを使い、画像データを Byte 配列で取得するメソッドを実装します。(どちらも試してみましたが、こちらが個人的に使い易そうだったからです)
フォルダ内の DemoModule.dproj でプロジェクトを開き uMain.pas を編集します。
また、上方で作成した MyImage.pas ファイルを同フォルダ内にコピーしておきます。
─────────────┐
編集前コード:uMain.pas
└─────────────┘
unit uMain;

interface

uses PythonEngine;

function PyInit_DemoModule: PPyObject; cdecl;


implementation

Uses
  System.Math,
  WrapDelphi;

type
  TDelphiFunctions = class
  public
    class function is_prime(const N: Integer): Boolean; static;
  end;

var
  gEngine : TPythonEngine;
  gModule : TPythonModule;
  gDelphiWrapper : TPyDelphiWrapper;
  DelphiFunctions: TDelphiFunctions;


function PyInit_DemoModule: PPyObject;
var
  Py : PPyObject;
begin
  try
    gEngine := TPythonEngine.Create(nil);
    gEngine.AutoFinalize := False;
    gEngine.UseLastKnownVersion := False;
    // Adapt to the desired python version
    gEngine.RegVersion := '3.8';
    gEngine.DllName := 'python38.dll';

    gModule := TPythonModule.Create(nil);
    gModule.Engine := gEngine;
    gModule.ModuleName := 'DemoModule';

    gDelphiWrapper := TPyDelphiWrapper.Create(nil);
    gDelphiWrapper.Engine := gEngine;
    gDelphiWrapper.Module := gModule;

    gEngine.LoadDll;
    Py := gDelphiWrapper.Wrap(DelphiFunctions, TObjectOwnership.soReference);
    gModule.SetVar('delphi_funcs', Py);
    gEngine.Py_DecRef(Py);
  except
  end;
  Result := gModule.Module;
end;

{ TTestRttiAccess }


{ TDelphiFunctions }

class function TDelphiFunctions.is_prime(const N: Integer): Boolean;
// Naive implementation.  It is just a demo...
begin
  if (N <= 1) then Exit(False);

  var q := Floor(Sqrt(N));
  for var I := 2 to q do
    if (N mod I = 0) then
      Exit(False);
  Exit(True);
end;

initialization
  DelphiFunctions := TDelphiFunctions.Create;
finalization
  DelphiFunctions.Free;
  gEngine.Free;
  gModule.Free;
  gDelphiWrapper.Free;
end.
主な編集ポイント
PythonEngine と言うのを使い各種設定をすることにより、Python から呼び出せるようになります。
(TPy~と言うクラスが幾つか出てきますがそれらが使用するための根幹になっているようです)
・1.Python のバージョン設定
プロジェクトをそのままビルドして実行すると Python のバージョンエラーが出る場合があります。その際は図の箇所をコメントアウトまたは削除して一行追加してください。
(または現在インストールされているバージョンを入力してください)

・2.メソッドを追加
サンプルのメソッドに変えて画像データを取得するメソッドを追加します。
MyImage は事前に作成してコピーしておいた MyImage.pas ファイルを使用します。
(Delphi 版のアプリで使用したユニットファイルが使えます)

──────────────────┐
編集後コード:uMain.pas
└──────────────────┘
unit uMain;

interface

uses PythonEngine;

function PyInit_DemoModule: PPyObject; cdecl;


implementation

Uses
  System.Math
  , System.SysUtils
  , System.Classes
  , FMX.Graphics
  , WrapDelphi
  , MyImage
  ;

type
  TDelphiFunctions = class
  public
    class function GetBitmapBytes(const AVal: Integer): TBytes; static;
  end;

var
  gEngine : TPythonEngine;
  gModule : TPythonModule;
  gDelphiWrapper : TPyDelphiWrapper;
  DelphiFunctions: TDelphiFunctions;

function PyInit_DemoModule: PPyObject;
var
  Py : PPyObject;
begin
  try
    gEngine := TPythonEngine.Create(nil);
    gEngine.AutoFinalize := False;
//    gEngine.UseLastKnownVersion := False;
//    // Adapt to the desired python version
//    gEngine.RegVersion := '3.8';
//    gEngine.DllName := 'python38.dll';
    gEngine.UseLastKnownVersion := True;

    gModule := TPythonModule.Create(nil);
    gModule.Engine := gEngine;
    gModule.ModuleName := 'DemoModule';

    gDelphiWrapper := TPyDelphiWrapper.Create(nil);
    gDelphiWrapper.Engine := gEngine;
    gDelphiWrapper.Module := gModule;

    gEngine.LoadDll;
    Py := gDelphiWrapper.Wrap(DelphiFunctions, TObjectOwnership.soReference);
    gModule.SetVar('delphi_funcs', Py);
    gEngine.Py_DecRef(Py);
  except
  end;
  Result := gModule.Module;
end;


{ TDelphiFunctions }

class function TDelphiFunctions.GetBitmapBytes(const AVal: Integer): TBytes;
begin
  var MyImage := TMyImage.Create;
  try
    Result := MyImage.GetBitmapBytes(AVal);
  finally
    MyImage.Free;
  end;
end;

initialization
  DelphiFunctions := TDelphiFunctions.Create;
finalization
  DelphiFunctions.Free;
  gEngine.Free;
  gModule.Free;
  gDelphiWrapper.Free;
end.
ファイルを編集してプロジェクトをビルドすると「DemoModule.pyd」ファイルができます。
このファイルを上方の「Python 用に出力」で作成した Unit1.py などと同じフォルダにコピーします。
また、表示用の画像ファイル2つを同フォルダにコピーします。(ここでは Delphi アプリ作成で使用した画像ファイル)
ここまでに作成したファイル群

Python で Delphi の Bitmap コンポーネントを使えるようにする
ここから少し複雑になりますが、Python で Delphi を使う際に以下のように「delphifmx」を import して使用しますが、TBitmap などはデフォルトでは実装されていないため、直接使用することができません。

こう言ったコンポーネントなどを使えるようにするには、個別に実装して使えるように登録する必要があります。
今回は TBitmap を使いたいため、delphifmx を作り直して追加したいと思います。
上方で入れた Python for Delphi のフォルダ内にスケルトン(と思われる)プロジェクトがあり、それを使ってファイルを作成します。
Python4Delphi-1.0\Modules\DelphiFMX
pyd ファイルを作成
DelphiFMX フォルダのスケルトンを元に、TBitmap を使えるように実装します。
フォルダ内の DelphiFMX.dproj でプロジェクトを開きます。
・WrapDelphiFmx.pas ファイル編集
次に、以下のディレクトリにある「WrapDelphiFmx.pas」ファイルを開きます
C:\Users\ユーザー名\Documents\Embarcadero\Studio\22.0\CatalogRepository\Python4Delphi-1.0\Source\fmx\WrapDelphiFmx.pas

ここに Python から Delphi を使えるように Wrap したファイルがあります。この Wrap の中に TBitmap の実装・登録が無いため、直接 Python から使えません。そのため今回は WrapFmxBitmap を新規作成して追加します。
──────────────────┐
編集後コード:WrapDelphiFmx.pas
└──────────────────┘
unit WrapDelphiFmx;

interface

implementation

uses
  WrapDelphiTypes,
  WrapDelphiClasses,
  {$IFDEF MSWINDOWS}
  WrapDelphiWindows,
  {$ENDIF MSWINDOWS}
  WrapDelphiDataBind,
  WrapFmxTypes,
  WrapFmxControls,
  WrapFmxStdCtrls,
  WrapFmxEdit,
  WrapFmxListBox,
  WrapFmxListView,
  WrapFmxActnList,
  WrapFmxStdActns,
  WrapFmxComCtrls,
  WrapFmxDialogs,
  WrapFmxForms,
  WrapFmxShapes,
  WrapFmxLayouts,
  WrapFmxScrollBox,
  WrapFmxGrids,
  WrapFmxMedia,
  WrapFmxMenus,
  WrapFmxStyles,
  WrapFmxMemo,
  WrapFmxColors,
  WrapFmxDataBind,
  WrapFmxBitmap
  ;

end.
・WrapFmxBitmap.pas ファイル作成
次に、上記と同じ階層に「WrapFmxBitmap.pas」ファイルを作成してコードを記述します。
主な実装ポイント
この実装は他の Wrap~.pas ファイルを参考に作りました。
実装の詳細は下方の全コードをご参照ください。
(また、機能の根幹は WrapDelphi, PythonEngine, WrapDelphiClasses, WrapFmxTypes ファイル辺りのようで、ソースコードを追っていくと実装が詰まってます。詳しくは直接これらのファイルをご参照ください。)
Python for Delphi で登録に必要なクラスを継承して新たにクラスを作成します。
・TPyDelphiBitmap クラス

ここでは TPyDelphiPersistent を継承して override の DelphiObjectClass() と RegisterMethods() で型・Python から使用したいメソッドを登録します。
(元をたどると TPyDelphiObject, TPyObject などから継承)
また、今回メソッドは3つ用意します。
・CreateBitmap()
親クラスの変数(DelphiObject)に Bitmap を生成
・LoadFromBinary()
Python のバイナリデータから画像を変換して Bitmap に読込む
・LoadFromBytes()
文字列のバイト配列データから画像を変換して Bitmap に読込む
※LoadFrom~で画像のデータを Delphi で受け取った際に、不要な値「([ ],) (b' ',) etc...」が含まれているため、Delphi で扱えるように削除します。また、バイナリはエスケープシーケンスが入っているため、Delphi で扱えるように変換して Bitmap に入れるようにしています。
・TBitmapRegistration クラス
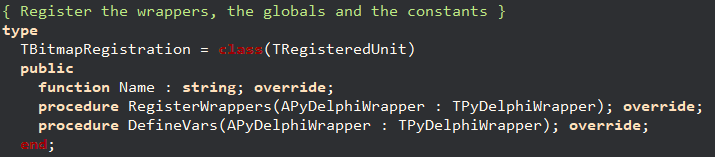
TRegisteredUnit を継承して override の RegisterWrappers() で 作成した TPyDelphiBitmap を登録します。(TPyDelphiWrapper でユニットファイルのラッパーを登録)

利用時の名前を設定します。

上方で作成した Bitmap のラッパー TPyDelphiBitmap を登録します。

そして実行時にシングルトンで全ユニットファイルを登録管理する TRegisteredUnits の RegisteredUnits.Add で TBitmapRegistration を追加します。
──────────────────┐
作成コード:WrapFmxBitmap.pas
└──────────────────┘
{$I ..\Definition.Inc}
unit WrapFmxBitmap;
interface
uses
System.Classes
, System.SysUtils
, FMX.Graphics
, PythonEngine
, WrapDelphi
, WrapDelphiClasses
, VarPyth
;
type
TPyDelphiBitmap = class(TPyDelphiPersistent)
private
function GetDelphiObject: TBitmap;
procedure SetDelphiObject(const Value: TBitmap);
function BinaryStringToStream(AVal: AnsiString): TMemoryStream;
function ByteStringToStream(AVal: AnsiString): TMemoryStream;
protected
procedure CreateBitmap_Wrapper; cdecl;
procedure LoadFromBinary_Wrapper(args : PPyObject) cdecl;
procedure LoadFromBytes_Wrapper(args : PPyObject) cdecl;
public
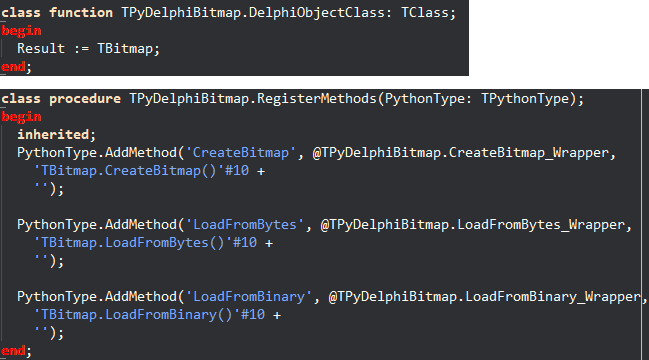
class function DelphiObjectClass : TClass; override;
class procedure RegisterMethods( PythonType : TPythonType ); override;
// Properties
property DelphiObject: TBitmap read GetDelphiObject write SetDelphiObject;
end;
implementation
uses
System.Types
, System.AnsiStrings
, WrapDelphiTypes
;
{ Register the wrappers, the globals and the constants }
type
TBitmapRegistration = class(TRegisteredUnit)
public
function Name : string; override;
procedure RegisterWrappers(APyDelphiWrapper : TPyDelphiWrapper); override;
procedure DefineVars(APyDelphiWrapper : TPyDelphiWrapper); override;
end;
{ TBitmapRegistration }
procedure TBitmapRegistration.DefineVars(APyDelphiWrapper: TPyDelphiWrapper);
begin
inherited;
end;
function TBitmapRegistration.Name: string;
begin
Result := 'Bitmap';
end;
procedure TBitmapRegistration.RegisterWrappers(
APyDelphiWrapper: TPyDelphiWrapper);
begin
inherited;
APyDelphiWrapper.RegisterDelphiWrapper(TPyDelphiBitmap);
end;
{ TPyDelphiBitmap }
/// バイナリ文字列の不要なエスケープシーケンスを取除きストリームに変
function TPyDelphiBitmap.BinaryStringToStream(
AVal: AnsiString): TMemoryStream;
var
Data: AnsiString;
Index: Integer;
function GetCh: AnsiChar;
begin
Result := AnsiChar(Data[Index]);
Inc(Index);
end;
begin
Result := TMemoryStream.Create;
Data := AVal;
// 不要な文字データを除去
Data := AnsiReplaceStr(Data, '(b'#39, '');
Data := AnsiReplaceStr(Data, #39',)', '');
var Len := Length(Data);
Index := 1;
while Index < Len do
begin
var Ch := GetCh;
if Ch = '\' then
begin
var EscCh := GetCh;
case EscCh of
't':
Result.WriteData(UInt8(9));
'n':
Result.WriteData(UInt8(10));
'r':
Result.WriteData(UInt8(13));
'\', '''':
Result.WriteData(EscCh);
'x':
begin
var B := StrToInt('$' + String(GetCh) + String(GetCh));
Result.WriteData(UInt8(B));
end;
else
raise Exception.Create('unknown data: ' + EscCh);
end;
end
else
Result.WriteData(Ch);
end;
end;
/// バイト文字列をストリームに変換
function TPyDelphiBitmap.ByteStringToStream(AVal: AnsiString): TMemoryStream;
begin
Result := TMemoryStream.Create();
var Data := AVal;
// 不要な文字データを除去
Data := AnsiReplaceStr(Data, '([', '');
Data := AnsiReplaceStr(Data, '],)', '');
var DataArray := String(Data).Split([', ']);
for var D in DataArray do
Result.WriteData(UInt8(StrToInt(D)));
end;
/// DelphiObject にBitmapを生成
procedure TPyDelphiBitmap.CreateBitmap_Wrapper;
begin
Adjust(@Self);
with GetPythonEngine do begin
if DelphiObject = nil then
begin
DelphiObject := TBitmap.Create;
end;
end;
end;
class function TPyDelphiBitmap.DelphiObjectClass: TClass;
begin
Result := TBitmap;
end;
function TPyDelphiBitmap.GetDelphiObject: TBitmap;
begin
Result := TBitmap(inherited DelphiObject);
end;
procedure TPyDelphiBitmap.LoadFromBinary_Wrapper(args: PPyObject);
begin
var V := VarPythonCreate(args);
Adjust(@Self);
with GetPythonEngine do
begin
var Stream := BinaryStringToStream(AnsiString(V));
try
DelphiObject.LoadFromStream(Stream);
finally
Stream.Free;
end;
end;
end;
procedure TPyDelphiBitmap.LoadFromBytes_Wrapper(args: PPyObject);
begin
var V := VarPythonCreate(args);
Adjust(@Self);
with GetPythonEngine do begin
var Stream := ByteStringToStream(AnsiString(V));
try
DelphiObject.LoadFromStream(Stream);
finally
Stream.Free;
end;
end;
end;
class procedure TPyDelphiBitmap.RegisterMethods(PythonType: TPythonType);
begin
inherited;
PythonType.AddMethod('CreateBitmap', @TPyDelphiBitmap.CreateBitmap_Wrapper,
'TBitmap.CreateBitmap()'#10 +
'');
PythonType.AddMethod('LoadFromBytes', @TPyDelphiBitmap.LoadFromBytes_Wrapper,
'TBitmap.LoadFromBytes()'#10 +
'');
PythonType.AddMethod('LoadFromBinary', @TPyDelphiBitmap.LoadFromBinary_Wrapper,
'TBitmap.LoadFromBinary()'#10 +
'');
end;
procedure TPyDelphiBitmap.SetDelphiObject(const Value: TBitmap);
begin
inherited DelphiObject := Value;
end;
initialization
RegisteredUnits.Add(TBitmapRegistration.Create);
end.
以上のファイルを編集・追加してプロジェクトをビルドすると「DelphiFMX.pyd」ファイルができます。
このファイルを上方の「Python 用に出力」で作成した Unit1.py などと同じフォルダにコピーします。
ここまでに作成したファイル群
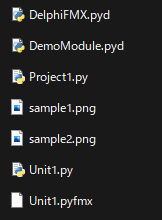
これでファイルは揃いました。
最後に Python から実行するために Project1.py, Unit1.py を編集します。
Python から実行するためにファイル編集
現状そのままで Project1.py で実行してもフォームは表示されますが、ボタンクリックイベントは未実装で機能しないため、編集します。
・Project1.py
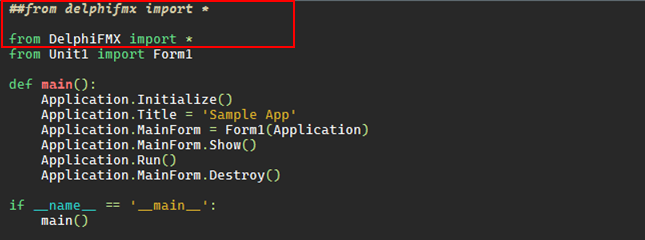
作成した DelphiFMX.pyd ファイルを使うため import を変更します。
・Unit1.py

作成した DemoModule.pyd, DelphiFMX.pyd ファイルを使うため import を変更追加
また、Python の Image ライブラリを使うため、import を追加します。
(ただし Delphi の Image と被るため、名前を Image2 としました)

クリックイベントで以下追加するメソッドを呼びます。
Button1 と Button2 で画像形式を変えてデータを Bitmap に Load して表示するようにしています。
Delphi からバイト配列のデータを取得し、それを Bitmap の LoadFromBytes で Bitmap に画像を入れ、Delphi で作成した画面の Image の Bitmap に値を入れて画像を表示します。
データ例:([137, 80, 78, 71, 13, 10, 26, 10, 0, 0, 0, 13~~])

Delphi からバイト配列のデータを取得し、それを Python のバイナリ画像データに変換して Bitmap の LoadFromBinary で Bitmap に画像を入れ、Delphi で作成した画面の Image の Bitmap に値を入れて画像を表示します。(こちらの方法では、Python のライブラリで読込んだ画像データにも対応できているかと思います)
データ例:(b'\x89PNG\r\n\x1a\n\x00\x00\x00\rIHDR\x00\~~)
※どちらのメソッドもデータ確認用に print で値を表示するようにしています。
──────────────────┐
編集後コード:Project1.py, Unit1.py
└──────────────────┘
##from delphifmx import *

from DelphiFMX import *
from Unit1 import Form1

def main():
    Application.Initialize()
    Application.Title = 'Sample App'
    Application.MainForm = Form1(Application)
    Application.MainForm.Show()
    Application.Run()
    Application.MainForm.Destroy()

if __name__ == '__main__':
    main()
import os
import io
from PIL import Image as Image2
from PIL import ImageOps
##from delphifmx import *
from DemoModule import delphi_funcs
from DelphiFMX import *
class Form1(Form):
def __init__(self, owner):
self.Layout1 = None
self.Image1 = None
self.Button1 = None
self.Button2 = None
self.LoadProps(os.path.join(os.path.dirname(os.path.abspath(__file__)), "Unit1.pyfmx"))
def Button1Click(self, Sender):
onByteImage(self);
def Button2Click(self, Sender):
onBinaryImage(self);
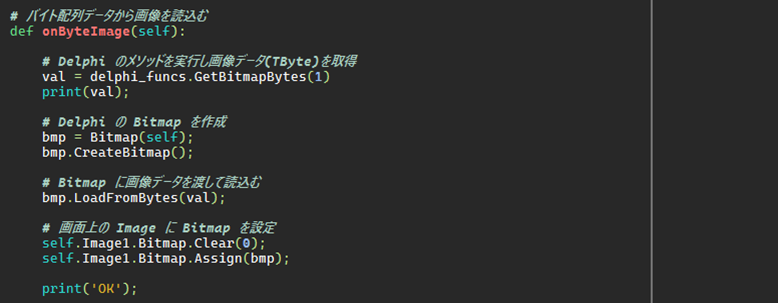
# バイト配列データから画像を読込む
def onByteImage(self):
# Delphi のメソッドを実行し画像データ(TByte)を取得
val = delphi_funcs.GetBitmapBytes(1)
print(val);
# Delphi の Bitmap を作成
bmp = Bitmap(self);
bmp.CreateBitmap();
# Bitmap に画像データを渡して読込む
bmp.LoadFromBytes(val);
# 画面上の Image に Bitmap を設定
self.Image1.Bitmap.Assign(bmp);
bmp.Free;
print('OK');
# バイナリデータから画像を読込む
def onBinaryImage(self):
# Delphi のメソッドを実行し画像データ(TByte)を取得得
val = delphi_funcs.GetBitmapBytes(2)
print(val);
# Delphi の Bitmap を作成
bmp = Bitmap(self);
bmp.CreateBitmap();
# Binary に変換
by = bytearray(val)
# Image モジュールで画像を開く
img = Image2.open(io.BytesIO(by))
# 開いた Image から Binary データを取得し BiBmap に画像データを渡して読込む
stream = io.BytesIO();
img.save(stream, img.format);
b = stream.getvalue();
print(b);
bmp.LoadFromBinary(b);
# 画面上の Image に Bitmap を設定
self.Image1.Bitmap.Assign(bmp);
bmp.Free;
print('OK');
Python 実行
PyScripter で Project1.py を開いて実行、または、Project1.py ファイルをダブルクリックで実行します。

実行すると Form1 が表示され、Button1 と Button2 のボタン押下でそれぞれ画像が表示されることが確認できます。

また、コマンドプロンプト(Pythonインタプリタ)で Print のデータを確認することができます。
まとめ
以上のように、Delphi で作成して実行したアプリと、同様な表示・動きが Python から実行できました。
Python から Delphi のメソッドを使うのは簡単ですが、「型」が異なるため、数字、文字列以外で値をやり取りするのが難しかったです。
また、Python から Delphi のコンポーネント(コントロール)を扱うの場合も、デフォルトの delphifmx.pyd では不足しているため、自分で実装が必要になり難しかったです。
今回はサンプルや中のコードを見ながら手探りで実施したため、実はもっと簡単に変換できたり使用する方法があるのかもしれません。(現段階では見付けられませんでしたが...)
また、もう少し簡単に扱えるようになれば、需要が増えるのかと思いました。