データ交換やシステム連携において、JSONとExcelは非常に一般的なデータ形式です。JSONはシステム間のデータ転送に適しており、柔軟な構造を持ちます。一方、Excelは視覚的な表示や手動編集に向いています。
本記事では、Pythonを使用して以下のタスクを実現する方法を紹介します:
- JSONを整形済みのExcelファイルに変換
- Excelから構造化JSONファイルを生成
- ネストされたJSONのフラット化処理
複数のデータソースが関係する場面において、効率的なデータ変換を可能にします。
使用ライブラリ:Free Spire.XLS for Python(pipでインストール可能:pip install spire.xls.free)
JSONを整形されたExcelにインポートする
構造化されたJSONファイルをExcelにインポートする際は、Spire.XLSを使うことで、列ヘッダーとデータを自動で挿入し、セルスタイルも設定できます。視認性が高く、分かりやすいExcelファイルを簡単に作成できます。
操作手順:
- JSONファイルを読み込み、キー名を表ヘッダーに使用
- データを書き込み、表ヘッダーにスタイル(太字・背景色)を適用
- 列幅を自動調整して可読性を向上
-
.xlsxファイルとして保存
JSONサンプル:employees.json
[
  {"Name": "Alice", "Age": 30, "Department": "HR"},
  {"Name": "Bob", "Age": 27, "Department": "IT"},
  {"Name": "Charlie", "Age": 35, "Department": "Sales"}
]
Pythonコード例:
from spire.xls import Workbook, FileFormat, Color
import json

# JSONデータを読み込み
with open("employees.json", "r", encoding="utf-8") as f:
    data = json.load(f)

workbook = Workbook()
workbook.Worksheets.Clear()
sheet = workbook.Worksheets.Add("employees")

# ヘッダーを書き込み、スタイルを設定
headers = list(data[0].keys())
for col, header in enumerate(headers):
    cell = sheet.Range[1, col + 1]
    cell.Text = header
    cell.Style.Font.FontName = "Times New Roman"
    cell.Style.Font.IsBold = True
    cell.Style.Font.Size = 16.0
    cell.Style.Color = Color.get_LightGray()

# データを書き込み、スタイルを設定
for row_idx, row in enumerate(data, start=2):
    for col_idx, key in enumerate(headers):
        sheet.Range[row_idx, col_idx + 1].Text = str(row.get(key, ""))
dataRange = sheet.Range[2, 1, sheet.LastRow, sheet.LastColumn]
dataRange.Style.Color = Color.get_LightPink()
dataRange.Style.Font.FontName = "Arial"
dataRange.Style.Font.Size = 12.0
dataRange.BorderInside()
dataRange.BorderAround()

# 列幅を自動調整
for i in range(1, len(headers) + 1):
    sheet.AutoFitColumn(i)

# Excelファイルとして保存
workbook.SaveToFile("output/employees.xlsx", FileFormat.Version2016)
workbook.Dispose()
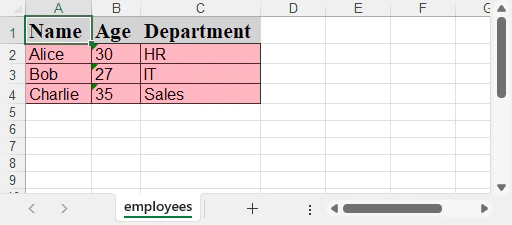
生成されたExcelプレビュー:
Excelを構造化JSONにエクスポートする
ExcelデータをJSON形式に変換する場合、1行目をキー名として利用し、各行を辞書(オブジェクト)に変換して .json ファイルとして保存します。
操作手順:
- 最終行と最終列を取得
- 1行目をヘッダーとして読み込み
- 各行のデータを辞書に変換
-
json.dumpでファイル出力
Pythonコード例:
import json

# 行数と列数を取得
rows = sheet.LastRow
cols = sheet.LastColumn

# ヘッダーを取得
headers = [sheet.Range[1, i + 1].Text for i in range(cols)]
data = []

# JSONデータを構築
for r in range(2, rows + 1):
    row_data = {}
    for c in range(cols):
        row_data[headers[c]] = sheet.Range[r, c + 1].Text
    data.append(row_data)

# JSONファイルに保存
with open("output/products_out.json", "w", encoding="utf-8") as f:
    json.dump(data, f, indent=2, ensure_ascii=False)
Excelデータ例:

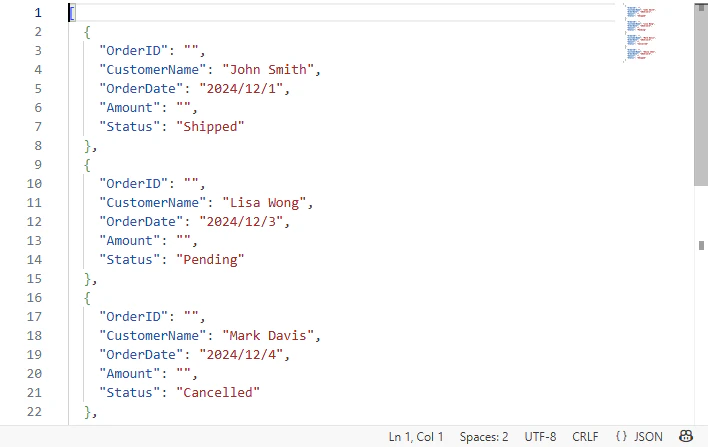
出力されたJSONの一部:
ネストされたJSONのフラット化処理
実際の業務では、JSONにネスト(入れ子)構造が含まれていることが多く、そのままExcelに取り込むとレイアウトが崩れる原因になります。そのため、ネスト構造を「フラット化」することで、address.cityのような形式に展開し、整然としたExcelへの出力が可能になります。
ネストされたJSON例:
[
  {
    "name": "John",
    "email": "john@example.com",
    "address": {
      "city": "New York",
      "zip": "10001"
    }
  }
]
Pythonによるフラット化関数:
def flatten_json(obj, prefix=""):
    flat = {}
    for key, value in obj.items():
        full_key = f"{prefix}{key}" if prefix == "" else f"{prefix}.{key}"
        if isinstance(value, dict):
            flat.update(flatten_json(value, full_key))
        else:
            flat[full_key] = value
    return flat

# フラット化を実行
with open("nested.json", "r", encoding="utf-8") as f:
    nested_data = json.load(f)

flat_data = [flatten_json(item) for item in nested_data]
フラット化後のJSON構造:
[
  {
    "name": "John",
    "email": "john@example.com",
    "address.city": "New York",
    "address.zip": "10001"
  }
]
まとめ
Spire.XLS for Pythonを活用すれば、PythonでJSONとExcel間の相互変換をスムーズに実現できます。視覚化やレポート用途に向くExcel形式への変換だけでなく、API連携やデータ転送に適したJSONへの変換も簡単に行えます。
複雑なネスト構造にも対応可能なフラット化処理を加えることで、より柔軟なデータハンドリングが可能になります。
さらに詳しいExcel処理のノウハウは以下をご参照ください:
Spire.XLS for Python チュートリアルセンター