経緯
kintoneのOutlookを連携してスケジュール管理をしたい。
けど検索して出てくる記事が古いため、アレンジしてなるべく最新のものに対応する。
要するに「Outlook連携 - kintoneからOutlookスケジュールを登録しよう!!」のOutlook連携をほぼサンプルのまま使っていたのだけど、先日急に動かなくなったので最新化対応したいということ。
やりたいこと
- MSAL v2 に対応してkintoneとOutlookのスケジュールを連携させたい。
- kintone UI Component v1 対応したUIを構築したい。
- FullCalendar.js を導入してカレンダー表示させたい。
参考サンプル
こちらの2つのサンプルを参考にOutlook連携カスタマイズを行います。
- Outlook連携 - kintoneからOutlookスケジュールを登録しよう!!
- クイックスタート: PKCE 対応の承認コード フローを使用して JavaScript SPA 内でユーザーをサインインさせ、アクセス トークンを取得する
今回(本記事)のゴール
MS Graphを使用してOutlookスケジュールを取得
記事一覧
- #01.ボタンを表示
- #02.サインイン
- #03.サインアウトとボタン表示制御
- MS Graphを使用してOutlookスケジュールを取得 ← 当記事
実装
Microsoftのサンプルを流用します。
javascript
- https://js.cybozu.com/jquery/3.3.1/jquery.min.js
- https://unpkg.com/kintone-ui-component/umd/kuc.min.js
- https://alcdn.msauth.net/browser/2.13.1/js/msal-browser.js
- authConfig.js
- authPopup.js
- graphConfig.js ← ★追加
- graph.js ← ★追加
- buttonSettings.js
- ui.js
css
- buttons.css
Azure AD の設定
スケジュールの取得に calendarview を使用するため、APIのアクセス許可に「Calendar.Read」と「Calendar.ReadWrite」を追加します。
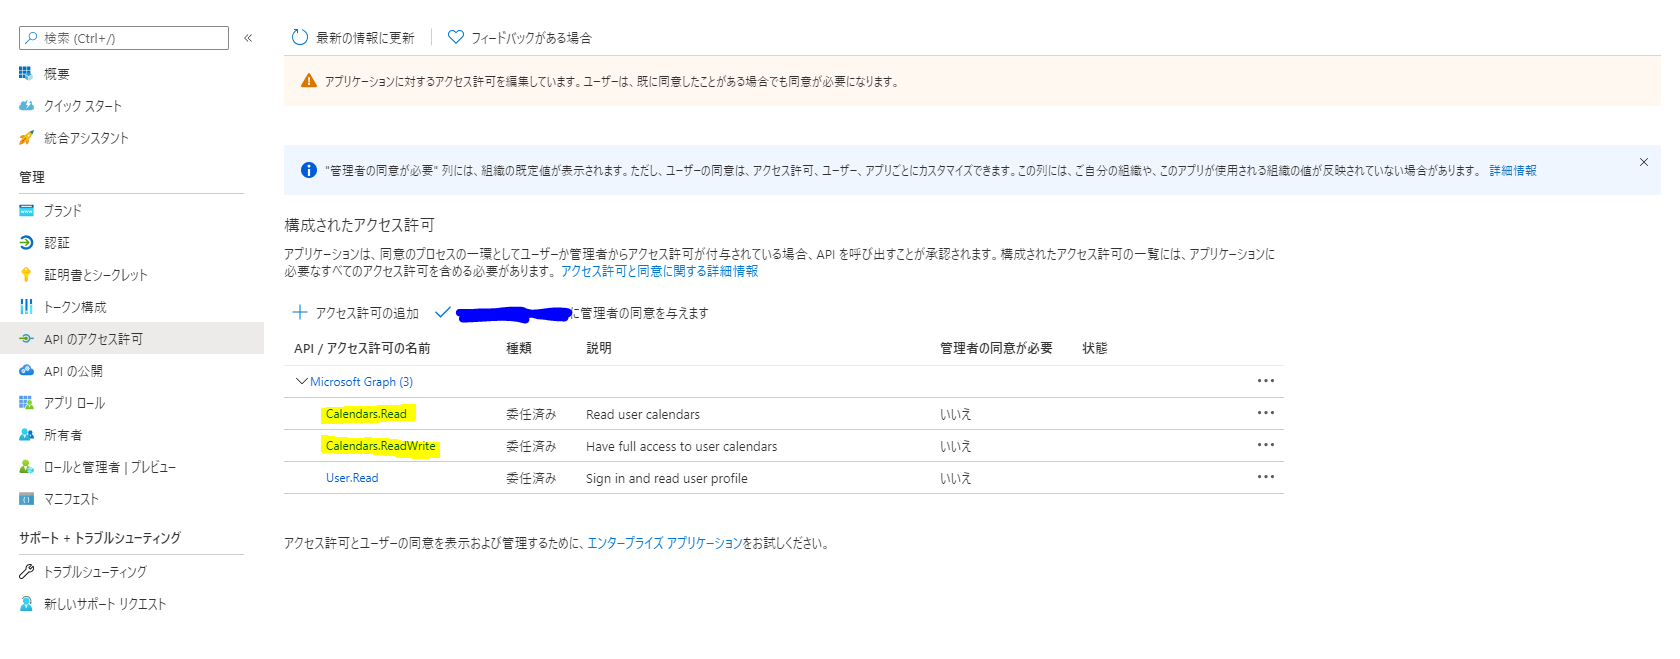
参考:https://docs.microsoft.com/ja-jp/graph/api/user-list-calendarview?view=graph-rest-1.0&tabs=http
Outlookのスケジュールを取得するためのエンドポイントの設定内容を記述します。
calendarviewには必須パラメータがあるので、必要な情報をひとまとめにし、エンドポイントURLを作成して返してくれる関数も追加しておきます。
日付は初期値を設定しています。確認用などで適宜入力してください。
ヘッダーにタイムゾーンを追加していますが、こちらは任意で設定してください。
let graphConfig = {
    // カレンダー取得設定
    graphCalView: {
        url: 'https://graph.microsoft.com/v1.0/me/calendarview',
        tokenRequest: {
            scopes: ['Calendars.Read', 'Calendars.ReadWrite'],
            forceRefresh: false
        },
        headers: {
            'Content-Type': 'application/json',
            'Prefer': "outlook.timezone=\"Tokyo Standard Time\", outlook.body-content-type=\"text\""
        },
        startPalam: 'startDateTime',
        startDate: '2021/04/01',
        startTime: 'T00:00:00.000Z',
        endPalam: 'endDateTime',
        endDate: '2021/04/01',
        endTime: 'T23:59:59.999Z',
    },

    // カレンダー取得のためのURLを取得
    getCalViewEndpoint: function () {
        return this.graphCalView.url + '?' + this.graphCalView.startPalam + '=' + this.graphCalView.startDate + this.graphCalView.startTime + '&' + this.graphCalView.endPalam + '=' + this.graphCalView.endDate + this.graphCalView.endTime;
    }
};
graph.jsはトークンの他にヘッダーを追加できるようにします。
コールバック用にスケジュール取得後に動く関数を追加しておきます。
現状は確認のためにコンソールに結果を返すようにしておきます。
let graphService = {
    callMSGraph: function (endpoint, token, header, callback) {
        const headers = new Headers();
        const bearer = `Bearer ${token}`;

        // ヘッダー追加
        headers.append('Authorization', bearer);
        for (let key of Object.keys(header)) {
            headers.append(key, header[key]);
        }

        const options = {
            method: "GET",
            headers: headers
        };

        console.log('request made to Graph API at: ' + new Date().toString());

        fetch(endpoint, options)
            .then(response => response.json())
            .then(response => callback(response, endpoint))
            .catch(error => console.log(error));
    },

    // Outlookスケジュール取得
    getEvent: function (data, endpoint) {
        console.log(endpoint);
        console.log(data);
    }
}
authPopup.jsにgrach.jsのcallMSGraphの呼び出しを追加します。
let authPopupService = {
...
    // Outlookイベントを取得する
    getEvent: function () {
        this.getTokenPopup(graphConfig.graphCalView.tokenRequest)
            .then(function (response) {
                graphService.callMSGraph(graphConfig.getCalViewEndpoint(), response.accessToken, graphConfig.graphCalView.headers, graphService.getEvent);
            }).catch(function (error) {
                console.log(error);
            });
    }
...
}
予定を取得するためのボタンを追加し、今回追加した処理を登録します。
    // サインイン後のボタン表示設定
    uiSignedCreateForIndex: function (kintoneHeaderSpace) {
...
        // 予定を取得ボタン
        this.data.ui.btnSignOut = this.createButton(this.setting.ui.buttons.getEvent, this.setting.i18n.button);
        this.data.ui.btnSignOut.addEventListener('click', function (event) {
            authPopupService.getEvent();
        });
        this.data.ui.HeaderSigned.appendChild(this.data.ui.btnSignOut);
...
},
「予定を取得」ボタンをヘッダーに表示するために設定を追加します。
...
    setting: {
        lang: 'ja',
        i18n: {},
        ui: {
            buttons: {
                signIn: {
                    text: 'signIn',
                    type: 'submit',
                    className: 'header-not-signed'
                },
                signOut: {
                    text: 'signOut',
                    type: 'normal',
                    className: 'header-signed'
                },
                getEvent: {
                    text: 'getEvent',
                    type: 'submit',
                    className: 'header-signed'
                },
                sendEvent: {
                    text: 'addEvent',
                    type: 'submit',
                    className: 'header-signed'
                }
            }
        }
    },
...
確認
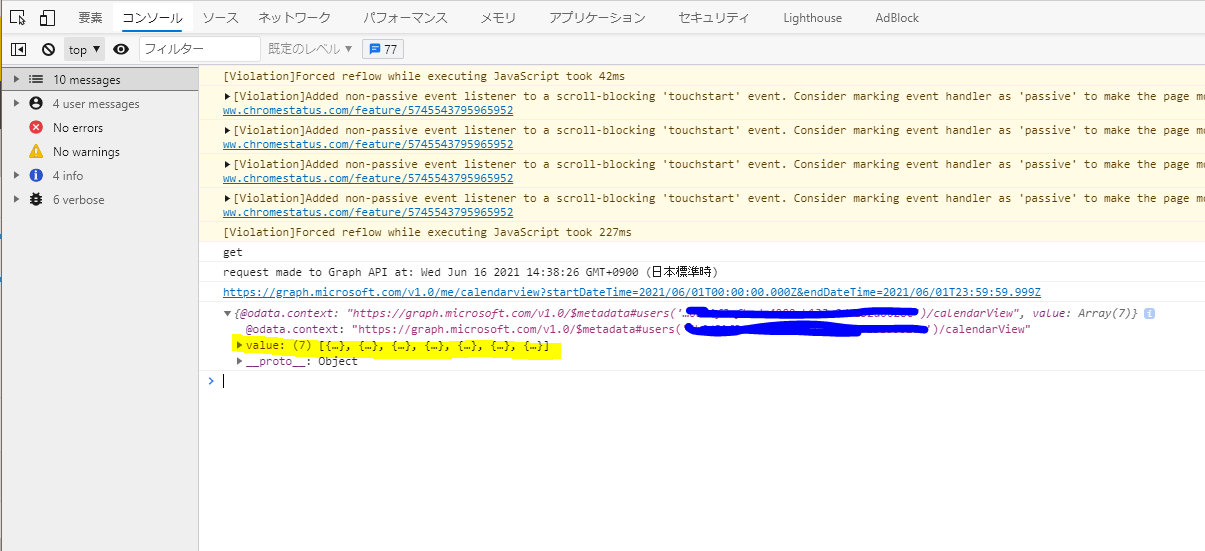
ボタンが表示されているので押下してみます。
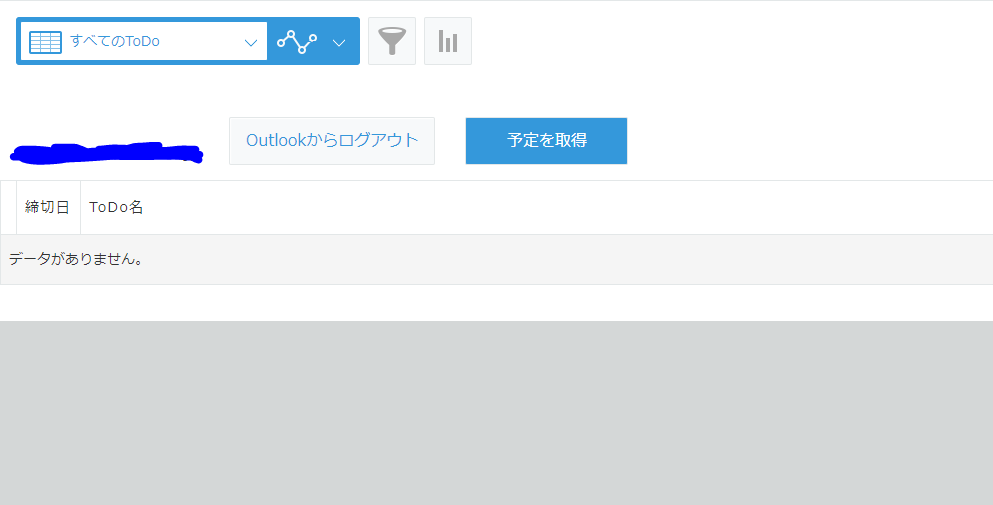
コンソールを確認してスケジュールのデータがjson形式で取得できていたらOKです。
次回
取得したOutlookスケジュールをkintoneに登録