Ateam Brides Inc. Advent Calendar 2021の12日目は
株式会社エイチームブライズの@hyshrが担当します。
これは何?
新型コロナ対策でマスク着用しつつアクリルパネル越しに会話をすると、声が聞こえにくくなり会話がしにくくなったので、Rasberry Pi(以下RasPi)を使って解決策を試行錯誤してみた話です。
先週「RasPi 4を使ってコロナ禍でのコミュニケーションを改善してみようとする話」を投稿しました。
ブラウザでSpeechToTextを利用し音声認識&解析し、RasPiに解析結果を投げ電光掲示板で表示する、というものでした。
RasPiはテキストを表示するだけのものとして機能させるのも良いと思ってます。
しかし、もし実用を考えた時にはPCもないスマホもない、手ぶらでということもあるでしょう。
先週宣言したように、今回はRasPiだけで完結させてみます。
そして・・・
クリスマスだからといって何か光らせたい = 電光掲示板を使う、もやめました。
ガチで考えるなら、文字が流れてくるの意味がなさすぎるので。
今回使うもの
- Rasberry Pi 4
- LCDパネル 240x240
- USBマイク
- GCP Speech-To-Text
- ※Azure Cognitive Servicesは今回RasPiで環境を作れませんでした。あとで少しだけ補足を入れます。
制作 & 実装
今回の手順はこちらです。
- RasPiとLCDパネルを接続&動作確認
2. RasPiとUSBマイクを接続 - RasPi上にSpeech-To-Text環境作成
- 1-3を繋ぎ合わせる
1. RasPiとLCDパネルを接続&動作確認
1-1. RasPiとLCDパネルを接続
PasPiとLCDパネルを接続していきます。
Amazoneで1,000円前後で買えます。
ジャンパー線を接続するためのピンが最初からはんだ付けされているもの、されていないものがあります。
今回私が買ったのははんだ付けされていないものでした。
(十数年ぶりのはんだ付けだったため、めちゃ下手くそになっており接触が悪くなるような問題を解決するために2日かかりました。。。。)
さて。
ジャンパー線を接続できるようになったら、RasPiとLCDパネルを繋げていきます。
前回の記事でRasPi側のピン一覧をまとめましたが、前回のピン一覧はLEDに特化したような書かれ方だったため、raspberriypi.comのものを参考にして対応表を作ります。
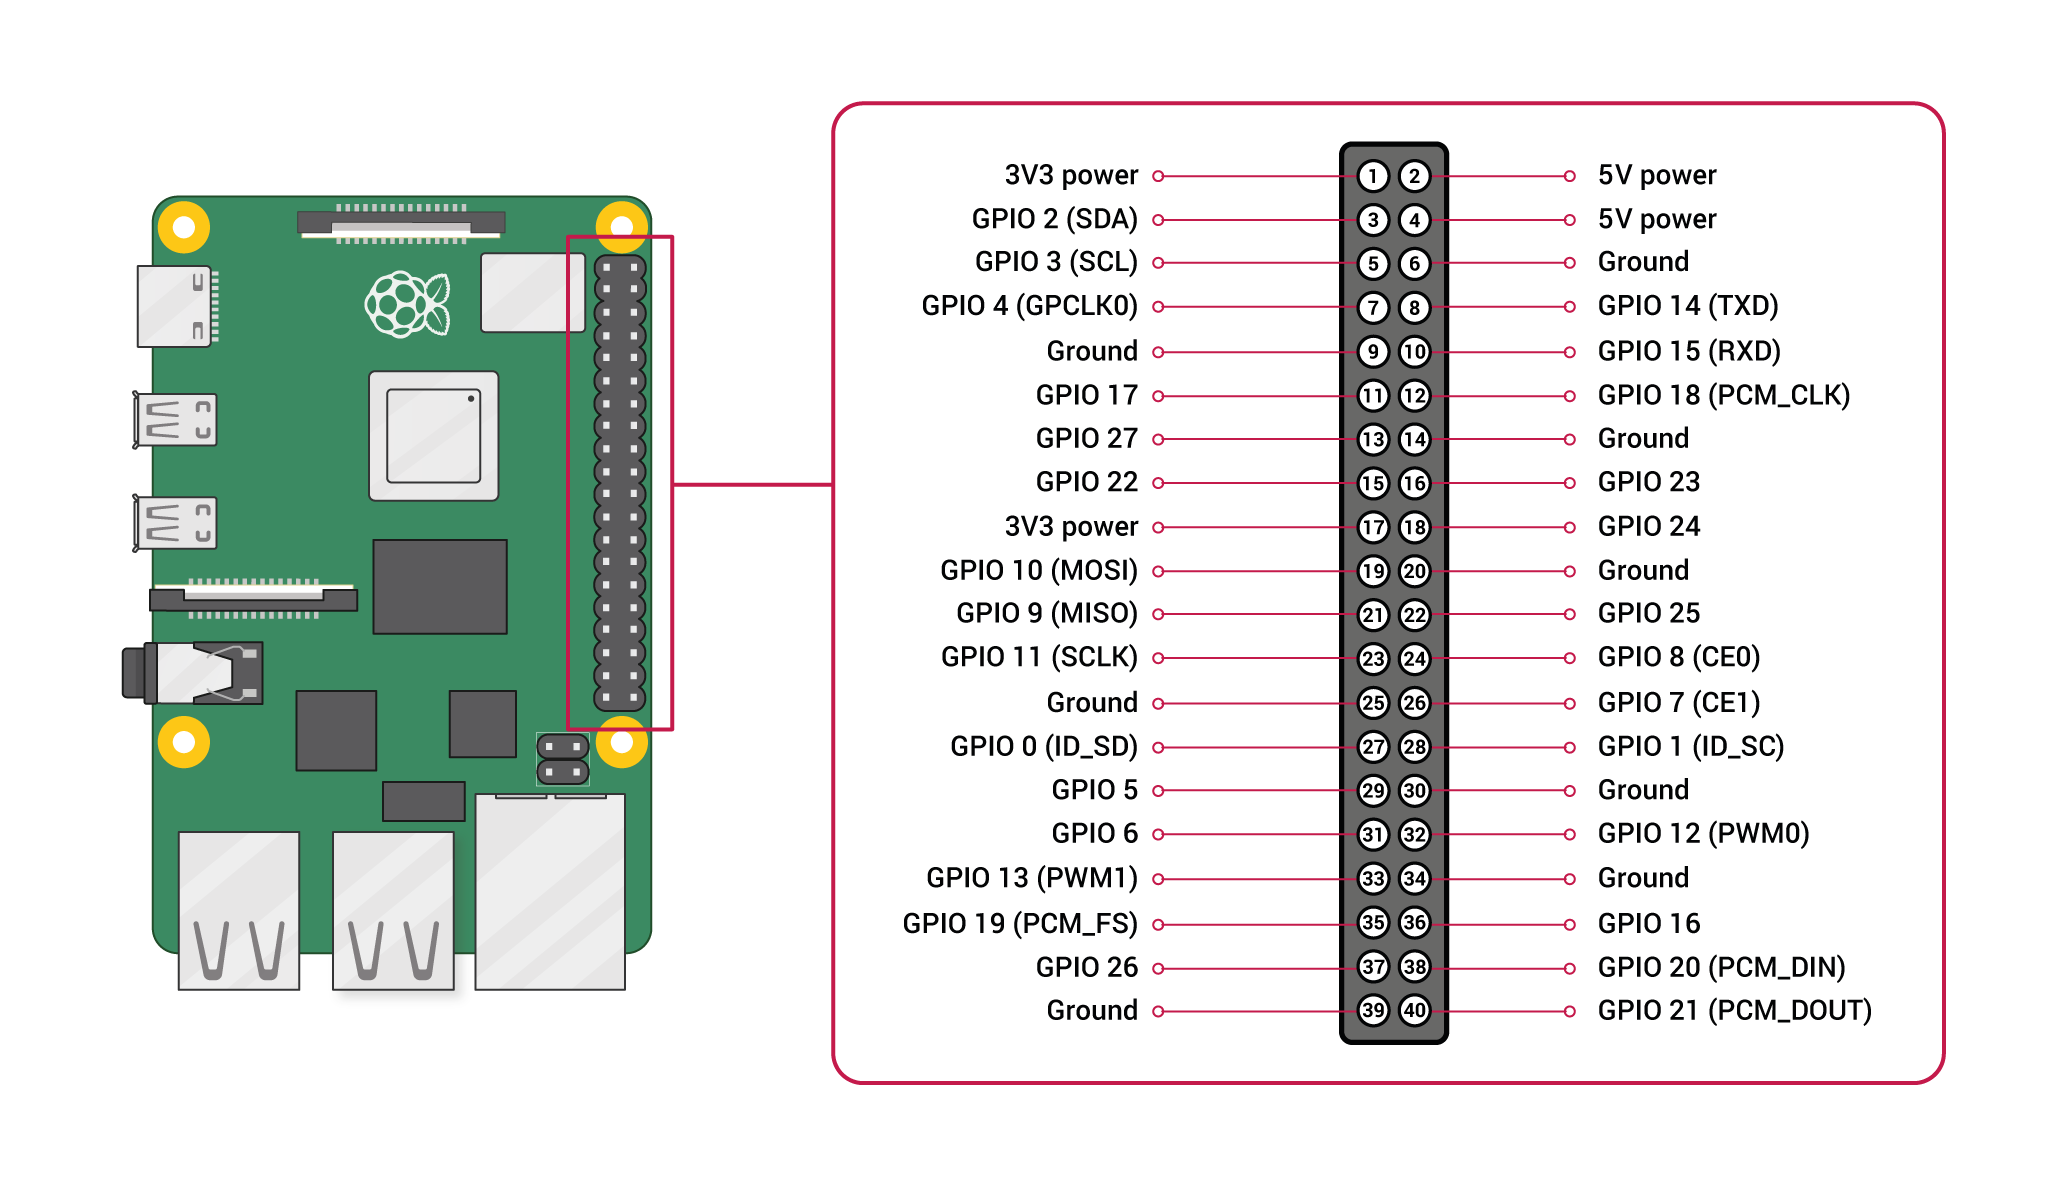
LCDのピンとRasPiのピンとの対応表はこちらになります。
| LCDパネル | RaspPi:name - pin番号 |
|---|---|
| GDN | Ground - 25番 |
| VCC | 3V3 power - 17番 |
| SCL | GPIO 11(SCLK) - 23番 |
| SDA | GPIO 10(MOSI) - 19番 |
| RES | GPIO 5 - 29番 |
| DC | GPIO 6 - 31番 |
| BLK | GPIO 13 - 33番 |
接続はこれで完了です。
1-2. 動作確認
正しく接続されているか、動作確認をしましょう。
動作確認をするためのsampleです。
RasPiからLCDパネルに簡単にアクセスできるライブラリがあるため、そちらを使っていきます。
sudo apt update
sudo apt install python3-rpi.gpio python3-spidev python3-pip python3-pil python3-numpy

sudo pip3 install st7789
背景を変える、画像を読み込んで表示の2パターンを試してみます。
import ST7789
from PIL import Image, ImageDraw, ImageFont

disp=ST7789.ST7789(port=0, cs=0,
        rst=5, dc=6, backlight=13,
        spi_speed_hz=8*1000*1000, offset_left=0, offset_top=0)

disp._spi.mode=3
disp.reset()
disp._init()

## background
image = Image.new("RGB", (disp.width, disp.height), (255, 0, 100))
disp.display(image)
import ST7789
from PIL import Image, ImageDraw, ImageFont

disp=ST7789.ST7789(port=0, cs=0,
        rst=5, dc=6, backlight=13,
        spi_speed_hz=8*1000*1000, offset_left=0, offset_top=0)

disp._spi.mode=3
disp.reset()
disp._init()

## image
image = Image.open("rasbpi.png")
resize_image = image.resize((disp.width, disp.height), resample=Image.LANCZOS)

disp.display(resize_image)
LCDパネルにもよるようなのですが、私の場合にはGithubにあるサンプルのままでは動きませんでした。
・spi_speed_hzを8Mhzに設定(サンプル、デフォルトでは60~80Mhz)
・spi.modeを3にに設定(デフォルトでは0)
この2点をすることで、RasPiからLCDパネルへの出力ができるようになりました。
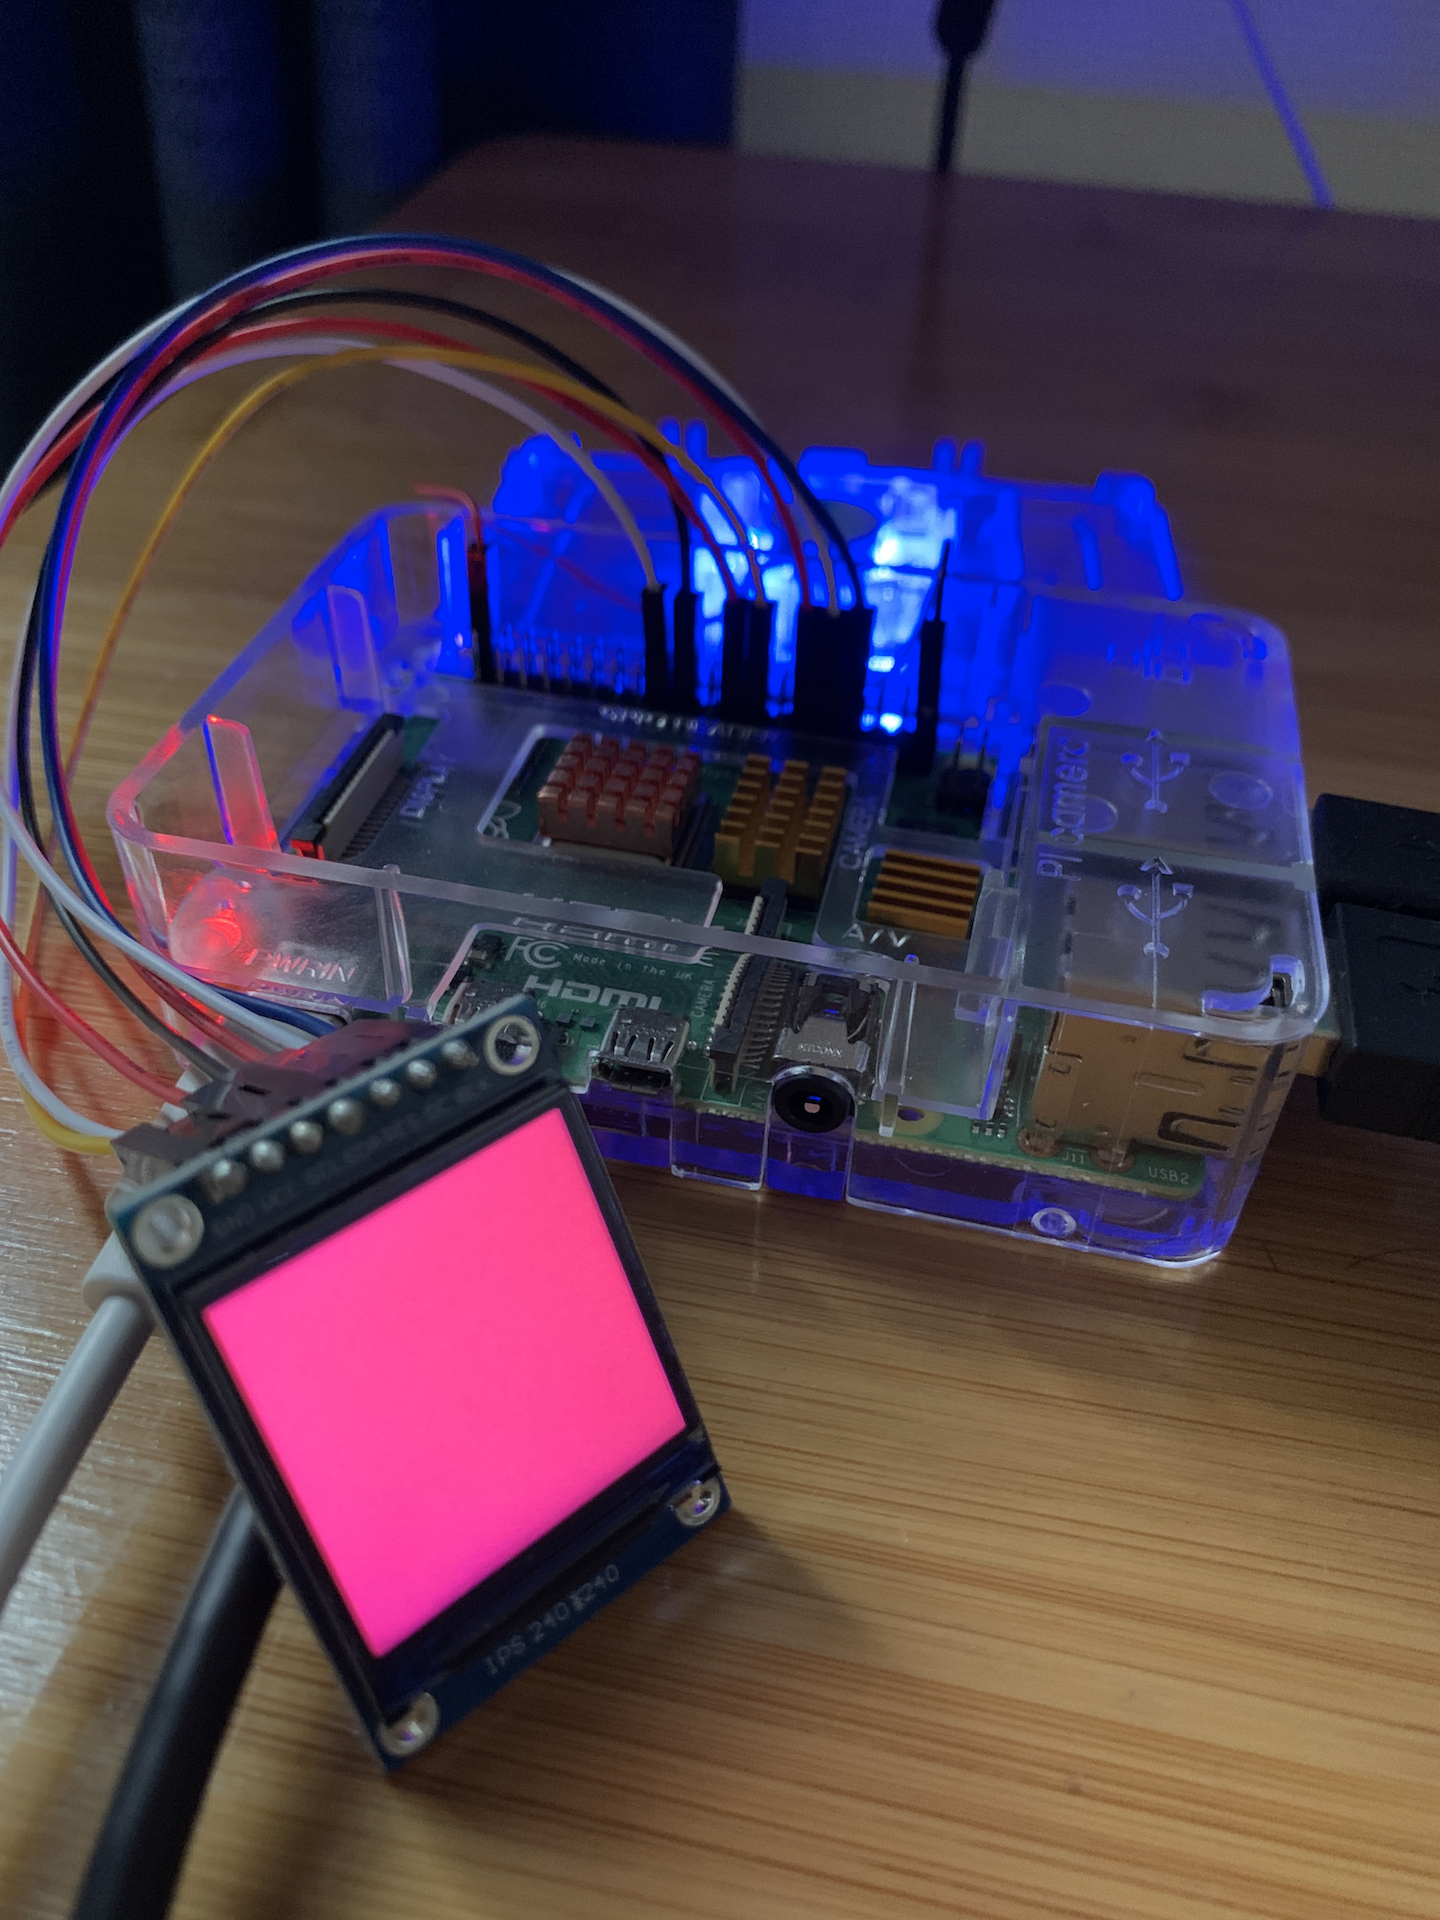
結果はそれぞれこのようになりました。
問題なく接続できていますね。

2. RasPiとUSBマイクを接続
USBマイクであれば基本的にはなんでも良いかと思います。
今回は2,000円ぐらいのものを使いました。

3. RasPi上にSpeech-To-Text環境作成
3-1. Speech-To-Textの準備
Googleのドキュメントの手順通りに進めるのみです。
「認証情報の環境変数を設定する」まで手順に沿って終わらせましょう。
3-2. ライブラリのインストールとコードの準備
今回の環境作成は、コードも含めGoogleのドキュメント:ストリーミング入力の音声を文字変換するをそのまま利用しています。
をベースに作成します。
server.pyでlanguage_codeを「ja-JP」に変更するのを忘れないようにしましょう。
pip3 install --upgrade google-cloud-speech
from __future__ import division

import re
import sys

from google.cloud import speech

import pyaudio
from six.moves import queue

# Audio recording parameters
RATE = 16000
CHUNK = int(RATE / 10)  # 100ms

class MicrophoneStream(object):
    """Opens a recording stream as a generator yielding the audio chunks."""

    def __init__(self, rate, chunk):
        self._rate = rate
        self._chunk = chunk

        # Create a thread-safe buffer of audio data
        self._buff = queue.Queue()
        self.closed = True

    def __enter__(self):
        self._audio_interface = pyaudio.PyAudio()
        self._audio_stream = self._audio_interface.open(
            format=pyaudio.paInt16,
            # The API currently only supports 1-channel (mono) audio
            # https://goo.gl/z757pE
            channels=1,
            rate=self._rate,
            input=True,
            frames_per_buffer=self._chunk,
            # Run the audio stream asynchronously to fill the buffer object.
            # This is necessary so that the input device's buffer doesn't
            # overflow while the calling thread makes network requests, etc.
            stream_callback=self._fill_buffer,
        )

        self.closed = False

        return self

    def __exit__(self, type, value, traceback):
        self._audio_stream.stop_stream()
        self._audio_stream.close()
        self.closed = True
        # Signal the generator to terminate so that the client's
        # streaming_recognize method will not block the process termination.
        self._buff.put(None)
        self._audio_interface.terminate()

    def _fill_buffer(self, in_data, frame_count, time_info, status_flags):
        """Continuously collect data from the audio stream, into the buffer."""
        self._buff.put(in_data)
        return None, pyaudio.paContinue

    def generator(self):
        while not self.closed:
            # Use a blocking get() to ensure there's at least one chunk of
            # data, and stop iteration if the chunk is None, indicating the
            # end of the audio stream.
            chunk = self._buff.get()
            if chunk is None:
                return
            data = [chunk]

            # Now consume whatever other data's still buffered.
            while True:
                try:
                    chunk = self._buff.get(block=False)
                    if chunk is None:
                        return
                    data.append(chunk)
                except queue.Empty:
                    break

            yield b"".join(data)

def listen_print_loop(responses):
    """Iterates through server responses and prints them.

    The responses passed is a generator that will block until a response
    is provided by the server.

    Each response may contain multiple results, and each result may contain
    multiple alternatives; for details, see https://goo.gl/tjCPAU.  Here we
    print only the transcription for the top alternative of the top result.

    In this case, responses are provided for interim results as well. If the
    response is an interim one, print a line feed at the end of it, to allow
    the next result to overwrite it, until the response is a final one. For the
    final one, print a newline to preserve the finalized transcription.
    """
    num_chars_printed = 0
    for response in responses:
        if not response.results:
            continue

        # The `results` list is consecutive. For streaming, we only care about
        # the first result being considered, since once it's `is_final`, it
        # moves on to considering the next utterance.
        result = response.results[0]
        if not result.alternatives:
            continue

        # Display the transcription of the top alternative.
        transcript = result.alternatives[0].transcript

        # Display interim results, but with a carriage return at the end of the
        # line, so subsequent lines will overwrite them.
        #
        # If the previous result was longer than this one, we need to print
        # some extra spaces to overwrite the previous result
        overwrite_chars = " " * (num_chars_printed - len(transcript))

        if not result.is_final:
            sys.stdout.write(transcript + overwrite_chars + "\r")
            sys.stdout.flush()

            num_chars_printed = len(transcript)

        else:
            output_text = transcript + overwrite_chars
            print(transcript + overwrite_chars)
            createPPM([output_text, [0, 255, 0]])

            # Exit recognition if any of the transcribed phrases could be
            # one of our keywords.
            if re.search(r"\b(exit|quit)\b", transcript, re.I):
                print("Exiting..")
                break

            num_chars_printed = 0

def main():
    # See http://g.co/cloud/speech/docs/languages
    # for a list of supported languages.
    language_code = "ja-JP"  # a BCP-47 language tag

    client = speech.SpeechClient()
    config = speech.RecognitionConfig(
        encoding=speech.RecognitionConfig.AudioEncoding.LINEAR16,
        sample_rate_hertz=RATE,
        language_code=language_code,
    )

    streaming_config = speech.StreamingRecognitionConfig(
        config=config, interim_results=True
    )


    with MicrophoneStream(RATE, CHUNK) as stream:
        audio_generator = stream.generator()
        requests = (
            speech.StreamingRecognizeRequest(audio_content=content)
            for content in audio_generator
        )

        responses = client.streaming_recognize(streaming_config, requests)

        # Now, put the transcription responses to use.
        listen_print_loop(responses)

if __name__ == "__main__":
    main()
4. 1-3を繋ぎ合わせる
最終的に作ったものがこちらです
from __future__ import division

import re
import sys
import pyaudio

import ST7789

from PIL import Image, ImageFont, ImageDraw
from subprocess import Popen
from google.cloud import speech
from six.moves import queue

# Audio recording parameters
RATE = 16000
CHUNK = int(RATE / 10)  # 100ms

# font size
FONT_SIZE = 24

# create display instance
disp = ST7789.ST7789(port=0, cs=0,
        rst=5, dc=6, backlight=13,
        spi_speed_hz=8*1000*1000, offset_left=0, offset_top=0)

disp._spi.mode=3
disp.reset()
disp._init()

# image = Image.new("RGB", (disp.width, disp.height), (0, 0, 0))

def display_text(text_color_pair):
    global disp
    font = ImageFont.truetype("/usr/share/fonts/opentype/noto/NotoSansCJK-Medium.ttc", FONT_SIZE)

    image = Image.new("RGB", (disp.width, disp.height), (0, 0, 0))
    draw = ImageDraw.Draw(image)

    x = 10;
    y = 0;

    text = text_color_pair[0]
    color = tuple(text_color_pair[1])

    # break
    split_text = [text[i: i+9] for i in range(0, len(text), 9)]

    for t in split_text:
        draw.text((x, y), t, font = font, fill = color)
        y = y + FONT_SIZE + 2

    disp.reset()
    disp._init()
    disp.display(image)


# init
display_text([u"初期メッセージ表示", [0, 255, 255]])


class MicrophoneStream(object):
    """Opens a recording stream as a generator yielding the audio chunks."""

    def __init__(self, rate, chunk):
        self._rate = rate
        self._chunk = chunk

        # Create a thread-safe buffer of audio data
        self._buff = queue.Queue()
        self.closed = True

    def __enter__(self):
        self._audio_interface = pyaudio.PyAudio()
        self._audio_stream = self._audio_interface.open(
            format=pyaudio.paInt16,
            # The API currently only supports 1-channel (mono) audio
            # https://goo.gl/z757pE
            channels=1,
            rate=self._rate,
            input=True,
            frames_per_buffer=self._chunk,
            # Run the audio stream asynchronously to fill the buffer object.
            # This is necessary so that the input device's buffer doesn't
            # overflow while the calling thread makes network requests, etc.
            stream_callback=self._fill_buffer,
        )

        self.closed = False

        return self

    def __exit__(self, type, value, traceback):
        self._audio_stream.stop_stream()
        self._audio_stream.close()
        self.closed = True
        # Signal the generator to terminate so that the client's
        # streaming_recognize method will not block the process termination.
        self._buff.put(None)
        self._audio_interface.terminate()

    def _fill_buffer(self, in_data, frame_count, time_info, status_flags):
        """Continuously collect data from the audio stream, into the buffer."""
        self._buff.put(in_data)
        return None, pyaudio.paContinue

    def generator(self):
        while not self.closed:
            # Use a blocking get() to ensure there's at least one chunk of
            # data, and stop iteration if the chunk is None, indicating the
            # end of the audio stream.
            chunk = self._buff.get()
            if chunk is None:
                return
            data = [chunk]

            # Now consume whatever other data's still buffered.
            while True:
                try:
                    chunk = self._buff.get(block=False)
                    if chunk is None:
                        return
                    data.append(chunk)
                except queue.Empty:
                    break

            yield b"".join(data)

def listen_print_loop(responses):
    """Iterates through server responses and prints them.

    The responses passed is a generator that will block until a response
    is provided by the server.

    Each response may contain multiple results, and each result may contain
    multiple alternatives; for details, see https://goo.gl/tjCPAU.  Here we
    print only the transcription for the top alternative of the top result.

    In this case, responses are provided for interim results as well. If the
    response is an interim one, print a line feed at the end of it, to allow
    the next result to overwrite it, until the response is a final one. For the
    final one, print a newline to preserve the finalized transcription.
    """
    num_chars_printed = 0
    for response in responses:
        if not response.results:
            continue

        # The `results` list is consecutive. For streaming, we only care about
        # the first result being considered, since once it's `is_final`, it
        # moves on to considering the next utterance.
        result = response.results[0]
        if not result.alternatives:
            continue

        # Display the transcription of the top alternative.
        transcript = result.alternatives[0].transcript

        # Display interim results, but with a carriage return at the end of the
        # line, so subsequent lines will overwrite them.
        #
        # If the previous result was longer than this one, we need to print
        # some extra spaces to overwrite the previous result
        overwrite_chars = " " * (num_chars_printed - len(transcript))

        if not result.is_final:
            sys.stdout.write(transcript + overwrite_chars + "\r")
            sys.stdout.flush()

            num_chars_printed = len(transcript)

        else:
            output_text = transcript + overwrite_chars
            print(transcript + overwrite_chars)
            display_text([output_text, [0, 255, 0]])

            # Exit recognition if any of the transcribed phrases could be
            # one of our keywords.
            if re.search(r"\b(exit|quit)\b", transcript, re.I):
                print("Exiting..")
                break

            num_chars_printed = 0

def main():
    # See http://g.co/cloud/speech/docs/languages
    # for a list of supported languages.
    language_code = "ja-JP"  # a BCP-47 language tag

    client = speech.SpeechClient()
    config = speech.RecognitionConfig(
        encoding=speech.RecognitionConfig.AudioEncoding.LINEAR16,
        sample_rate_hertz=RATE,
        language_code=language_code,
    )

    streaming_config = speech.StreamingRecognitionConfig(
        config=config, interim_results=True
    )


    with MicrophoneStream(RATE, CHUNK) as stream:
        audio_generator = stream.generator()
        requests = (
            speech.StreamingRecognizeRequest(audio_content=content)
            for content in audio_generator
        )

        responses = client.streaming_recognize(streaming_config, requests)

        # Now, put the transcription responses to use.
        listen_print_loop(responses)

if __name__ == "__main__":
    main()
結果
ラズパイ完結でのLCDパネルバージョン pic.twitter.com/F49WUxtK6Y
— hyshr_dev (@HyshrD) December 11, 2021
やりたいことができるものは作れました。
が、表示までの反応が想像よりも時間がかかっています。
音声認識終了後、待ち時間が発生することがあるので、その辺りのチューニングができれば実用できそうな気はします。
おまけ:Azure Cognitive ServiceのPython Clinet環境について
今回RasPi+Python ClientでのAzure Cognitive Service環境作成まではいけませんでした。
- Azure Cognitive ServiceのPython Clientの動作環境は下記を満たす必要がある
- Python 64bit版
- Python バージョン 3.6 - 3.9 (2021/12時点)
- 私のRasPiの環境は
- Python 32bit版
- Python バージョン 3.9
32bit版から64bit版へ切り替えて、色々と動かなくなり記事が間に合わなくなることに対してひよってしまったからです。
RasPiで試すことは諦めましたが、Client版の挙動は気になったので手持ちのMacで環境を作成し試しに動かしてみました。
pip3 install azure-cognitiveservices-speech
あとはサンプルコードをベースにコードを用意します。
 <code>
import azure.cognitiveservices.speech as speechsdk
import time

# Creates an instance of a speech config with specified subscription key and service region.
# Replace with your own subscription key and service region (e.g., "westus").
speech_key, service_region, language = "*********", "********", "ja-JP"

speech_config = speechsdk.SpeechConfig(
    subscription=speech_key, region=service_region, speech_recognition_language=language)

# Creates a recognizer with the given settings
speech_recognizer = speechsdk.SpeechRecognizer(speech_config=speech_config)

print("Say something...")


# Starts speech recognition, and returns after a single utterance is recognized. The end of a
# single utterance is determined by listening for silence at the end or until a maximum of 15
# seconds of audio is processed.  The task returns the recognition text as result.
# Note: Since recognize_once() returns only a single utterance, it is suitable only for single
# shot recognition like command or query.
# For long-running multi-utterance recognition, use start_continuous_recognition() instead.

done = False

def stop_cb(evt):
    print('CLOSING on {}'.format(evt))
    speech_recognizer.stop_continuous_recognition()
    global done
    done = True

speech_recognizer.recognizing.connect(lambda evt: print('RECOGNIZING: {}'.format(evt)))
speech_recognizer.recognized.connect(lambda evt: print('RECOGNIZED: {}'.format(evt)))
speech_recognizer.session_started.connect(lambda evt: print('SESSION STARTED: {}'.format(evt)))
speech_recognizer.session_stopped.connect(lambda evt: print('SESSION STOPPED {}'.format(evt)))
speech_recognizer.canceled.connect(lambda evt: print('CANCELED {}'.format(evt)))

speech_recognizer.session_stopped.connect(stop_cb)
speech_recognizer.canceled.connect(stop_cb)

speech_recognizer.start_continuous_recognition()
while not done:
    time.sleep(.5)

# </code>
実際に試してみると、反応、変換ともにGCPのSpeech-To-TextよりもAzureの方が良さそう。
動物の鳴き声のモノマネのようなものはGCP、Azure共に解析&変換はどっこいどっこいでしたが、普通の会話であれば、個人的な体感としてはAzureの方が良かったです。
まとめ
そんなに難しい場面もなく、RasPiとLCDパネルを使って音声認識したものをテキスト表示できるようになりました。
今回使ったLCDパネルは小さいものでしたが、もっと大きなものでも接続&通信は可能なので、音声入力端末を自分が持っていない場合でも問題ないような、音声認識+パネル表示システムの構築は可能だと思います。
RasPiの会社持ち込みが問題なければ、大きなLCDパネルを買って試しに使ってみたいです。
Ateam Brides Inc. Advent Calendar 2021の13日目は、@Shuniがお送りします。
どんなネタを用意してくるのか楽しみですね!!