self host acme serverを構築して証明書取得の検証を行った
概要
smallstep/certificatesというACMEに対応したオンライン認証局のサーバーを利用してcertbotの検証を行います。
ACMEとは、Automatic Certificate Management Environment の略で、Let's Encryptの中で使われているプロトコルです。HTTPS + JSONが使用されます。
引用元: https://qiita.com/urakarin/items/b0fa10546f4eaf1630db
self hostする理由
ストーリー
ある日、AnsibleでWebサーバーを構築できるようにとplaybookを書いていました。内容はすごく簡単でApache2サーバーにLet's Encryptで用意した証明書を設定してhttps通信できるようにするというものです。
検証にはLXCコンテナを用いていました。しかし、この構成ではLet's Encryptのhttp-01認証が行えないことに気づきました。なぜなら外部からアクセスできないからです。しかもドメインも用意していません。困ったなあ。
理由
ということで今回self hostする理由として以下が挙げられます。
- certbotで証明書を取得する検証を行いたい
- 外部からアクセスできるサーバーを用意できない(面倒くさい)
- ドメインが決まっていない
「certbotで証明書を取得する検証」に関してはLet's Encryptのステージング環境があるので、レート制限を気にしたくないなどの理由がない限りはself hostする理由にはなりませんが、後の2つの問題でLet's Encryptが利用できないので、self hostしようと考えました。ドメインはLXCコンテナのホスト名を利用します。
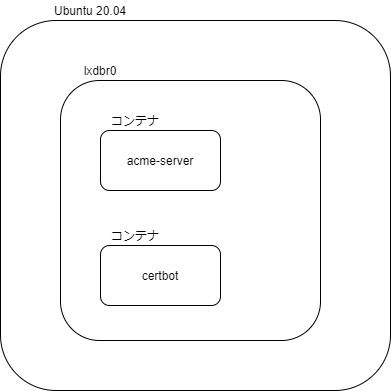
構成
今回の検証ではUbuntu 20.04上のLXDを利用して各サーバーなどを構築します。LXDではホスト名で名前解決できるのでDNSサーバーを構築する必要がないためです。
acme-serverとcertbotのコンテナを作成します。
手順
プロンプト$の後が入力するコマンドです。それ以外の行は出力になります。
準備
lxd init
lxdの初期化を行います。基本的にデフォルトで大丈夫ですが今回ipv6は使わないのでnoneを指定しています。
$ lxd init
Would you like to use LXD clustering? (yes/no) [default=no]:
Do you want to configure a new storage pool? (yes/no) [default=yes]:
Name of the new storage pool [default=default]: Name of the storage backend to use (btrfs, dir, lvm, ceph) [default=btrfs]:
Create a new BTRFS pool? (yes/no) [default=yes]:
Would you like to use an existing block device? (yes/no) [default=no]:
Size in GB of the new loop device (1GB minimum) [default=15GB]:
Would you like to connect to a MAAS server? (yes/no) [default=no]:
Would you like to create a new local network bridge? (yes/no) [default=yes]:
What should the new bridge be called? [default=lxdbr0]:
What IPv4 address should be used? (CIDR subnet notation, “auto” or “none”) [default=auto]:
What IPv6 address should be used? (CIDR subnet notation, “auto” or “none”) [default=auto]: none
Would you like LXD to be available over the network? (yes/no) [default=no]:
Would you like stale cached images to be updated automatically? (yes/no) [default=yes]
Would you like a YAML "lxd init" preseed to be printed? (yes/no) [default=no]:
acme-serverとcertbotのコンテナを作成する
コンテナは以下のコマンドで作成できます。
# lxc launch イメージ名 コンテナ名
今回はubuntuの20.04を利用するのでイメージ名にはubuntu:20.04を指定します。centos 7を利用したい場合はimages:centos/7のように指定します。
$ lxc launch ubuntu:20.04 acme-server
Creating acme-server
Starting acme-server
$ lxc launch ubuntu:20.04 certbot
Creating certbot
Starting certbot
smallstep/certificatesのセットアップ
コンソールに接続する
lxcコンテナのシェルを操作できるようにします。
$ lxc exec acme-server bash
root@acme-server:~#
以降 プロンプトが$の場合はホスト、#の場合はacme-serverのシェルとします。
step-cli
操作用のcliツールをインストールします。
リリースページにdebファイルがあるのでダウンロードします。
現在(2020/12/12時点)で最新のstep-cli_0.15.3_amd64.debをダウンロード・インストールします。
# wget https://github.com/smallstep/cli/releases/download/v0.15.3/step-cli_0.15.3_amd64.deb
# dpkg -i step-cli_0.15.3_amd64.deb
step-ca
リリースページにdebファイルがあるのでダウンロードします。
現在(2020/12/12時点)で最新の step-certificates_0.15.5_amd64.debをダウンロードします。
# wget https://github.com/smallstep/certificates/releases/download/v0.15.5/step-certificates_0.15.5_amd64.deb
# dpkg -i step-certificates_0.15.5_amd64.deb
設定
以下のコマンドでstep-caの設定ファイルやルートCA証明書(自己署名)などを生成します。
# step ca init
✔ What would you like to name your new PKI? (e.g. Smallstep): Test
✔ What DNS names or IP addresses would you like to add to your new CA? (e.g. ca.smallstep.com[,1.1.1.1,etc.]): acme-server.lxd
✔ What address will your new CA listen at? (e.g. :443): :443
✔ What would you like to name the first provisioner for your new CA? (e.g. you@smallstep.com): a@b.c
✔ What do you want your password to be? [leave empty and we'll generate one]:

Generating root certificate...
all done!

Generating intermediate certificate...
all done!

✔ Root certificate: /root/.step/certs/root_ca.crt
✔ Root private key: /root/.step/secrets/root_ca_key
✔ Root fingerprint: 9325322b14fef37b035911aa94e23a07e14d32e10a114672faec1886f91bed4a
✔ Intermediate certificate: /root/.step/certs/intermediate_ca.crt
✔ Intermediate private key: /root/.step/secrets/intermediate_ca_key
✔ Database folder: /root/.step/db
✔ Default configuration: /root/.step/config/defaults.json
✔ Certificate Authority configuration: /root/.step/config/ca.json

Your PKI is ready to go. To generate certificates for individual services see 'step help ca'.

FEEDBACK 😍 🍻
      The step utility is not instrumented for usage statistics. It does not
      phone home. But your feedback is extremely valuable. Any information you
      can provide regarding how you’re using `step` helps. Please send us a
      sentence or two, good or bad: feedback@smallstep.com or join
      https://github.com/smallstep/certificates/discussions.
- What would you like to name your new PKI? (e.g. Smallstep)
- PKIの名前です。適当につけます。
- What DNS names or IP addresses would you like to add to your new CA?
- CAのドメインまたはIPアドレスです。acme-serverのドメインである
acme-server.lxdを指定します。
- CAのドメインまたはIPアドレスです。acme-serverのドメインである
- What address will your new CA listen at? (e.g. :443)
- 何番ポートでListenするかを指定します。今回は
443を指定します。
- 何番ポートでListenするかを指定します。今回は
- What would you like to name the first provisioner for your new CA?
- メールアドレスを指定します。適当に指定します。
- What do you want your password to be?
- 証明書作成時の鍵のパスワードを指定します。入力せずにエンターを押した場合は自動で生成してくれます。
次にacmeの設定をします。acmeという名前で登録します。
# step ca provisioner add acme --type ACME
Success! Your `step-ca` config has been updated. To pick up the new configuration SIGHUP (kill -1 <pid>) or restart the step-ca process.
ルートCA証明書のコピー
certbotのほうで利用するためルートCA証明書をコピーしておきます。
# cat /root/.step/certs/root_ca.crt
-----BEGIN CERTIFICATE-----
MIIBcTCCARegAwIBAgIQe4jDv/EsOwz/LfuSRFt2njAKBggqhkjOPQQDAjAXMRUw
EwYDVQQDEwxUZXN0IFJvb3QgQ0EwHhcNMjAxMjEyMTQ1NzMyWhcNMzAxMjEyMTQ1
NzMyWjAXMRUwEwYDVQQDEwxUZXN0IFJvb3QgQ0EwWTATBgcqhkjOPQIBBggqhkjO
PQMBBwNCAAQWBNVtiHB4xqGUPyefpGJM4H5sI+W2MZTkHCysXlULV/mEwOModNxk
KlCNzZtmJL2b2g4ouBEkhhaLkoUgtbyQo0UwQzAOBgNVHQ8BAf8EBAMCAQYwEgYD
VR0TAQH/BAgwBgEB/wIBATAdBgNVHQ4EFgQUPZUFUy2/1YZJXqeDZMk9J4sWifcw
CgYIKoZIzj0EAwIDSAAwRQIgd2AiBI/mJ6nq3/r9XCQh9QTUt/U9i0Kr+ksZsMdJ
rw8CIQCHdbcTJ7KeS1ebHsOG0fBSU81peYi0MBHKVKnN4BrS2Q==
-----END CERTIFICATE-----
実行
以下のコマンドで実行できます。鍵のパスワードを聞かれるのでstep ca initで指定したパスワードを入力します。
# step-ca /root/.step/config/ca.json
Please enter the password to decrypt /root/.step/secrets/intermediate_ca_key:
2020/12/12 15:08:22 Serving HTTPS on :443 ...
次はcertbotのセットアップを行います。別のターミナルを開いて作業してください。
certbotのセットアップ
コンソールに接続する
lxcコンテナのシェルを操作できるようにします。
$ lxc exec certbot bash
root@certbot:~#
以降 プロンプトが$の場合はホスト、#の場合はcertbotのシェルとします。
certbotコマンドのインストール
aptでインストールできます。install時にY/nを求められるので適宜yを入力するか-yオプションを指定してください。
# apt update
# apt install certbot
step-caのルートCA証明書をインストールする
/usr/local/share/ca-certificates/以下にacme-serverのセットアップでコピーした証明書のファイルを設置します。
# cat <<EOF > /usr/local/share/ca-certificates/my-root-ca.crt
-----BEGIN CERTIFICATE-----
MIIBcTCCARegAwIBAgIQe4jDv/EsOwz/LfuSRFt2njAKBggqhkjOPQQDAjAXMRUw
EwYDVQQDEwxUZXN0IFJvb3QgQ0EwHhcNMjAxMjEyMTQ1NzMyWhcNMzAxMjEyMTQ1
NzMyWjAXMRUwEwYDVQQDEwxUZXN0IFJvb3QgQ0EwWTATBgcqhkjOPQIBBggqhkjO
PQMBBwNCAAQWBNVtiHB4xqGUPyefpGJM4H5sI+W2MZTkHCysXlULV/mEwOModNxk
KlCNzZtmJL2b2g4ouBEkhhaLkoUgtbyQo0UwQzAOBgNVHQ8BAf8EBAMCAQYwEgYD
VR0TAQH/BAgwBgEB/wIBATAdBgNVHQ4EFgQUPZUFUy2/1YZJXqeDZMk9J4sWifcw
CgYIKoZIzj0EAwIDSAAwRQIgd2AiBI/mJ6nq3/r9XCQh9QTUt/U9i0Kr+ksZsMdJ
rw8CIQCHdbcTJ7KeS1ebHsOG0fBSU81peYi0MBHKVKnN4BrS2Q==
-----END CERTIFICATE-----
EOF
システム証明書を更新します。
# update-ca-certificates
Updating certificates in /etc/ssl/certs...
1 added, 0 removed; done.
Running hooks in /etc/ca-certificates/update.d...
done.
certbotで証明書を取得する
certbotコマンドで証明書を取得します。
コマンドを実行するマシンはcertbot.lxdで名前解決できるのでこれを指定します。
--serverで以下のようにacmeサーバーのURLを指定します。
-
https://{サーバーのドメイン}/acme/{名前}/directory- {サーバーのドメイン}: 今回は
acme-server.lxdです - {名前}:
step ca provisioner addで追加した名前を指定します。今回はacmeです。
- {サーバーのドメイン}: 今回は
# certbot certonly --standalone --server https://acme-server.lxd/acme/acme/directory \
    -d certbot.lxd -m a@b.c -n --agree-tos
Saving debug log to /var/log/letsencrypt/letsencrypt.log
Plugins selected: Authenticator standalone, Installer None
Obtaining a new certificate
Performing the following challenges:
http-01 challenge for certbot.lxd
Waiting for verification...
Cleaning up challenges

IMPORTANT NOTES:
 - Congratulations! Your certificate and chain have been saved at:
   /etc/letsencrypt/live/certbot.lxd/fullchain.pem
   Your key file has been saved at:
   /etc/letsencrypt/live/certbot.lxd/privkey.pem
   Your cert will expire on 2020-12-13. To obtain a new or tweaked
   version of this certificate in the future, simply run certbot
   again. To non-interactively renew *all* of your certificates, run
   "certbot renew"
 - If you like Certbot, please consider supporting our work by:

   Donating to ISRG / Let's Encrypt:   https://letsencrypt.org/donate
   Donating to EFF:                    https://eff.org/donate-le
取得することができました! 実際に発行された証明書を見てみます。
# ls -la /etc/letsencrypt/live/certbot.lxd
total 20
drwxr-xr-x 1 root root  94 Dec 12 15:20 .
drwx------ 1 root root  34 Dec 12 15:20 ..
-rw-r--r-- 1 root root 692 Dec 12 15:20 README
lrwxrwxrwx 1 root root  35 Dec 12 15:20 cert.pem -> ../../archive/certbot.lxd/cert1.pem
lrwxrwxrwx 1 root root  36 Dec 12 15:20 chain.pem -> ../../archive/certbot.lxd/chain1.pem
lrwxrwxrwx 1 root root  40 Dec 12 15:20 fullchain.pem -> ../../archive/certbot.lxd/fullchain1.pem
lrwxrwxrwx 1 root root  38 Dec 12 15:20 privkey.pem -> ../../archive/certbot.lxd/privkey1.pem

# openssl x509 -text -noout -in /etc/letsencrypt/live/certbot.lxd/cert.pem
Certificate:
    Data:
        Version: 3 (0x2)
        Serial Number:
            ad:00:ee:46:08:d5:f1:01:48:f3:f2:09:44:bc:78:d9
        Signature Algorithm: ecdsa-with-SHA256
        Issuer: CN = Test Intermediate CA
        Validity
            Not Before: Dec 12 15:19:06 2020 GMT
            Not After : Dec 13 15:20:06 2020 GMT
        Subject:
        Subject Public Key Info:
            Public Key Algorithm: rsaEncryption
                RSA Public-Key: (2048 bit)
                Modulus:
                    00:b0:6d:0f:da:37:80:e4:2b:fa:cd:fa:96:aa:f4:
                    9c:4d:ca:77:67:7f:b2:ca:aa:ef:c8:36:92:31:ed:
                    18:ce:7b:9f:b0:82:4c:f3:58:a3:8f:1e:30:56:27:
                    45:5e:24:5e:9b:7f:48:65:f1:ff:84:c7:9f:a8:ce:
                    c2:eb:a6:52:96:f4:1d:d0:b6:89:c6:c5:31:c4:40:
                    74:b9:98:d7:83:eb:b9:8c:a4:38:ef:ea:29:f7:97:
                    b3:94:ae:91:f5:16:27:77:91:95:ab:ce:8f:b0:24:
                    08:7f:26:e1:4e:08:3e:a6:0f:79:49:8c:7d:13:6f:
                    6b:7b:67:d1:07:d5:32:4a:82:c8:c8:1b:36:36:12:
                    cc:a0:de:02:6e:13:d5:1b:d0:a0:ea:9d:d1:2a:23:
                    58:6c:fe:37:4f:8f:d4:7f:61:fe:e6:36:c2:2d:8c:
                    6b:c1:0e:19:1e:2a:96:f0:89:50:25:b1:b9:6c:d4:
                    ad:24:0d:36:9c:81:4f:36:0f:c9:8c:0d:80:c0:0a:
                    47:87:e7:c7:23:0d:aa:da:ec:94:14:5a:b7:36:2c:
                    01:55:cb:66:6b:b0:76:c0:8a:e8:5f:bd:a6:b8:fe:
                    50:c4:cd:fe:65:92:50:d6:37:da:0f:c3:c9:8d:6c:
                    cc:f6:b4:cc:19:84:0a:97:5d:23:b5:be:13:d4:1b:
                    88:ab
                Exponent: 65537 (0x10001)
        X509v3 extensions:
            X509v3 Key Usage: critical
                Digital Signature, Key Encipherment
            X509v3 Extended Key Usage:
                TLS Web Server Authentication, TLS Web Client Authentication
            X509v3 Subject Key Identifier:
                20:11:CE:6C:2D:59:AC:74:46:7B:76:94:FE:65:B4:FC:04:A0:9F:F1
            X509v3 Authority Key Identifier:
                keyid:E0:1B:D7:8B:C7:F3:07:27:9E:59:0A:91:85:B6:19:14:D9:80:D9:5F

            X509v3 Subject Alternative Name: critical
                DNS:certbot.lxd
            1.3.6.1.4.1.37476.9000.64.1:
                0......acme..
    Signature Algorithm: ecdsa-with-SHA256
         30:46:02:21:00:ec:2e:e3:fa:a3:35:ee:01:68:cf:17:df:cb:
         4f:3c:4e:ed:89:86:2d:0b:45:11:0a:9d:87:e5:54:5c:0b:bd:
         06:02:21:00:93:13:e1:20:32:b9:c9:a0:72:ca:e0:49:29:aa:
         73:4d:76:34:69:50:a5:77:98:ce:72:e8:b4:54:fb:a3:b3:93
Issuer: CN = Test Intermediate CAはstep-caにあるCAのことです。
Validityにある通り証明書の有効期限は1日で生成されています。これはstep-caの設定で変更することができます。
        Validity
            Not Before: Dec 12 15:19:06 2020 GMT
            Not After : Dec 13 15:20:06 2020 GMT
証明書の有効期限が1日なのでcertbot renewも試せます。
# certbot renew
Saving debug log to /var/log/letsencrypt/letsencrypt.log

- - - - - - - - - - - - - - - - - - - - - - - - - - - - - - - - - - - - - - - -
Processing /etc/letsencrypt/renewal/certbot.lxd.conf
- - - - - - - - - - - - - - - - - - - - - - - - - - - - - - - - - - - - - - - -
Cert is due for renewal, auto-renewing...
Plugins selected: Authenticator standalone, Installer None
Renewing an existing certificate
Performing the following challenges:
http-01 challenge for certbot.lxd
Waiting for verification...
Cleaning up challenges

- - - - - - - - - - - - - - - - - - - - - - - - - - - - - - - - - - - - - - - -
new certificate deployed without reload, fullchain is
/etc/letsencrypt/live/certbot.lxd/fullchain.pem
- - - - - - - - - - - - - - - - - - - - - - - - - - - - - - - - - - - - - - - -

- - - - - - - - - - - - - - - - - - - - - - - - - - - - - - - - - - - - - - - -

Congratulations, all renewals succeeded. The following certs have been renewed:
  /etc/letsencrypt/live/certbot.lxd/fullchain.pem (success)
- - - - - - - - - - - - - - - - - - - - - - - - - - - - - - - - - - - - - - - -

# openssl x509 -text -noout -in /etc/letsencrypt/live/certbot.lxd/cert.pem  | grep -A 2 Validity
        Validity
            Not Before: Dec 12 15:54:59 2020 GMT
            Not After : Dec 13 15:55:59 2020 GMT
さいごに
以上の手順で簡単にcertbotの検証環境を構築することができました。またLXCコンテナを用いた検証環境のため、Ansibleなどの検証が容易にでき重宝しました。
蛇足: ルートCA証明書をインストールしない場合
certbotがacme-serverと通信するときにhttps通信を行います。その時に使用されるのがルートCA証明書で署名された証明書を利用します。そのため、certbotコマンドを実行するマシンにルートCA証明書をインストールする必要があります。
certbotコマンドを実行するマシンに証明書をインストールするのが面倒くさい、又はできない場合は、Let's Encryptで取得した正規の証明書をacme-serverのhttps通信用に設定し、そのドメインでcerbotコマンドに指定すればルートCA証明書をインストールする必要はなくなります。もちろん、コンテナのIPアドレスを引ける必要がありますが...。
他には、名前ベースでプロキシするプロキシサーバーを経由してアクセスできるようにするという方法もあります。その場合はcerbotとプロキシサーバー間を正規の証明書、プロキシサーバーとacme-server間をルートCA証明書(自己署名)で通信するように設定します。
(これらの解決策をやる方が面倒だ...)