ありがちだけど、Pythonでチャットボット作ってみた
Python・機械学習の初心者ですが、遊びでチャットボット作ってみました。
似たような記事はよくある気がしますが、qiitaに投稿してみたかったのと何か意見がもらえたら嬉しいので手順をまとめました。
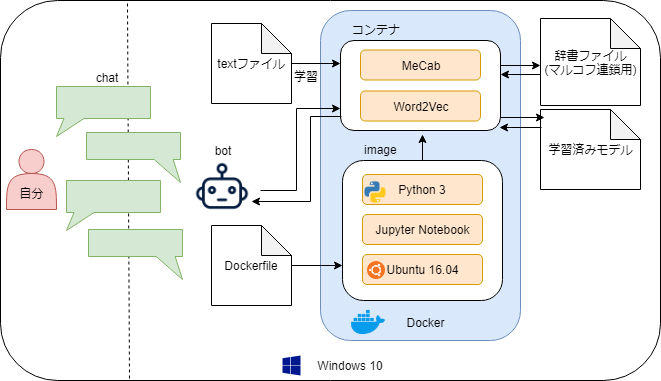
プログラムの概要
言語はPythonで、MeCabとWord2Vecを利用し、入力された単語に対してマルコフ連鎖で自動作文をさせるプログラムです。
※入力された文章ではなく単語1語
ちなみに私は自分の日記4年分のテキストファイルを学習させました。
正直なところ、チャットボットとしてのクオリティーが低すぎて会話してる感はありませんでした。が、「昔こういう言葉よく使ってたな~」という楽しみはありました。
動かした環境
- Windows 10(ホストOS)
- VM VirtualBox -> Docker Toolbox
- Ubuntu 16.04
- Jupyter Notebook
- Python 3
- MeCab
- Word2Vec
- Ubuntu 16.04
- utf-8かshift_jis のtxtファイルで学習
- VM VirtualBox -> Docker Toolbox
参考にしたソース
こちらを参考にさせて頂きました👇
①【チャットボット入門】syamu_gameと会話しよう
② すぐに使える!業務で実践できる!Pythonによる AI・機械学習・深層学習アプリのつくり方 (書籍) - 4章
全体の流れ
- 実行環境を構築(docker)
- Jupyter Notebookを開く
- 学習済みモデルを作成(mecabとword2vec)
- マルコフ連鎖用の辞書を作成
- チャットする
事前準備
- Docker Toolboxをインストールしておく
- ここからDockerfileをローカルにコピーさせて頂く
1. 実行環境を構築(docker)
① Docker Quickstart Terminalを起動
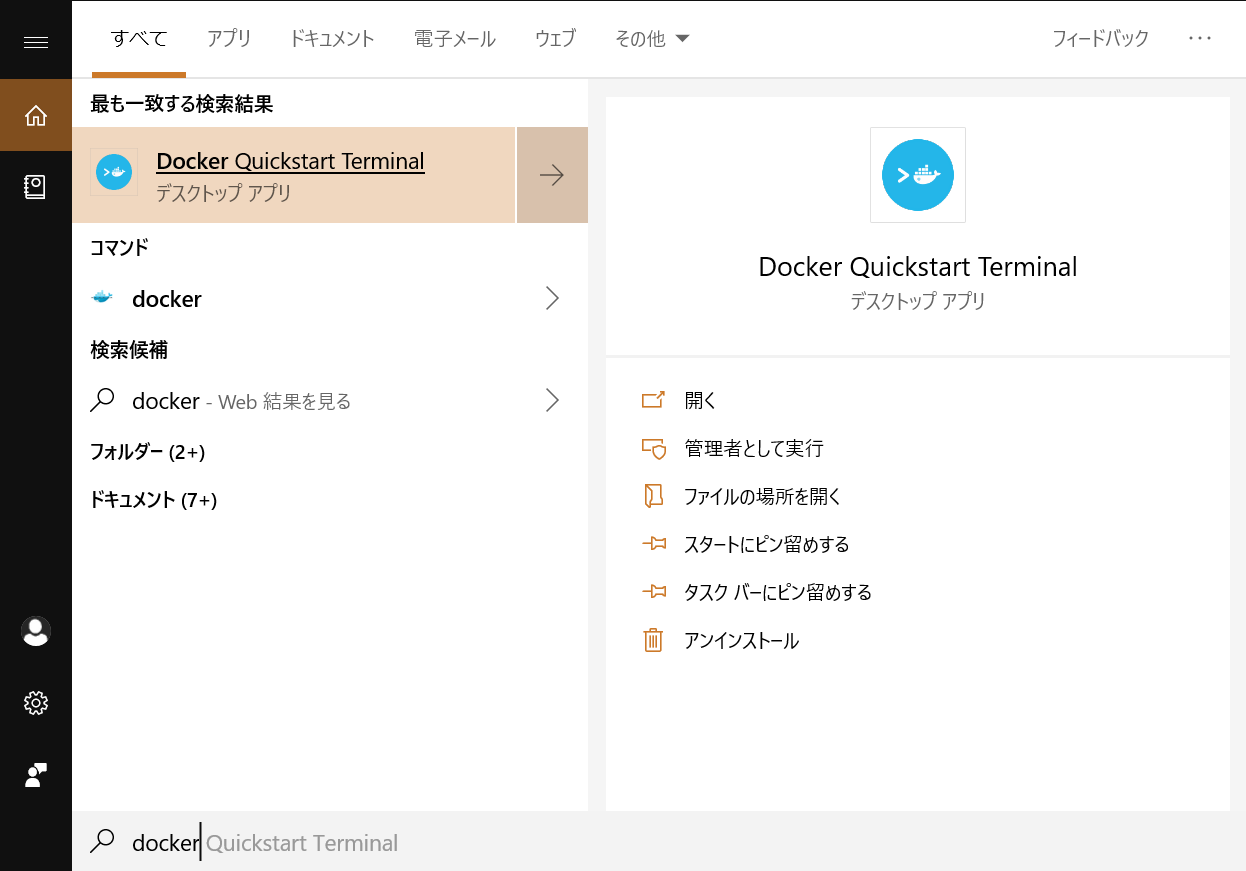
② cdコマンドでDockerfileをコピーしたディレクトリに移動する
cd {Dockerfileをコピーしたフォルダ}
③ イメージを作成する
docker build -t tanjun-chat-bot .
④ コンテナを作成・起動しコンテナに入る
docker run -it -p 8888:8888 -v /{Dockerfileをコピーしたフォルダ}:/{Dockerfileをコピーしたフォルダ名} --name tanjun-chat-bot tanjun-chat-bot
例:docker run -it -p 8888:8888 -v //c/Users/hogehoge/tanjun-chat-bot:/tanjun-chat-bot --name tanjun-chat-bot tanjun-chat-bot
※ 同じ単語使いすぎ...
//c/Users/hogehoge/tanjun-chat-bot☞ マウントするホスト側のディレクトリ
:/tanjun-chat-bot ☞ コンテナ上でのディレクトリ
--name tanjun-chat-bot☞ コンテナ名
tanjun-chat-bot ☞ イメージ名
⑤ デフォルトをPython2からPython3に変更
※変更の必要はないですが、jupyter notebookを介さずにpython動かしたいときに便利なので一応変えます。
which python
と打つと、/usr/bin/pythonと表示され、
ls -l /usr/bin/python
シンボリックリンクを確認すると、/usr/bin/python -> python2.7とpython2に紐づいているので、
ln -nfs /usr/bin/python3 /usr/bin/python
とpython3にシンボリックリンクを変更する。
2. Jupyter Notebookを開く
docker上で起動したjupyter notebookをホストOSのブラウザで操作する。
① dockerを起動したときに表示されたIPアドレスを確認する

② Jupyter Notebookを起動する
jupyter notebook --no-browser --ip=0.0.0.0 --allow-root --NotebookApp.iopub_data_rate_limit=100000000
③ ブラウザでJupyter Notebookを開く
ターミナルに表示されているhttp://(1a6611d8c398 or 127.0.0.1):8888/...の(1a6611d8c398 or 127.0.0.1)部分を、先ほど確認したIPアドレスに書き換え、ブラウザからアクセスする。
④ ターミナルに表示されているtokenを入力し、ログインする
ブラウザの入力ボックスにtokenを貼り付け、ログインする。http://(~ or 127.0.0.1):8888/?token= {ここをコピーする}

3. 学習済みモデルを作成(mecabとword2vec)
① ファイルを作成する
画像のように、python3で動くノートを作成する

② mecabとword2vecを使えるようにする
!curl -kL https://bootstrap.pypa.io/get-pip.py | python3

!apt-get update -y
!apt-get upgrade -y
# 👆について、十分な空き容量がないとエラーになる場合がある。エラーメッセージでググったら解決法でる。

!apt-get -yV install swig-doc
!apt-get -yV install swig-examples
!apt-get -yV install swig2.0-doc
!apt-get -yV install swig2.0-
!apt-get -yV install swig2.0
!apt-get -yV install swig

!apt-get install mecab libmecab-dev mecab-ipadic-utf8 -y

!git clone --depth 1 https://github.com/neologd/mecab-ipadic-neologd.git /tmp/work/
# 👆のclone先をホストOSとの共有ディレクトリにしているとエラーとなる場合がある。
# そのためtmp/workに保存している

!mkdir /var/lib/mecab/dic/mecab-ipadic-neologd

!apt-get install file -y

!/tmp/work/bin/install-mecab-ipadic-neologd -n -p /var/lib/mecab/dic/mecab-ipadic-neologd -y
# 👆はdockerのVM VirtualMachineのメモリ割り当てが1024MBの場合エラーが出ることがある。1.5GB(1538MB)くらいに増やすと私はエラー出なくなりました。

!pip install mecab-python3

import MeCab
import sys
import MeCab
m = MeCab.Tagger ("-d /var/lib/mecab/dic/mecab-ipadic-neologd")
print(m.parse ("すもももももももものうち"))
# 👆mecabの稼働確認
# runtime errorとなる場合、まず !/tmp/work/bin/install-mecab-ipadic-neologd -n -p /var/lib/mecab/dic/mecab-ipadic-neologd -y のコマンド単体でエラー出るか確認する。このコマンドがダメならおそらくメモリ不足。

!pip install gensim
# word2vecの準備
上記のコマンドをセルに貼り付け実行する。


完了には結構時間がかかるので、暇なときにやるのがお勧めです。
③ 学習させるデータを格納する
Dockerfileと同じ階層のディレクトリにdataフォルダを作成し、さらにその中にlearningフォルダを作成、その中に学習させたいtxtファイル(utf-8かshift_jis)を格納する。
④ いよいよ文章を学習させる
セルを追加し、以下をコピペ、実行する
# 分かち書き作成
# 学習済みモデルを作成するため。分かち書きファイルを作成
import MeCab
import os, glob

wakati_file = './data/wakati.txt'

def wakati(text):
        result = []
        #各行に分ける(windowsの改行コード\r\nを想定)
        lines = text.split('\r')
        for line in lines:
            line = line.replace('\n','')

            # 形態素解析
            tagger = MeCab.Tagger("-d /var/lib/mecab/dic/mecab-ipadic-neologd")

            for chunk in tagger.parse(line).splitlines()[:-1]:
                (surface, hinshi) = chunk.split('\t')
                if hinshi.startswith('名詞') or hinshi.startswith('動詞') or hinshi.startswith('形容詞'):
    #           文章の一番最初に出てくる名詞or動詞or形容詞について処理を実行する
                    if '*' in hinshi.split(",")[6]:
    #                     基本形が存在しない場合、表層形を返す
                        result.append(surface)
                    else :
    #                     基本形を返す
                        result.append(hinshi.split(",")[6])
                elif hinshi.startswith('感動詞'):
                    result.append(surface)
        return result

def main(file):
    words = []
    file_dir = os.path.abspath(file)
    try:
        bindata = open(file_dir, 'rb').read()
        text = bindata.decode('shift_jis')
        words = wakati(text)
    except:
        try:
            text = bindata.decode('utf-8')
        except:
            try:
                text = bindata.decode('cp932')
            except Exception as e:
                print('error!',e)
                exit(0)

    with open(wakati_file, 'a', encoding='utf-8') as f:
        f.write(' '.join(words))

if __name__ == '__main__':
    if os.path.exists(wakati_file):
#         すでにわかち書きが存在する場合削除
        os.remove(wakati_file)
        print('remove -> ' + wakati_file)
#   learningフォルダ直下のテキストファイルを読み込む
    files = glob.glob('./data/learning/*.txt')
    for file in files:
        if not 'wakati' in file:
            print(file)
            main(file)
これでわかち書き(単語ごとにバラバラにした)ファイルが作成できた。
④ 学習積みモデルを作成(機械学習!)
パラメータ適当に設定し、word2vecでモデルを作成する
# word2vecでモデル作成
from gensim.models import word2vec

wakati_file = './data/wakati.txt'
model_file = './data/daily_w2v_model.model'

if __name__ == '__main__':
    file_dir = wakati_file
    w2v_data = word2vec.LineSentence(file_dir)
    model = word2vec.Word2Vec(w2v_data, size=100, window=3, hs=1, min_count=1, sg=1)
    model.save(model_file)
dateフォルダ直下に、wakati.txtとdaily_w2v_model.modelができていて、いい感じのファイルサイズ(軽すぎない)であれば完了。
4. マルコフ連鎖用の辞書を作成
① 会話の返答をマルコフ連鎖で返すためのjsonファイルを作成
※「マルコフ連鎖って?」という方はググっ見てください。要はつねにサイコロを転がして選択するということです。
ここでいうマルコフ連鎖は、ボットがある単語をしゃべろうとしたときに、次になんの単語をしゃべるのか、サイコロを振って(ランダムで選択)単語を紡いでいくというイメージです。
以下のコードを新たなセルに貼り付け、実行
# マルコフ辞書の作成
import MeCab
import json, os, glob

markov_file = "./data/markov_dict.json"
dic = {}

def wakati(text):
    wordlist = []
    lines = text.split('\r')
    for line in lines:
        line = line.replace('\n','')

        # 形態素解析
        tagger = MeCab.Tagger("-d /var/lib/mecab/dic/mecab-ipadic-neologd")

        for chunk in tagger.parse(line).splitlines()[:-1]:
            (surface, hinshi) = chunk.split('\t')

            if  hinshi not  in ["BOS/EOS"]:
                if hinshi.startswith('記号'):
#                   記号を辞書に登録しない
                    pass
                elif '*' in hinshi.split(",")[6]:
#                   基本形が存在しない場合、表層形を返す
                    wordlist.append([surface,hinshi])
                else :
#                   基本形を返す
                    wordlist.append([hinshi.split(",")[6],hinshi])

    return wordlist

def regist_dic(wordlist):
    global dic
    w1 = ""
    w2 = ""

    # 要素が3未満の場合は、何もしない
    if len(wordlist) < 3 : return

    for w in wordlist :
        word = w[0]
        if word == "" or  word == "\r\n" or word == "\n" : continue
        # 辞書に単語を設定
        if w1 and w2 :
            set_dic(dic,w1, w2, word)
        # 文末を表す語のの場合、連鎖をクリアする
        if word == "。" or word == "?" or  word == "?" :
            w1 = ""
            w2 = ""
            continue
        # 次の前後関係を登録するために、単語をスライド
        w1, w2 = w2, word

    # 辞書を保存
    json.dump(dic, open(markov_file,"w", encoding="utf-8"))

# 辞書に単語を設定 --- (*2)
def set_dic(dic, w1, w2, w3):
    # 新しい単語の場合は、新しい辞書オブジェクトを作成
    if w1 not in dic : dic[w1] = {}
    if w2 not in dic[w1] : dic[w1][w2] = {}
    if w3 not in dic[w1][w2]: dic[w1][w2][w3] = 0
    # 単語の出現数をインクリメントする
    dic[w1][w2][w3] += 1

if __name__ == '__main__':
        if os.path.exists(markov_file):
#         すでにわかち書きが存在する場合削除
            os.remove(markov_file)
            print('remove -> ' + markov_file)
        files = glob.glob('./data/learning/*.txt')
        for file in files:
            if not 'wakati' in file:
                print(file)
                try:
                    bindata = open(file, 'rb').read()
                    text = bindata.decode('shift_jis')
                except:
                    try:
                        text = bindata.decode('utf-8')
                    except:
                        try:
                            text = bindata.decode('cp932')
                        except Exception as e:
                            print('error!',e)
                            exit(0)

                wordlist = wakati(text)
                regist_dic(wordlist)
dataフォルダ直下にmarkov_dict.jsonができていればOKです。
以上でマルコフ連鎖で返答するための辞書が作成完了です!
5. チャットする
作成した学習済みモデル、マルコフ連鎖用辞書を用いて、会話してみます。
# chatを開始
import MeCab
from gensim.models import word2vec
import json, random, os

markov_dict = "./data/markov_dict.json"
model_file = './data/daily_w2v_model.model'


def preprocessing(sentence):
    return sentence.rstrip()

def talk_markov(text):
        # 文章整形
        if text[-1] != "." or text[-1] != "?" or text[-1] != "?" or text[-1] != "!" or text[-1] != "!":
            text = text[:-1]
            text += '。'

        # 形態素解析
        tagger = MeCab.Tagger("-d /var/lib/mecab/dic/mecab-ipadic-neologd")

        sentence = preprocessing(text)

        for chunk in tagger.parse(sentence).splitlines()[:-1]:
            (surface, hinshi) = chunk.split('\t')
            if hinshi.startswith('名詞') or hinshi.startswith('動詞') or hinshi.startswith('形容詞'):
#           文章の一番最初に出てくる名詞or動詞or形容詞について処理を実行する
                if '*' in hinshi.split(",")[6]:
#                     基本形が存在しない場合、表層形を返す
                    return surface
                else :
#                     基本形を返す
                    return hinshi.split(",")[6]
            elif hinshi.startswith('感動詞'):
#             感動詞の場合そのまま返答
                return '@' + surface

        return '@'

def load_w2v(word):
    model = word2vec.Word2Vec.load(model_file)
    try:
        similar_words = model.wv.most_similar(positive=[word])
        return random.choice([w[0] for w in similar_words])
    except:
        return word

def word_choice(sel):
    keys = sel.keys()
    ran = random.choice(list(keys))
    return ran

def make_sentence(reply):
    if '@' in reply:
#       感動詞の場合そのまま返す
        return word.replace('@','')

    markov_dic = json.load(open(markov_dict))
    if not reply == '':
        ret = []
        try:
            top = markov_dic[reply]
            word1 = word_choice(top)
            word2 = word_choice(top[word1])
            ret.append(reply)
            ret.append(word1)
            ret.append(word2)
        except Exception as e:
#             print('error:',e)
            return 'Sorry. There is no vocabulary.'

        while True:
            word3 = word_choice(markov_dic[word1][word2])
            ret.append(word3)
            if word3 == '。':
                break
            if len(ret) >= 10:
                ret.append('。')
                break
            word1, word2 = word2, word3
        return ''.join(ret)
    else:
        return ''

if __name__ == '__main__':
    while True:
        input_message = input('you -> ')
        if input_message == 'bay' or input_message == '':
            print('bot -> ' + 'bay !')
            break
            exit(0)
        word = talk_markov(input_message)
        if not '@' == word:
            reply = load_w2v(word)
        else:
#           名詞・動詞・形容詞・感動詞以外の場合
            reply = ''
        sentence = make_sentence(reply)
        print('bot -> ' + sentence)
bayと打つとチャットが終了します。
学習させたデータに関連ワードがないと、Sorry. There is no vocabulary.と表示されます。
挨拶など、感動詞は入力に対してそのまま返答します。
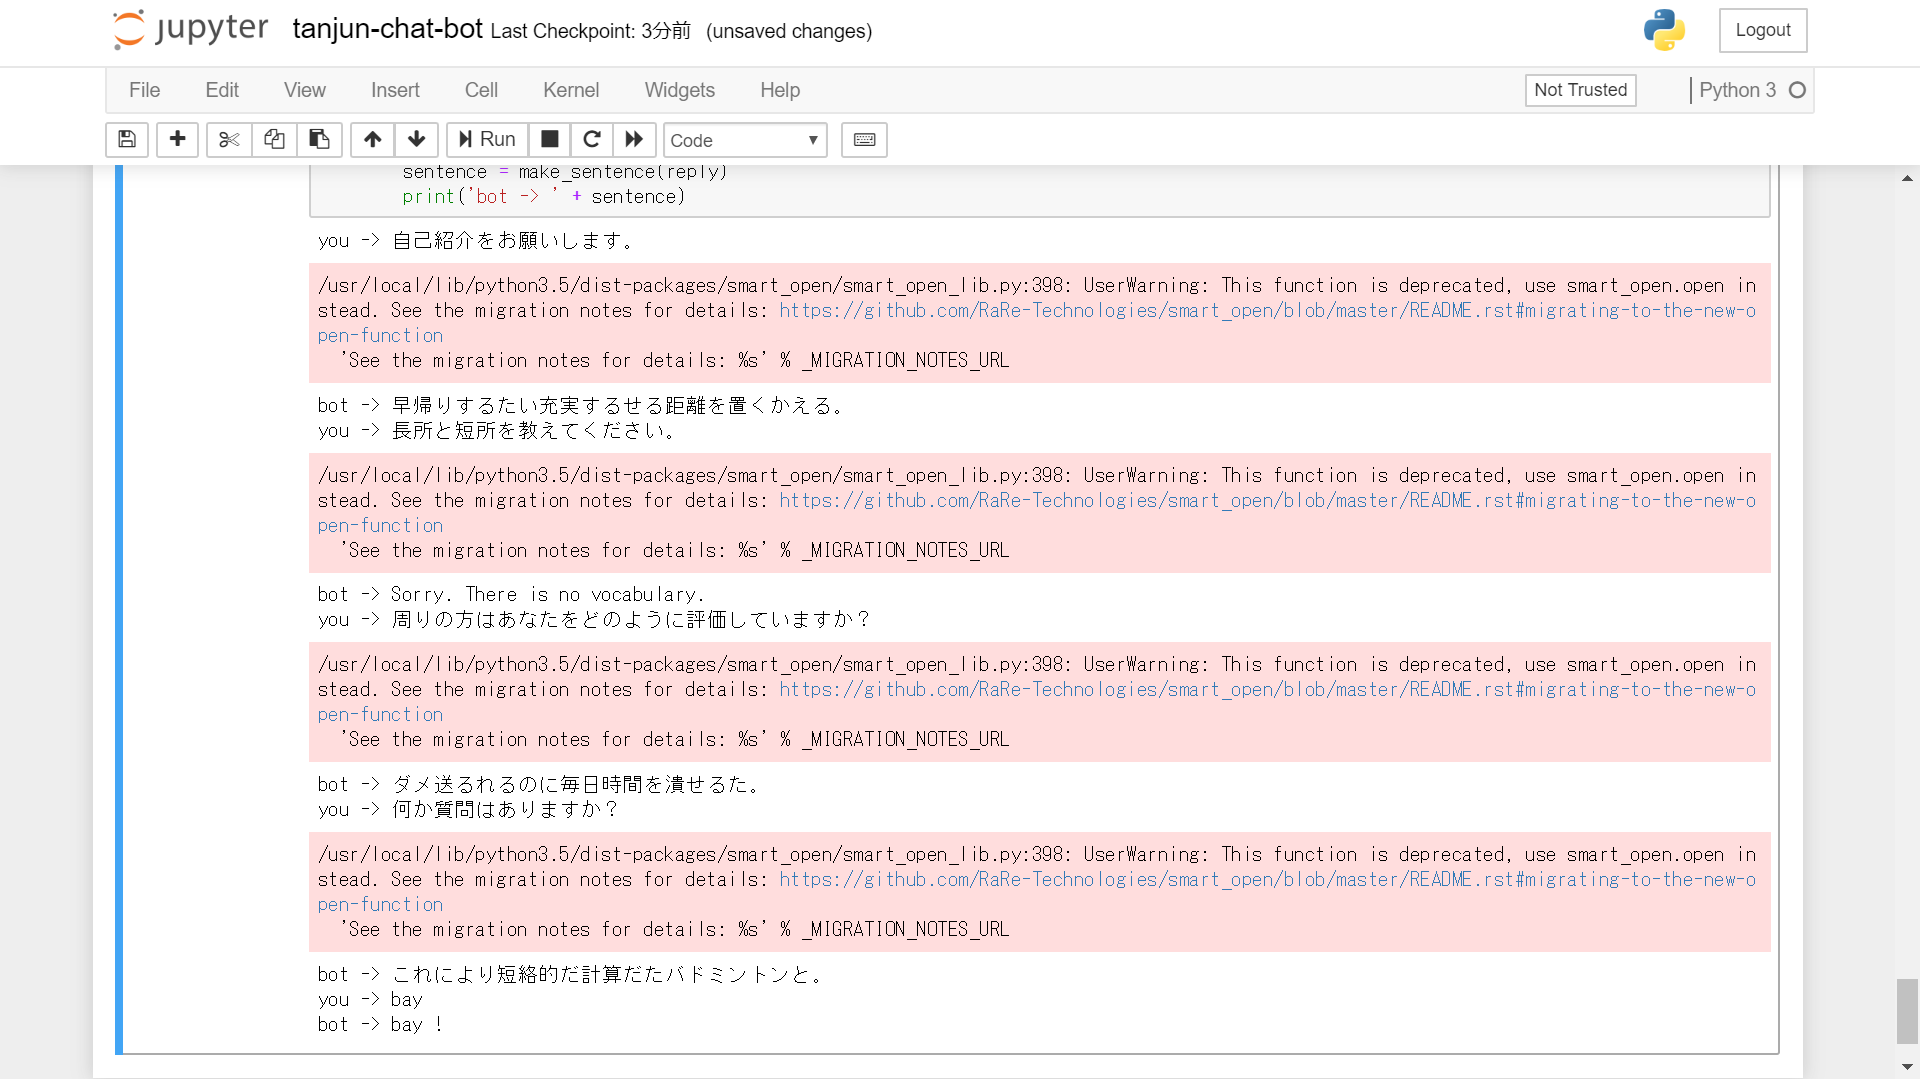
(久々にプログラム実行してみたらエラーはいてますした...。ただ一応ちゃんと動いてそうなので、いったんこのままにしてしまいます。)
以上です。
どなたかもおっしゃってましたが、かみ合ってるけど抽象的な会話より、かみ合ってなくても固有名詞が出てくる会話の方が面白いように思います。(ただ写真の会話はかみ合ってないどころじゃないですが...実装法的な意味で問題があるんですかね...?)
間違った記載があるかもしれないので、疑って読んでください。
突っ込みどころあればコメントください。