環境&ツール
Windows 10
Git-bash 2.35.1.windows.2
GitとGithub
Git:バージョン管理システムというソフトウェア。(Local)
GitHub:Gitを利用した開発者たちへのWebサービスプラットフォーム。(Remote)
(ほかにもBitbucket、GitLabなどのプラットフォームがあります。)
Brachとは
メインから、枝分かれしたところで開発を行うのがBranch。
master branch
Gitコマンド"git init"で初期化された時、デフォルトブランチとして設立されるブランチです。Main brachとして使われています。
基本的なコマンド
- git branch branch_name
- git branch -v
- git checkout branch_name
- git merge branch_name
- git branch -d branch_name
  # 新しいブランチを作る
$ git branch branch_name

  # ブランチ一覧を表示する。ブランチ、バージョン、最後のコミットが見られる。
$ git branch -v

  # ブランチに切り替える
$ git checkout branch_name

  # 別のブランチを、今にいるブランチに合併する
$ git merge branch_name

  # 指定ブランチを削除する
$ git branch -d branch_name
簡単な実践
新しいブランチで新機能を開発する時に遭う状況を大まかに分けてみました。
理想的な流れ
新ブランチ設立 ⇒ 開発完了コミット ⇒
メインブランチ移動&合併 ⇒ 使用済みブランチ削除
$ git branch new-feature
$ git branch -v
$ git checkout new-feature
$ code .

...ファイル編集が終わり、
$ git add .  # 新しいファイルも含めて全員Staged状態に
$ git commit -m "Add new-feature"  # すべて古いファイルなら"git commit -am"を
$ git log  # new-featureブランチのcommit logが表示される

...新機能の開発が終わり、メインブランチ(ここはmaster)に合併する
$ git checkout master  # masterブランチに移動
$ git merge new-feature  # new-featureブランチをmasterブランチに合併
$ git log  # masterでは合併されたnew-featureのlogも見られた
$ git branch -d new-feature  # 使用しないブランチを削除
コンフリクト(Confict)
合併するブランチが両方とも同じファイルを変更した場合、コンフリクト発生。コンフリクトに遭遇したらエディターでコンフリクトを排除してからマージする。
  # 例としてGit Bashの返す文
Auto-merging app.js
CONFLICT (content): Merge conflict in app.js  # app.jsコンフリクト発生
Automatic merge failed; fix conflicts and then commit the result.

  # エディターで開いたら、
<<<<<<< HEAD  # ここから===まで今のブランチでの編集
...
=======  # 分割
...
>>>>>>> new-feature  # ===からここまでnew-featureブランチでの編集

  # コンフリクト解除してファイル保存する
$ git commit -am ""  # 再度コミットしたら自動的にマージする。
コンフリクト処理に不安を感じる場合は、"git log"でバージョン調べて"git checkout"で過去のバージョンに切り替えることができる。
GitHub Repository
ここはLocal RepositoryからGitHub Repositoryにプッシュする流れをまとめたいと思います。
まず、GitHubにログインして、右上の+で"New Repository"を選択、

Repository nameを入れて、Create repositoryへ
(README file, .gitignore, licenseなどは後でも追加できます。)
すると、以下の画面に進みます。

Quick setup — if you’ve done this kind of thing before
(GitHubのGUIツール「GitHub Desktop」を使うならHTTPS/SSHをコピー)
…or create a new repository on the command line
(ローカルでまだ何も始まっていないなら以下の手順に従ってください)
…or push an existing repository from the command line
(ローカルで既にGitで管理しているならHTTPS/SSHをコピーしてコマンドで使う)
…or import code from another repository
(ほかのrepositoryからコードをインポート)
ローカルで作業が終わったので、pushという選択を使います。またSSHはほかの設定が必要なので、ここではHTTPSを使ってまとめていきたいと思います。
その前に、初めてGit repository使う場合は、Personal access tokenを入力しなければ進めないので、まずトークンの設定を。
Personal access token
$ git push https://github.com/<USER_NAME>/<REPOSITORY_NAME>.git
すると下のように小さなウィンドウが開き、Tokenの方を選択してトークンを入れる。

Personal access token取得の流れ
push an existing repository from the command line
  # リモート(GitHub)にoriginというRemote repositoryを追加し、アドレスは↓
git remote add origin https://github.com/<USER_NAME>/<REPOSITORY_NAME>.git

  # ローカルの主要ブランチ名を強制的に"main"に置き換える
git branch -M main

  # リモートにあるorigin repositoryにmain branchを設置し、ローカルのmain branchと連携する
git push -u origin main
成功したら返す文は
Everything up-to-date
branch 'main' set up to track 'origin/main'.
これでリモートとの連携作業が終わりました。
「origin」はただrepositoryの名前に過ぎないので、ほかの名前に置き換えることもできます。また、ローカルでGitに管理されているディレクトリには、Remoto repositoryが複数で設置することもできます。("git remote add")
Remoto repository削除したい場合は
$ git remote rm remote_repository
参考資料はこちら↓
git push -u
git branch -M
git push
連携と言っても自動的に行うわけではありませんので、ローカルでコミット作業が終わり、リモートにpushしたいとき、"git push"を使います。
  # コマンド
git push remote_repository branch_name

  # ここは前の設定を例として
$ git push origin main
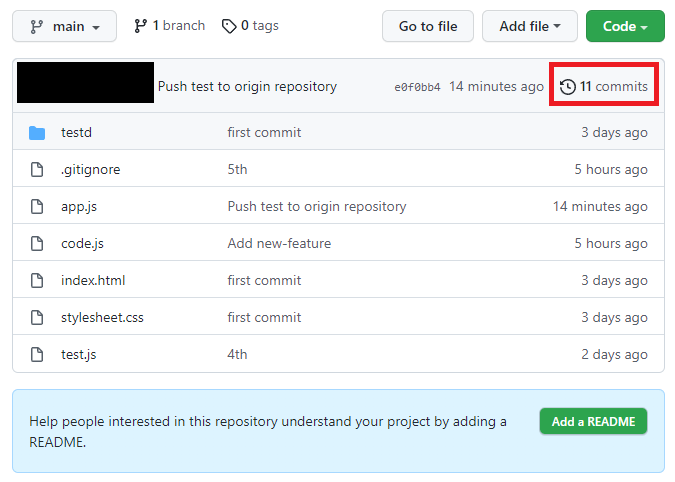
GitHubのページで再度読み込みしたらいままですべてのコミット編集履歴が見られます。

git push branch
Remote repositoryに新しいブランチをpushしたい場合は、
$ git branch branch_name
$ git checkout branch_name
$ git push origin brach_name
pushは大体こんな感じですが、次はpullについてまとめていきたいと思います。
git pull
GitHubページで編集するまたはほかの開発者がファイル変更したら、ローカルに搬送作業もしなければならないので、
git pull remote_repository branch_name
この時もコンフリクトが出てきて、編集して保存したらローカルのものとマージします。
(そして"git commit"と"git push"を使えばローカルとリモートと一致性を保ちます。)
git clone
ほかのrepositoryを自分のローカルに複製するコマンドです。

参考したリソースはこちら↓
adam-p/markdown-here
git clone URL
これでローカルで自由に編集作業ができますよね。しかしローカル編集ができてもローカルから直接pushすることができません。他からクローンしたrepositoryは基本的に所有者だけがpush/pullの権限を持っていて、Contributorなら管理員さんから一部の権限が与えられています。
権限がないけれど自分で機能の編集やコミット作業をGitHubにpushしたい場合は、右上にある「Fork」を押して、自分のGitHubに複製してからpull/push作業します。
pull requestまでの実践
...ローカルでcommit作業完了、GitHubでNew Repository設置完了
$ git remote add origin URL
$ git branch -M main
$ git push -u origin main

...ローカルで何度も新しいcommit作業完了
$ git commit -am "commit message"
$ git push origin main

...新しいブランチを作って新ファイルで機能を開発したい
$ git branch brach_name
$ git checkout branch_name
$ touch newfile
$ git add .
$ git commit -am "commit message"
$ git push origin branch_name  # ローカルの新ブランチをpush
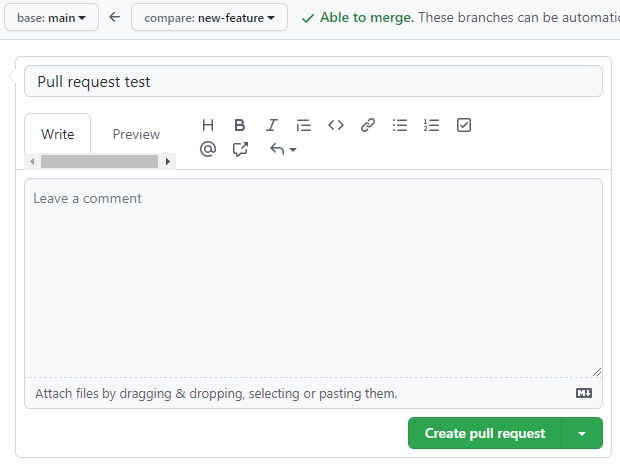
GitHubで新しいブランチができて、「compare&pull request」が出てきました。


compare&pull request押したら件名や本文を書いてpull requestを送ります。画像に表示していませんが、右側にReviewers指定することができます。

これでrepositoryの所有者にmergeを任せます。(自分のrepositoryならローカルでマージするのも同様ですが、ただローカルよりGitHubではファイルの変化が見やすいです。)
他の開発者のプロジェクトに参加する流れ
GitHubでRepositoryをFork ⇒ ローカルにpull ⇒ 新branchを作る ⇒
commit作業完了GitHubにpush ⇒ Repository元所有者にpull request送る
Git flow
MasterとDevelopは長期にわたるブランチです。
Master:正式の配布バージョンのブランチ。
Hotfix:正式版がすぐ修復が必要なときのブランチ。
Release:正式に行く前に最終テストを行うブランチ。
Develop:すべて開発の基礎ブランチ、Featureブランチの祖先。
Features:Developブランチから分けられて、開発完了後Developへ合併。
全体の流れ
Master
↑ ↓→Hotfix:修復後Bugが蘇らないようにMasterとDevelopへ合併。
↑
Release:テストで問題なければ正式版に、さらに最新のDevelopとして次の開発サイクルへ。
↑ ↓
Develop:Featureブランチと合併後問題なければReleaseにテスト行う。
↑
Features:Featureブランチ開発完了後Developへ。
参考資料・リソース
git push -u
git branch -M
adam-p/markdown-here
Read Git Flow | Leanpub
