はじめに
Turbo Pascal 3.0 でのスクリーン設定を調べてみました。
スクリーン設定
この記事のスクリーン設定は Turbo Pascal のマニュアルを参考にしています。スクリーン設定は TINST で行います。
TINST.COM を実行すると次のような画面になりますので、〔S〕を押してスクリーン設定に入ります。
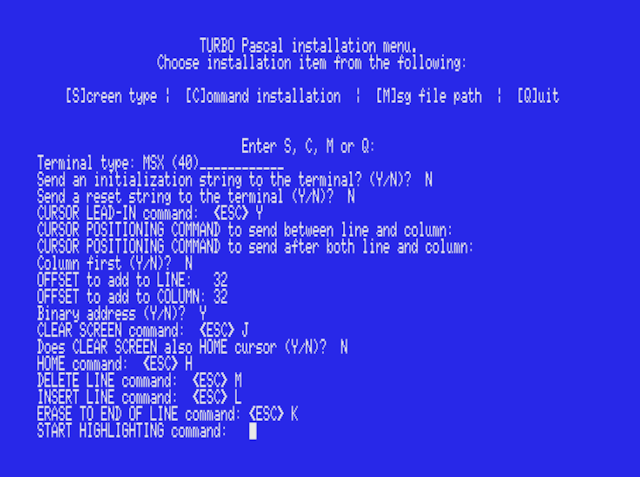
                 TURBO Pascal installation menu.
          Choose installation item from the following:

[S]creen installation   |   [C]ommand installation   |   [Q]uit


                       Enter S, C, or Q:
普通は次のいずれかを選びます。
| 項目 | 説明 |
|---|---|
| 6) ANSI | ANSI エスケープシーケンス |
| 7) DEC Rainbow, 8 bit | VT100 互換 |
| 25) Teleray series 10 | VT-52 互換 (ハイライトなし) |
| 30) Zenith | VT-52 互換 (ハイライトあり) |
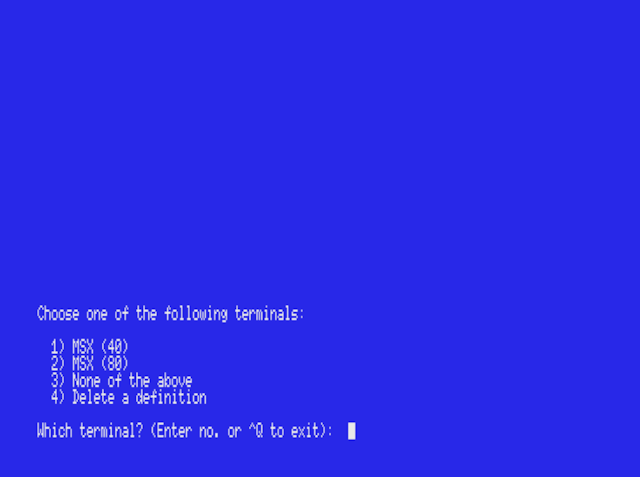
Choose one of the following terminals:

  1) ADDS 20/25/30          17) Osborne 1
  2) ADDS 40/60             18) Otrona Attache
  3) ADDS Viewpoint-1A      19) Qume
  4) ADM 3A                 20) RC-855 (ITT)
  5) Ampex D80              21) Soroc 120/Apple CP/M
  6) ANSI                   22) Soroc new models
  7) DEC Rainbow, 8 bit     23) SSM-UB3
  8) Hazeltine 1500         24) Tandberg TDV 2215
  9) Hazeltine Esprit       25) Teleray series 10
 10) Kaypro with hilite     26) Teletex 3000
 11) Kaypro, no hilite      27) Texas Instruments
 12) Lear-Siegler ADM-20    28) Visual 200
 13) Lear-Siegler ADM-31    29) Wyse WY-100/200/300
 14) Liberty                30) Zenith
 15) Microbee VDU           31) None of the above
 16) Morrow MDT-20          32) Delete a definition

Which terminal? (Enter no. or ^Q to exit): 6
例では 6) ANSI を選んでみました。この設定をカスタマイズするか聞いてくるので、必要なければ〔N〕を押してスキップします。
Do you want to modify this definition before installation? (Y/N)? N
ハードウェア依存情報を入力します。とりあえず〔Enter〕を押してスキップしてください。
                    Hardware dependent information

Operating frequency of your microprocessor in MHz (for delays): 20 Change to:
なお、何かしらの理由ですべての設定が飛んでいると (TINST.DTA の削除または破損)、設定を番号で選択する事が出来ず、いきなりスクリーンのカスタマイズ画面が表示されます。
                 TURBO Pascal installation menu.
          Choose installation item from the following:

[S]creen installation   |   [C]ommand installation   |   [Q]uit


                       Enter S, C, or Q:
Terminal type:____________________
スクリーンのカスタマイズ
TINST を起動し、〔S〕〔6〕〔Enter〕〔Y〕と押すと ANSI の設定をカスタマイズできます。スクリーンメニューで〔3〕〔1〕〔Enter〕を押し、全くの新規に設定を作ることもできます。
31) None of the above
Terminal Settings
空の値を設定したい時には - を入力してください。
| 項目 | デフォルト値 | 設定値 | ルーチン |
|---|---|---|---|
| Terminal type: | ANSI | ||
| Send an initialization string to the terminal? | Y | ||
| Command: | CrtInit() 手続きで実行される | ||
| Send a reset string to the terminal (Y/N)? | Y | ||
| Command: | <ESC> [ 0 m | CrtExit() 手続きで実行される | |
| CURSOR LEAD-IN command: | <ESC> [ | GoToXY() 手続きで実行される | |
| CURSOR POSITIONING COMMAND to send between line and column: | ; | GoToXY() 手続きで実行される | |
| CURSOR POSITIONING COMMAND to send after both line and column: | H | GoToXY() 手続きで実行される | |
| Column first (Y/N)? | N | ||
| OFFSET to add to LINE: | 1 | ||
| OFFSET to add to COLUMN: | 1 | ||
| Binary address (Y/N)? | N | ||
| Number of ASCII digits (2 or 3): | 2 | ||
| CLEAR SCREEN command: | <ESC> [ 2 J | ClrScr() 手続きで実行される | |
| Does CLEAR SCREEN also HOME cursor (Y/N)? | N | ||
| HOME command: | <ESC> [ f | ||
| DELETE LINE command: | <ESC> [ 1 M | DelLine() 手続きで実行される | |
| INSERT LINE command: | <ESC> [ 1 L | InsLine() 手続きで実行される | |
| ERASE TO END OF LINE command: | <ESC> [ K | ClrEol() 手続きで実行される | |
| START HIGHLIGHTING command: | <ESC> [ 1 m | 強調 表示 |
LowVideo() 手続きで実行される |
| END HIGHLIGHTING command: | <ESC> [ 0 m | 通常 表示 |
NormVideo() 手続きで実行される |
| Number of rows (lines) on your screen: | 24 | 行数 | |
| Number of columns on your screen: | 80 | 桁数 | |
| Delay after CURSOR ADDRESS (0-255 ms): | 0 | ||
| Delay after CLEAR, DELETE and INSERT (0-255 ms): | 0 | ||
| Delay after ERASE TO END OF LINE and HIGHLIGHT (0-255 ms): | 0 |
最後に設定が正しければ〔Y〕を、正しくなければ〔N〕を押します。
Is this definition correct? (Y/N)?
CP/M は基本的に 80x24 文字を前提としていますが、小型スクリーンで動作させる事も可能です。最低限、行数と桁数を設定すればいいでしょう。
また、Turbo Pascal をカラー化するには START HIGHLIGHTING の値を変更します。
| シーケンス | 意味 |
|---|---|
| <ESC> [ 0 m | 文字色と属性のリセット |
| <ESC> [ 1 m | ボールド (太字) |
| <ESC> [ 30 m | 黒 |
| <ESC> [ 31 m | 赤 |
| <ESC> [ 32 m | 緑 |
| <ESC> [ 33 m | イエロー |
| <ESC> [ 34 m | 青 |
| <ESC> [ 35 m | マゼンタ |
| <ESC> [ 36 m | シアン |
| <ESC> [ 37 m | 白 |
See also:
- VT100のエスケープシーケンス (BK class)
- 対応制御シーケンス - Tera Term ヘルプ 目次 (Tera Term Home Page)
- Chapter 3 Programmer Information - VT100 User Guide (VT100.net)
- ANSI/VT100 Terminal Control Escape Sequences (termsys.demon.co.uk)
- VT100 escape codes
- ANSI Escape sequences - VT100 / VT52
- コンソール仮想ターミナル シーケンス (learn.microsoft.com)
Hardware dependent information
| 項目 | デフォルト値 | 設定値 | ルーチン |
|---|---|---|---|
| Operating frequency of your microprocessor in MHz (for delays): | 20 | Delay() 手続きで使われる |
プロセッサの速度を聞いてきますが、最大でも 20 MHz までしか指定できません。CP/M エミュレータを使っている場合で 20 以外の値になっている場合には 20 を入力してください。既に 20 になっているのであれば〔Enter〕を押してスキップできます。
この制限により Delay() 関数が機種依存します。つまり、Delay() のパラメータに 1000 を指定しても 1 秒であるとは限らないという事です。
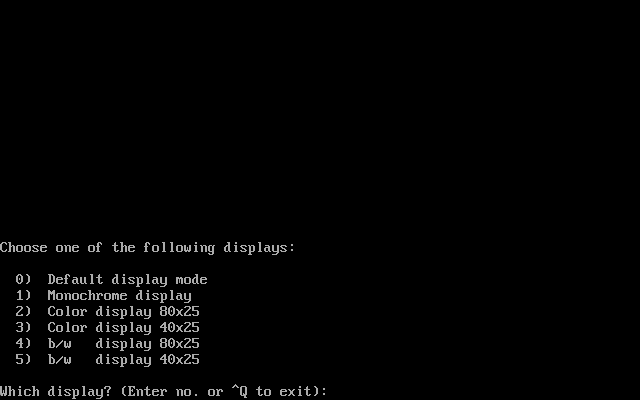
PC DOS バージョン
PC DOS バージョンの Turbo Pascal は TINST で新しいスクリーンモードを作れません。
Choose one of the following displays:

  0)  Default display mode
  1)  Monochrome display
  2)  Color display 80x25
  3)  Color display 40x25
  4)  b/w   display 80x25
  5)  b/w   display 40x25

Which display? (Enter no. or ^Q to exit):
MS-DOS が動作する IBM PC 互換機以外の機種で Turbo Pascal を走らせたい場合には MS-DOS 版を使ってください。
個別の設定
PC DOS 用の設定
・Embarcadero 配布版
Embarcadero 配布版の設定です。
2) Color display 80x25 を選んでおけば大丈夫だと思います。
Does your screen blink when the text scrolls? (Y/N):
これは N でいいと思います。
MS-DOS 用の設定
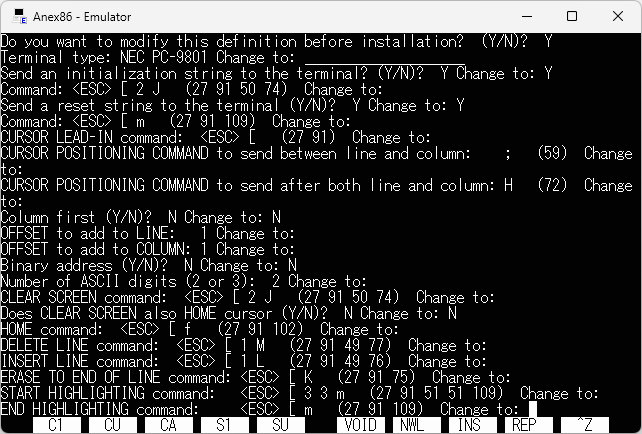
・NEC PC-9801 用の設定
NEC PC-9801 用の場合、ほぼ 6) ANSI の設定が使えます。以下を参考に PC-9801 用の設定を新規作成する事もできます。
| 項目 | デフォルト値 |
|---|---|
| Terminal type: | NEC PC-9801 |
| Send an initialization string to the terminal? | Y |
| Command: | |
| Send a reset string to the terminal (Y/N)? | Y |
| Command: | <ESC> [ m |
| CURSOR LEAD-IN command: | <ESC> [ |
| CURSOR POSITIONING COMMAND to send between line and column: | ; |
| CURSOR POSITIONING COMMAND to send after both line and column: | H |
| Column first (Y/N)? | N |
| OFFSET to add to LINE: | 1 |
| OFFSET to add to COLUMN: | 1 |
| Binary address (Y/N)? | N |
| Number of ASCII digits (2 or 3): | 2 |
| CLEAR SCREEN command: | <ESC> [ 2 J |
| Does CLEAR SCREEN also HOME cursor (Y/N)? | N |
| HOME command: | <ESC> [ f |
| DELETE LINE command: | <ESC> [ 1 M |
| INSERT LINE command: | <ESC> [ 1 L |
| ERASE TO END OF LINE command: | <ESC> [ K |
| START HIGHLIGHTING command: | <ESC> [ 3 3 m |
| END HIGHLIGHTING command: | <ESC> [ m |
| Number of rows (lines) on your screen: | 24 |
| Number of columns on your screen: | 80 |
| Delay after CURSOR ADDRESS (0-255 ms): | 0 |
| Delay after CLEAR, DELETE and INSERT (0-255 ms): | 0 |
| Delay after ERASE TO END OF LINE and HIGHLIGHT (0-255 ms): | 0 |
ESC[0m の解釈が異なるようで、ESC[m にしないと、Turbo Pascal 終了時にコマンドプロンプトがハイライトのままになる事があります。
空白の箇所は設定なしなので、〔Enter〕キーを押してスキップしてください。
Is this definition correct? (Y/N)?
設定が正しければ〔Y〕を、正しくなければ〔N〕を押します。
| 項目 | 設定値 |
|---|---|
| Operating frequency of your microprocessor in MHz (for delays): | 10 |
『NEC PC-9801 VM』や『EPSON PC-286』が 10MHz です。例では 10 に設定しています。
PC-9801 用として発売された Turbo Pascal ではこの設定は不要かもしれません。
See also:
CP/M-80 用の設定
・ MSX (MSX-DOS) 用の設定
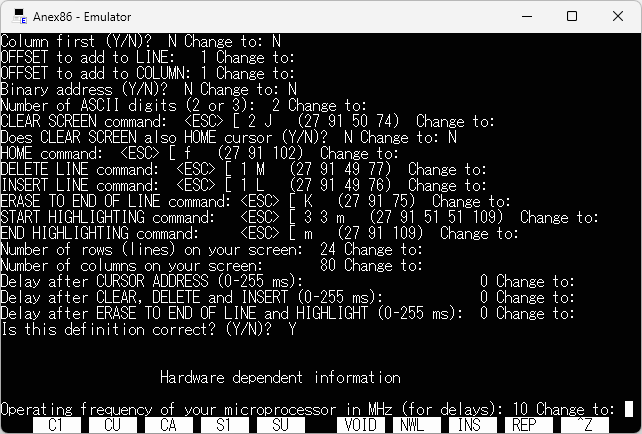
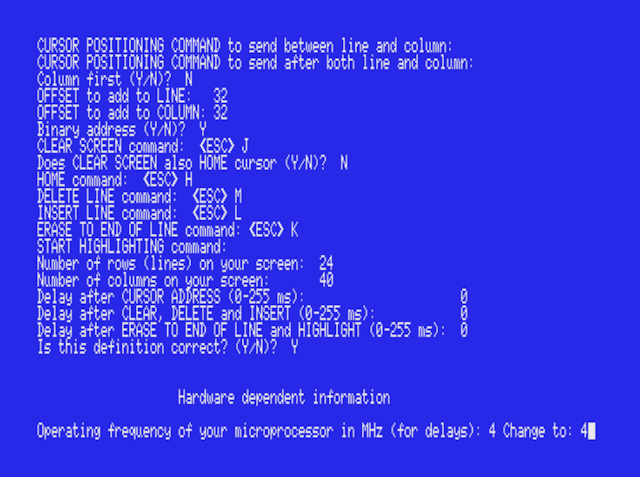
MSX (MSX-DOS) 用の設定です。MODE 40 で動作する設定例です。デフォルトで MODE 80 用の設定になっているので、まずは 80 桁モードに変更してから TINST を実行します。
A> MODE 80
A> TINST
MODE 80 だけでいいのなら 25) Teleray series 10 (VT-52 互換) で動くと思います。判りやすいようにリネームしておくとよいでしょう。MODE 40 用に手動で設定を追加する場合には次のようにします。
| 項目 | 設定値 |
|---|---|
| Terminal type: | MSX (40) |
| Send an initialization string to the terminal? | N |
| Send a reset string to the terminal (Y/N)? | N |
| CURSOR LEAD-IN command: | <ESC> Y |
| CURSOR POSITIONING COMMAND to send between line and column: | |
| CURSOR POSITIONING COMMAND to send after both line and column: | |
| Column first (Y/N)? | N |
| OFFSET to add to LINE: | 32 |
| OFFSET to add to COLUMN: | 32 |
| Binary address (Y/N)? | Y |
| CLEAR SCREEN command: | <ESC> J |
| Does CLEAR SCREEN also HOME cursor (Y/N)? | N |
| HOME command: | <ESC> H |
| DELETE LINE command: | <ESC> M |
| INSERT LINE command: | <ESC> L |
| ERASE TO END OF LINE command: | <ESC> K |
| START HIGHLIGHTING command: | |
| Number of rows (lines) on your screen: | 24 |
| Number of columns on your screen: | 40 |
| Delay after CURSOR ADDRESS (0-255 ms): | 0 |
| Delay after CLEAR, DELETE and INSERT (0-255 ms): | 0 |
| Delay after ERASE TO END OF LINE and HIGHLIGHT (0-255 ms): | 0 |
空白の箇所は設定なしなので、〔Enter〕キーを押してスキップしてください。
Is this definition correct? (Y/N)?
設定が正しければ〔Y〕を、正しくなければ〔N〕を押します。
| 項目 | 設定値 |
|---|---|
| Operating frequency of your microprocessor in MHz (for delays): | 4 |
MSX は 3.58MHz なので、とりあえず 4 に設定しておきます。
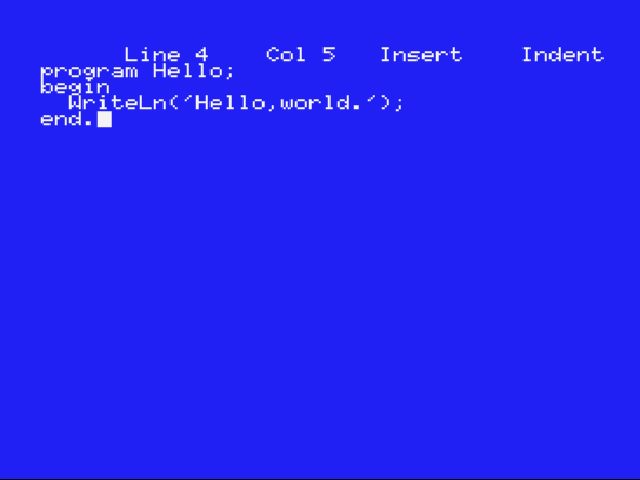
これで MODE 40 でもエディタ画面が破綻しなくなりました。
設定をすべて削除して MSX 用だけにすると 4KB 程ディスク容量を節約できるので、最初に TINST.DTA を削除してから TINST を実行するといいかもしれません。
See also:
- Pascal compilers for the MSX (pascal.hansotten.com)
- 14章 画面制御コード - MSX Datapack wiki化計画 (ngs.no.coocan.jp)
・ NEC PC-8801 / mkII および FUJITSU FM-7 用の設定
『TURBO Pascalトレーニングブック』pp.12-13 で紹介されています。
『TURBO Pascalトレーニングブック 』は国立国会図書館デジタルコレクションで読む事ができます。書籍の閲覧には国立国会図書館の利用者登録 (本登録) が必要です。
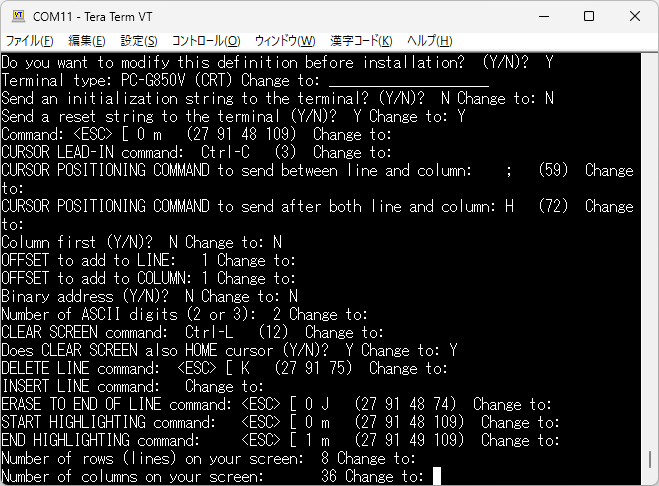
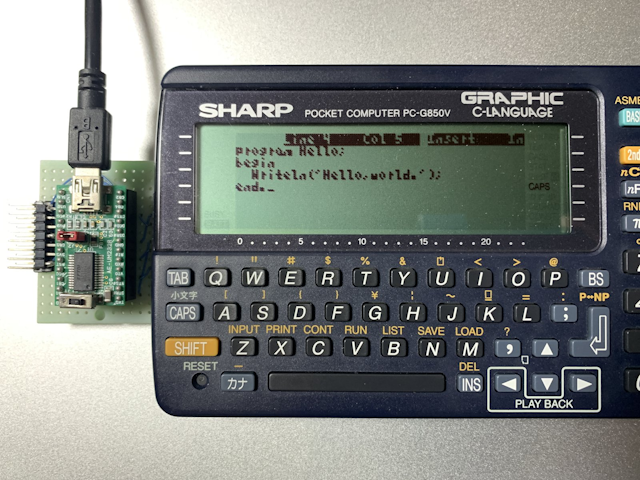
・ PC-G850V with EborsyEEP 用の設定
PC-G850V with EborsyEEP 用の設定です。PC-G850V で設定するのはミスタイプする可能性があるので、ターミナルソフトから TINST を実行します。
A>stat con:=TTY:
ターミナル用だけでいいのなら 7) DEC Rainbow, 8 bit で動くと思います。判りやすいようにリネームしておくとよいでしょう。CRT (PC-G850V の LCD) 用に手動で設定を追加する場合には次のようにします。
| 項目 | 設定値 |
|---|---|
| Terminal type: | PC-G850V (CRT) |
| Send an initialization string to the terminal? | N |
| Send a reset string to the terminal (Y/N)? | Y |
| Command: | <ESC> [ 0 m |
| CURSOR LEAD-IN command: | <ESC> [ |
| CURSOR POSITIONING COMMAND to send between line and column: | ; |
| CURSOR POSITIONING COMMAND to send after both line and column: | H |
| Column first (Y/N)? | N |
| OFFSET to add to LINE: | 1 |
| OFFSET to add to COLUMN: | 1 |
| Binary address (Y/N)? | N |
| Number of ASCII digits (2 or 3): | 2 |
| CLEAR SCREEN command: | CTRL-L |
| Does CLEAR SCREEN also HOME cursor (Y/N)? | Y |
| DELETE LINE command: | <ESC> [ K |
| INSERT LINE command: | |
| ERASE TO END OF LINE command: | <ESC> [ 0 J |
| START HIGHLIGHTING command: | <ESC> [ 0 m |
| END HIGHLIGHTING command: | <ESC> [ 1 m |
| Number of rows (lines) on your screen: | 8 |
| Number of columns on your screen: | 36 |
| Delay after CURSOR ADDRESS (0-255 ms): | 0 |
| Delay after CLEAR, DELETE and INSERT (0-255 ms): | 0 |
| Delay after ERASE TO END OF LINE and HIGHLIGHT (0-255 ms): | 0 |
空白の箇所は設定なしなので、〔Enter〕キーを押してスキップしてください。
Is this definition correct? (Y/N)?
設定が正しければ〔Y〕を、正しくなければ〔N〕を押します。
| 項目 | 設定値 |
|---|---|
| Operating frequency of your microprocessor in MHz (for delays): | 8 |
PC-G850V は 8MHz なので 8 に設定します。

表示を PC-G850V の CRT (LCD) に戻すには次のようにします。
A>stat con:=CRT:
これで PC-G850V の CRT (LCD) でもエディタ画面が破綻しなくなりました。
設定をすべて削除して PC-G850V 用だけにすると 4KB 程ディスク容量を節約できるので、最初に TINST.DTA を削除してから TINST を実行するといいかもしれません。
See also:
- ポケコン (PC-G850V) 用増設メモリボード (EborsyEEP) (BOOTH: @筆選び工房)
- ポケコン (G850) 用拡張ボード (EborsyEEP) でCP/M (その 10) エスケープシーケンス対応 [ポケコン] (PIC マイコンは面白い)
おわりに
もうお解りかと思いますが、Turbo Pascal 3.0 のスクリーン関係のルーチンはエスケープシーケンスを発行しているにすぎません。
See also:
- Embarcadero が公開しているアンティークソフト一覧 (Qiita)
- Pascal の勉強に使えそうな Pascal 処理系 (Qiita)
- RunCPM (Z80 CP/M 2.2 エミュレータ) (ht-deko.com)
- 【RunCPM】オレオレ EGR シーケンスを実装してみる (Qiita)
索引
-
Turbo Pascal 3.0.x の使い方
- Turbo Pascal 3.0.x の Pascal
- Turbo Pascal 3.0.x のスクリーン設定
- Turbo Pascal 3.0.x のキーボードショートカット