はじめに
本記事では、数年前に公開されたものですが、aws-samples にある「Cognito ユーザーで QuickSight にログインするシステム」のサンプルを現在の環境(2025年時点)で実際に動かした結果と、必要だった修正点をまとめます。
適用手順
1. サンプル適用
1.1 サンプルダウンロード・修正
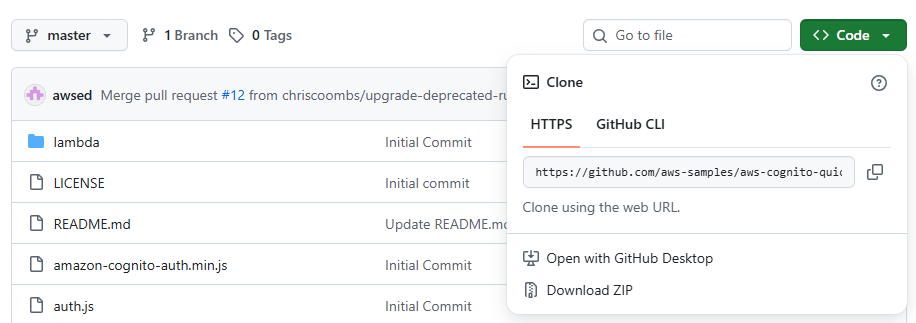
1.GitHub からサンプルを ZIP 形式でダウンロードし、任意のフォルダに解凍します。
2.以下のファイルは古いバージョンだとそのままでは動作しないため、「quicksight.yaml」の修正が必要になります。
- Node.js 14 のサポート終了に伴い、Runtime を更新
- Runtime: nodejs14.x
+ Runtime: nodejs18.x
- 現時点で S3はデフォルトでパブリックアクセスをブロックするため、PublicRead を設定すると デプロイ時にエラー になります。そのため、S3 バケットを Private に変更し、CloudFront OAI を設定することで、CloudFront 経由のみアクセスできる安全な構成に変更します。
- S3WebSite:
-   Type: "AWS::S3::Bucket"
-   Properties:
-     AccessControl: PublicRead
-     WebsiteConfiguration:
-       IndexDocument: index.html
- CloudFrontDistro:
-   Type: 'AWS::CloudFront::Distribution'
-   Properties:
-     DistributionConfig:
-       Origins:
-       - DomainName: !Join [ ".", [ !Ref S3WebSite, "s3-website" , !Ref 'AWS::Region', "amazonaws.com" ] ]
-         Id: S3WebSite
-         CustomOriginConfig:
-           HTTPPort: '80'
-           HTTPSPort: '443'
-           OriginProtocolPolicy: http-only
-
+ CloudFrontOAI:
+   Type: "AWS::CloudFront::CloudFrontOriginAccessIdentity"
+   Properties:
+     CloudFrontOriginAccessIdentityConfig:
+       Comment: "Access Identity for CloudFront to access S3"
+ S3WebSite:
+   Type: "AWS::S3::Bucket"
+   Properties:
+     # AccessControl: PublicRead
+     AccessControl: Private
+     WebsiteConfiguration:
+       IndexDocument: index.html
+ S3BucketPolicy:
+   Type: AWS::S3::BucketPolicy
+   Properties:
+     Bucket: !Ref S3WebSite
+     PolicyDocument:
+       Version: "2012-10-17"
+       Statement:
+         - Sid: AllowCloudFrontServicePrincipalReadOnly
+           Effect: Allow
+           Principal:
+             CanonicalUser: !GetAtt CloudFrontOAI.S3CanonicalUserId
+           Action:
+             - "s3:GetObject"
+           Resource:
+             - !Sub "${S3WebSite.Arn}/*"
+ CloudFrontDistro:
+   Type: 'AWS::CloudFront::Distribution'
+   Properties:
+     DistributionConfig:
+       Origins:
+         - DomainName: !GetAtt S3WebSite.RegionalDomainName
+           Id: S3WebSite
+           S3OriginConfig:
+             OriginAccessIdentity: !Sub "origin-access-identity/cloudfront/${CloudFrontOAI}"
2. CloudFormation でサンプルをデプロイ
2.1 S3バケット作成
SAM テンプレートの保存先として、S3 バケットを作成します。
# S3バケット作成
$ aws s3 mb s3://$BUCKET_NAME --region <AWS Region>
2.2 テンプレートをS3にパッケージ
ローカルのLambdaや静的ファイルをAWSで使えるようにZIP化してS3に置き、テンプレートを書き換えます。
$ aws cloudformation package
--template-file quicksight.yaml
--output-template-file quicksight-output.yaml
--s3-bucket $BUCKET_NAME
2.3 デプロイ実行
$ aws cloudformation deploy
--template-file quicksight-output.yaml
--stack-name CognitoQuickSight
--capabilities CAPABILITY_IAM
デプロイが完了すると、CloudFormation スタックに以下が作成されます。
- Cognito User Pool
- Cognito User Pool Client
- Identity Pool
- Lambda 関数
- API Gateway
- S3バケット(静的ホスティング用)
- CloudFront
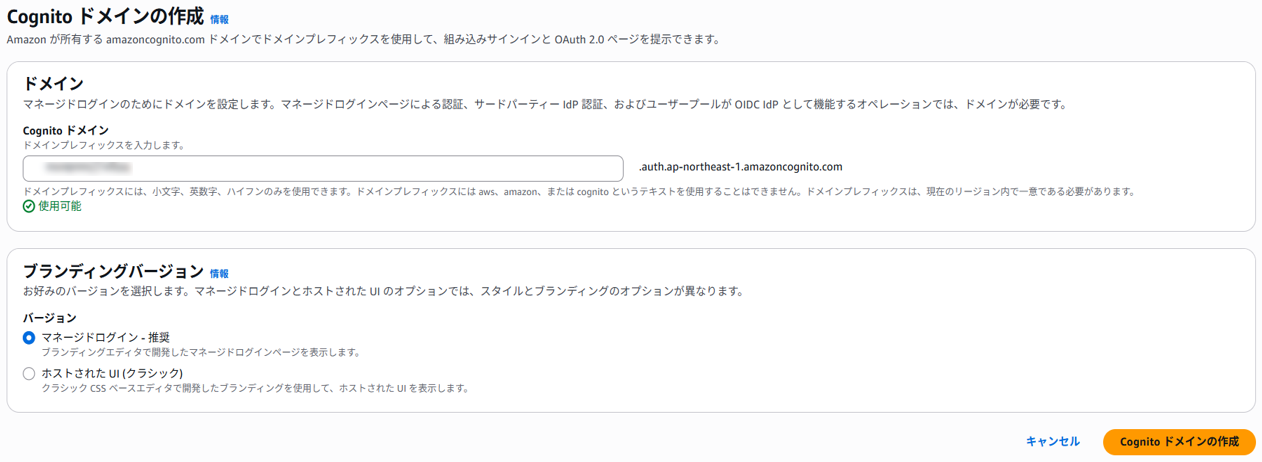
3. Cognitoにドメイン名を設定
Cognito User Poolを使うため、ログイン画面にアクセスするためにドメイン名を設定します。AWSコンソール画面 > Cognito > User Pool > [対象のUser Pool]から設定します。
4. 設定ファイル(auth.js)編集
サンプルのフロントエンドで使用する設定ファイルを編集します。
サンプルでは、CloudFormationの「出力」画面に設定に必要な情報が表示されるので、それを確認して各設定をしていきます。AWSコンソール画面 > CloudFormation > スタック > [対象のスタック]から確認できます。
5. Cognitoのアプリケーションクライアント設定
Cognito で作成した User Pool を使ってログインするために、アプリクライアントを設定します。
5.1 マネージドログインの設定
AWSコンソール画面 > Cognito > ユーザープール > [対象のUser Pool] >
アプリケーションクライアント > [対象のアプリケーションクライアント名] > ログインページ > マネージドログインページを編集 から設定できます。

5.2 マネージドログインの設定内容
- 許可されているコールバック URL:CloudFront の URL
- 許可されているサインアウト URL:CloudFront の URL
- ID プロバイダー:Cognito User Pool
- OpenID Connect のスコープ:OpenID


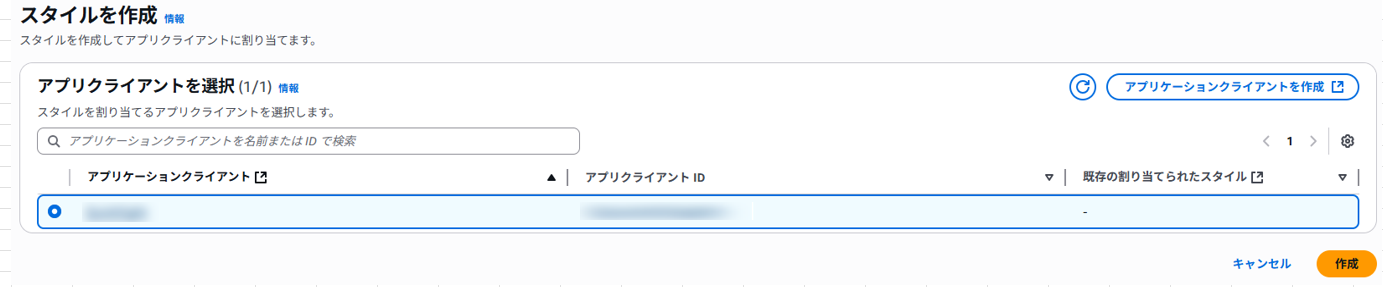
6. スタイルの作成
Cognito が提供するログイン画面のスタイルを作成します。
AWSコンソール画面 > Cognito > ユーザープール > [対象のUser Pool] > マネージドログイン からスタイルを設定できます。

対象のアプリケーションクライアントを選択し、作成を押下します。
7. フロントエンドファイルをS3にデプロイ
2.3 デプロイ実行 で作成されたS3バケット(cognitoquicksight-s3websitexxxxxxxxx)に以下のファイルをアップロードします。アップロード後、CloudFront の URL にアクセスしてページが表示されることを確認します。
- amazon-cognito-auth.min.js
- auth.js
- aws-cognito-sdk.js
- index.html

おわりに
SSO検証にあたり、Qiita上の既存記事を参考にサンプルを試しましたが、エラーが多発し、うまく動作しないケースが多くありました。その過程で、現在のバージョンでは変更されていた設定内容を整理し、自分自身の忘備録として本記事をまとめました。
株式会社ジールでは、「ITリテラシーがない」「初期費用がかけられない」「親切・丁寧な支援がほしい」「ノーコード・ローコードがよい」「運用・保守の手間をかけられない」などのお客様の声を受けて、オールインワン型データ活用プラットフォーム「ZEUSCloud」を月額利用料にてご提供しております。
ご興味がある方は是非下記のリンクをご覧ください: