
This article is the 5th entry for the UMITRON Advent Calendar 2023.
Table of Contents
Introduction
Overview
Creating Training Data with Amazon SageMaker Ground Truth
Training Object Detection Model with Amazon SageMaker Built-in Algorithm
Deploying Object Detection Model with Amazon SageMaker Endpoint
Running Object Detection
Stopping the Endpoint
Conclusion
Introduction
Hello, I'm Hosono from UMITRON.
Following last year's article, this is another article about object detection.
At UMITRON, several object detection algorithms are used depending on the requirements. When we want to easily verify object detection performances, Amazon SageMaker's built-in object detection algorithm is often used. Since the object detection algorithm is SSD1, there may be scenes where accuracy is difficult to achieve compared to the latest algorithms, but we can do everything from generating training data to deploying a model with a web interface. It's easy to build an object detection service.
In terms of ease of operation, it is often better to manage by source code with SDK rather than the web interface for tasks such as updating models. However, using the web interface allows those who are not familiar with object detection or AWS to easily verify, which is a significant advantage. Therefore, in this page, I will introduce a method that does not require code writing for all parts except for the inference execution part of object detection.
So, this page may be helpful for the following people:
- Those who have little knowledge of object detection but want to develop a service using object detection.
- Those who have experience with object detection but have not used Amazon SageMaker.
Overview
In this page, I will introduce the dataset creation method for object detection model training using Amazon SageMaker, the deployment method as an API server of a model trained using that data, and how to call it. The overview is as follows:
- Creating Training Data with Amazon SageMaker Ground Truth
- Training Object Detection Model with Amazon SageMaker Built-in Algorithm
- Deploying Object Detection Model with Amazon SageMaker Endpoint
- Running Object Detection
Regarding the deployment of the object detection model, this page introduces the method using real-time inference2. With real-time inference, you can host an API server that is available with low latency.
By the way, in Amazon SageMaker, other deployment methods such as serverless inference3 suitable for applications with sporadic requests and asynchronous inference4 suitable for processing large data can also be selected.
From now on, I will explain each step.
Creating Training Data with Amazon SageMaker Ground Truth
In this article, I will introduce a method for labeling training data by ourselves. While it is possible to use Amazon Mechanical Turk for crowdsourcing, please be aware of the associated costs and the inability to handle confidential information.
Creating a Labeling Workforce
To label data on your own, you need to create a labeling workforce in advance. The steps are as follows:
- Select "SageMaker" -> "Ground Truth" -> "Labeling workforces" -> "Private" -> "Create private team".
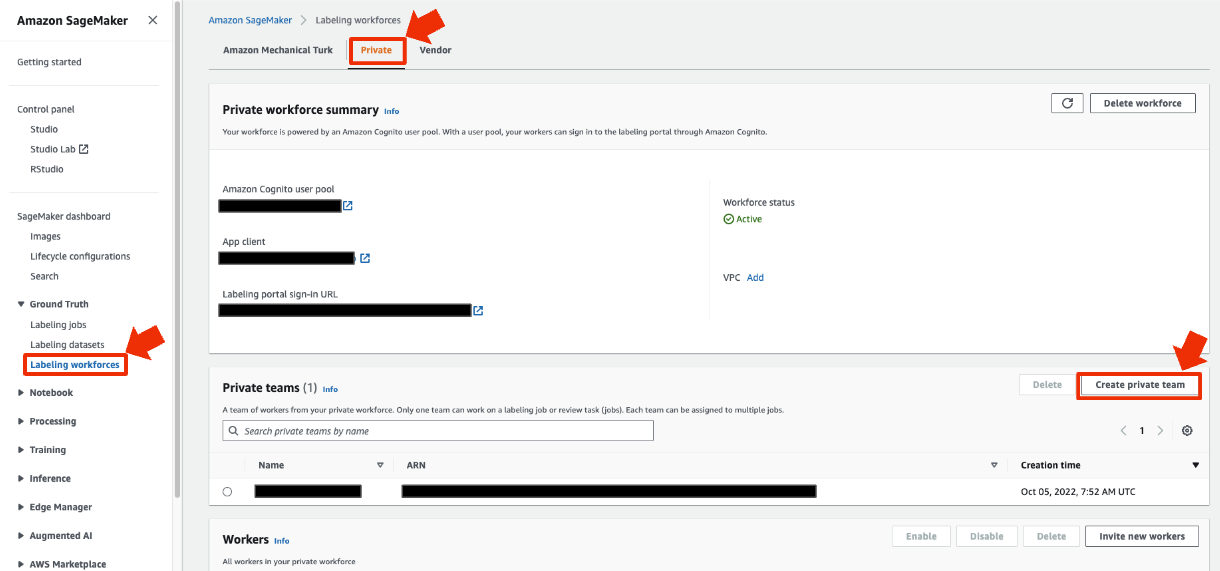
- Decide on a team name and create the team (leave everything else as default).

- Return to the "Labeling workforces" page and select "Invite new workers".
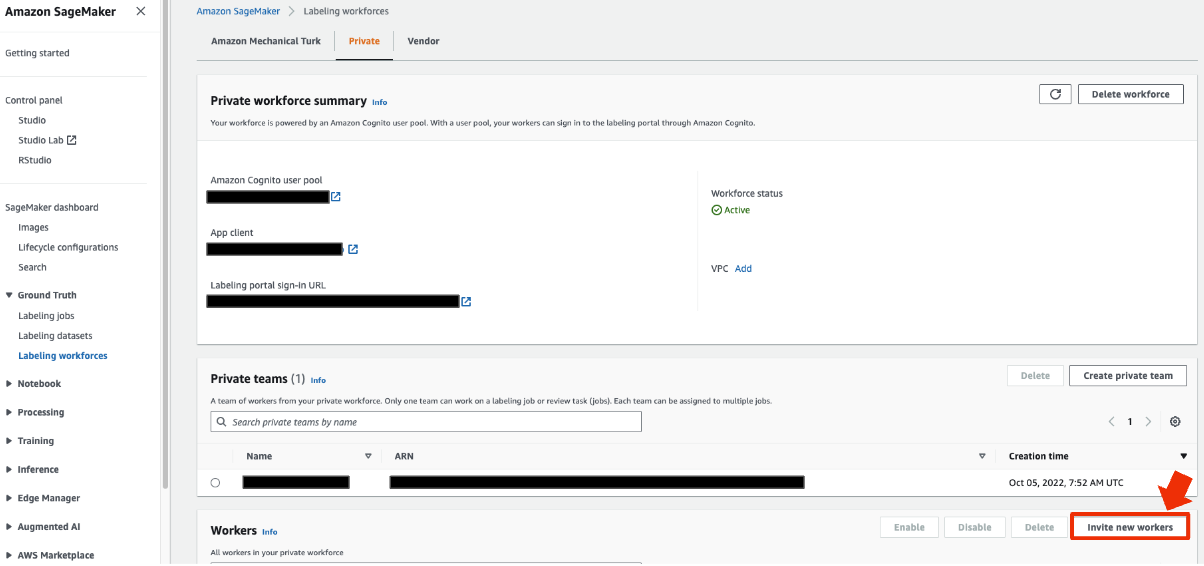
- Enter the email address of the person who will perform the labeling and select "Invite New Workers".

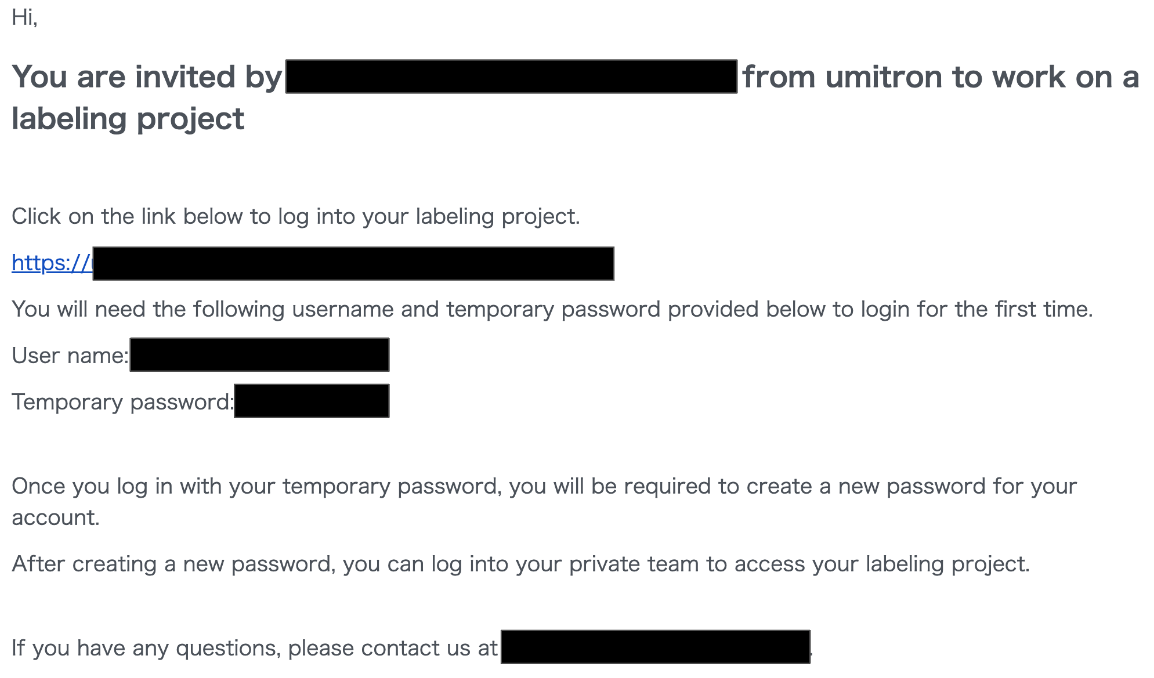
- The registered worker will receive an email with content like the one below. They should log in to the worker portal from the link in the email and set their password. It's convenient to keep the URL for logging in to the worker portal.
Uploading Images for Training Data to S3
Upload image data to any location in Amazon S3.
- Go to "Amazon S3" -> Navigate to the folder where you want to upload images -> Upload.

- Select images by dragging and dropping, etc., and upload them.

Creating a Labeling Job
- Select "SageMaker" -> "Labeling jobs" -> "Create labeling job".

- Set each item in Job overview. Choose automated data setup for Input data setup, and enter the path of the folder where you uploaded the images in S3 location for input datasets. Also, choose image for data type. Specify one with AmazonSageMakerFullAccess for IAM Role. Then, click "Complete data setup".

- After a successful data setup, the display will look like the image below.

- Change the Task type to bounding box and click "Next".

- Confirm that Worker types is set to private and set the team you created earlier to private teams. Adjust task timeout (time spent annotating one image) and task expiration time (deadline for completing annotation of all data) as needed.

- Configure the bounding box labeling tool. Here, only labels are set. If you want to provide detailed instructions on the task to the members who will perform the labeling, you can describe examples or rules here. After setting, click "Create" to complete.

Labeling
- After logging into the Worker Portal, start labeling by selecting the task from the list and clicking on "Start Working."

- Proceed with labeling (all fish images used in this page are from the DeepFish dataset5).

- Once completed, the status of the labeling job will change to "complete" after a short while.

Training Object Detection Model with Amazon SageMaker Built-in Algorithm
Creating a Training Job
- Select "SageMaker" -> "Training Jobs" -> "Create Training Job".

- Configure the job settings. Set the IAM role to the one with AmazonSageMakerFullAccess. Choose Amazon SageMaker built-in algorithm for algorithm source, and select Vision - Object Detection (MxNet) for the algorithm. Input mode is file.

- For the resource configuration, choose an instance type with GPU (such as p2 or g4dn).

- Configure hyperparameters. If you are not familiar with object detection, these may look complex. But, most of the defaults are fine. The num_classes and num_training_samples highlighted in red in the image below must be set. Specify the number of classes (types of labels) and the total number of images in the training data, respectively. Additionally, the base_network, epochs, and mini_batch_size highlighted in green may need adjustment. The base_network may provide slightly better accuracy with resnet-50, so it's worth trying first. Epochs can affect the learning process; too few may result in insufficient learning, while too many can increase training time. The mini_batch_size is often fine with the default value, but when the number of training data is small, it's better to keep it around 1/10 of the training data (setting it larger than num_training_samples will result in an error). If the number of num_training_samples is large, such as tens of thousands, you may consider setting it larger than the default (e.g., to 512).

- Set up the input data configuration. There are many changes from the default, so set them as shown in the image below. Set the job name of the labeling job in the second AugmentedManifestFile attribute names highlighted in red. In the S3 location highlighted in green, enter the S3 URI of the manifest/output/output.manifest generated under the output dataset location of the labeling job's folder. Then, click "Add channel".

- For the added channel, set the channel name to "validation," and enter the same things as "train" for the rest (ideally, it's better to prepare validation data separate from training data, but for simplicity, I'll omit it).

- For the output data configuration, specify the folder where you want to place the generated model file. Enabling managed spot training can make training longer but cheaper. Finally, click "Create training job" to start training.

Checking Training Results
- Confirm that the status of the training job created earlier is "completed" in SageMaker -> Training Jobs, then click to go to the job's details page.

- In the monitor section of the job's details page, review various log values. Here, we'll briefly explain the validation:mAP and train:cross_entropy, which are indicators to adjust the number of epochs set during the creation of the training job.
The vertical axis of validation:mAP represents how accurately object detection is performed on the validation data, and higher values are better. In this case, with a small dataset of 42 images, the value may not be very high, but with more extensive and well-learned data, it should be around 0.8 (values may be lower for datasets with challenging object detection). The horizontal axis represents the training time, proportional to the number of epochs. The graph shows that the convergence is around 0.4 as the training progresses. If the convergence is insufficient, it is advisable to increase the number of epochs and retrain. Also, if the model continues to train for an extended period after convergence, when training with similar data next time, you can reduce the number of epochs to maintain accuracy while reducing training time.
The vertical axis of train:cross_entropy is an indicator of how well the learning is progressing, and lower values are better. The horizontal axis is the training time. This value also converges as the training progresses, allowing you to check the number of epochs is appropriate.

Deploying Object Detection Model with Amazon SageMaker Endpoint
Creating the Model
- Select SageMaker -> Training Jobs -> The training job created earlier -> Create Model.

- Enter only the Model name and click create model.

Creating the Endpoint
- Select "SageMaker" -> "Models" -> The model created earlier -> "Create Endpoint".

- Enter the endpoint name and endpoint configuration name, then click "Create endpoint configuration".

- After the endpoint configuration is created, click "Create endpoint".

- The endpoint will be created in a few minutes.

Running Object Detection
1. Set up AWS SDK6 and OpenCV7 in a Python environment. Both can be installed with pip.
$ pip install boto3
$ pip install opencv-python
2. Write the code. Below is a sample function to call the endpoint:
import boto3
import cv2

def detect(img, endpoint_name, aws_profile_name):
   """Detect pellets using SageMaker endpoint
   Args:
       img (np.array): Image data loaded with OpenCV
       endpoint_name (str): SageMaker endpoint name
       aws_profile_name (str): AWS profile name to access endpoint
   Return:
       dict: detection result json
           {"prediction":[[class id, score, xmin, ymin, xmax, ymax],...]}
   """
   _, buffer = cv2.imencode(".jpg", img)
   session = boto3.session.Session(profile_name=aws_profile_name)
   client = session.client("sagemaker-runtime")

   response = client.invoke_endpoint(
       EndpointName=endpoint_name,
       Body=buffer.tobytes(),
       ContentType="image/jpeg",
   )
   return json.loads(response["Body"].read())
Here is the result. Although trained with only 42 images, it detected quite well.

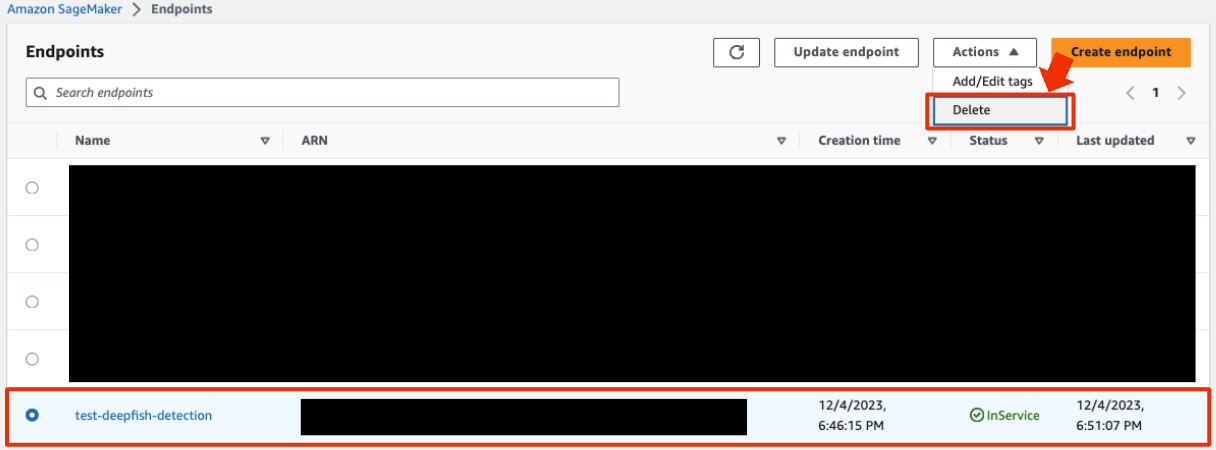
Stopping the Endpoint
Since endpoints incur charges for the time they are running, delete them when not in use. If you keep the endpoint configuration, you can easily recreate it from "SageMaker" -> "Endpoints" -> "Create Endpoint".
- Select "SageMaker" -> "Endpoints" -> The endpoint created earlier -> "Delete".
Conclusion
This page introduced how to create an object detection server using Amazon SageMaker. It's easy to verify object detection if you can collect images, and if you achieve sufficient accuracy, you can deploy it as an object detection server for production. This makes it possible to develop services using object detection quickly. I hope this article serves as a helpful guide for those interested in developing services using object detection.
Umitron is recruiting colleagues to work with us. Under the mission of implementing sustainable aquaculture on Earth, why not join us in tackling aquaculture x technology?
https://umitron.com/en/career.html
https://open.talentio.com/r/1/c/umitron/homes/3604