はじめに
機械学習モデルの推論結果を返す Web API を FastAPI で作成で作成したものを AWS 環境でデプロイする。Docker を用いた開発環境で作成したアプリであるため、そのままコンテナイメージを活用して AWS ECS on Fargate 上で稼働させる。AWSコンテナ設計・構築[本格]入門を参考にした。全体の流れは以下である。
- ネットワーク構築
- コンテナレジストリ構築
- オーケストレーション構築
構築はすべて AWS CloudFormation を用いて実行する。CloudFormation で使用するテンプレートファイルは、AWSコンテナ設計・構築[本格]入門で提供されているテンプレートファイルをベースにしている。
説明の流れに合わせてテンプレートファイルを network.yml, registry.yml, orchestration.yml の3つに分けるが、分け方として適切ではないので、実際には AWS CloudFormation ベストプラクティスなどを参考にファイルを分割した方がよい。
本記事ではコンテナレジストリ構築に関して述べるため、registry.yml のみ使用する。
ECR (Elastic Container Registry) リポジトリの作成
AWS マネジメントコンソール上でリポジトリを作成する。詳細は公式ドキュメントを参照。リポジトリ名は [test-image] とした。
コンテナレジストリへのネットワーク
前記事である AWS ECS on Fargateを使ってコンテナ構築~ネットワーク構築編~で作成したベースネットワークを、以下のように更新する。インターフェイス型 VPC エンドポイントが属するサブネットをアプリケーションから分離するために新しいサブネットを作成し、ECR 向けの VPC エンドポイントを作成。また S3 向けのゲートウェイ型 VPC エンドポイントを作成し、前記事で作成したルートテーブルに紐付けている。
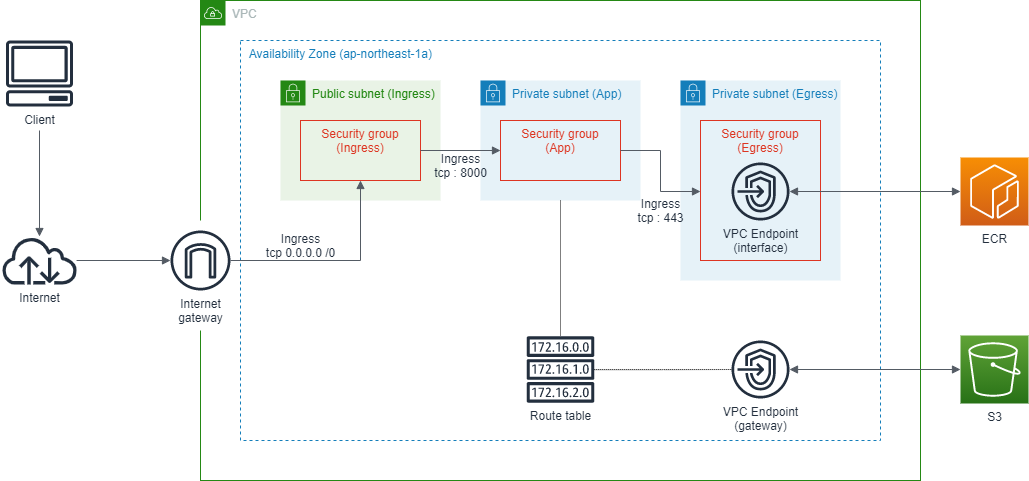
サブネットの設定は以下のようにした。
| 用途 | NW 区分 | AZ | CIDR | サブネット名 |
|---|---|---|---|---|
| Egress 用 | Private | 1a | 10.0.248.0/24 | test-subnet-private-egress-1a |
| Egress 用 | Private | 1c | 10.0.249.0/24 | test-subnet-private-egress-1c |
CloudFormation テンプレートファイル
上記で説明したネットワークを構築するテンプレートファイルが以下となる。
AWSTemplateFormatVersion: "2010-09-09"
Description: Vpc endpoint template
Resources:
  # VPCエンドポイント周りの設定
  ## VPCエンドポイント(Egress通信)用のプライベートサブネット
  testSubnetPrivateEgress1A:
    Type: AWS::EC2::Subnet
    Properties:
      CidrBlock: 10.0.248.0/24
      VpcId:
        !ImportValue testVpc
      AvailabilityZone:
        Fn::Select:
          - 0
          - Fn::GetAZs: ""
      MapPublicIpOnLaunch: false
      Tags:
        - Key: Name
          Value: test-subnet-private-egress-1a
        - Key: Type
          Value: Isolated
  testSubnetPrivateEgress1C:
    Type: AWS::EC2::Subnet
    Properties:
      CidrBlock: 10.0.249.0/24
      VpcId:
        !ImportValue testVpc
      AvailabilityZone:
        Fn::Select:
          - 1
          - Fn::GetAZs: ""
      MapPublicIpOnLaunch: false
      Tags:
        - Key: Name
          Value: test-subnet-private-egress-1c
        - Key: Type
          Value: Isolated

  ## VPCエンドポイント用セキュリティグループの生成
  testSgEgress:
    Type: AWS::EC2::SecurityGroup
    Properties:
      GroupDescription: Security Group of VPC Endpoint
      GroupName: egress
      SecurityGroupEgress:
        - CidrIp: 0.0.0.0/0
          Description: Allow all outbound traffic by default
          IpProtocol: "-1"
      Tags:
        - Key: Name
          Value: test-sg-vpce
      VpcId:
        !ImportValue testVpc

  ## Container -> VPC endpoint
  testSgVpceFromSgContainerTCP:
    Type: AWS::EC2::SecurityGroupIngress
    Properties:
      IpProtocol: tcp
      Description: HTTPS for Container App
      FromPort: 443
      GroupId:
        Fn::GetAtt:
          - testSgEgress
          - GroupId
      SourceSecurityGroupId:
        !ImportValue testSgContainer
      ToPort: 443

  # VPCエンドポイントの作成
  ## ECR 向けインターフェイス型 VPCエンドポイント
  testEndpointEcr:
    Type: AWS::EC2::VPCEndpoint
    Properties:
      PrivateDnsEnabled: True
      SecurityGroupIds:
        - !Ref testSgEgress
      ServiceName: !Join
        - ''
        - - com.amazonaws.
          - !Ref 'AWS::Region'
          - .ecr.api
      SubnetIds:
        - !Ref testSubnetPrivateEgress1A
        - !Ref testSubnetPrivateEgress1C
      VpcEndpointType: Interface
      VpcId: !ImportValue testVpc
  testEndpointDkr:
    Type: AWS::EC2::VPCEndpoint
    Properties:
      PrivateDnsEnabled: True
      SecurityGroupIds:
        - !Ref testSgEgress
      ServiceName: !Join
        - ''
        - - com.amazonaws.
          - !Ref 'AWS::Region'
          - .ecr.dkr
      SubnetIds:
        - !Ref testSubnetPrivateEgress1A
        - !Ref testSubnetPrivateEgress1C
      VpcEndpointType: Interface
      VpcId: !ImportValue testVpc

  ## S3 向けゲートウェイ型 VPCエンドポイント
  testEndpointS3:
    Type: AWS::EC2::VPCEndpoint
    Properties:
      RouteTableIds:
        - !ImportValue testRouteApp
      ServiceName: !Join
        - ''
        - - com.amazonaws.
          - !Ref 'AWS::Region'
          - .s3
      VpcEndpointType: Gateway
      VpcId: !ImportValue testVpc

Outputs:
  # Subnet
  ## Egress private subnet
  testSubnetPrivateEgress1A:
    Value: !Ref testSubnetPrivateEgress1A
    Export:
      Name: testSubnetPrivateEgress1A
  testSubnetPrivateEgress1C:
    Value: !Ref testSubnetPrivateEgress1C
    Export:
      Name: testSubnetPrivateEgress1C

  # Security group
  ## Egress security group
  testSgEgress:
    Value: !Ref testSgEgress
    Export:
      Name: testSgEgress
サブネットなどと同様に VPC エンドポイントにもタグで Name を付与したかったが、AWS::EC2::VPCEndpoint - Tags #196 によると、VPCEndpoint では Tags がサポートされていないらしい。仕方ないので、今回作成した3つの VPC エンドポイントには AWS CLI を使って Name タグを付ける。
$ aws ec2 create-tags --resources [endpoint ID] --tags Key=Name,Value=[endpoint name]
コンテナイメージの登録
上記までで ECR にコンテナイメージを登録する準備が完了した。ここでは、アプリケーションのビルド処理を行い、作成されたコンテナイメージを ECR に登録する。(本記事では、AWS ECS on Fargate を使ってコンテナを構築することを主としているため、コンテナ上で動くアプリケーションはすでに存在している前提で話を進めている。)
まずコンテナイメージをビルドする。
$ docker image build -t test-image:0.0.1 .
$ docker image ls --format "table {{.ID}}\t{{.Repository}}\t{{.Tag}}"
IMAGE ID       REPOSITORY   TAG
opqrstuvwxyz   test-image   0.0.1
次に、Docker イメージをプッシュするを参考に上記で作成したイメージを ECR へプッシュしていく。
Docker イメージを ECR に登録するために、AWS アカウントが認識できるような形式にする。
$ AWS_ACCOUNT_ID=$(aws sts get-caller-identity --query 'Account' --output text)
$ docker image tag test-image:0.0.1 ${AWS_ACCOUNT_ID}.dkr.ecr.ap-northeast-1.amazonaws.com/test-image:0.0.1
$ docker image ls --format "table {{.ID}}\t{{.Repository}}\t{{.Tag}}"
IMAGE ID       REPOSITORY                                                  TAG
abcdefghijkl   123456789.dkr.ecr.ap-northeast-1.amazonaws.com/test-image   0.0.1
Amazon ECR レジストリに対して Docker クライアントを認証する。
$ aws ecr --region ap-northeast-1 get-login-password | docker login --username AWS --password-stdin https://${AWS_ACCOUNT_ID}.dkr.ecr.ap-northeast-1.amazonaws.com/test-image
Login Succeeded
Docker イメージをプッシュする。
$ docker image push ${AWS_ACCOUNT_ID}.dkr.ecr.ap-northeast-1.amazonaws.com/test-image:0.0.1
The push refers to repository [123456789012.dkr.ecr.ap-northeast-1.amazonaws.com/test-image]
2eb0dc7856ad: Pushed
0c668eb965fd: Pushed
...
以上で、ECR にコンテナイメージを登録することができた。
おわりに
AWS ECS on Fargate を使ってコンテナを構築する第2段階として、VPC エンドポイントを作成し、コンテナイメージを ECR に登録した。いよいよコンテナを構築していく。