はじめに
機械学習モデルの推論結果を返す Web API を FastAPI で作成で作成したものを AWS 環境でデプロイする。Docker を用いた開発環境で作成したアプリであるため、そのままコンテナイメージを活用して AWS ECS on Fargate 上で稼働させる。AWSコンテナ設計・構築[本格]入門を参考にした。全体の流れは以下である。
- ネットワーク構築
- コンテナレジストリ構築
- オーケストレーション構築
構築はすべて AWS CloudFormation を用いて実行する。CloudFormation で使用するテンプレートファイルは、AWSコンテナ設計・構築[本格]入門で提供されているテンプレートファイルをベースにしている。
説明の流れに合わせてテンプレートファイルを network.yml, registry.yml, orchestration.yml の3つに分けるが、分け方として適切ではないので、実際には AWS CloudFormation ベストプラクティスなどを参考にファイルを分割した方がよい。
本記事ではネットワーク構築に関して述べるため、network.yml のみ使用する。
ベースとなるネットワーク
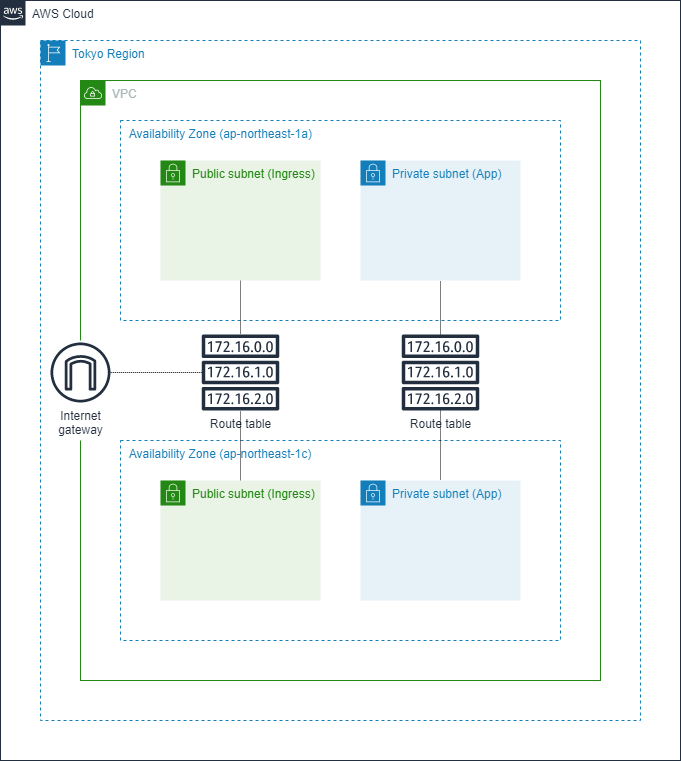
まずベースとして以下図のようなネットワークを構築する。Multi Availability Zone としており、各 AZ にて Ingress 用の Public Subnet と App 用の Private Subnet を作成している。またルートテーブルを2つ作成しており、1つは Ingress 用の Public Subnet とインターネットゲートウェイを紐付けており、もう1つは現段階では App 用の Private Subnet のみを紐付けている。これは本記事では以降触れないが、今後予定しているコンテナレジストリ構築編でゲートウェイ型 VPC エンドポイントとの紐付けに使用するため、この段階ではその準備をしている。
VPC、サブネットの設定は以下のようにした。
| VPC 名 | IPv4 CIDR |
|---|---|
| testVpc | 10.0.0.0/16 |
| 用途 | NW 区分 | AZ | CIDR | サブネット名 |
|---|---|---|---|---|
| Ingress 用 | Public | 1a | 10.0.0.0/24 | test-subnet-public-ingress-1a |
| Ingress 用 | Public | 1c | 10.0.1.0/24 | test-subnet-public-ingress-1c |
| App 用 | Private | 1a | 10.0.8.0/24 | test-subnet-private-container-1a |
| App 用 | Private | 1c | 10.0.9.0/24 | test-subnet-private-container-1c |
さらにこれらのセキュリティグループの設定は以下図のようになっている。インバウンドルールは図のように制限しており、アウトバウンドルールはすべてを許容するものとした。

CloudFormation テンプレートファイル
上記で説明したネットワークを構築するテンプレートファイルが以下となる。
AWSTemplateFormatVersion: "2010-09-09"
Description: Network template
Resources:
  # VPCの設定
  testVpc:
    Type: AWS::EC2::VPC
    Properties:
      CidrBlock: 10.0.0.0/16
      EnableDnsHostnames: true
      EnableDnsSupport: true
      InstanceTenancy: default
      Tags:
        - Key: Name
          Value: testVpc

  ############### Subnet, RouteTable, IGW ###############
  # Ingress周りの設定
  ## Ingress用のパブリックサブネット
  testSubnetPublicIngress1A:
    Type: AWS::EC2::Subnet
    Properties:
      CidrBlock: 10.0.0.0/24
      VpcId:
        Ref: testVpc
      AvailabilityZone:
        Fn::Select:
          - 0
          - Fn::GetAZs: ""
      MapPublicIpOnLaunch: true
      Tags:
        - Key: Name
          Value: test-subnet-public-ingress-1a
        - Key: Type
          Value: Public
  testSubnetPublicIngress1C:
    Type: AWS::EC2::Subnet
    Properties:
      CidrBlock: 10.0.1.0/24
      VpcId:
        Ref: testVpc
      AvailabilityZone:
        Fn::Select:
          - 1
          - Fn::GetAZs: ""
      MapPublicIpOnLaunch: true
      Tags:
        - Key: Name
          Value: test-subnet-public-ingress-1c
        - Key: Type
          Value: Public
  ## Ingress用のルートテーブル
  testRouteIngress:
    Type: AWS::EC2::RouteTable
    Properties:
      VpcId:
        Ref: testVpc
      Tags:
        - Key: Name
          Value: test-route-ingress
  ## Ingressサブネットへルート紐付け
  testRouteIngressAssociation1A:
    Type: AWS::EC2::SubnetRouteTableAssociation
    Properties:
      RouteTableId:
        Ref: testRouteIngress
      SubnetId:
        Ref: testSubnetPublicIngress1A
  testRouteIngressAssociation1C:
    Type: AWS::EC2::SubnetRouteTableAssociation
    Properties:
      RouteTableId:
        Ref: testRouteIngress
      SubnetId:
        Ref: testSubnetPublicIngress1C
  ## Ingress用ルートテーブルのデフォルトルート
  testRouteIngressDefault:
    Type: AWS::EC2::Route
    Properties:
      RouteTableId:
        Ref: testRouteIngress
      DestinationCidrBlock: 0.0.0.0/0
      GatewayId:
        Ref: testIgw
    DependsOn:
      - testVpcgwAttachment

  # インターネットへ通信するためのゲートウェイの作成
  testIgw:
    Type: AWS::EC2::InternetGateway
    Properties:
      Tags:
        - Key: Name
          Value: test-igw
  testVpcgwAttachment:
    Type: AWS::EC2::VPCGatewayAttachment
    Properties:
      VpcId:
        Ref: testVpc
      InternetGatewayId:
        Ref: testIgw

  # コンテナ周りの設定
  ## コンテナアプリ用のプライベートサブネット
  testSubnetPrivateContainer1A:
    Type: AWS::EC2::Subnet
    Properties:
      CidrBlock: 10.0.8.0/24
      VpcId:
        Ref: testVpc
      AvailabilityZone:
        Fn::Select:
          - 0
          - Fn::GetAZs: ""
      MapPublicIpOnLaunch: false
      Tags:
        - Key: Name
          Value: test-subnet-private-container-1a
        - Key: Type
          Value: Isolated
  testSubnetPrivateContainer1C:
    Type: AWS::EC2::Subnet
    Properties:
      CidrBlock: 10.0.9.0/24
      VpcId:
        Ref: testVpc
      AvailabilityZone:
        Fn::Select:
          - 1
          - Fn::GetAZs: ""
      MapPublicIpOnLaunch: false
      Tags:
        - Key: Name
          Value: test-subnet-private-container-1c
        - Key: Type
          Value: Isolated
  ## コンテナアプリ用のルートテーブル
  testRouteApp:
    Type: AWS::EC2::RouteTable
    Properties:
      VpcId:
        Ref: testVpc
      Tags:
        - Key: Name
          Value: test-route-app
  ## コンテナサブネットへルート紐付け
  testRouteAppAssociation1A:
    Type: AWS::EC2::SubnetRouteTableAssociation
    Properties:
      RouteTableId:
        Ref: testRouteApp
      SubnetId:
        Ref: testSubnetPrivateContainer1A
  testRouteAppAssociation1C:
    Type: AWS::EC2::SubnetRouteTableAssociation
    Properties:
      RouteTableId:
        Ref: testRouteApp
      SubnetId:
        Ref: testSubnetPrivateContainer1C

  ############### Security groups ###############
  # セキュリティグループの生成
  ## インターネット公開のセキュリティグループの生成
  testSgIngress:
    Type: AWS::EC2::SecurityGroup
    Properties:
      GroupDescription: Security group for ingress
      GroupName: ingress
      SecurityGroupEgress:
        - CidrIp: 0.0.0.0/0
          Description: Allow all outbound traffic by default
          IpProtocol: "-1"
      SecurityGroupIngress:
        - CidrIp: 0.0.0.0/0
          Description: from 0.0.0.0/0:80
          FromPort: 80
          IpProtocol: tcp
          ToPort: 80
        - CidrIpv6: ::/0
          Description: from ::/0:80
          FromPort: 80
          IpProtocol: tcp
          ToPort: 80
      Tags:
        - Key: Name
          Value: test-sg-ingress
      VpcId:
        Ref: testVpc
  ## コンテナアプリ用セキュリティグループの生成
  testSgContainer:
    Type: AWS::EC2::SecurityGroup
    Properties:
      GroupDescription: Security Group of app
      GroupName: container
      SecurityGroupEgress:
        - CidrIp: 0.0.0.0/0
          Description: Allow all outbound traffic by default
          IpProtocol: "-1"
      Tags:
        - Key: Name
          Value: test-sg-container
      VpcId:
        Ref: testVpc

  # ルール紐付け
  ## Internet LB -> Container
  testSgContainerFromsSgIngress:
    Type: AWS::EC2::SecurityGroupIngress
    Properties:
      IpProtocol: tcp
      Description: HTTP for Ingress
      FromPort: 80
      GroupId:
        Fn::GetAtt:
          - testSgContainer
          - GroupId
      SourceSecurityGroupId:
        Fn::GetAtt:
          - testSgIngress
          - GroupId
      ToPort: 8000

Outputs:
  # VPC
  testVpc:
    Value: !Ref testVpc
    Export:
      Name: testVpc

  # Subnet, RouteTable
  ## Ingress public subnet
  testRouteIngressAssociation1A:
    Value: !Ref testRouteIngressAssociation1A
    Export:
      Name: testRouteIngressAssociation1A
  testRouteIngressAssociation1C:
    Value: !Ref testRouteIngressAssociation1C
    Export:
      Name: testRouteIngressAssociation1C
  ## Container private subnet
  testSubnetPrivateContainer1A:
    Value: !Ref testSubnetPrivateContainer1A
    Export:
      Name: testSubnetPrivateContainer1A
  testSubnetPrivateContainer1C:
    Value: !Ref testSubnetPrivateContainer1C
    Export:
      Name: testSubnetPrivateContainer1C
  ## Route table
  testRouteApp:
    Value: !Ref testRouteApp
    Export:
      Name: testRouteApp

  # Security group
  ## Ingress security group
  testSgIngress:
    Value: !Ref testSgIngress
    Export:
      Name: testSgIngress
  ## Container security group
  testSgContainer:
    Value: !Ref testSgContainer
    Export:
      Name: testSgContainer
Resources にて、スタックを構成するリソースなどを定義している。テンプレートの基礎についての学習などを参考に、コードとネットワーク図を見ればわかるため説明は割愛。
Outputs では、このテンプレートファイルにて作成されたリソースを他テンプレートファイルから参照できるようエクスポートしている。以降の記事では、クロススタックリファレンスを使ってこれらを参照していく。
スタックの作成
作成したテンプレートファイルを用いてスタックを作成する。AWS マネジメントコンソールにて、[CloudFormation]→[スタックの作成]と進むと以下のような画面に遷移するので、Amazon S3 URL またはテンプレートファイルをその場でアップロードして進めれば作成できる。

以降の記事でクロススタックリファレンスする際には、S3 上の URL が必要となるのでここでは事前に S3 にテンプレートファイルをアップロードしておき、その URL を入力することでスタックを作成した。アップロード前には aws cloudformation validate-template --template-body file://[Template file path] コマンドを実行することで CloudFormation のテンプレートファイルの文法などをチェックすることもできる。詳細はテンプレートの検証を参照。
作成を実行後、ステータスが UPDATE_COMPLETE となっていれば、問題なく作成できている。
おわりに
AWS ECS on Fargate を使ってコンテナを構築する第1段階として、ベースとなるネットワークを作成した。今回作成したネットワークにスタックを追加していく形で、以降も進めていく。