概要
この記事ではsoftether VPNをローカルブリッジ接続にて構築します。SecureNAT機能は利用しません。
SecureNATを利用するサーバー構築方法はこちらの記事をどうぞ。
[2023/07/03 追記]
構築手順をansibleにまとめました
https://github.com/honahuku/ansible/tree/main/softether
背景
SecureNAT機能は一部環境にてアドレスの枯渇を原因とする1スループットの低下を引き起こす場合があります。
SecureNATを利用することで簡単にVPN環境を構築できる方法としてとても有用でしたが、これを利用していた私の環境では数分に一度ZoomやTeams等の通話サービスが切断されとても不安定でした。
これをSecureNATではなくローカルブリッジを用いて構築を行うことでVPNの接続パフォーマンスを向上させます。
SecureNAT 機能は内部で仮想の TCP/IP スタックを持つことによって、一度 TCP/IP スタックによってパケット化した TCP/IP ストリームを再度組み立て、さらにそれをオペレーティングシステムを通じて、TCP/IP パケット化するというような大変高度な処理を行っています。したがって、これらの処理にかかわるオーバーヘッドは大きく、十分高速なコンピュータを用いる場合でも 、仮想 NAT 機能を経由したスループットは物理的な最大スループットと比較して大きく低下してしまいます。そのため、仮想 NAT 機能はパフォーマンスが重視されるような用途には使用しないでください。
3.7 仮想 NAT および仮想 DHCP サーバー - SoftEther VPN プロジェクト
事前準備
Softetherを動作させるために必要なプログラムをインストールします。
apt update
apt install -y build-essential libssl-dev g++ openssl libpthread-stubs0-dev gcc-multilib dnsmasq
設定情報の確認
後の設定で利用するために、サーバーに割り振られたIPアドレスとNIC名を調べます。
IPアドレスは原則グローバルIPアドレスで問題ありませんが、IDCFクラウドなどNICにグローバルIPが割り当てられていない場合は、NATより付与されたプライベートIPアドレスをメモしておきます。
グローバルIPアドレスを調べる場合は
curl globalip.me
とすると調べることが出来ます。
NIC名はifconfigコマンドで調べることが出来ます。eth0やenp1s0のような名前が一般的でしょう。
Softetherのダウンロードとインストール
SoftEther ダウンロード センターより環境に合ったファイルをダウンロードします。
2021/10/17現在では、Ver4.38がRTM版のようなのでこれをダウンロードします。
wget https://github.com/SoftEtherVPN/SoftEtherVPN_Stable/releases/download/v4.38-9760-rtm/softether-vpnserver-v4.38-9760-rtm-2021.08.17-linux-x64-64bit.tar.gz
ダウンロードしたファイルを展開・コンパイルを行い、/use/localに配置します。
tar xvf softether-vpnserver*
cd vpnserver
make
chmod 600 *
chmod 700 vpncmd
chmod 700 vpnserver
cd
\cp -r -f ./vpnserver/ /usr/local/
\rm -rf ./vpnserver
ls -lra /usr/local/vpnserver
rm -rf softether-vpnserver*
Softetherの設定
Softetherはコマンドラインから設定を行うためのvpncmdというプログラムが用意されています。クライアントマシンから遠隔操作し、GUIで設定を行う方法もありますが、今回はサーバー側の設定をCUIにてすべて設定します。
/usr/local/vpnserver/vpnserver start
/usr/local/vpnserver/vpncmd /server localhost
とすることでvpncmdを操作できます。
サーバー管理画面にアクセスするためのパスワードを設定します。ServerPasswordSetに続けて設定したいパスワードを入力します。
ServerPasswordSet yourserverpasswd
新しい仮想HUBを作成します。/PASSWORDに続けて設定したい仮想hubのパスワードを入力してください
HubCreate vpnhub1 /PASSWORD:yourhubpasswd
デフォルトの仮想HUBを削除します。
HubDelete DEFAULT
ローカルブリッジ接続を作成します。接続名はsoftとします。
BridgeCreate vpnhub1 /DEVICE:soft /TAP:yes
仮想HUBの設定を行います。
Hub vpnhub1
新しいユーザーグループを作成します。
GroupCreate Admin /REALNAME:none /NOTE:none
新しいユーザーを作成します。
UserCreate username /GROUP:Admin /NOTE:none /REALNAME:none
先程作成したユーザーのパスワード認証を有効にします。/passwordに続きユーザーに設定したいパスワードを入力してください。
UserPasswordSet honahuku /password:youruserpasswd
設定を終了します。
exit
Softetherのsystemdintファイル作成
Softetherをサービスとして動かすためにsystemdintファイルを作成します。
vim /lib/systemd/system/vpnserver.service
以下を貼り付けます。
[Unit]
Description=SoftEther VPN Server
After=network.target

[Service]
Type=forking
ExecStart=/usr/local/vpnserver/vpnserver start
ExecStop=/usr/local/vpnserver/vpnserver stop
ExecStartPost=/bin/sleep 05
ExecStartPost=/bin/bash /root/softether-iptables.sh
ExecStartPost=/bin/sleep 03
ExecStartPost=/bin/systemctl start dnsmasq.service
ExecReload=/bin/sleep 05
ExecReload=/bin/bash /root/softether-iptables.sh
ExecReload=/bin/sleep 03
ExecReload=/bin/systemctl restart dnsmasq.service
ExecStopPost=/bin/systemctl stop dnsmasq.service
Restart=always

[Install]
WantedBy=multi-user.target
iptables用スクリプトファイル作成
VPNの各端末にipを配布するためのiptables用スクリプトファイルを作成します。
5行目のNET_INTERFACEに先程確認したNIC名、6行目のVPNEXTERNALIPにIPアドレスを入力します。
vim /root/softether-iptables.sh
#!/bin/bash
TAP_ADDR=192.168.30.1
TAP_INTERFACE=tap_soft
VPN_SUBNET=192.168.30.0/24
NET_INTERFACE=ens18
VPNEXTERNALIP=93.158.203.113

iptables -F && iptables -X
/sbin/ifconfig $TAP_INTERFACE $TAP_ADDR

iptables -t nat -A POSTROUTING -s $VPN_SUBNET -j SNAT --to-source $VPNEXTERNALIP

iptables -A INPUT -m state --state ESTABLISHED,RELATED -j ACCEPT
iptables -A OUTPUT -m state --state ESTABLISHED,RELATED -j ACCEPT
iptables -A FORWARD -m state --state ESTABLISHED,RELATED -j ACCEPT

iptables -A INPUT -s $VPN_SUBNET -m state --state NEW -j ACCEPT
iptables -A OUTPUT -s $VPN_SUBNET -m state --state NEW -j ACCEPT
iptables -A FORWARD -s $VPN_SUBNET -m state --state NEW -j ACCEPT
スクリプトに実行権限を付与します。
chmod +x /root/softether-iptables.sh
dnsmasqの設定
VPN接続を行いインターネットと通信を行うには、VPNセッションを張った後にVPNサーバーと通信するためのプライベートIPアドレスを割り振る必要があります。
今回はIPの割り振りを行うDNSサーバーとしてdnsmasqを利用します。
デフォルトの設定ファイルをバックアップします。
mv /etc/dnsmasq.conf /etc/dnsmasq.conf-bak
新しくdnsmasq.confファイルを作成し、以下の内容を入力します。
5行目のexcept-interfaceは先程メモしたNIC名に変更してください
vim /etc/dnsmasq.conf
# In this case it is the Softether bridge
interface=tap_soft

# Don't ever listen to anything on eth0, you wouldn't want that.
except-interface=enp1s0

listen-address=192.168.30.1
bind-interfaces

# Let's give the connecting clients an internal IP
dhcp-range=tap_soft,192.168.30.10,192.168.30.200,720h

# Default route and dns
dhcp-option=tap_soft,3,192.168.30.1

# enable dhcp
dhcp-authoritative

# enable IPv6 Route Advertisements
enable-ra

#  have your simple hosts expanded to domain
expand-hosts

# Let dnsmasq use the dns servers in the order you chose.
strict-order

# Let's try not giving the same IP to all, right?
dhcp-no-override

# The following directives prevent dnsmasq from forwarding plain names (without any dots)
# or addresses in the non-routed address space to the parent nameservers.
domain-needed

# Never forward addresses in the non-routed address spaces
bogus-priv


# blocks probe-machines attack
stop-dns-rebind
rebind-localhost-ok

# Set the maximum number of concurrent DNS queries. The default value is 150. Adjust to your needs.
dns-forward-max=300

# stops dnsmasq from getting DNS server addresses from /etc/resolv.conf
# but from below
no-resolv
no-poll

# Prevent Windows 7 DHCPDISCOVER floods
dhcp-option=252,"\n"

# Use this DNS servers for incoming DNS requests
server=1.1.1.1
server=8.8.4.4

# Use these IPv6 DNS Servers for lookups/ Google and OpenDNS
server=2620:0:ccd::2
server=2001:4860:4860::8888
server=2001:4860:4860::8844

# Set IPv4 DNS server for client machines # option:6
dhcp-option=option:dns-server,192.168.30.1,176.103.130.130

# Set IPv6 DNS server for clients
dhcp-option=option6:dns-server,[2a00:5a60::ad2:0ff],[2a00:5a60::ad1:0ff]

# How many DNS queries should we cache? By defaults this is 150
# Can go up to 10k.
cache-size=10000

neg-ttl=80000
local-ttl=3600

# TTL
dhcp-option=23,64

# value as a four-byte integer - that's what microsoft wants. See
dhcp-option=vendor:MSFT,2,1i

dhcp-option=44,192.168.30.1 # set netbios-over-TCP/IP nameserver(s) aka WINS server(s)
dhcp-option=45,192.168.30.1 # netbios datagram distribution server
dhcp-option=46,8         # netbios node type
dhcp-option=47

read-ethers

log-facility=/var/log/dnsmasq.log
log-async=5

log-dhcp
quiet-dhcp6

# Gateway
dhcp-option=3,192.168.30.1
NATの設定
サーバーのNICとVPN内の通信を結ぶためにNATでルーティングを行います。
設定ファイルを開き以下の内容を貼り付けます。
すでに
net.ipv6.conf.all.accept_ra = 2
net.core.default_qdisc=fq
net.ipv4.tcp_congestion_control=bbr
などの設定がる場合は、その設定を一度すべて消してから以下の内容を貼り付けます。
vim /etc/sysctl.conf
net.core.somaxconn=4096
net.ipv4.ip_forward=1
net.ipv4.conf.all.send_redirects = 0
net.ipv4.conf.all.accept_redirects = 1
net.ipv4.conf.all.rp_filter = 1
net.ipv4.conf.default.send_redirects = 1
net.ipv4.conf.default.proxy_arp = 0

net.ipv6.conf.all.forwarding=1
net.ipv6.conf.default.forwarding = 1
net.ipv6.conf.tap_softether.accept_ra=2
net.ipv6.conf.all.accept_ra = 1
net.ipv6.conf.all.accept_source_route=1
net.ipv6.conf.all.accept_redirects = 1
net.ipv6.conf.all.proxy_ndp = 1
NATの設定を反映します。
sysctl -f
サービスの起動
今設定したdnsmasqとsoftetherのサービスを起動します。
systemctl enable vpnserver
systemctl enable dnsmasq
systemctl start vpnserver
systemctl status vpnserver
systemctl start dnsmasq
systemctl status dnsmasq
systemctl restart dnsmasq
それぞれステータスがactiveとなっていれば設定できています。
fieldなら設定に抜けがないか見直しましょう。
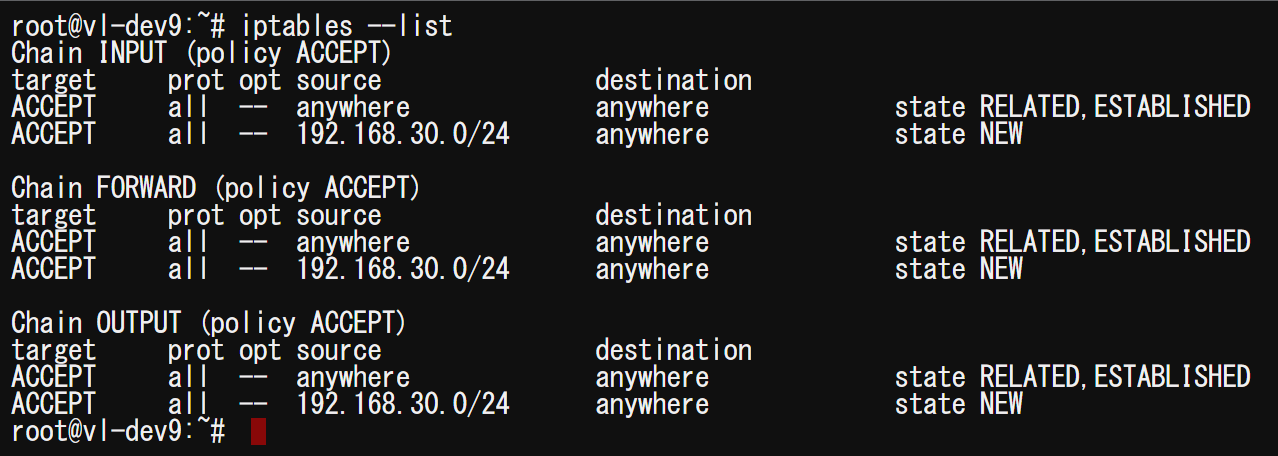
NAT設定確認
iptables --list
クライアントからの接続
Windowsクライアントから構築したサーバーに接続します。
クライアント接続用のソフトウェアは、SoftEther ダウンロード センターからダウンロードしてください。
macやlinuxの方はこの記事が参考になると思います。

インストール完了後にクライアント接続ツールが開きます。
この画面がクライアントのホームです。
上の新しい接続設定の作成を選択してください。
仮想LANカードのインストールを求められるのでそのままはいを選択してください
仮想LANカードの名前はそのままでOKを選択してください。
LANカードの作成完了後に上の新しい接続設定の作成をもう一度選択してください。
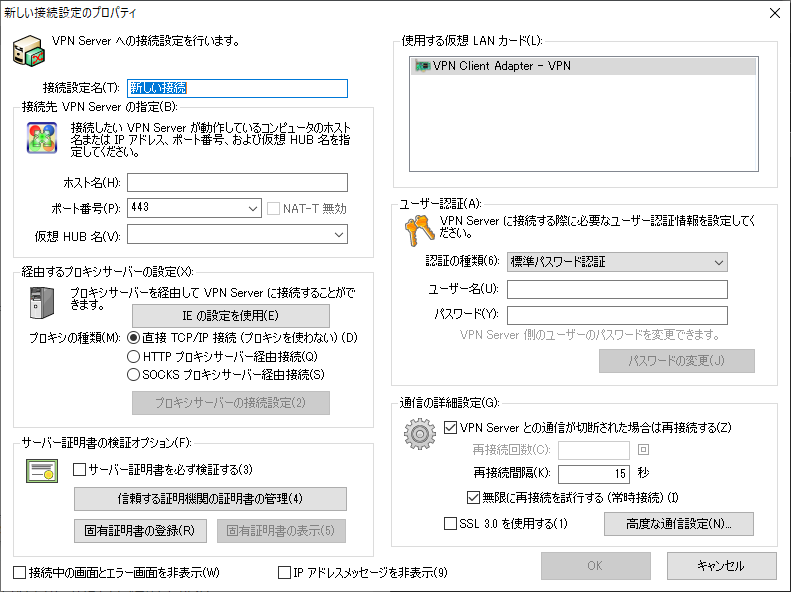
接続設定名は任意に設定して構いません。
ホスト名はサーバーのドメイン、
ポートは既定の443
仮想hub名は先程に作成した仮想hub名です。
プロキシの種類はあなたの環境に合わせて任意に設定してください。
右側のユーザー認証で初期設定ウィザードで作成したユーザーの接続情報を入力します。
すべて入力したらOKを選択してください。
クライアントのホームに戻るので、今設定した接続設定をダブルクリックして接続して下さい。
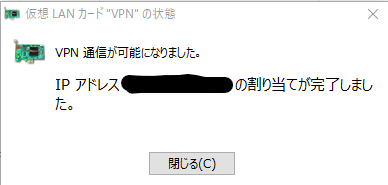
このような画面が出れば成功です。
参考文献
SoftEther VPN Setup with Dnsmasq and port forwarding | What The Server
icoexist/softether-autoinstall: SoftEther Autoinstaller
Softether VPN serverをGUIで初期設定する
-
筆者の経験によります。要出典 ↩