1. はじめに
動画を入力に、OpenVINOモデルとOpen3Dを使って3次元復元を試してみました。
手元のWindows PCで手軽に3次元復元を試したかったため、CPUを使うことに拘りました。
OpenVINOモデルとOpen3Dを使った3次元復元に関しては、既に先駆者の方々がいます。
本記事では、特に下記のソースコードを参考にして、動画を入力にした3次元復元を試しました。
https://qiita.com/iwatake2222/items/bbd4ccdacfcf8f846a0a#open3dを使って3次元再構築する
復元結果をリアルタイムに更新して表示する処理は、下記の記事を参考に実装しました。
https://kobot.hatenablog.jp/entry/2019/10/22/121550
2. 環境構築
下記の環境で動作確認しました。
| OS | Windows 10 (22H2) |
| CPU | Intel(R) Core(TM) i5-8265U CPU |
| Python | 3.10.11 |
| numpy | 1.25.2 |
| open3d | 0.17.0 |
| opencv-python | 4.8.0.76 |
| openvino | 2023.0.1 |
モデルを用意する
下記からxmlファイルとbinファイルをダウンロードしてください。
-
MiDaS_small.xml: https://storage.openvinotoolkit.org/repositories/openvino_notebooks/models/depth-estimation-midas/FP32/MiDaS_small.xml -
MiDaS_small.bin: https://storage.openvinotoolkit.org/repositories/openvino_notebooks/models/depth-estimation-midas/FP32/MiDaS_small.bin
ダウンロードした2つのファイルは同じフォルダ内に置いてください。
必要なライブラリをインストールする
下記の4つのライブラリが必要です。
- numpy
- open3d
- opencv-python
- openvino
例えば、pipenvを使う場合は、下記のようにライブラリをpipenv installしてください。
$ pipenv install numpy opencv-python openvino
$ pipenv install open3d
3. 復元手順
OpenVINOの深度推定モデルを使用し、下記の手順で復元します。
- OpenVINOの深度推定モデルでdepth画像を生成する。
- 元画像と1で生成したdepth画像からRGBD画像を生成する。
- 2で生成したRGBD画像から点群を生成する。
4. 実装コード
import time
from pathlib import Path

import cv2
import numpy as np
from openvino.runtime import Core
import open3d as o3d

# 画像サイズとピンホールカメラモデルの内部パラメータ値を用意する
WIDTH = 640
HEIGHT = 480
DISPLAY_SIZE = (WIDTH, HEIGHT)
FX = 500
FY = 500
CX = WIDTH / 2
CY = HEIGHT / 2

# 3次元復元結果を表示するウィンドウの名前とサイズを用意する
WINDOW_TITLE = 'PCD'
WINDOW_WIDTH = 1280
WINDOW_HEIGHT = 720

VIDEO_PATH = 0 # 動画ファイルを指定する場合はここにファイルパスを記載する。

DEVICE = 'CPU'

# モデルのパスを用意する
MODEL_FOLDER = Path('model') # フォルダ'./model'にxmlファイルとbinファイルが存在する前提でパスを記載している。
IR_MODEL_NAME_XML = 'MiDaS_small.xml'
MODEL_XML_PATH = MODEL_FOLDER / IR_MODEL_NAME_XML


def normalize_minmax(data):
    """Normalizes the values in `data` between 0 and 1"""
    return (data - data.min()) / (data.max() - data.min())


def convert_result_to_image(result):
    """Converts OpenVINO model's result to depth image"""
    result = result.squeeze(0)
    result = normalize_minmax(result)
    result = result * 255
    result = result.astype(np.uint8)
    return result


ie = Core()
ie.set_property({'CACHE_DIR': '../cache'})
model = ie.read_model(MODEL_XML_PATH)
compiled_model = ie.compile_model(model=model, device_name=DEVICE)

input_key = compiled_model.input(0)
output_key = compiled_model.output(0)

network_input_shape = list(input_key.shape)
network_image_height, network_image_width = network_input_shape[2:]

# ピンホールカメラモデルの内部パラメータを設定する
camera_intrinsic = o3d.camera.PinholeCameraIntrinsic(
    width=WIDTH,
    height=HEIGHT,
    fx=FX,
    fy=FY,
    cx=CX,
    cy=CY
)

cap = cv2.VideoCapture(VIDEO_PATH)
assert cap.isOpened(), f'[ERROR] VideoCapture is not opened. VIDEO_PATH={VIDEO_PATH}'

vis = o3d.visualization.Visualizer()
vis.create_window(
    WINDOW_TITLE, width=WINDOW_WIDTH, height=WINDOW_HEIGHT
)
pointcloud = o3d.geometry.PointCloud()
geom_added = False

try:
    while True:
        start_time = time.time()
        ret, orig_image = cap.read()

        if not ret:
            print('Cannot capture image.')
            break

        # Resize to input shape for network.
        resized_image = cv2.resize(orig_image, (network_image_height, network_image_width))

        # Reshape the image to network input shape NCHW.
        input_image = np.expand_dims(np.transpose(resized_image, (2, 0, 1)), 0)

        # 1. OpenVINOの深度推定モデルでdepth画像を生成する
        result = compiled_model([input_image])[output_key]
        result_image = convert_result_to_image(result)

        # 元画像とdepth画像を指定した画像サイズにリサイズする
        image = cv2.resize(orig_image, DISPLAY_SIZE)
        result_image = cv2.resize(result_image, DISPLAY_SIZE)

        image_rgb = o3d.geometry.Image(cv2.cvtColor(image, cv2.COLOR_BGR2RGB))
        image_depth = o3d.geometry.Image(result_image)

        # 2. 元画像とdepth画像からRGBD画像を生成する
        image_rgbd = o3d.geometry.RGBDImage.create_from_color_and_depth(
            image_rgb,
            image_depth,
            convert_rgb_to_intensity=False
        )

        # 3. RGBD画像から点群を生成する
        pcd = o3d.geometry.PointCloud.create_from_rgbd_image(image_rgbd, camera_intrinsic)

        pcd.estimate_normals(search_param=o3d.geometry.KDTreeSearchParamHybrid(radius=0.1, max_nn=30))
        # Flip it, otherwise the pointcloud will be upside down
        pcd.transform([[1, 0, 0, 0], [0, -1, 0, 0], [0, 0, 1, 0], [0, 0, 0, 1]])

        pointcloud.points = pcd.points
        pointcloud.colors = pcd.colors

        if geom_added == False:
            vis.add_geometry(pointcloud)
            geom_added = True

        vis.update_geometry(pointcloud)
        vis.poll_events()
        vis.update_renderer()

        duration = time.time() - start_time
        print(f'duration: {duration:.04f}, FPS: {1 / duration:.04f}')
except KeyboardInterrupt:
    pass
except Exception:
    raise
finally:
    cap.release()
    vis.destroy_window()
    del vis
    print('finish')
5. 実行結果
下記のデータセットのサンプル動画に対して3次元復元を実行しました。
https://www.crcv.ucf.edu/data/UCF101.php
-
UCF-101/Archery/v_Archery_g01_c01.avi
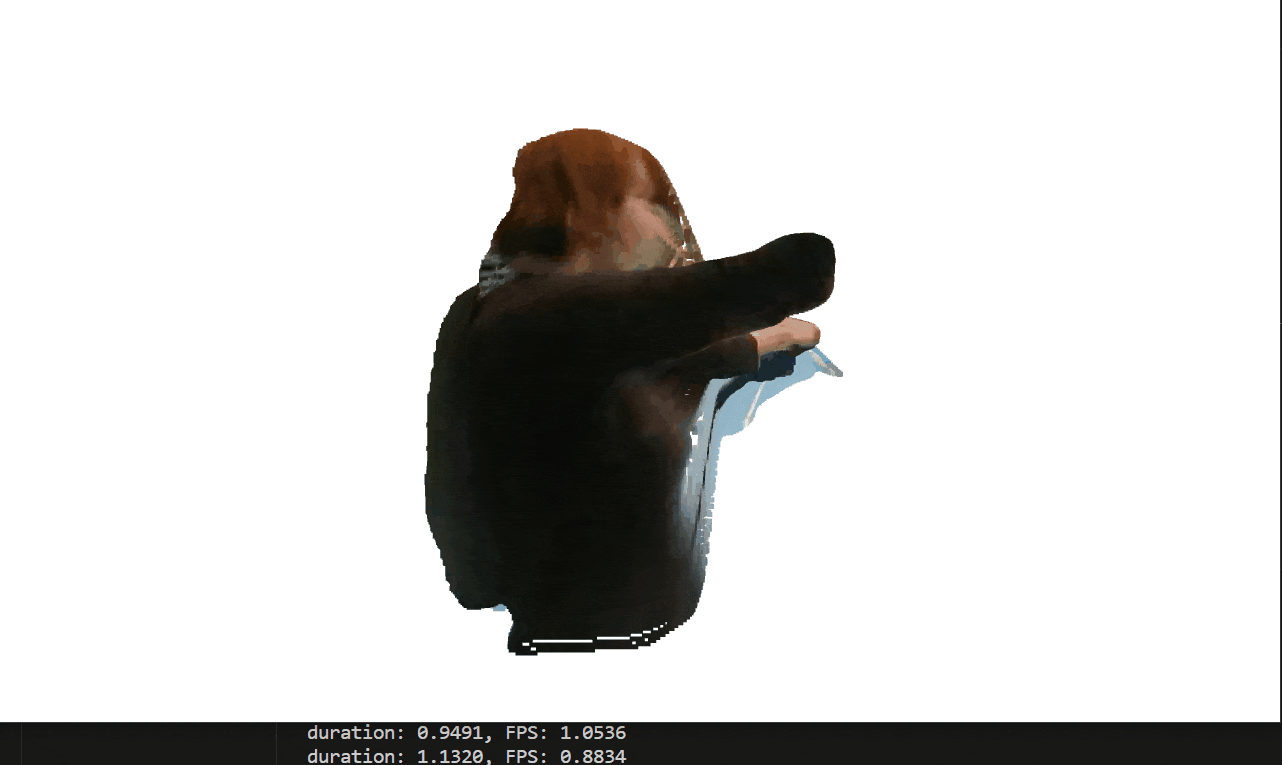
人物は画面手前に、背景は遠方にあるように復元されています。
-
UCF-101\BalanceBeam\v_BalanceBeam_g01_c01.avi
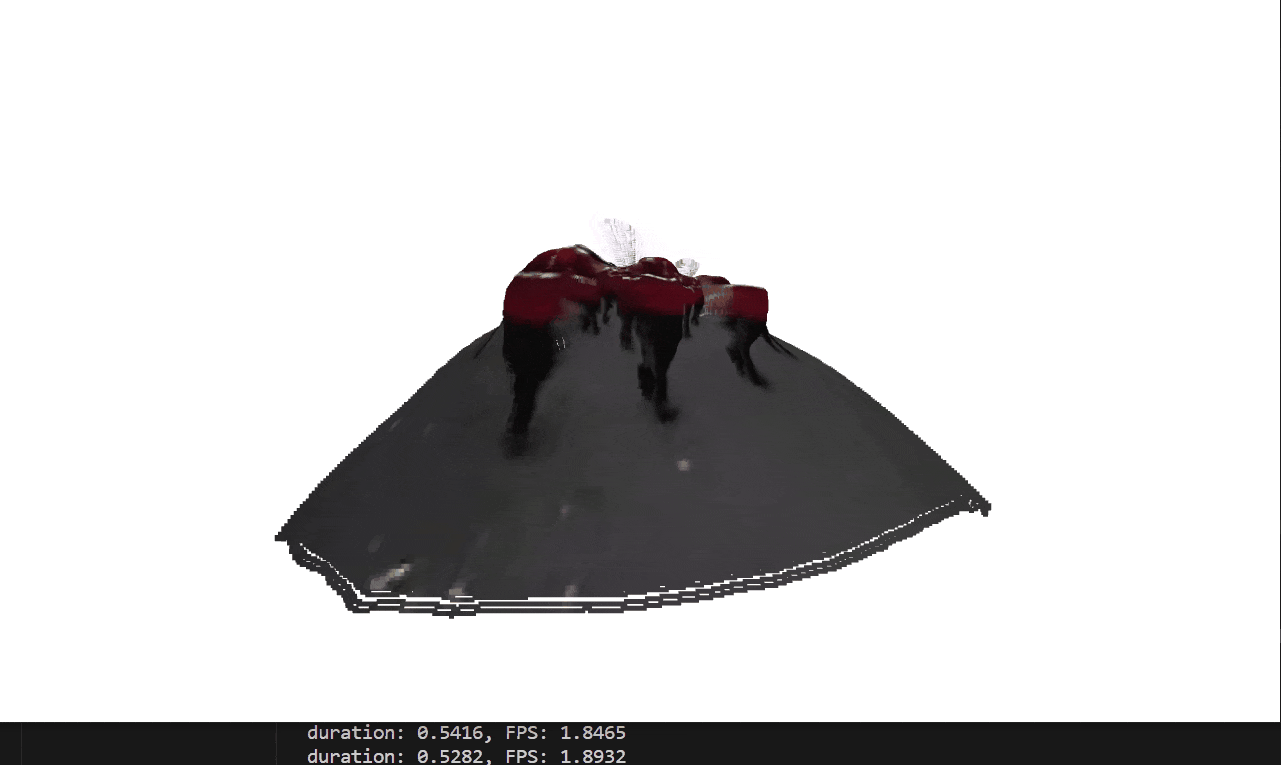
複数人が画面に映る際も、画面手前の人物と奥の人物とで異なる奥行きで復元されています。
復元結果の表示を含めて処理速度は1.5FPS程度になります。
カメラキャリブレーションをして内部パラメータを設定すれば、より正確に点群を生成できるかもしれません。
6. おわりに
CPUでもOpenVINOモデルを使えばまあまあな精度・処理速度で3次元復元ができますね。
7. 参考文献
- OpenCVとDepth Mapを用いて、1枚の写真から3次元再構築する: https://qiita.com/iwatake2222/items/bbd4ccdacfcf8f846a0a
- Realsenseの点群をリアルタイム表示(Python): https://kobot.hatenablog.jp/entry/2019/10/22/121550
- MiDaS Webcamを用いてリアルタイム単眼深度推定してみた: https://qiita.com/yakiimo121/items/a86c01a39af56475c216