はじめに
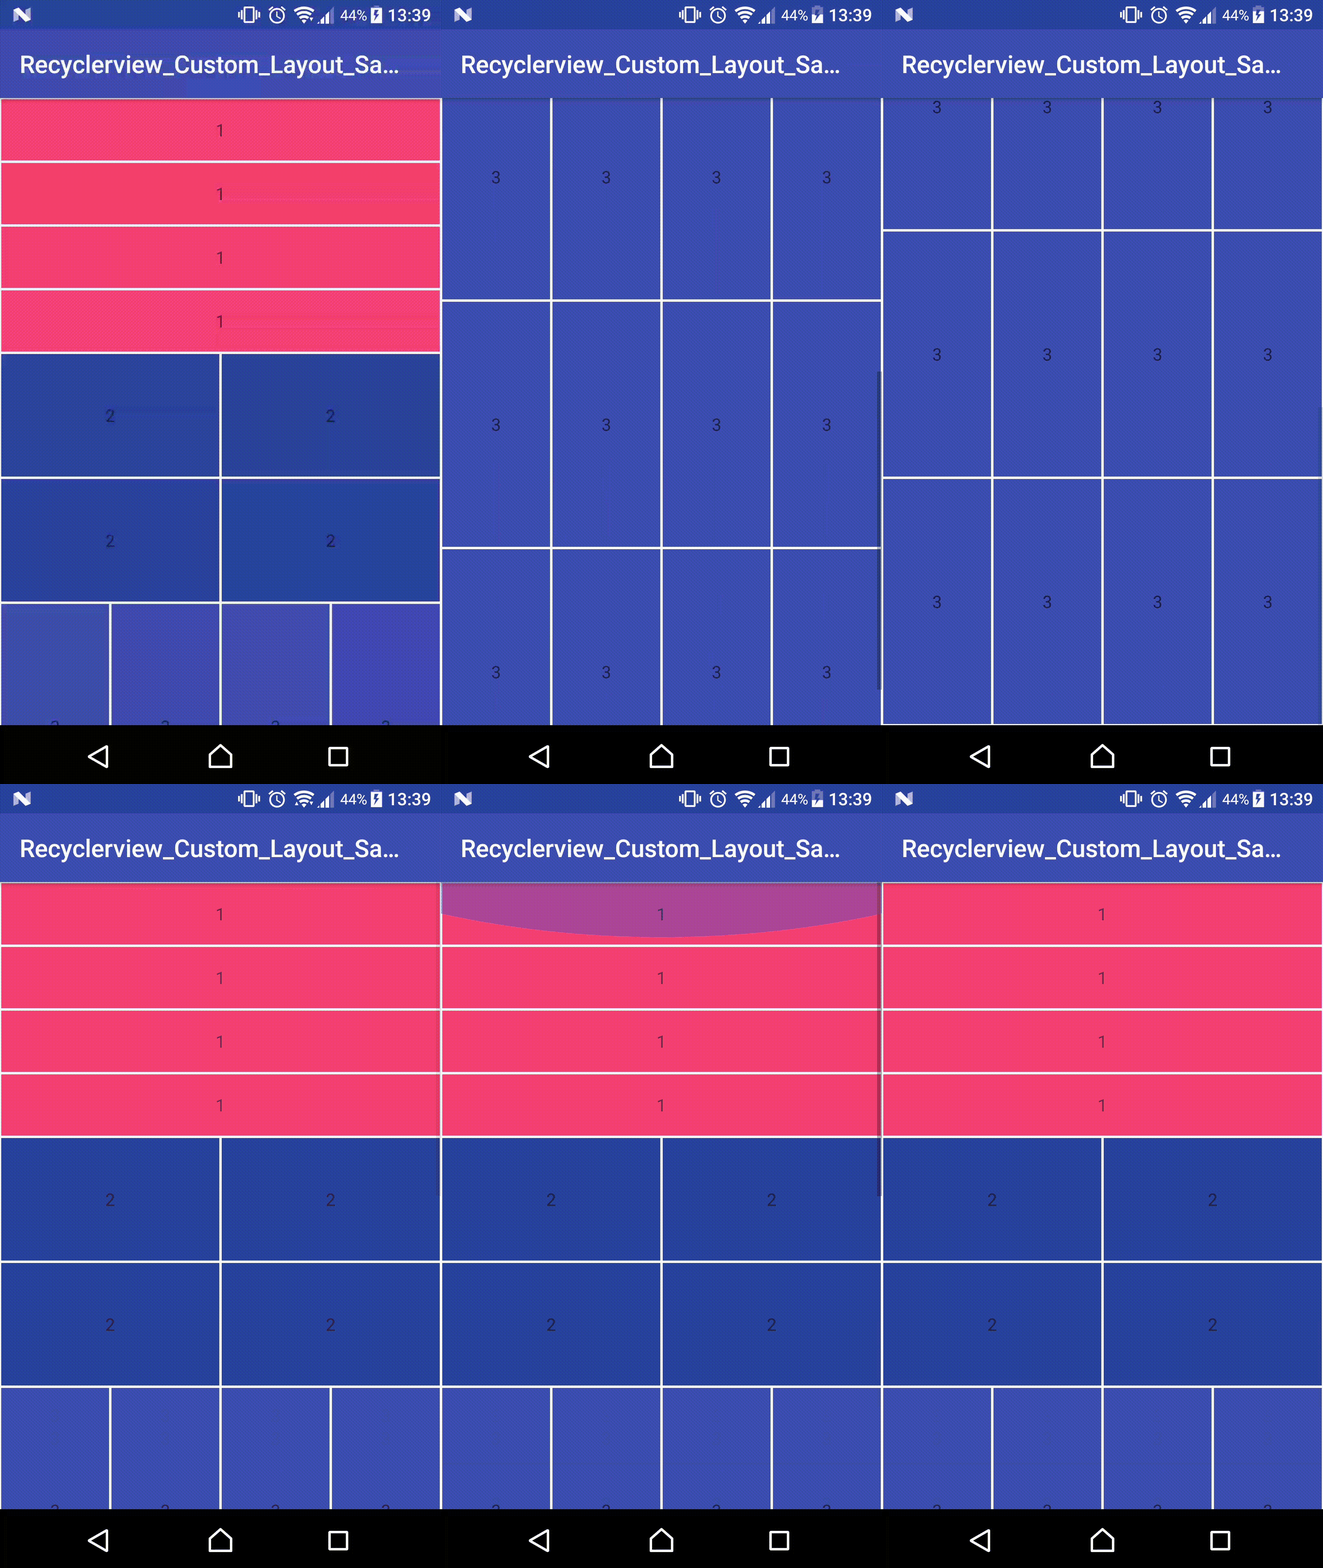
Recyclerviewの中身のレイアウトを場合によっては2分割,その下はさらに4分割,いやこの4分割の下は分割なんかいらない!
という風に,recyclerviewの中身の分割を様々な風にしたい!

こんなかんじ!
参考文献
RecyclerViewについて
http://qiita.com/Yuki_Yamada/items/ec8b6c1ff0c9d74c2a53
setSpanについて(itemを何分割するか)
https://stackoverflow.com/questions/32366412/gridlayoutmanager-setspansizelookup-creating-blank-cells
Viewtypeについて
http://woshidan.hatenablog.com/entry/2015/11/02/083000
ライブラリ設定
compile 'com.android.support:recyclerview-v7:25.3.1'
を追加してください.
実装
今回は3つの layout file に記述したxmlの内容をrecyclerviewに適用させます.
では,layout file を以下に記述します.
<?xml version="1.0" encoding="utf-8"?>
<LinearLayout xmlns:android="http://schemas.android.com/apk/res/android"
    android:orientation="vertical" android:layout_width="match_parent"
    android:layout_height="wrap_content">

    <TextView
        android:layout_margin="1dp"
        android:text="1"
        android:background="@color/colorAccent"
        android:gravity="center"
        android:layout_width="match_parent"
        android:layout_height="50dp" />
</LinearLayout>
<?xml version="1.0" encoding="utf-8"?>
<LinearLayout xmlns:android="http://schemas.android.com/apk/res/android"
    android:orientation="vertical" android:layout_width="match_parent"
    android:layout_height="wrap_content">
    <TextView
        android:layout_margin="1dp"
        android:text="2"
        android:background="@color/colorPrimaryDark"
        android:gravity="center"
        android:layout_width="match_parent"
        android:layout_height="100dp" />
</LinearLayout>
<?xml version="1.0" encoding="utf-8"?>
<LinearLayout xmlns:android="http://schemas.android.com/apk/res/android"
    android:orientation="vertical" android:layout_width="match_parent"
    android:layout_height="wrap_content">
    <TextView
        android:layout_margin="1dp"
        android:text="3"
        android:background="@color/colorPrimary"
        android:gravity="center"
        android:layout_width="match_parent"
        android:layout_height="200dp" />
</LinearLayout>
つぎに,Recyclerviewをいつものように設定しましょう.
まずは,Recyclerviewを用意(Recyclerviewは子の要素は持てません)
<?xml version="1.0" encoding="utf-8"?>
<LinearLayout xmlns:android="http://schemas.android.com/apk/res/android"
    android:orientation="vertical" android:layout_width="match_parent"
    android:layout_height="match_parent">
    <android.support.v7.widget.RecyclerView
        android:id="@+id/recyclerview"
        android:scrollbars="vertical"
        android:layout_width="match_parent"
        android:layout_height="match_parent"/>
</LinearLayout>
次に,Recyclerviewとlayout1.xml,layout2.xml,layout3.xmlをadapterによって繋げます.
package 自分のパッケージ;

import android.app.Activity;
import android.support.v7.widget.RecyclerView;
import android.util.Log;
import android.view.LayoutInflater;
import android.view.View;
import android.view.ViewGroup;

public class custom_recyclerview_adapter extends RecyclerView.Adapter<custom_recyclerview_adapter.ViewHolder>{
    private Activity mactivity;
    private int item_count;

    public custom_recyclerview_adapter(Activity mactivity,int item_count) {
        this.mactivity = mactivity;
        this.item_count = item_count;
    }

    @Override
    public custom_recyclerview_adapter.ViewHolder onCreateViewHolder(ViewGroup viewGroup, int i) {

        View view;
        final custom_recyclerview_adapter.ViewHolder viewHold;

        /******重要******/
        switch(i) {//ここでレイアウトのviewTypeからそれぞれの適用させたいlayoutへ分岐
            case 0:
                view = LayoutInflater.from(viewGroup.getContext()).inflate(R.layout.layout1, viewGroup, false);
                viewHold = new custom_recyclerview_adapter.ViewHolder(view,i);
                // クリックリスナを搭載
                view.setOnClickListener(new View.OnClickListener() {
                    @Override
                    public void onClick(View v) {
                        int position = viewHold.getAdapterPosition(); // positionを取得
                        Log.d("test",String.valueOf(position));//何番目を押したか返す
                    }
                });
                return viewHold;
            case 1:
                view = LayoutInflater.from(viewGroup.getContext()).inflate(R.layout.layout2, viewGroup, false);
                viewHold = new custom_recyclerview_adapter.ViewHolder(view,i);
                // クリックリスナを搭載
                view.setOnClickListener(new View.OnClickListener() {
                    @Override
                    public void onClick(View v) {
                        int position = viewHold.getAdapterPosition(); // positionを取得
                        Log.d("test",String.valueOf(position));//何番目を押したか返す
                    }
                });
                return viewHold;
            case 2:
                view = LayoutInflater.from(viewGroup.getContext()).inflate(R.layout.layout3, viewGroup, false);
                viewHold = new custom_recyclerview_adapter.ViewHolder(view,i);
                // クリックリスナを搭載
                view.setOnClickListener(new View.OnClickListener() {
                    @Override
                    public void onClick(View v) {
                        int position = viewHold.getAdapterPosition(); // positionを取得
                        Log.d("test",String.valueOf(position));//何番目を押したか返す
                    }
                });
                return viewHold;
        }
        /*************/
        return null;
    }

    @Override//ここでviewに対し変化を施す
    public void onBindViewHolder(custom_recyclerview_adapter.ViewHolder viewHolder, int i) {
        // データ表示
        if(0 <= i && i <= 3) {
            //viewHolder.title1.setText(test[i] + "さん");
        }
        else if(4 <= i && i <= 7){// creates second view
            //viewHolder.title2.setText("hello");
        }
        else{// creates third view
            //viewHolder.title3.setText("test");
        }
    }

    @Override
    public int getItemCount() {
        return item_count;
    }

    /******重要*******/
    @Override
    public int getItemViewType(int position) {//positionはrecyclerviewの中身のitemの位置
        if(0 <= position && position <= 3) {//recyclerviewの中身の0~3番目をviewtype "0" に設定する
            return 0;
        }
        else if(4 <= position && position <= 7){//recyclerviewの中身の4~7番目をviewtype "1" に設定する
            return 1;
        }
        else{//それ以外のviewtype "2" に設定する
            return 2;
        }
    }
    /*****************/

    public class ViewHolder extends RecyclerView.ViewHolder{
        /*TextView title1;
        TextView title2;
        TextView title3;*/
        public ViewHolder(View view,int i) {
            super(view);
            /*title1 = (TextView)view.findViewById(R.id.textsample);
            title2 = (TextView)view.findViewById(R.id.textsample1);
            title3 = (TextView)view.findViewById(R.id.textsample2);*/
        }
    }
}
getItemViewTypeでpositionごとにViewTypeを設定できます.ViewTypeはフラグと思ってもらっていいでしょう.
これで,役者はそろいました.
実装しましょう!!
package jp.app.oomae.hisaki.recyclerview_custom_layout_sample;

import android.support.v7.app.AppCompatActivity;
import android.os.Bundle;
import android.support.v7.widget.GridLayoutManager;
import android.support.v7.widget.LinearLayoutManager;
import android.support.v7.widget.RecyclerView;

public class MainActivity extends AppCompatActivity {

    @Override
    protected void onCreate(Bundle savedInstanceState) {
        super.onCreate(savedInstanceState);
        setContentView(R.layout.recyclerview);

        RecyclerView recyclerView = (RecyclerView)findViewById(R.id.recyclerview);
        recyclerView.setHasFixedSize(true);//viewの大きさが固定の場合,処理パフォーマンスが向上する
        /*****************************************重要*****************************************************/
        GridLayoutManager gridLayoutManagerVertical = new GridLayoutManager(this, 4, LinearLayoutManager.VERTICAL,false);
        gridLayoutManagerVertical.setSpanSizeLookup(new Custom_Spansize(4, 2 ,1));
        recyclerView.setLayoutManager(gridLayoutManagerVertical);
        /*************************************************************************************************/
        custom_recyclerview_adapter adapter = new custom_recyclerview_adapter(this,20);//20個itemを作る
        recyclerView.setAdapter(adapter);
    }
}
しかしながら,このままではエラーが発生します.
Recyclerviewの中身のSpanを設定していません.
以下のファイルを記述します.
package 自分のパッケージ;

import android.support.v7.widget.GridLayoutManager;

public class Custom_Spansize extends GridLayoutManager.SpanSizeLookup{
    private int spanCnt1, spanCnt2 , spanCnt3;

    public Custom_Spansize(int spanCnt1, int spanCnt2,int spanCnt3) {
        super();
        this.spanCnt1 = spanCnt1;
        this.spanCnt2 = spanCnt2;
        this.spanCnt3 = spanCnt3;
    }

    @Override
    public int getSpanSize(int position) {
        int result;
        if(position >= 0 && position <= 3){
            result = spanCnt1;
        }
        else if(position >= 4 && position <= 7){
            result = spanCnt2;
        }
        else {
            result = spanCnt3;
        }
        return result;
    }
}
これで実装完了です.
応用
        GridLayoutManager gridLayoutManagerVertical = new GridLayoutManager(this, 4, LinearLayoutManager.VERTICAL,false);
        gridLayoutManagerVertical.setSpanSizeLookup(new Custom_Spansize(4, 2 ,1));
ここでspanの間隔を変えます.
GridLayoutManager gridLayoutManagerVertical = new GridLayoutManager(this, 4,LinearLayoutManager.VERTICAL,false);
ここの4っていうのは,最高のSpan数です.
gridLayoutManagerVertical.setSpanSizeLookup(new Custom_Spansize(4, 2 ,1));
ここの引数で間隔を変えます.
考え方は,
- 第一引数 : 4 ÷ 4 = 1
- 第二引数 : 4 ÷ 2 = 2
- 第三引数 : 4 ÷ 1 = 4
GridLayoutManagerの第二引数 ÷ Custom_Spansizeのそれぞれの引数 = span
みたいな感じで,割り算の結果がSpanになります.
これで終了です.
是非,意見をお待ちしております.
今回のコード