HDPでHadoopのKerberos化にFreeIPAを使いたい!
Active Directoryは使いたくない。しかし、素のKerberosと素のLDAPは面倒臭いですよね。そこで、ADの代わりにFreeIPAを使おうと言うお話しです。
FreeIPAとは、Linux上でActive Directory的なIDM(Identity Management)を実現できる素敵ツールです。簡単に言うと「Kerberos + LDAP(389 Directory Server) + DNS(bind) + 素敵GUI」と言った感じでしょうか。詳細はこの辺を見てみてください。
LDAPの認証基盤を自力で作るよりは100倍ぐらい簡単です。
ちなみに、AmbariのFreeIPAサポートは、2.4からの機能で、まだExperimentalな機能となります。
(2.3まででも、Kerberosウィザードのマニュアルセットアップを使うことで、FreeIPAと連携させることは一応できましたが、かなり面倒な手順が必要でした。今回のFreeIPAサポートでえらい簡単になりました。)
今回の環境
- IDCF Cloud
-
CentOS 7.2 +
yum update - HDP 2.5.0
- Ambari 2.4.0.1(ちょっと古いです。最新は2.4.1.0です。)
※ 2015/09/30 時点での環境。
AmbariでHDP環境を作る
まずは頑張ってAmbariでHDPをインストールしてください。
ちょっとバージョン古いですが、下記参照してください。HDP 2.5でもほぼ変わっていないです。
※ 上述のAmbariのレポジトリを登録のURLをAmbari 2.4.1.0で行なえば良いと思います。(僕が試したのは2.4.0.1ですが、たぶん同じだと思います。)
※ Ambari 2.4.1.0のレポジトリファイルのURLはhttp://public-repo-1.hortonworks.com/ambari/centos7/2.x/updates/2.4.1.0/ambari.repoです。
FreeIPAサーバをインストール
IDCF CloudでCentOS 7.2のテンプレートからOSを起動して、yum updateしておきます。
なお、最初に記載しましたが、ドキュメントは下記になります。
上記ドキュメント見ればセットアップできると思いますが、ここは少し記載しておきます。
FreeIPAサーバ側の設定
IPA Serverのrpmをインストール
# yum -y install ipa-server bind bind-dyndb-ldap ipa-server-dns
IPA Serverのセットアップ
IDCF Cloudの場合、ローカル内のネットワークはDNSが引けるようになります。今回kerberosのrealm/domainなどはIDCF Cloud内のdomain名をそのまま使いました。
# hostname -f
freeipa.cs30idcfcloud.internal
※ cs30idcfcloudの部分はIDCF Cloudのリージョンやゾーンによって代わるので、ちゃんと自分の環境で確認しましょう。
# ipa-server-install -r CS30IDCFCLOUD.INTERNAL -n cs30idcfcloud.internal -p password -a password --mkhomedir --hostname=freeipa.cs30idcfcloud.internal --force-ntpd
- -r
- realm nameを指定
- -n
- domain nameを指定
- -p
- Directory Managerのパスワードを指定
- -a
- adminユーザのkerberosのパスワードを指定
- --mkhomedir
- 最初のログイン時にホームディレクトリを作成する
- --hostname
- ホスト名の指定
- --force-ntpd
- NTPの設定を強制します。(chronyは対応してないらしい。)
また、前述のようにIDCF Cloud内はDNSが引けるため、FreeIPA上にDNSのセットアップはしていません。
Do you want to configure integrated DNS (BIND)? [no]: はnoとします。環境によってはyesとして、BINDをセットアップすれば良いと思います。
# ipa-server-install -r CS30IDCFCLOUD.INTERNAL -n cs30idcfcloud.internal -p 6zCYTSn4 -a 6zCYTSn4 --mkhomedir --hostname=freeipa.cs30idcfcloud.internal --force-ntpd

The log file for this installation can be found in /var/log/ipaserver-install.log
==============================================================================
This program will set up the IPA Server.

This includes:
  * Configure a stand-alone CA (dogtag) for certificate management
  * Configure the Network Time Daemon (ntpd)
  * Create and configure an instance of Directory Server
  * Create and configure a Kerberos Key Distribution Center (KDC)
  * Configure Apache (httpd)

To accept the default shown in brackets, press the Enter key.

WARNING: conflicting time&date synchronization service 'chronyd' will be disabled
in favor of ntpd

Do you want to configure integrated DNS (BIND)? [no]: no


The IPA Master Server will be configured with:
Hostname:       freeipa.cs30idcfcloud.internal
IP address(es): 10.22.0.114
Domain name:    cs30idcfcloud.internal
Realm name:     CS30IDCFCLOUD.INTERNAL

Continue to configure the system with these values? [no]: yes

The following operations may take some minutes to complete.
Please wait until the prompt is returned.

Configuring NTP daemon (ntpd)
  [1/4]: stopping ntpd
  [2/4]: writing configuration
  [3/4]: configuring ntpd to start on boot
  [4/4]: starting ntpd
Done configuring NTP daemon (ntpd).
Configuring directory server (dirsrv). Estimated time: 1 minute
  [1/42]: creating directory server user
  [2/42]: creating directory server instance
  [3/42]: adding default schema
  [4/42]: enabling memberof plugin
  [5/42]: enabling winsync plugin
  [6/42]: configuring replication version plugin
  [7/42]: enabling IPA enrollment plugin
  [8/42]: enabling ldapi
  [9/42]: configuring uniqueness plugin
  [10/42]: configuring uuid plugin
  [11/42]: configuring modrdn plugin
  [12/42]: configuring DNS plugin
  [13/42]: enabling entryUSN plugin
  [14/42]: configuring lockout plugin
  [15/42]: creating indices
  [16/42]: enabling referential integrity plugin
  [17/42]: configuring certmap.conf
  [18/42]: configure autobind for root
  [19/42]: configure new location for managed entries
  [20/42]: configure dirsrv ccache
  [21/42]: enable SASL mapping fallback
  [22/42]: restarting directory server
  [23/42]: adding default layout
  [24/42]: adding delegation layout
  [25/42]: creating container for managed entries
  [26/42]: configuring user private groups
  [27/42]: configuring netgroups from hostgroups
  [28/42]: creating default Sudo bind user
  [29/42]: creating default Auto Member layout
  [30/42]: adding range check plugin
  [31/42]: creating default HBAC rule allow_all
  [32/42]: adding entries for topology management
  [33/42]: initializing group membership
  [34/42]: adding master entry
  [35/42]: initializing domain level
  [36/42]: configuring Posix uid/gid generation
  [37/42]: adding replication acis
  [38/42]: enabling compatibility plugin
  [39/42]: activating sidgen plugin
  [40/42]: activating extdom plugin
  [41/42]: tuning directory server
  [42/42]: configuring directory to start on boot
Done configuring directory server (dirsrv).
Configuring certificate server (pki-tomcatd). Estimated time: 3 minutes 30 seconds
  [1/28]: creating certificate server user
  [2/28]: configuring certificate server instance
  [3/28]: stopping certificate server instance to update CS.cfg
  [4/28]: backing up CS.cfg
  [5/28]: disabling nonces
  [6/28]: set up CRL publishing
  [7/28]: enable PKIX certificate path discovery and validation
  [8/28]: starting certificate server instance
  [9/28]: creating RA agent certificate database
  [10/28]: importing CA chain to RA certificate database
  [11/28]: fixing RA database permissions
  [12/28]: setting up signing cert profile
  [13/28]: setting audit signing renewal to 2 years
  [14/28]: restarting certificate server
  [15/28]: requesting RA certificate from CA
  [16/28]: issuing RA agent certificate
  [17/28]: adding RA agent as a trusted user
  [18/28]: authorizing RA to modify profiles
  [19/28]: configure certmonger for renewals
  [20/28]: configure certificate renewals
  [21/28]: configure RA certificate renewal
  [22/28]: configure Server-Cert certificate renewal
  [23/28]: Configure HTTP to proxy connections
  [24/28]: restarting certificate server
  [25/28]: migrating certificate profiles to LDAP
  [26/28]: importing IPA certificate profiles
  [27/28]: adding default CA ACL
  [28/28]: updating IPA configuration
Done configuring certificate server (pki-tomcatd).
Configuring directory server (dirsrv). Estimated time: 10 seconds
  [1/3]: configuring ssl for ds instance
  [2/3]: restarting directory server
  [3/3]: adding CA certificate entry
Done configuring directory server (dirsrv).
Configuring Kerberos KDC (krb5kdc). Estimated time: 30 seconds
  [1/10]: adding sasl mappings to the directory
  [2/10]: adding kerberos container to the directory
  [3/10]: configuring KDC
  [4/10]: initialize kerberos container
  [5/10]: adding default ACIs
  [6/10]: creating a keytab for the directory
  [7/10]: creating a keytab for the machine
  [8/10]: adding the password extension to the directory
  [9/10]: starting the KDC
  [10/10]: configuring KDC to start on boot
Done configuring Kerberos KDC (krb5kdc).
Configuring kadmin
  [1/2]: starting kadmin
  [2/2]: configuring kadmin to start on boot
Done configuring kadmin.
Configuring ipa_memcached
  [1/2]: starting ipa_memcached
  [2/2]: configuring ipa_memcached to start on boot
Done configuring ipa_memcached.
Configuring ipa-otpd
  [1/2]: starting ipa-otpd
  [2/2]: configuring ipa-otpd to start on boot
Done configuring ipa-otpd.
Configuring the web interface (httpd). Estimated time: 1 minute
  [1/19]: setting mod_nss port to 443
  [2/19]: setting mod_nss protocol list to TLSv1.0 - TLSv1.2
  [3/19]: setting mod_nss password file
  [4/19]: enabling mod_nss renegotiate
  [5/19]: adding URL rewriting rules
  [6/19]: configuring httpd
  [7/19]: configure certmonger for renewals
  [8/19]: setting up ssl
  [9/19]: importing CA certificates from LDAP
  [10/19]: setting up browser autoconfig
  [11/19]: publish CA cert
  [12/19]: creating a keytab for httpd
  [13/19]: clean up any existing httpd ccache
  [14/19]: configuring SELinux for httpd
  [15/19]: create KDC proxy user
  [16/19]: create KDC proxy config
  [17/19]: enable KDC proxy
  [18/19]: restarting httpd
  [19/19]: configuring httpd to start on boot
Done configuring the web interface (httpd).
Applying LDAP updates
Upgrading IPA:
  [1/9]: stopping directory server
  [2/9]: saving configuration
  [3/9]: disabling listeners
  [4/9]: enabling DS global lock
  [5/9]: starting directory server
  [6/9]: upgrading server
  [7/9]: stopping directory server
  [8/9]: restoring configuration
  [9/9]: starting directory server
Done.
Restarting the directory server
Restarting the KDC
Sample zone file for bind has been created in /tmp/sample.zone.ZVZfxB.db
Restarting the web server
==============================================================================
Setup complete

Next steps:
	1. You must make sure these network ports are open:
		TCP Ports:
		  * 80, 443: HTTP/HTTPS
		  * 389, 636: LDAP/LDAPS
		  * 88, 464: kerberos
		UDP Ports:
		  * 88, 464: kerberos
		  * 123: ntp

	2. You can now obtain a kerberos ticket using the command: 'kinit admin'
	   This ticket will allow you to use the IPA tools (e.g., ipa user-add)
	   and the web user interface.

Be sure to back up the CA certificates stored in /root/cacert.p12
These files are required to create replicas. The password for these
files is the Directory Manager password
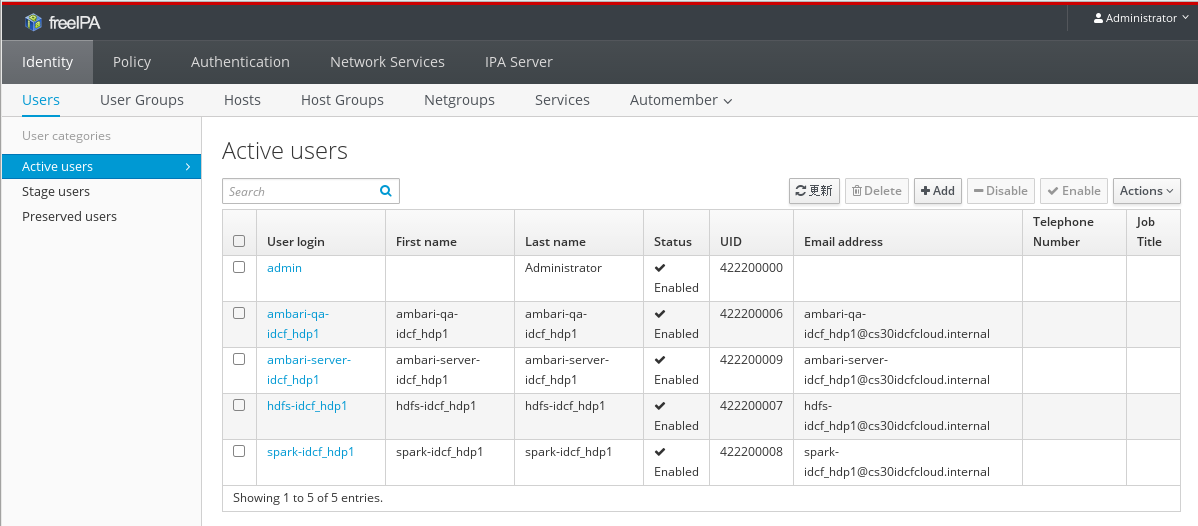
FreeIPAのサーバ環境の設定は、これで完了です。ブラウザでIPAサーバ(443)へアクセスすると、GUIでFreeIPAを管理できるようになっていて、ユーザやグループやPrincipal(Service)をポチポチと管理できるようになります。(これを書いていて思いましたが、ADみたいにDirectoryっぽくは無いですね。そういえば。まぁ、FreeIPAも言うほどやってないんですけど。)
IPA Client側の設定
各HDPのノードにIPA Clientをセットアップして、Linuxの認証をFreeIPA対応します。
各HDPのノードで実行していきます。
IPA Clinetのrpmをインストール
# yum -y install ipa-server bind bind-dyndb-ldap ipa-server-dns
IPA Clientのセットアップ
# ipa-client-install --domain=cs30idcfcloud.internal --server=freeipa.cs30idcfcloud.internal --realm=CS30IDCFCLOUD.INTERNAL -p admin -w password --mkhomedir --hostname=hdp10.cs30idcfcloud.internal --force-ntpd
- --domain
- domain nameを指定
- --server
- IPA Serverを指定
- --realm
- realm nameを指定
- -p
- FreeIPA(kerberos)のadminユーザを指定
- -w
- adminユーザのkerberosのパスワードを指定
- --mkhomedir
- 最初のログイン時にホームディレクトリを作成する
- --hostname
- ホスト名の指定
- --force-ntpd
- NTPの設定を強制します。(chronyは対応してないらしい。)
# ipa-client-install --domain=cs30idcfcloud.internal --server=freeipa.cs30idcfcloud.internal --realm=CS30IDCFCLOUD.INTERNAL -p admin -w password --mkhomedir --hostname=hdp1.cs30idcfcloud.internal --force-ntpd
Autodiscovery of servers for failover cannot work with this configuration.
If you proceed with the installation, services will be configured to always access the discovered server for all operations and will not fail over to other servers in case of failure.
Proceed with fixed values and no DNS discovery? [no]: yes
Client hostname: hdp1.cs30idcfcloud.internal
Realm: CS30IDCFCLOUD.INTERNAL
DNS Domain: cs30idcfcloud.internal
IPA Server: freeipa.cs30idcfcloud.internal
BaseDN: dc=cs30idcfcloud,dc=internal

Continue to configure the system with these values? [no]: yes
Synchronizing time with KDC...
Attempting to sync time using ntpd.  Will timeout after 15 seconds
Successfully retrieved CA cert
    Subject:     CN=Certificate Authority,O=CS30IDCFCLOUD.INTERNAL
    Issuer:      CN=Certificate Authority,O=CS30IDCFCLOUD.INTERNAL
    Valid From:  Fri Sep 30 02:46:16 2016 UTC
    Valid Until: Tue Sep 30 02:46:16 2036 UTC

Enrolled in IPA realm CS30IDCFCLOUD.INTERNAL
Created /etc/ipa/default.conf
New SSSD config will be created
Configured sudoers in /etc/nsswitch.conf
Configured /etc/sssd/sssd.conf
Configured /etc/krb5.conf for IPA realm CS30IDCFCLOUD.INTERNAL
trying https://freeipa.cs30idcfcloud.internal/ipa/json
Forwarding 'ping' to json server 'https://freeipa.cs30idcfcloud.internal/ipa/json'
Forwarding 'ca_is_enabled' to json server 'https://freeipa.cs30idcfcloud.internal/ipa/json'
Systemwide CA database updated.
Added CA certificates to the default NSS database.
Adding SSH public key from /etc/ssh/ssh_host_rsa_key.pub
Adding SSH public key from /etc/ssh/ssh_host_ecdsa_key.pub
Adding SSH public key from /etc/ssh/ssh_host_ed25519_key.pub
Forwarding 'host_mod' to json server 'https://freeipa.cs30idcfcloud.internal/ipa/json'
Could not update DNS SSHFP records.
SSSD enabled
Configured /etc/openldap/ldap.conf
No SRV records of NTP servers found. IPA server address will be used
NTP enabled
Configured /etc/ssh/ssh_config
Configured /etc/ssh/sshd_config
Configuring cs30idcfcloud.internal as NIS domain.
Client configuration complete.
これで、Linuxの認証はFreeIPAで認証されるようになります。(FreeIPA側にUserを作るだけで、どのサーバにもログインできるようになります。)
これを、すべてのHDPノードで実行していきます。

IPA Serverは色々できる
ここでは、ざっくりと設定方法だけ書きましたが、FreeIPAでは、ssh-keyをFreeIPA側にもたせたりとか、Sudoを一括で管理できたりとか、ログインできるホストを制限したりとか、色々できます。私も細かくやってないですけど。
AmbariでHDPのKerberosを有効
あとは、AmbariのGUIからKerberosをEnableすれば、良いのですが、実行前にいくつかやっておく事があります。
AmbariでFreeIPAサポートを有効化
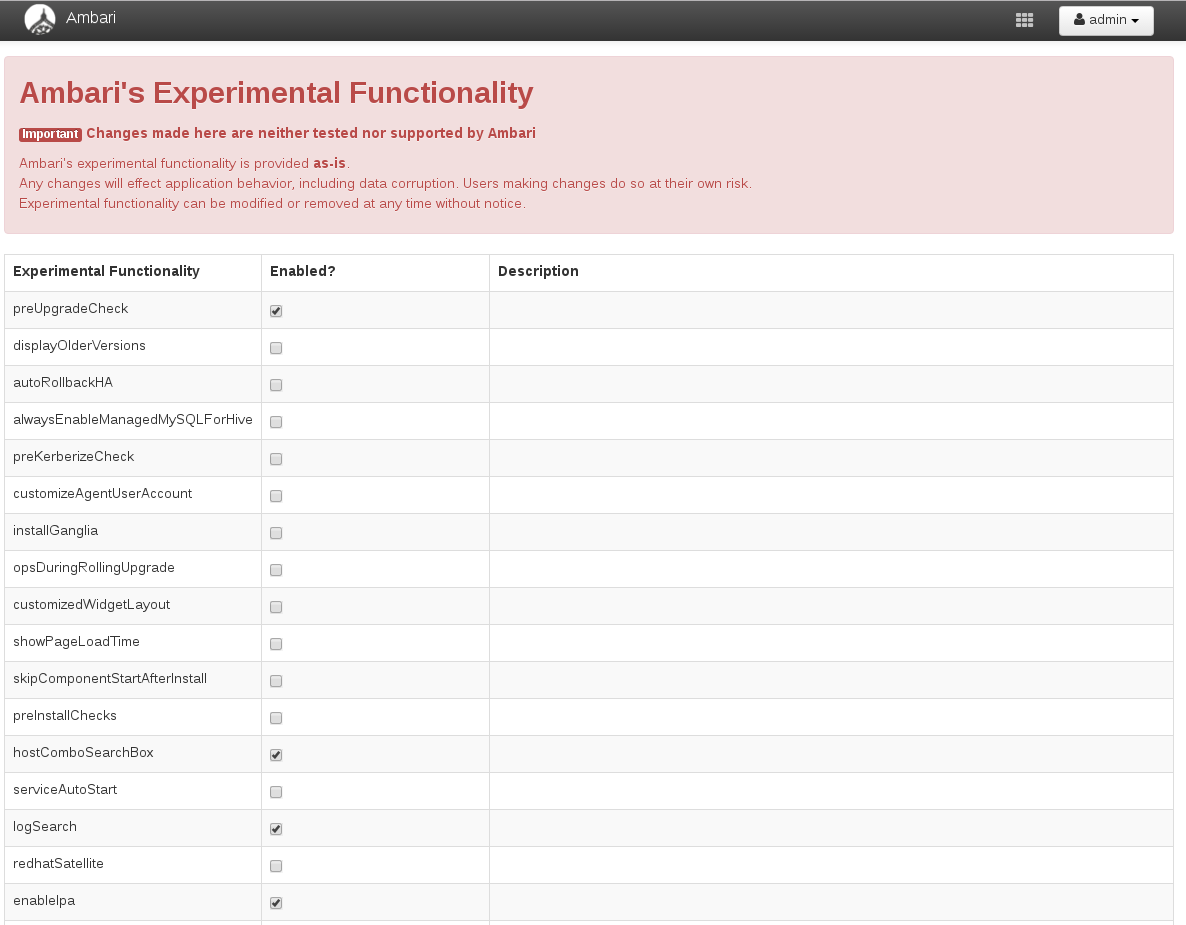
Ambari 2.4のFreeIPAサポートはExperrimentalな機能なので、有効にしないと使えません。(Kerberos有効化のウィザードを実行しても、FreeIPAの選択が出てこない。)
http://FreeIPA_Server_IP:8080/#/experimentalへアクセスすると「Ambari's Experimental Functionality」が出てきますのでenableIpaにチェックを入れて、Saveしましょう。
FreeIPA側にグループを作成
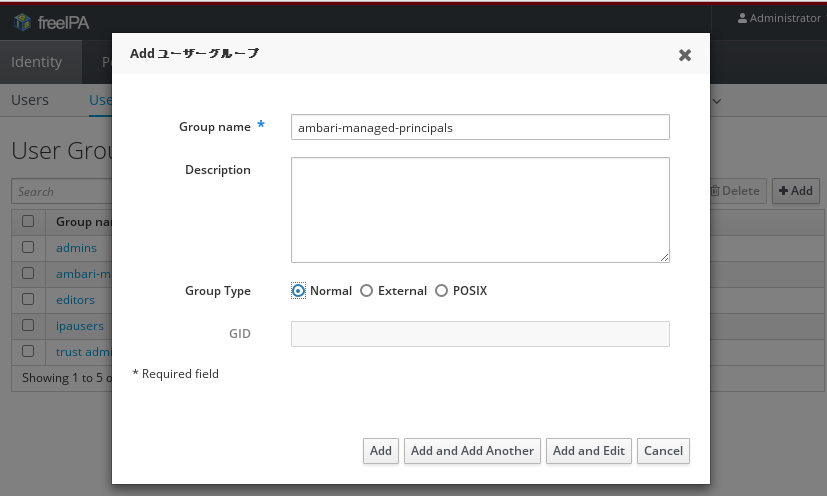
Kerberos有効化のウィザードを実行する前に、FreeIPA側にUser Groupを作成しておく必要があります。
デフォルトでは、ambari-managed-principalsになっています(Kerberos化ウィザードの途中で変更可能)ので、FreeIPAのGUIから作成しておきます。次の様な感じです。(Group Type:はNormalで問題なかったですが、正しいのか良くわからないです。)
HDP Kerberos化ウィザードを実行
いよいよ、Kerberos化していきましょう。
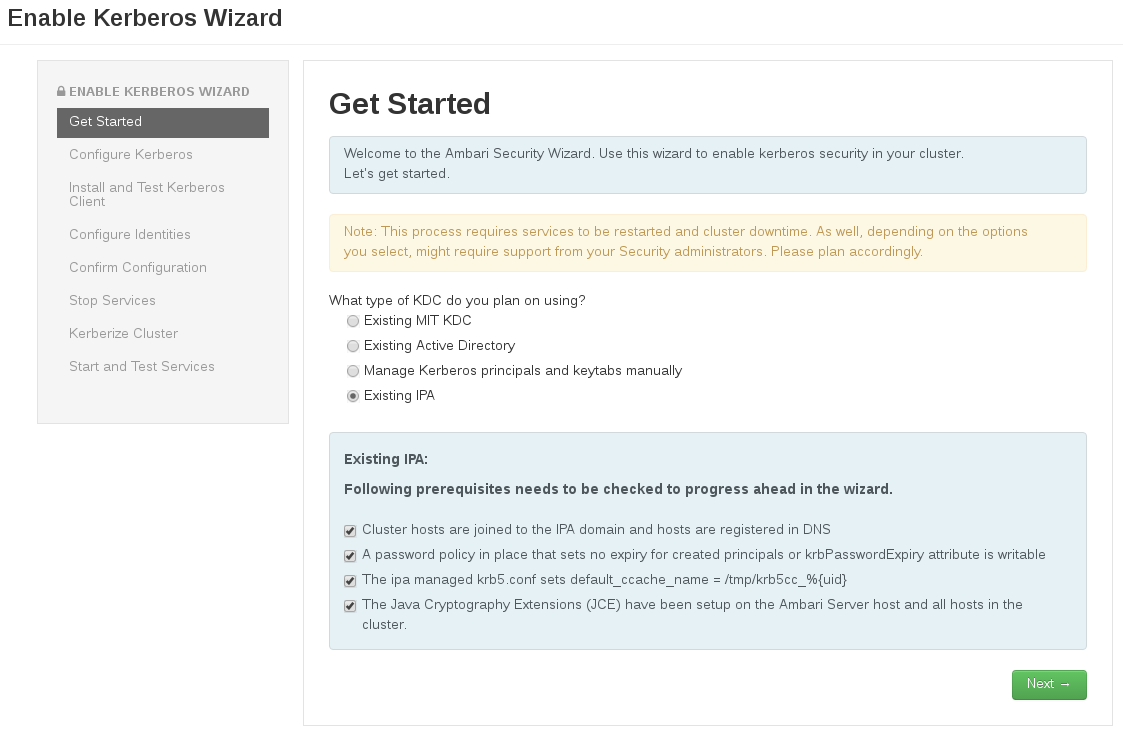
AmbariのGUIから、上部に並んでいるメニューの「Admin -> Kerberos」を選択します。「Enable Kerberos」を選択して、Kerberos化ウィザードを実行します。

次のような画面(Get Started)が開きますので、Existing IPAを選択し、その下のチェックボックスに全部チェックを入れて(ちゃんと読んでね)、次へ。
次の画面では、FreeIPAの情報(Configure Kerberos)を入力します。上述の例であげたFreeIPAの情報だと、以下の画面のようになります。(すいません、だんだん適当で。)
ちなみに、ここで先に作成したFreeIPA側のグループ名などを変更することも可能です。
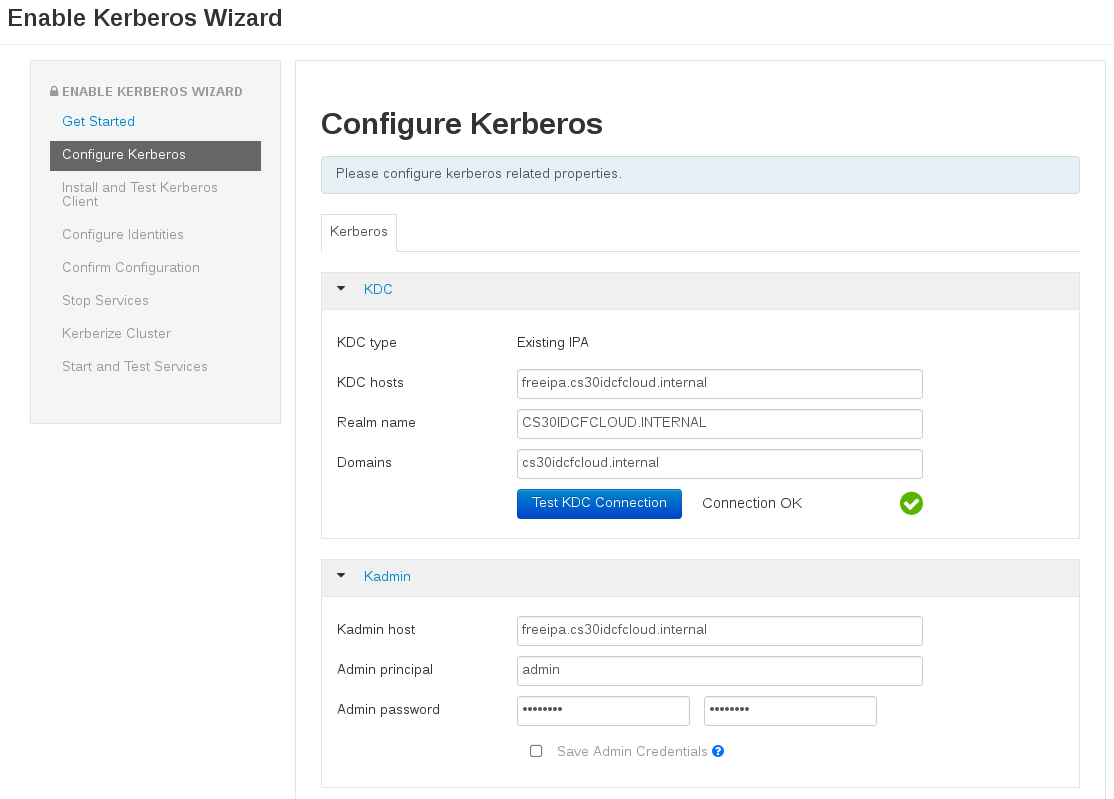
後は、基本的に特に変更することなく「Next」で大丈夫です。
以下スクリーンショットですが、一部(だいぶ)抜けてます。(とり忘れた。すいません。)
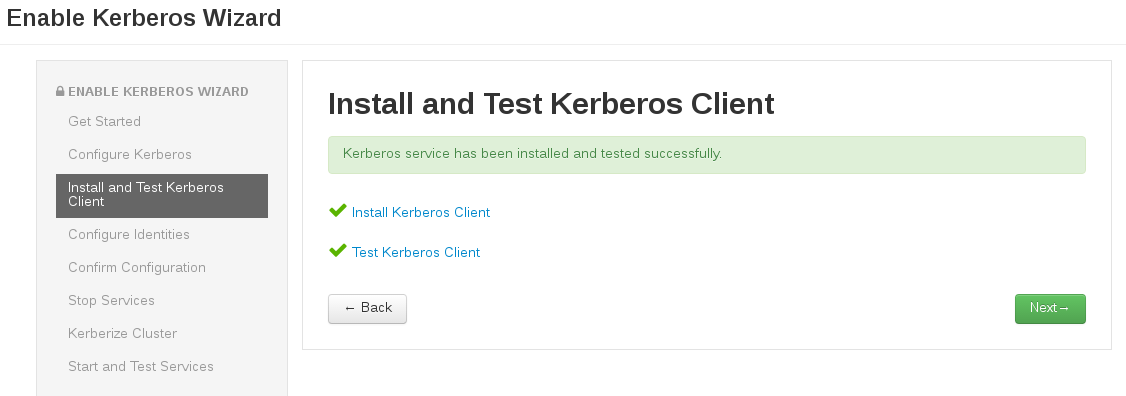
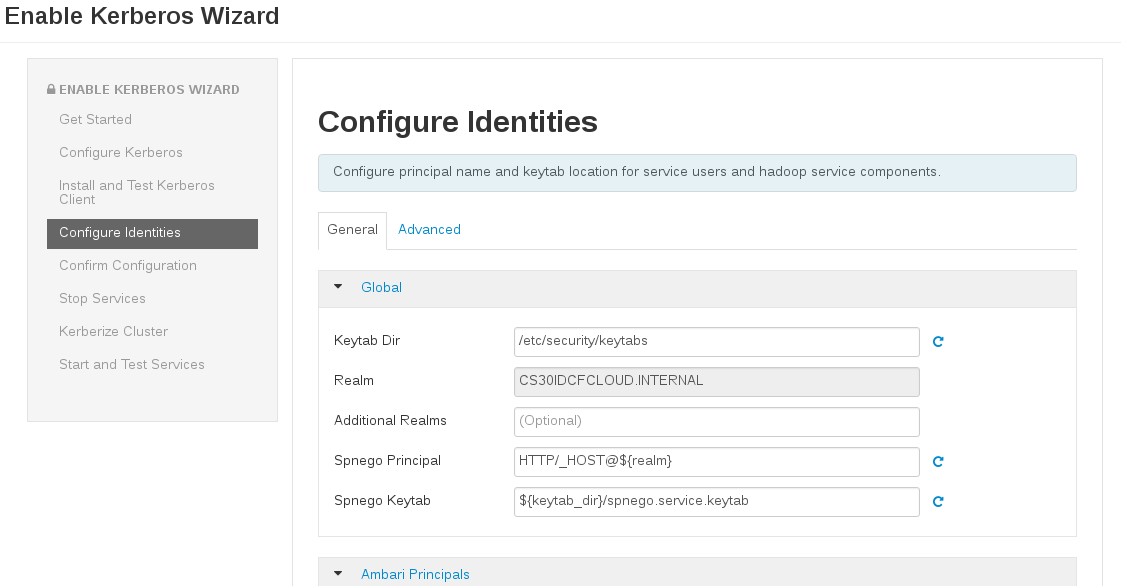
この後、最後にサービスがすべて再開されて、Kerberos化完了です!(最後適当で申し訳ない。)
その他にやった方が良いこと
基本的な部分はこれで完了なのですが、いくつかやっても良いことがあります。たとえば、Ambariのユーザ管理をLDAP(FreeIPA)連携させるとか、そんなのですね。詳細は、下記ドキュメントを参照して、必要であればチャレンジしてみてください。
このドキュメントの2.1が今まで説明してきた部分で、2.2以降を見てみてください。
ちなみに、私もやっていないので、FreeIPAでちゃんとできんのかは良くわからんですけど。