はじめに
Nuxt.jsとContentfulとNetlifyでモダンな(?)SPAブログを作りました。こちら
何回かにわけて構築の記録を残しているシリーズの第3回です。
前回つくったSPAブログを、APIベースのCMS「Contentful」に対応させていきます。
【シリーズの予定】
事前情報
Contentfulの構造
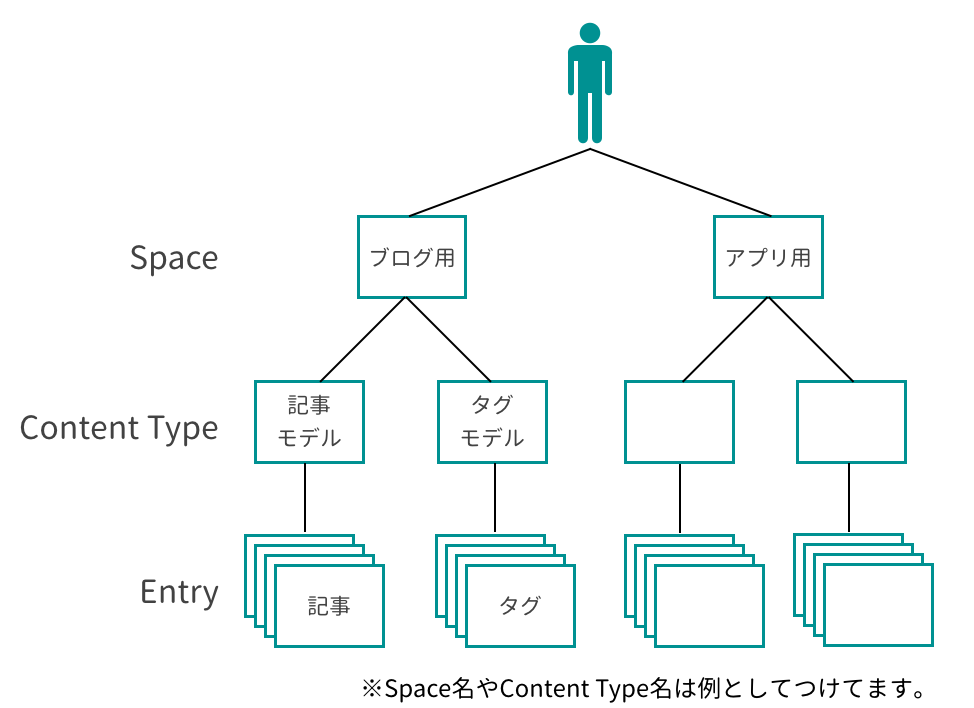
ContentfulはユーザーごとにSpace、Content Model、Entryという構造を持っていて、それぞれにIDが割り振られています。
Space以下を複数のユーザーで共有することもできるみたいですが、一人で使用する場合は、以下のような階層構造だと思ってもらえればいいかと。
セットアップ
ユーザー登録
まずはこちらからユーザー登録をしましょう。GitHubアカウントも使えますよ。
Spaceの作成
ここからは2018年8月2日現在の内容になります。(アップデートして見た目が変わってるとかよくありますもんね)
無事完了したら左上のロゴをクリックしてメニューバーを出し、「+Add space」に進みます。
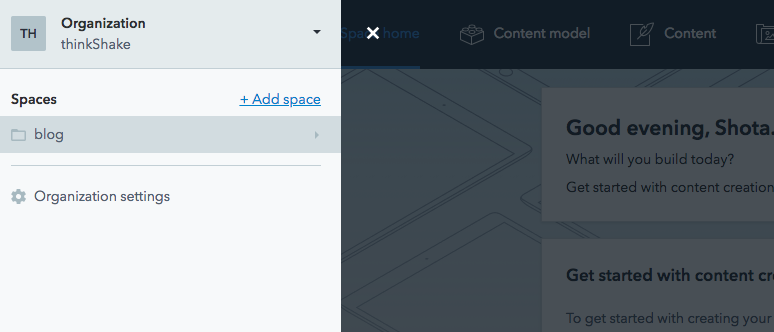
space typeは「Free」でいいです。
space nameはお好みで設定し(ここでは「sample」にしました)、「Create an empty space.」を選びましょう。
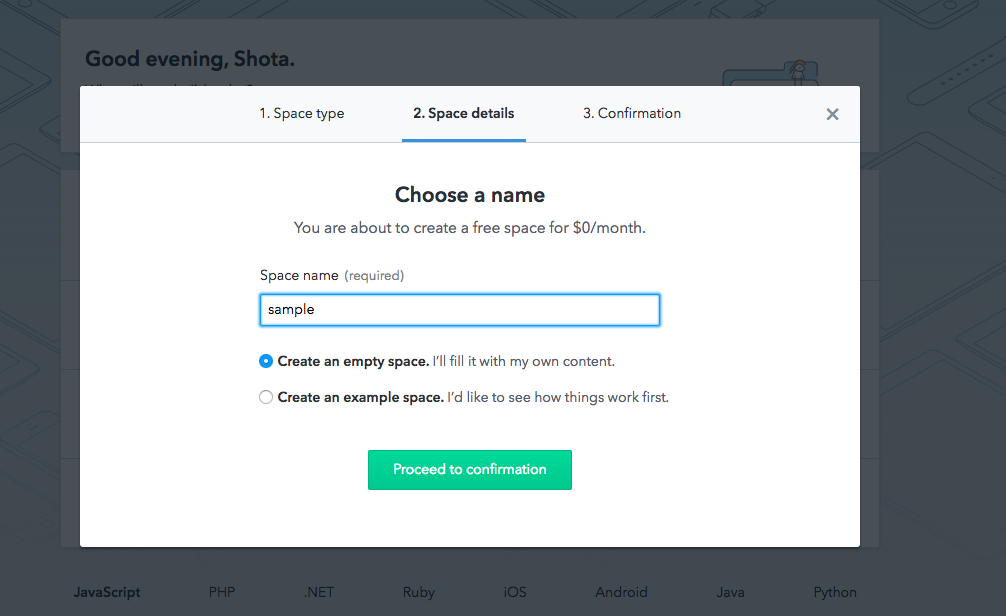
あとはconfirmしたらとりあえずOK。
Content Modelの作成
ヘッダーの「Content Model」→「Add Content Type」と進みましょう。
モーダルが出てくるハズなので、Content Type名を設定します。「Blog Post」とでも。
Api Identifierは、API呼び出し側でどういう名前で呼び出すかを設定します。今回はJavaScriptなので、JSらしくキャメルケースで「blogPost」としましょう。
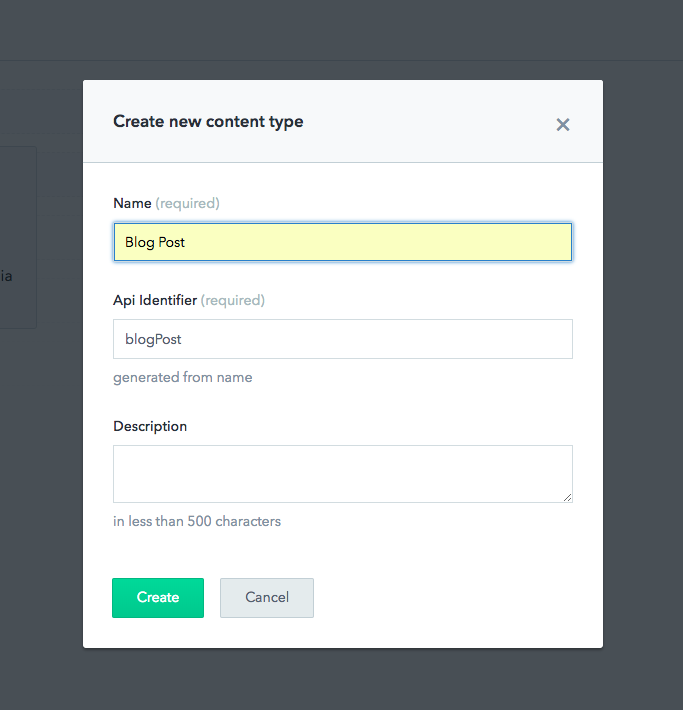
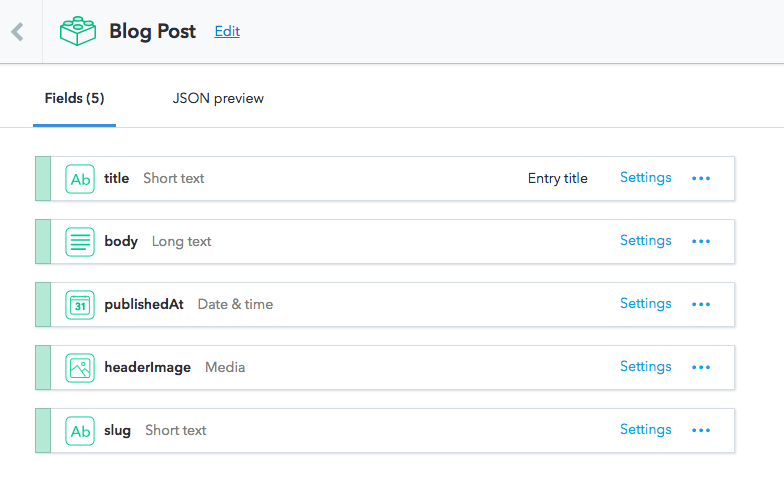
右側の「Add field」を押して、モデルに対するフィールドを設定していきます。
| フィールド名 | フィールドのタイプ | バリデーション |
|---|---|---|
| title | Text → Short Text | Required, Unique |
| body | Text → Long Text | Required |
| publishedAt | Date & time | Required |
| headerImage | Media | Required |
| slug | Text → Short Text | Required, Unique |
各項目をどうやって設定していけばいいかは、なんとなくわかるかと。
バリデーションはフィールドを作ってから、「Setting」を押して設定できます。
slugはurlの末尾ですね。お好きなように決められます。
出来上がりはこんな感じです!
Entryの作成
いよいよ記事の作成です!
ヘッダーの「Content」をクリックして「Add Blog Post」から、思う存分書いていきましょう!
ブログ側のコードをいじる
ここまでで記事は作成できましたが、肝心のブログの方が受け取る状態になっていません。
前回作ったNuxt.jsのコードをいじっていきましょう。
はじめにContentfulのパッケージを落とします。
$ yarn add contentful
APIKeyの選択
Contentfulと接続するためのAPI keyを取得し、接続設定をします。次回のNetlify編を見越して、環境変数の設定を工夫しておきます。
おなじみ(?)dotenvを使いましょう。
$ yarn add dotenv
ここからは個人ごとのAPI keyをContentfulのコンソール上から取得していきます。
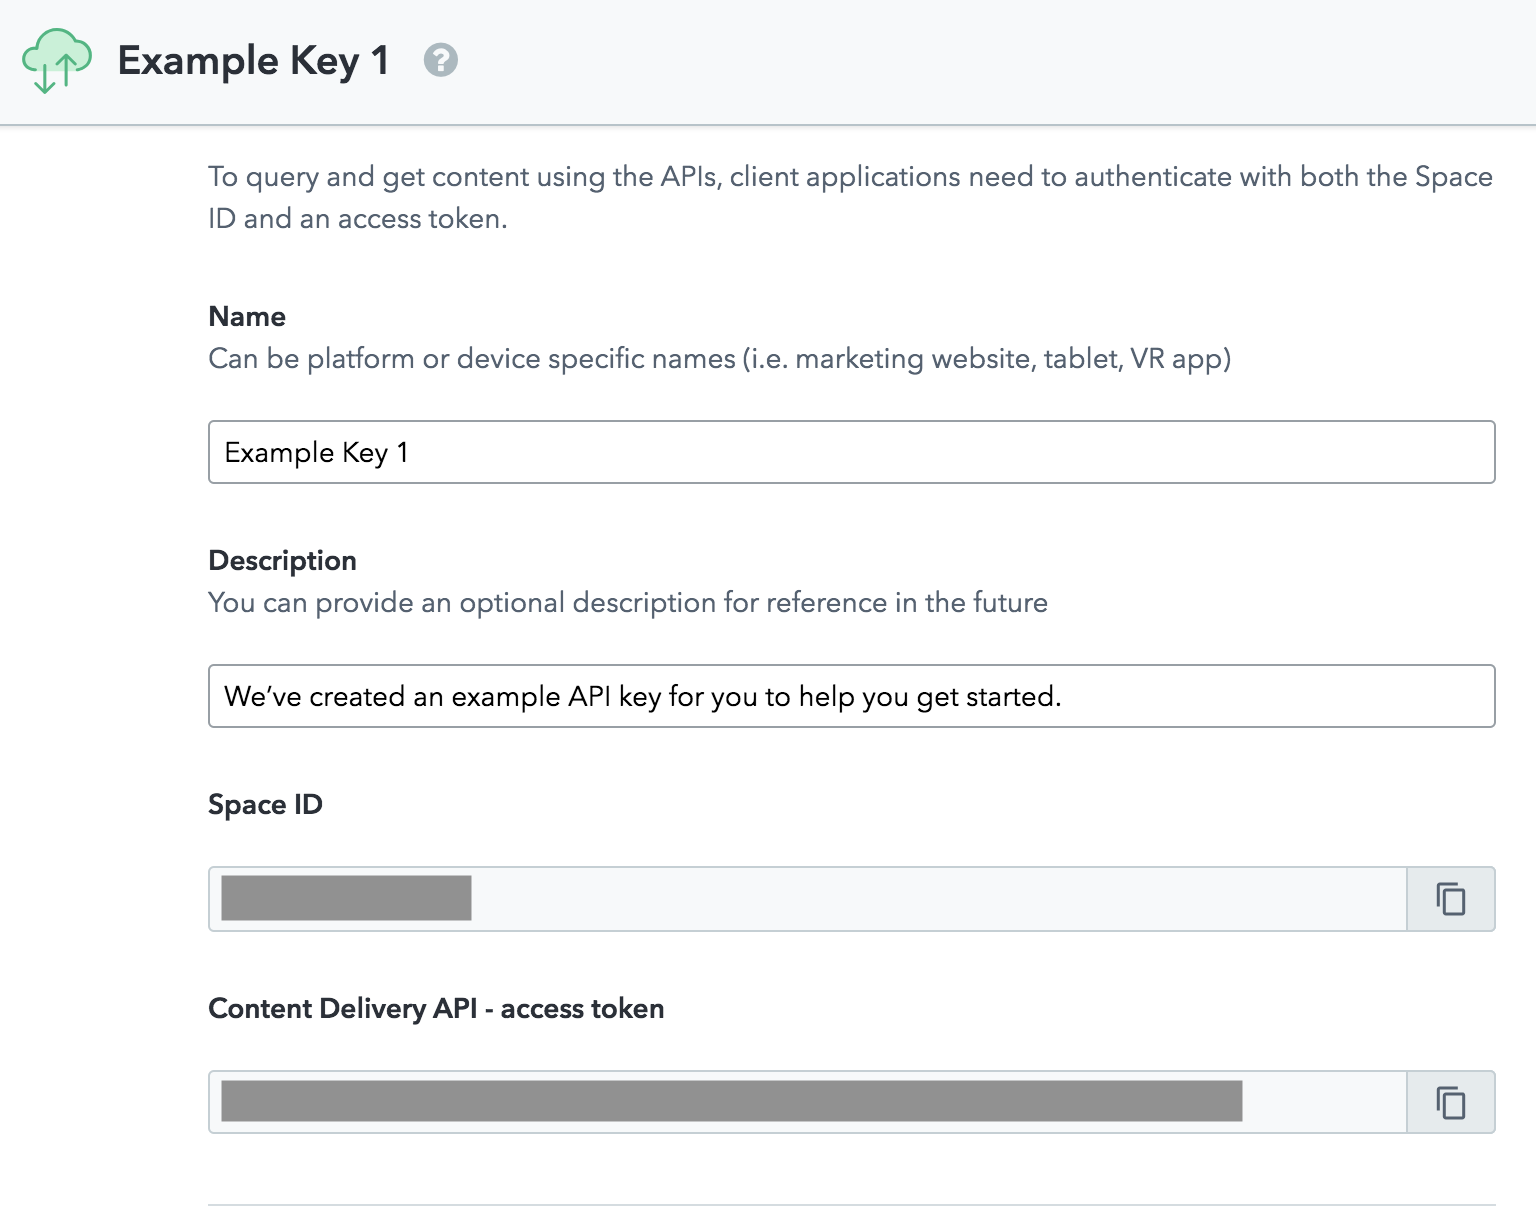
API keyはSpace ID、Access Tokenの2つです。
ヘッダータブから「Setting」→「API keys」と進みましょう。すでに「Example Key 1」というのがあるはずなので、それを選択するか、右側の「+Add API Key」から新しいキーを作ってもいいです。

keyの詳細画面に進むと「Space ID」と「Content Delivery API access token」があるので、プロジェクトディレクトリ直下に.envファイルを作成して、下記のようにコピります。
CTF_SPACE_ID=<あなたのSpace ID>
CTF_CDA_ACCESS_TOKEN=<あなたのAccess token>
CTF_BLOG_POST_TYPE_ID="blogPost"
接続設定
nuxtの設定ファイルを以下のようにします。
const {getConfigForKeys} = require('./lib/config.js')
const ctfConfig = getConfigForKeys([
  'CTF_BLOG_POST_TYPE_ID',
  'CTF_SPACE_ID',
  'CTF_CDA_ACCESS_TOKEN'
])
const {createClient} = require('./plugins/contentful')
const cdaClient = createClient(ctfConfig)

const config = {
  head: {
    title: 'nuxt_blog',
    meta: [
      { charset: 'utf-8' },
      { name: 'viewport', content: 'width=device-width, initial-scale=1' },
      { hid: 'description', name: 'description', content: 'Nuxt.js project' }
    ],
    link: [ { rel: 'icon', type: 'image/x-icon', href: '/favicon.ico' } ]
  },

  loading: { color: '#3B8070' },

  build: {
    extend (config, { isDev, isClient }) {
      if (isDev && isClient) {
        config.module.rules.push({
          enforce: 'pre',
          test: /\.(js|vue)$/,
          loader: 'eslint-loader',
          exclude: /(node_modules)/
        })
      }
    },
  },

  plugins: [ { src: '~plugins/contentful' } ],

  generate: {
    routes () {
      return cdaClient.getEntries({
        'content_type': ctfConfig.CTF_BLOG_POST_TYPE_ID
      }).then(entries => {
        return [
          ...entries.items.map(entry => `/blog/${entry.fields.slug}`)
        ]
      })
    }
  },

  env: {
    CTF_SPACE_ID: ctfConfig.CTF_SPACE_ID,
    CTF_CDA_ACCESS_TOKEN: ctfConfig.CTF_CDA_ACCESS_TOKEN,
    CTF_BLOG_POST_TYPE_ID: ctfConfig.CTF_BLOG_POST_TYPE_ID
  }
}

module.exports = config
次に環境変数を読み込むためのスクリプトを作ります。プロジェクト直下にlibディレクトリを作り、そこに入れてください。
require('dotenv').config()

function getValidConfig (configEnv, keys) {
  let {config, missingKeys} = keys.reduce((acc, key) => {
    if (!configEnv[key]) {
      acc.missingKeys.push(key)
    } else {
      acc.config[key] = configEnv[key]
    }
    return acc
  }, {config: {}, missingKeys: []})

  if (missingKeys.length) {
    throw new Error(`Contentful key is missing : ${missingKeys.join(', ')}`)
  }
  return config
}

module.exports = {
  getConfigForKeys (keys) {
    const configEnv = {
      CTF_BLOG_POST_TYPE_ID: process.env.CTF_BLOG_POST_TYPE_ID,
      CTF_SPACE_ID: process.env.CTF_SPACE_ID,
      CTF_CDA_ACCESS_TOKEN: process.env.CTF_CDA_ACCESS_TOKEN
    }
    return getValidConfig(configEnv, keys)
  }
}
最後にContentfulの呼び出し用プラグインの設定をします。
const contentful = require('contentful')
const defaultConfig = {
  CTF_SPACE_ID: process.env.CTF_SPACE_ID,
  CTF_CDA_ACCESS_TOKEN: process.env.CTF_CDA_ACCESS_TOKEN
}

module.exports = {
  createClient (config = defaultConfig) {
    return contentful.createClient({
      space: config.CTF_SPACE_ID,
      accessToken: config.CTF_CDA_ACCESS_TOKEN
    })
  }
}
これでContentfulと連携をする準備ができました!
記事の取得
最後にvueファイルのコードをいじって記事を取得するようにします。
前回からの差分だけ書こうかと思ってたけど、めんどくさいから全部のっけちゃいます!
<template>
  <section class="index">
    <card v-for="post in posts"
      v-bind:key="post.fields.slug"
      :title="post.fields.title"
      :slug="post.fields.slug"
      :headerImage="post.fields.headerImage"
      :publishedAt="post.fields.publishedAt"/>
  </section>
</template>

<script>
import Card from '~/components/card.vue'
import {createClient} from '~/plugins/contentful.js'

const client = createClient()
export default {
  transition: 'slide-left',
  components: {
    Card
  },
  async asyncData ({ env, params }) {
    return await client.getEntries({
      'content_type': env.CTF_BLOG_POST_TYPE_ID,
      order: '-fields.publishedAt',
    }).then(entries => {
      return {
        posts: entries.items
      }
    })
    .catch(console.error)
  }
}
</script>

<style scoped>
.index {
  display: flex;
  flex-wrap: wrap;
}
</style>
asyncData内でContentfulから記事を取得して、カードに渡してますね。
<template>
  <article class="card">
    <nuxt-link v-bind:to="{ name: 'blog-slug', params: { slug: slug }}" class="wrapper">
      <img class="card_image" v-bind:src="headerImage.fields.file.url"/>
      <h1 class="card_title">{{ title }}</h1>
      <p class="card_date">{{ (new Date(publishedAt)).toLocaleDateString() }}</p>
    </nuxt-link>
  </article>
</template>

<script>
export default {
  props: ['title', 'slug', 'headerImage', 'publishedAt']
}
</script>

<style scoped>
.card {
  width: 300px;
  height: 200px;
  box-shadow: 1px 2px 3px 1px rgba(0,0,0,0.2);
  border: 0.5px solid rgb(57, 72, 85);
  padding: 10px 20px;
  margin: 10px 10px;
  text-align: center;
}
.wrapper {
  text-decoration: none;
}
.card_title {
  font-size: 1.2rem;
}
.card_date {
  font-size: 0.7rem;
  color: rgb(57, 72, 85);
  text-align: right;
}
.card_image {
  max-height: 100px;
}
</style>
cardはindexから受け取るだけで、Contentfulからの取得はしてません。
slugへのlinkでパラメータとして記事タイトルを渡してます。
<template>
  <section class="slug">
    <h1 class="slug_title">{{ post.fields.title }}</h1>
    <p class="slug_date">
      {{ (new Date(post.fields.publishedAt)).toLocaleDateString() }}
    </p>
    <img class="slug_image" v-bind:src="post.fields.headerImage.fields.file.url"/>
    <vue-markdown>{{post.fields.body}}</vue-markdown>
  </section>
</template>

<script>
import VueMarkdown from 'vue-markdown'
import {createClient} from '~/plugins/contentful.js'

const client = createClient()
export default {
  transition: 'slide-left',
  components: {
    VueMarkdown
  },
  async asyncData ({ env, params }) {
    return await client.getEntries({
      'content_type': env.CTF_BLOG_POST_TYPE_ID,
      'fields.slug': params.slug,
      order: '-sys.createdAt'
    }).then(entries => {
      return {
        post: entries.items[0],
      }
    })
    .catch(console.error)
  }
}
</script>

<style scoped>
.slug {
  max-width: 800px;
  margin: 0 auto;
}
.slug_title {
  font-size: 2.0rem;
  font-weight: bolder;
}
.slug_date {
  font-size: 1.0rem;
  color: rgb(57, 72, 85);
  text-align: right;
}
</style>
ページの読み込み時(asyncData)に再度Contentfulから記事内容を取得させます。その際、パラメータとして与えられたslug値で絞り込みをしてます。uniqueな値にしてたのでキー代わりですね。
この辺、indexの読み込み時にstoreに格納しておけば、いちいち記事を再取得しなくてもいいかも知れませんね。
途中経過
開発環境を立ち上げて記事を確認してみましょう。
こんな感じになっていたら成功です!
- 記事一覧

- 記事内容

おわりに
今回はContentfulと連携して記事を登録できるようにしました!
次回はとうとうNetlifyを通して公開していきます!
ではではー。