この記事は、「【連載】初めてのReact Native + Expo開発環境構築入門」の子記事です。環境などの条件は、親記事をご覧ください。
前回までに、unstatedに格納した請求書情報をきれいに画面上にリスト表示できるようになったので、今回は請求書情報をサーバーから取得できるようにします。テスト用に簡易ローカルHTTPサーバーも立ち上げます。
目標
サーバーとの通信は、Reduxよりunstatedが楽
Reduxを使った場合、そもそもそのままではサーバーからデータを取得してグローバルStateに取得データを格納できません。(厳密にはできますが、各コンポーネント内に非同期処理を書かなければいけないので、コンポーネント間でコード再利用ができない。)なので通常redux-thunkというミドルウェアを使ってActionで非同期処理を実行できるようにします。これに比べて、unstatedなら2つの点で断然有利です。
- ミドルウェア無しで(追加モジュール無しで)非同期処理できる
- Containerのメンバーメソッドとして非同期処理を書ける。ActionやReducerなどあちこちに処理を書かなくていい
※もちろんReduxのほうがいい場合もあります。
テストサーバーを立てる
実際のコーディングの前に、まずはテストサーバーを立てましょう。ローカルPCにnode.jsのサーバーを立てて、そこにinvoice.jsというファイルを置いて、HTTP通信で取得できるようにします。今回はnode.jsのサーバーを簡易的に立ててくれるhttp-serverを使います。
まずhttp-serverをグローバルインストール。
npm install -g http-server
次に、テストサーバーのドキュメントルートフォルダを設置。プロジェクトフォルダの横とかがわかりやすいかもですね。
たとえば今回のプロジェクトは私の場合C:\ExpoProjects\hello-world-testに設置しているので、C:\ExpoProjects\hello-world-testdataというフォルダを作って、以下のinovice.jsを設置します。
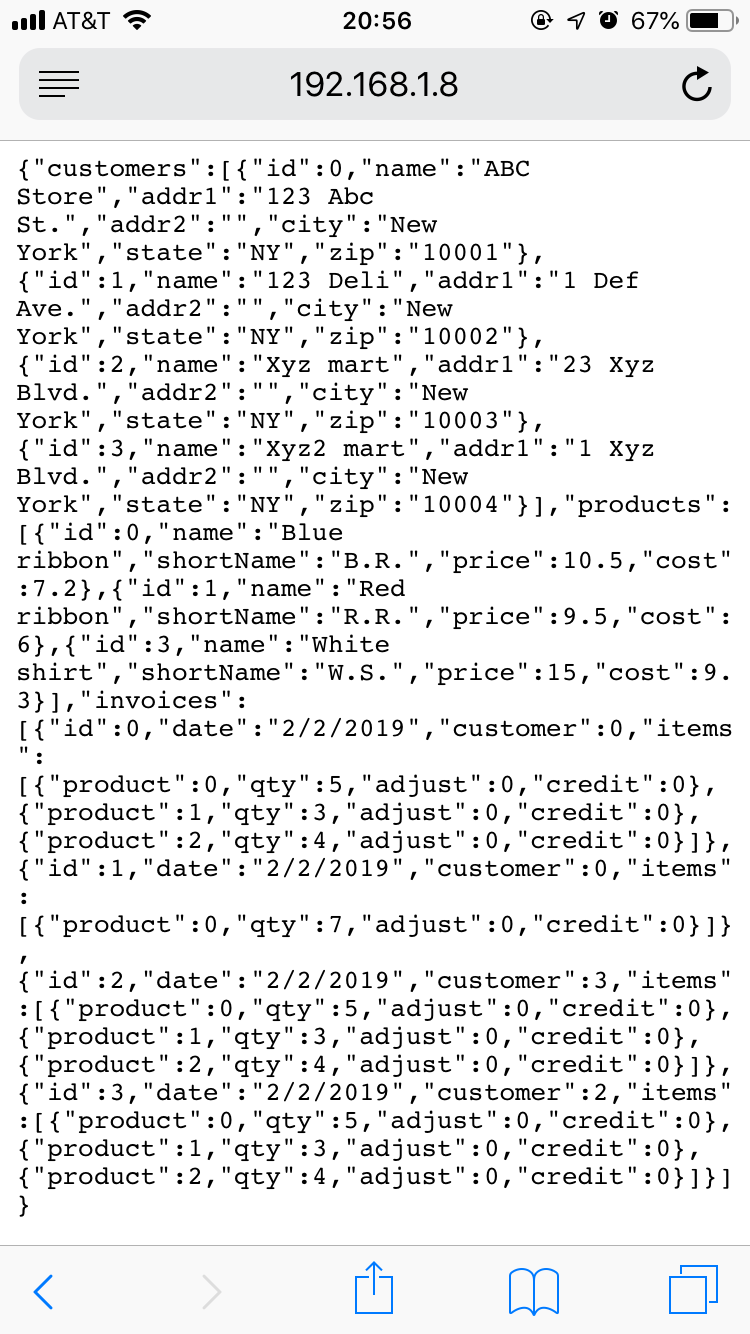
{"customers":[{"id":0,"name":"ABC Store","addr1":"123 Abc St.","addr2":"","city":"New York","state":"NY","zip":"10001"},{"id":1,"name":"123 Deli","addr1":"1 Def Ave.","addr2":"","city":"New York","state":"NY","zip":"10002"},{"id":2,"name":"Xyz mart","addr1":"23 Xyz Blvd.","addr2":"","city":"New York","state":"NY","zip":"10003"},{"id":3,"name":"Xyz2 mart","addr1":"1 Xyz Blvd.","addr2":"","city":"New York","state":"NY","zip":"10004"}],"products":[{"id":0,"name":"Blue ribbon","shortName":"B.R.","price":10.5,"cost":7.2},{"id":1,"name":"Red ribbon","shortName":"R.R.","price":9.5,"cost":6},{"id":3,"name":"White shirt","shortName":"W.S.","price":15,"cost":9.3}],"invoices":[{"id":0,"date":"2/2/2019","customer":0,"items":[{"product":0,"qty":5,"adjust":0,"credit":0},{"product":1,"qty":3,"adjust":0,"credit":0},{"product":2,"qty":4,"adjust":0,"credit":0}]},{"id":1,"date":"2/2/2019","customer":0,"items":[{"product":0,"qty":7,"adjust":0,"credit":0}]},{"id":2,"date":"2/2/2019","customer":3,"items":[{"product":0,"qty":5,"adjust":0,"credit":0},{"product":1,"qty":3,"adjust":0,"credit":0},{"product":2,"qty":4,"adjust":0,"credit":0}]},{"id":3,"date":"2/2/2019","customer":2,"items":[{"product":0,"qty":5,"adjust":0,"credit":0},{"product":1,"qty":3,"adjust":0,"credit":0},{"product":2,"qty":4,"adjust":0,"credit":0}]}]}
長いのでコンパクト化していますが、中身が気になる方は、オンラインJSONエディタに貼り付けてみてください。このデータにはInvoiceが4つ入っています。
ではローカルサーバーを立てます。PowerShellを開き(Visual Studio Codeの中ではなく、独立したPowerShellを立ち上げます)、ドキュメントルートまで移動してhttp-serverを実行。
cd \ExpoProjects\hello-world-testdata
http-server
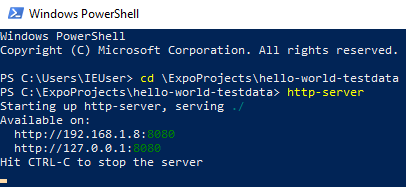
上のようにどこに立ち上がってるか表示してくれるので、実験に使ってるモバイル実機のブラウザでアクセスしてみます。このとき、ポート番号とファイル名を忘れないように注意します。

axiosをインストール
axiosはHTTP通信を「よしなに」処理してくれる便利屋さんです。なくてもいいですが、記述が簡単になるのでぜひ。
npm install axios
unstatedコンテナに通信用メソッドを追加
以前の記事で作ったunstatedコンテナcontainers/InvoiceContainer.jsに、API通信を実行するメソッドを追加します。
import axios from 'axios';
const INVOICE_API_ENDPOINT = 'http://192.168.1.8:8080/invoice.js';
...
export default class InvoiceContainer extends Container {
  constructor(props = {}) {
    super();
    this.state = {
      data: props.initialSeeding ? Seeder.getSeed() : this.getEmptyData(),
      isDataLoading: false
    };
  }
...
  getDataFromServer() {
    this.setState({ isDataLoading: true });
    axios
      .get(INVOICE_API_ENDPOINT, { params: {} })
      .then(results => {
        console.log("HTTP Request succeeded.");
        console.log(results);
        this.setState({ data: results.data });
        this.setState({ isDataLoading: false });
      })
      .catch(() => {
        console.log("HTTP Request failed.");
        this.setState({ isDataLoading: false });
      });
  }
...
}
INVOICE_API_ENDPOINTには、簡易テストサーバーのアドレスに対象データファイル名まで入れたURLを指定します。
グローバルStateとして、isDataLoadingを追加しました。axiosがサーバーと通信中にこれをオンにすることで、画面コンポーネント側でこのフラグを見て表示内容を変更できることを狙っています。
追加したgetDataFromServer()では、axiosによるサーバーとの通信が実装されています。最初にロード中フラグisDataLoadingを立てて、INVOICE_API_ENDPOINTと通信し、成功(.then)したらグローバルStateのdataに書き込んでからロード中フラグオフ、失敗(.catch)したら単にロード中フラグオフ。
これだけで通信コーディングは終わりです。実践ではエラーになった場合の処理についてもう少し書く必要がありますね。
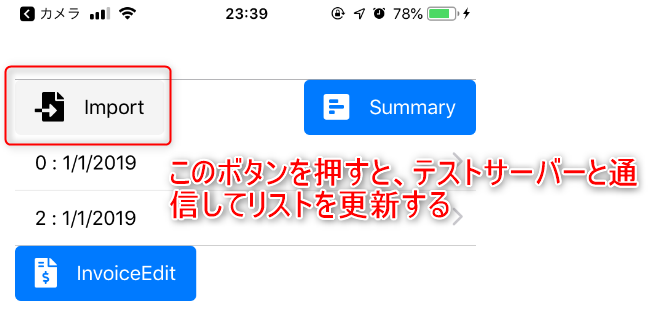
API通信を開始するボタンを作る
単純に、画面コンポーネントにImportボタンとイベントを実装します。
class HomeScreenContent extends React.Component {
  constructor(props) {
    super(props);
    this.onImportClick = this.onImportClick.bind(this);
  }

  onImportClick() {
    this.props.globalState.getDataFromServer();
  }
...
  render() {
    let globalState = this.props.globalState;
    let invoiceList = <Text>No invoice</Text>;

    // Wait for data loading...
    if (globalState.state.isDataLoading) {
      return (
        <View>
          <Text>loading...</Text>
        </View>
      );
    }
...
    return (
      <Container>
        <Content>
          <View style={{ flexDirection: "row" }}>
            <Left>
              <Button light onPress={() => this.onImportClick()}>
                <Icon type="FontAwesome5" name="file-import" />
                <Text style={{ paddingLeft: 0 }}>Import</Text>
              </Button>
            </Left>
            <Right>
              <Button onPress={() => this.props.navigation.navigate("Summary")}>
                <Icon type="FontAwesome5" name="poll-h" />
                <Text style={{ paddingLeft: 0 }}>Summary</Text>
              </Button>
            </Right>
          </View>

          {invoiceList}

          <View style={{ flexDirection: "row" }}>
            <Left>
              <Button
                onPress={() => this.props.navigation.navigate("InvoiceEdit")}
              >
                <Icon type="FontAwesome5" name="file-invoice-dollar" />
                <Text style={{ paddingLeft: 0 }}>InvoiceEdit</Text>
              </Button>
            </Left>
          </View>
        </Content>
      </Container>
    );
  }
}
...
まずイベントハンドラonImportClick()を登録します。この中では、グローバルStateコンテナに書いたgetDataFromServerを呼んでるだけです。
次に、render()内に、通信中(グローバルStateのisDataLoadingがオン)だったら「loading...」と表示するコードを入れます。これにより、通信中にほかの操作をされることを防ぎます。
最後に、Importボタンを追加します。タップされたらthis.onImportClick()を呼ぶだけです。
※さらに若干ボタンの配置を変えています。
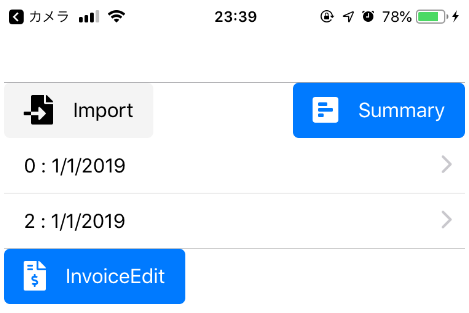
修正が終わったら、テスト用サーバーがPowerShell上で起動していることを確認して、モバイル実機でテストします。結果は、以下のようになります。
初期画面
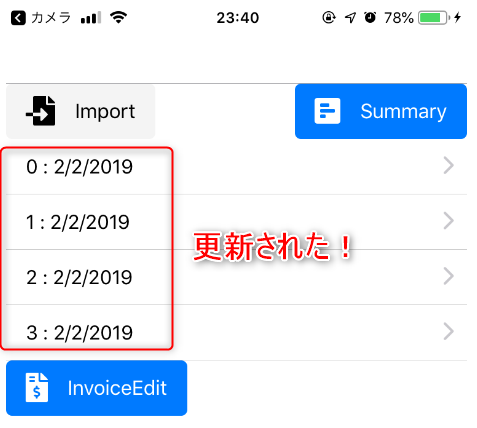
Importボタンを押した後
いかがでしょうか。Redux+Thunk+axiosを使ったことがある方は、あまりの簡単さに驚きが隠せないのでは?私はよっぽど大きなプロジェクトでない限り、もうReduxに戻りたくないです。。。