はじめに
この記事はReactのサンプルアプリケーションにRBAC(Role Based Access Control)を実装する手順で、こちらの原文を元に作成しています。ソースコードに"もしロールがxxだったらxxする"と実装しがちですが、この記事では要件やロールが変わっても柔軟に対応できてステップ数も少なくメンテナンス性の高い方法で実装しています。nodeとnpmのインストール、Auth0の無料アカウントの取得とテナントの作成が完了していることが前提となっています。まだの方はこちらの記事を参照の上ご準備をお願いします。
完成版のソースコードはここで公開しています。
環境
-
OS :
macOS Mojave 10.14.6 -
node :
10.15.3 -
npm :
6.10.3
手順
アプリケーションの作成
任意のディレクトリでnpxを実行してnpmのバイナリを実行します。
$ npx create-react-app rbac-tutotial-app
rbac-tutorial-app配下に必要なディレクトリ・ファイルを作成します。
$ cd rbac-tutorial-app/src
$ rm App.js App.test.js App.css index.css logo.svg serviceWorker.js
$ mkdir components pages
$ touch pages/dashboard.js pages/home.js
React Routerをインストールします。
$ pwd
rbac-tutotial-app
$ npm install react-router react-router-dom
src/inded.jsを編集してRouting Pageを作成します。
import React from 'react';
import ReactDOM from 'react-dom';
import {BrowserRouter as Router, Route, Switch} from 'react-router-dom';

import HomePage from './pages/home';
import DashboardPage from './pages/dashboard';

function App() {
  return (
    <div className="App container">
      <div className="jumbotron">
        <Router>
          <Switch>
            <Route exact path="/" component={HomePage}/>
            <Route path="/dashboard" component={DashboardPage}/>
          </Switch>
        </Router>
      </div>
    </div>
  );
}

const rootElement = document.getElementById('root');
ReactDOM.render(<App/>, rootElement);
src/pages/home.jsを編集してHomeページを作成します。
import React from 'react';

const HomePage = () => (
  <h2>Home</h2>
);

export default HomePage;
src/pages/dashboard.jsを編集してDashboardページを作成します。
import React from 'react';

const DashboardPage = () => (
  <h2>Dashboard</h2>
);

export default DashboardPage;
index.htmlの
セクションにBootstrapのリンクを追加します。 <link rel="stylesheet" href="https://stackpath.bootstrapcdn.com/bootstrap/4.3.1/css/bootstrap.min.css">
アプリケーションを起動してChromeでhttp://localhost:3000, http://localhost:3000/dashboardに各々アクセスして動作を確認します。
$ pwd
rbac-tutotial-app
$ npm start

Auth0との連携
Auth0にログインしてテナントを作成します。この記事では詳細な手順は割愛しています。こちらをご参照お願いします。
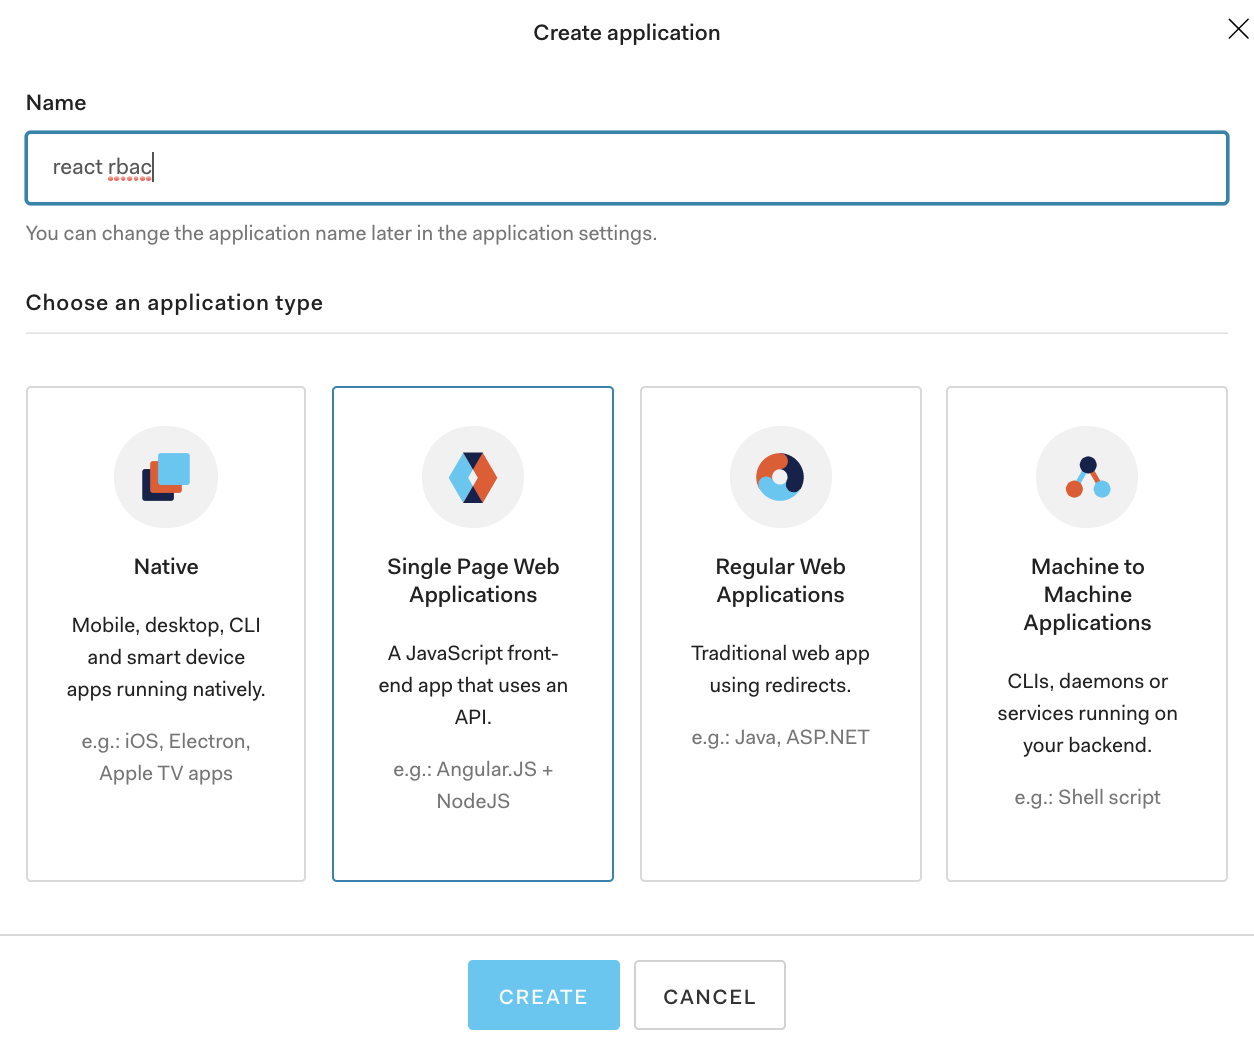
作成したアプリケーションをAuth0に登録します。左ペインの"Applications"をクリック、右上の"CREATE APPLICATION"を押します。

”Name"に任意の名前を入力、"Single Page Web Applications"を選択して"CREATE"ボタンを押します。
"Settings"タブをクリックして”Allowed Callback URLs“に”http://localhost:3000/callback”を入力します。

ユーザにロールを割り当てるルールを作成します。左ペインの"Rules"をクリック、右上の"CREATE RULE"を押します。

"empty rule"をクリックします。

javascriptを作成して"SAVE"ボタンを押します。"your-email-id@gmail.com"にはご自身のメールアドレスを指定します。
function (user, context, callback) {
  user.app_metadata = user.app_metadata || {};

  if (user.email === 'your-email-id@gmail.com') {
    user.app_metadata.role = 'admin';
  } else {
    user.app_metadata.role = 'writer';
  }

  auth0.users.updateAppMetadata(user.user_id, user.app_metadata)
    .then(() => {
      context.idToken['https://rbac-tutorial-app/role'] = user.app_metadata.role;
      callback(null, user, context);
    })
    .catch((err) => {
      callback(err);
    });
}
Auth0-jsライブラリをインストールします。
$ pwd
rbac-tutotial-app
$ npm install auth0-js
src/auth0-variables.jsを作成して環境変数を設定します。””、“”にはAuth0のダッシュボードで登録したアプリケーションのdomain, clientIdを指定します。
export const AUTH_CONFIG = {
  domain: "<YOUR_AUTH0_DOMAIN>",
  roleUrl: "https://rbac-tutorial-app/role",
  clientId: "<YOUR_AUTH0_CLIENT_ID>",
  callbackUrl: "http://localhost:3000/callback"
};

src/authContext.jsを作成して複数のReactコンポーネントとAuth0の連携を可能にします。
import { createContext } from "react";

const authContext = createContext({
  authenticated: false, // to check if authenticated or not
  user: {}, // store all the user details
  accessToken: "", // accessToken of user for Auth0
  initiateLogin: () => {}, // to start the login process
  handleAuthentication: () => {}, // handle Auth0 login process
  logout: () => {} // logout the user
});

export const AuthProvider = authContext.Provider;
export const AuthConsumer = authContext.Consumer;
};
src/Auth.js(authCotextの親コンポーネント)を作成します。
import React, { Component } from "react";
import auth0 from "auth0-js";

import { AUTH_CONFIG } from "../constants/auth0-variables";
import { AuthProvider } from "../authContext";

const auth = new auth0.WebAuth({
  domain: AUTH_CONFIG.domain,
  clientID: AUTH_CONFIG.clientId,
  redirectUri: AUTH_CONFIG.callbackUrl,
  audience: `https://${AUTH_CONFIG.domain}/userinfo`,
  responseType: "token id_token"
});

class Auth extends Component {
  state = {
    authenticated: false,
    user: {
      role: "visitor"
    },
    accessToken: ""
  };

  initiateLogin = () => {
    auth.authorize();
  };

  logout = () => {
    this.setState({
      authenticated: false,
      user: {
        role: "visitor"
      },
      accessToken: ""
    });
  };

  handleAuthentication = () => {
    auth.parseHash((error, authResult) => {
      if (error) {
        console.log(error);
        console.log(`Error ${error.error} Occured`);
        return;
      }

      this.setSession(authResult.idTokenPayload);
    });
  };

  setSession(data) {
    const user = {
      id: data.sub,
      email: data.email,
      role: data[AUTH_CONFIG.roleUrl]
    };
    this.setState({
      authenticated: true,
      accessToken: data.accessToken,
      user
    });
  }

  render() {
    const authProviderValue = {
      ...this.state,
      initiateLogin: this.initiateLogin,
      handleAuthentication: this.handleAuthentication,
      logout: this.logout
    };
    return (
      <AuthProvider value={authProviderValue}>
        {this.props.children}
      </AuthProvider>
    );
  }
}

export default Auth;
src/index.jsを修正してcallbackルートを追加します。
import React from "react";
import ReactDOM from "react-dom";
import {BrowserRouter as Router, Route, Switch} from "react-router-dom";

import HomePage from "./pages/home";
import DashboardPage from "./pages/dashboard";
import CallbackPage from "./pages/callback";
import Auth from "./components/Auth";

function App() {
  return (
    <div className="App container">
      <Auth>
        <div className="jumbotron">
          <Router>
            <Switch>
              <Route exact path="/" component={HomePage}/>
              <Route path="/dashboard" component={DashboardPage}/>
              <Route path="/callback" component={CallbackPage}/>
            </Switch>
          </Router>
        </div>
      </Auth>
    </div>
  );
}

const rootElement = document.getElementById("root");
ReactDOM.render(<App/>, rootElement);
src/pages/callback.js(callbackページ)を作成します。
import React from "react";
import {Redirect} from "react-router-dom";

import {AuthConsumer} from "../authContext";

const Callback = props => (
  <AuthConsumer>
    {({handleAuthentication}) => {
      if (/access_token|id_token|error/.test(props.location.hash)) {
        handleAuthentication();
      }
      return <Redirect to="/"/>;
    }}
  </AuthConsumer>
);

export default Callback;
src/components/Login.js(Loginコンポーネント)を作成します。
import React from "react";

import { AuthConsumer } from "../authContext";

const Login = () => (
  <AuthConsumer>
    {({ initiateLogin }) => (
      <button className="btn btn-sm btn-primary" onClick={initiateLogin}>
        Login
      </button>
    )}
  </AuthConsumer>
);

export default Login;
src/components/Logout.js(Logoutコンポーネント)を作成します。
import React from "react";

import { AuthConsumer } from "../authContext";

const Logout = () => (
  <AuthConsumer>
    {({ logout }) => (
      <button className="btn btn-sm btn-default" onClick={logout}>
        Logout
      </button>
    )}
  </AuthConsumer>
);

export default Logout;
src/components/Home.js(Homeコンポーネント)を作成します。
import React from "react";
import { Redirect } from "react-router-dom";

import { AuthConsumer } from "../authContext";
import Login from "../components/Login";
import PostsList from "../components/PostsList";

const HomePage = () => (
  <AuthConsumer>
    {({ authenticated }) =>
      authenticated ? (
        <Redirect to="/dashboard" />
      ) : (
        <div>
          <h2>Welcome to React RBAC Tutorial.</h2>
          <Login />
          <PostsList />
        </div>
      )
    }
  </AuthConsumer>
);

export default HomePage;
認可の実装
src/rbac-rules.jsを作成してRole-Permissionの紐付けを定義します。
const rules = {
  visitor: {
    static: ["posts:list", "home-page:visit"]
  },
  writer: {
    static: [
      "posts:list",
      "posts:create",
      "users:getSelf",
      "home-page:visit",
      "dashboard-page:visit"
    ],
    dynamic: {
      "posts:edit": ({userId, postOwnerId}) => {
        if (!userId || !postOwnerId) return false;
        return userId === postOwnerId;
      }
    }
  },
  admin: {
    static: [
      "posts:list",
      "posts:create",
      "posts:edit",
      "posts:delete",
      "users:get",
      "users:getSelf",
      "home-page:visit",
      "dashboard-page:visit"
    ]
  }
};

export default rules;
src/components/Can.js(Canコンポーネント)を作成します。
import rules from "../rbac-rules";

const check = (rules, role, action, data) => {
  const permissions = rules[role];
  if (!permissions) {
    // role is not present in the rules
    return false;
  }

  const staticPermissions = permissions.static;

  if (staticPermissions && staticPermissions.includes(action)) {
    // static rule not provided for action
    return true;
  }

  const dynamicPermissions = permissions.dynamic;

  if (dynamicPermissions) {
    const permissionCondition = dynamicPermissions[action];
    if (!permissionCondition) {
      // dynamic rule not provided for action
      return false;
    }

    return permissionCondition(data);
  }
  return false;
};

const Can = props =>
  check(rules, props.role, props.perform, props.data)
    ? props.yes()
    : props.no();

Can.defaultProps = {
  yes: () => null,
  no: () => null
};

export default Can;
src/pages/dashboard.jsを修正してDashboardページでCanコンポーネントを利用します。
import React from "react";
import { Redirect } from "react-router-dom";

import { AuthConsumer } from "../authContext";
import Can from "../components/Can";
import Logout from "../components/Logout";
import Profile from "../components/Profile";
import PostsList from "../components/PostsList";

const DashboardPage = () => (
  <AuthConsumer>
    {({ user }) => (
      <Can
        role={user.role}
        perform="dashboard-page:visit"
        yes={() => (
          <div>
            <h1>Dashboard</h1>
            <Logout />
            <Profile />
            <PostsList />
          </div>
        )}
        no={() => <Redirect to="/" />}
      />
    )}
  </AuthConsumer>
);

export default DashboardPage;
src/components/Profile.js(Profileコンポーネント)を作成します。
import React from "react";

import {AuthConsumer} from "../authContext";

const Profile = () => (
  <AuthConsumer>
    {({user}) => (
      <div>
        <h2>User Profile</h2>
        <ul>
          <li>ID: {user.id}</li>
          <li>Email: {user.email}</li>
          <li>Role: {user.role}</li>
        </ul>
      </div>
    )}
  </AuthConsumer>
);

export default Profile;
src/components/PostsList.js(PostsListコンポーネント)を作成します。
import React from "react";

import posts from "../posts";
import {AuthConsumer} from "../authContext";
import Can from "./Can";

const PostsList = () => (
  <AuthConsumer>
    {({user}) => (
      <div>
        <h2>Posts List</h2>
        <table className="table">
          <thead>
          <tr>
            <th scope="col">#</th>
            <th scope="col">Title</th>
            <th scope="col">Actions</th>
          </tr>
          </thead>
          <tbody>
          {posts.map((post, index) => (
            <tr key={post.id}>
              <th scope="row">{index + 1}</th>
              <td>{post.title}</td>
              <td>
                <Can
                  role={user.role}
                  perform="posts:edit"
                  data={{
                    userId: user.id,
                    postOwnerId: post.ownerId
                  }}
                  yes={() => (
                    <button className="btn btn-sm btn-default">
                      Edit Post
                    </button>
                  )}
                />
                <Can
                  role={user.role}
                  perform="posts:delete"
                  yes={() => (
                    <button className="btn btn-sm btn-danger">
                      Delete Post
                    </button>
                  )}
                />
              </td>
            </tr>
          ))}
          </tbody>
        </table>
      </div>
    )}
  </AuthConsumer>
);

export default PostsList;
src/posts.jsを作成してProfileコンポーネントとPostsListコンポーネントをラップします。
const posts = [
  {
    id: "a",
    title: "Post a",
    ownerId: ""
  },
  {
    id: "b",
    title: "Post b",
    ownerId: ""
  },
  {
    id: "c",
    title: "Post c",
    ownerId: ""
  },
  {
    id: "d",
    title: "Post d",
    ownerId: ""
  }
];

export default posts;
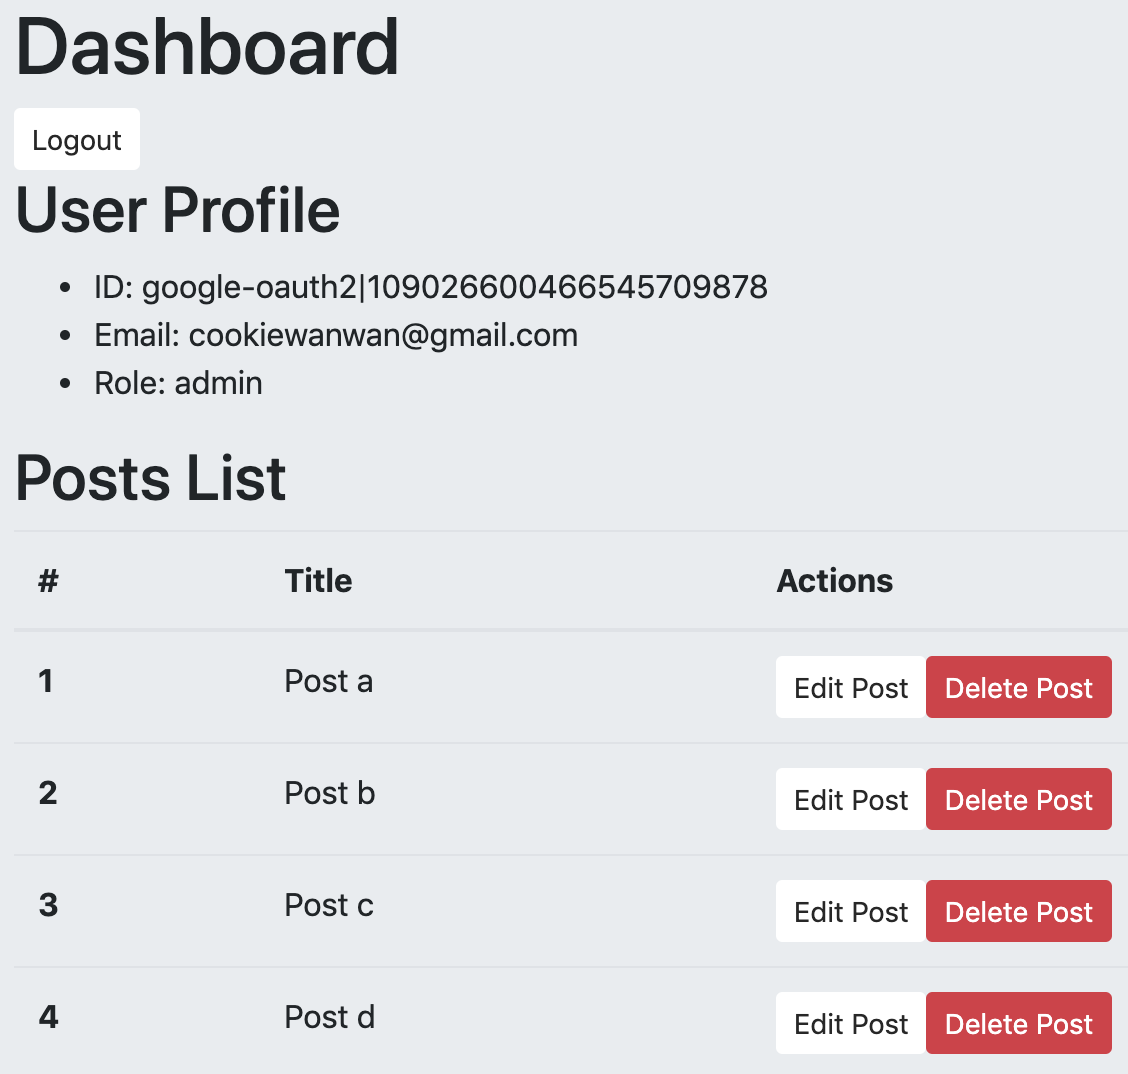
アプリケーションを起動してChromeでhttp://localhost:3000にアクセスして動作を確認します。Writer, Admin各々のロールでログインして画面を確認します。
$ pwd
rbac-tutotial-app
$ npm start

おわりに
従来型の認可の実装方式はロールやパーミッションをハードコードするケースが多く、ステップ数も増えてしまいソフトウェアの品質や管理性を低下させてしまう要因になっていました。"あるものは使い倒す"の発想で認証・認可はAuth0の機能を使い、認証・認可は最小のコードで実装したいですね。