この記事は
CSS Advent Calendar 2019 21日目の記事です。
気になってたtailwindcssを、Vue.jsでやってみましたという記事です。
リポジトリはこちら→ https://github.com/hisako135/tailwindcss_vue_demo
やったことは以下のような感じです。
- Vue.js でのtailwindcssのセットアップ
- PurgeCSS でのファイル容量の削減
tailwindcssってなんぞ
"Bootstrapをゴリゴリいじってカスタマイズしても良いのだが、そこに時間かけるんならCSSフレームワーク使う利点なくない...?![]() " などと思ったことがある人はいませんか...?
" などと思ったことがある人はいませんか...?
グリッドシステムとForm周りさえあればよくて、他の必要なコンポーネントは自分で作った方が楽だよな、とかゴニョゴニョ...(小声)
そこでtailwindcssです!
Most CSS frameworks do too much.
(ほとんどのCSSフレームワークは多くのことをやり過ぎている)
https://tailwindcss.com/#what-is-tailwind
"あらゆる種類のコンポーネントが用意されているCSSフレームワークって初期段階に素早く作るのには確かにとっても便利。でもカスタマイズしようとするとしんどいよね。事前に設計されたコンポーネントの代わりに、低レベルなUtilityクラスを提供することによって、HTMLを離れることなくデザインをカスタマイズできるよ。"
というのがtailwindcssです。
ちなみにCSSでのUtilityクラスとは、.font-small {font-size: 10px;} や .text-left {text-align: left;} のように、単一のプロパティを定義した汎用的なクラスを指します。Helperクラスとも呼ばれたり。
FLOCSSではUtilityレイヤーに、FLOCSSのベースとなっているMCSSではCosmeticsレイヤーあたりに記載されるやつです。
tailwindcssのUtility-firstの考え方についてはこちらの翻訳記事に詳細書いてありますので是非!
![]() CSS Utility Classes and "Separation of Concerns" 翻訳
CSS Utility Classes and "Separation of Concerns" 翻訳
セットアップ手順
何はともあれVue.jsでのtailwindcssのセットアップをやっていきましょう。
まずはvue-cliでVue.jsプロジェクトを作成します。
以降、tailwindcss/setup-examples を参考に進めます。
- tailwindcssをインストール
npm install tailwindcss
- postcss.config.js ファイルを作成しプラグインとして設定
const tailwindcss = require('tailwindcss');
const autoprefixer = require('autoprefixer');

module.exports = {
  plugins: [
    tailwindcss,
    autoprefixer,
  ]
}
-
src/assets/tailwind.cssというtailwindのスタイル用のCSSファイルを作成します
@tailwind base;
@tailwind components;
@tailwind utilities;
-
main.jsでtailwind.cssをimportします
import Vue from 'vue'
import App from './App.vue'
import '@/assets/tailwind.css' //これ

Vue.config.productionTip = false

new Vue({
  render: h => h(App),
}).$mount('#app')
セットアップは以上です! ![]()
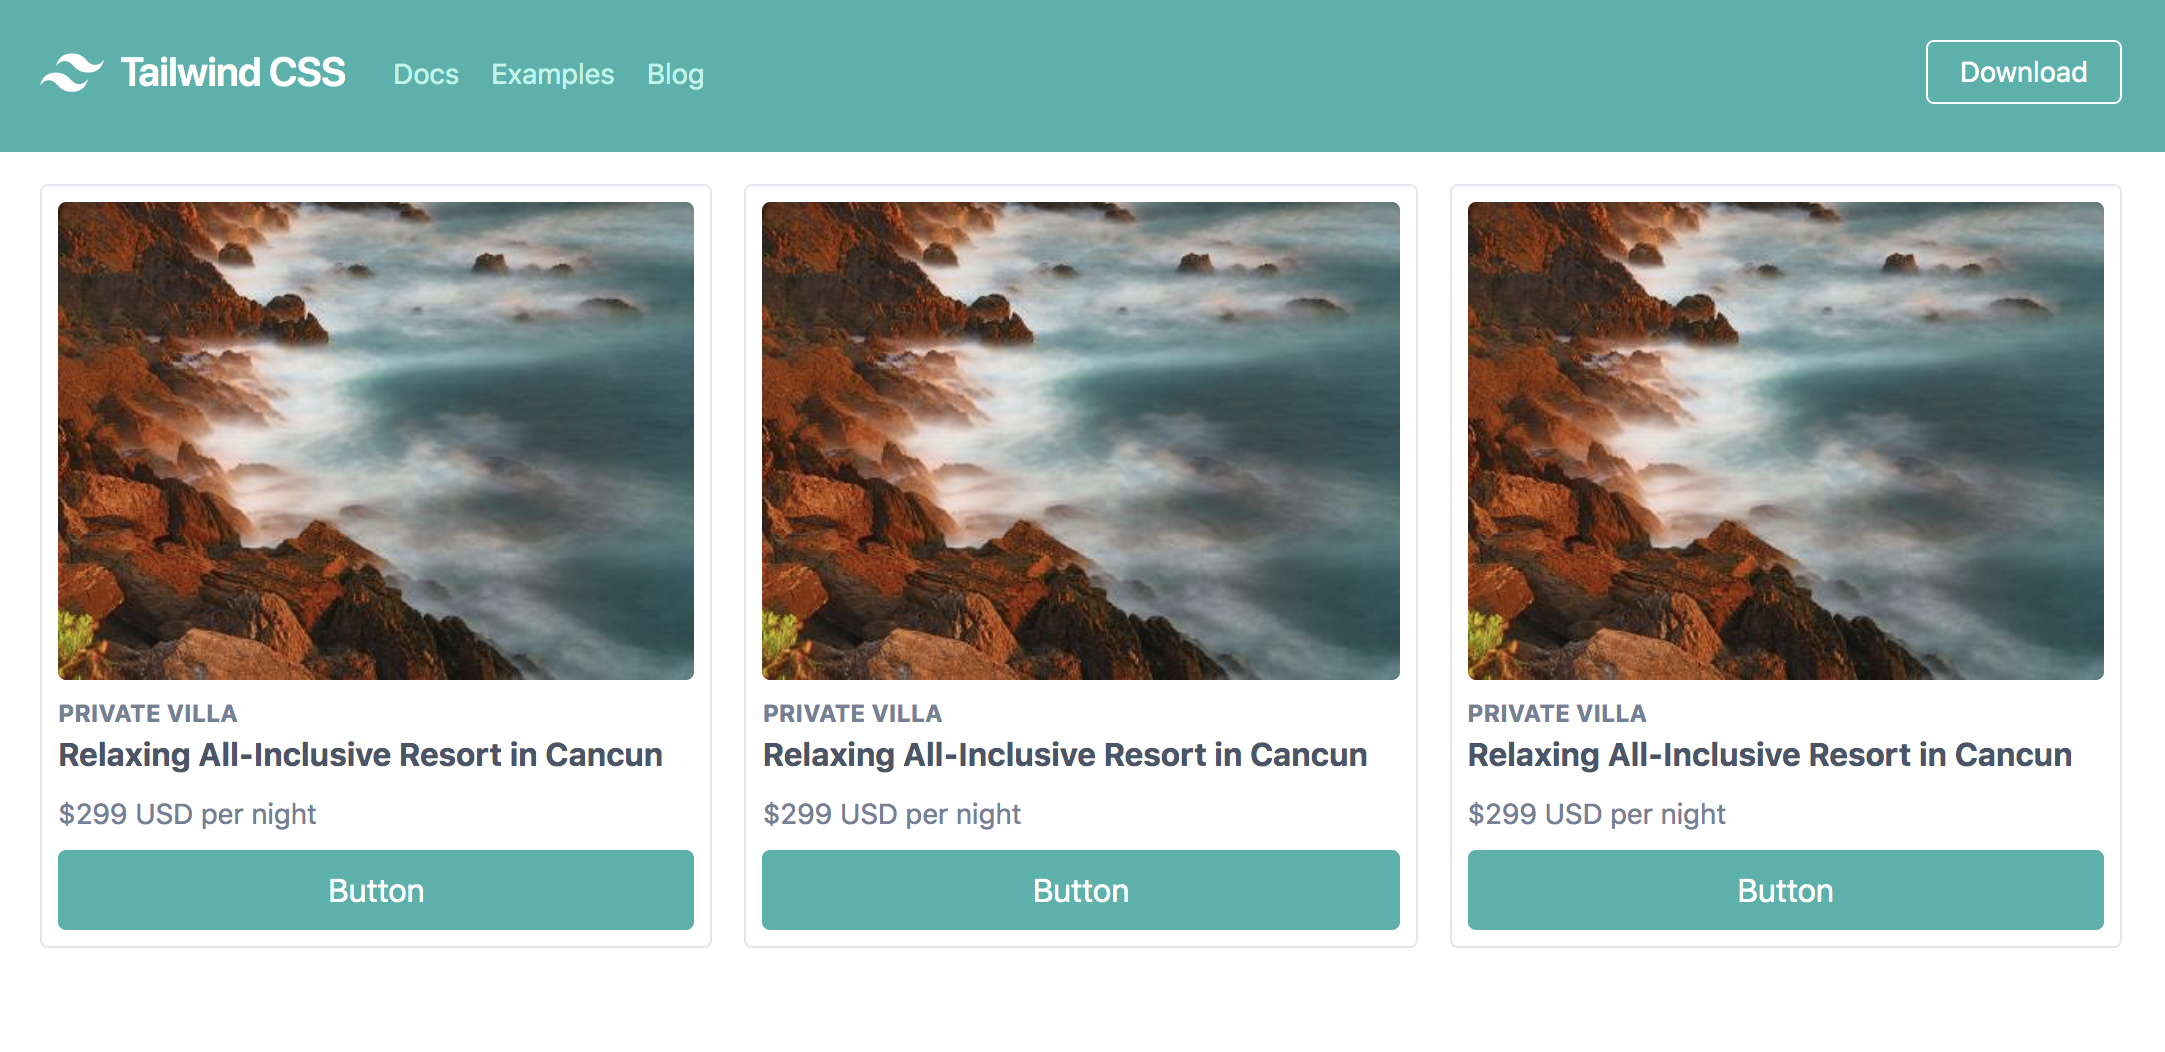
今回はNavigationやCardの例を利用してサクッと画面を作っています。
あんまりtailwindcssで作り込まれてると <transition>コンポーネント使いづらいな...と、うっすら思いましたとさ(結果、使ってない)。
<template>
  <nav class="flex items-center justify-between flex-wrap bg-teal-500 p-6">
    <div class="flex items-center flex-shrink-0 text-white mr-6">
      <svg class="fill-current h-8 w-8 mr-2" width="54" height="54" viewBox="0 0 54 54" xmlns="http://www.w3.org/2000/svg"><path d="M13.5 22.1c1.8-7.2 6.3-10.8 13.5-10.8 10.8 0 12.15 8.1 17.55 9.45 3.6.9 6.75-.45 9.45-4.05-1.8 7.2-6.3 10.8-13.5 10.8-10.8 0-12.15-8.1-17.55-9.45-3.6-.9-6.75.45-9.45 4.05zM0 38.3c1.8-7.2 6.3-10.8 13.5-10.8 10.8 0 12.15 8.1 17.55 9.45 3.6.9 6.75-.45 9.45-4.05-1.8 7.2-6.3 10.8-13.5 10.8-10.8 0-12.15-8.1-17.55-9.45-3.6-.9-6.75.45-9.45 4.05z"/></svg>
      <span class="font-semibold text-xl tracking-tight">Tailwind CSS</span>
    </div>
    <div @click='hideMenu=!hideMenu' class="block lg:hidden">
      <button class="flex items-center px-3 py-2 border rounded text-teal-200 border-teal-400 hover:text-white hover:border-white">
        <svg class="fill-current h-3 w-3" viewBox="0 0 20 20" xmlns="http://www.w3.org/2000/svg"><title>Menu</title><path d="M0 3h20v2H0V3zm0 6h20v2H0V9zm0 6h20v2H0v-2z"/></svg>
      </button>
    </div>
    <div :class='{"hidden md:hidden sm:hidden":hideMenu}' class="w-full block flex-grow lg:flex lg:items-center lg:w-auto">
      <div class="text-sm lg:flex-grow">
        <a href="#responsive-header" class="block mt-4 lg:inline-block lg:mt-0 text-teal-200 hover:text-white mr-4">
          Docs
        </a>
        <a href="#responsive-header" class="block mt-4 lg:inline-block lg:mt-0 text-teal-200 hover:text-white mr-4">
          Examples
        </a>
        <a href="#responsive-header" class="block mt-4 lg:inline-block lg:mt-0 text-teal-200 hover:text-white">
          Blog
        </a>
      </div>
      <div>
        <a href="#" class="inline-block text-sm px-4 py-2 leading-none border rounded text-white border-white hover:border-transparent hover:text-teal-500 hover:bg-white mt-4 lg:mt-0">Download</a>
      </div>
    </div>
  </nav>
</template>

<script>
export default {
  data() {
    return {
      hideMenu: true
    }
  }
}
</script>
ざっくり紹介tailwindcss
さて、tailwindcssの特徴を極一部ですがご紹介します!
めちゃくちゃ詳しく書いて下さっている記事はこちらですので是非!
![]() TailwindCSS入門 ~ Utility First + デザインシステムの構築 ~i
TailwindCSS入門 ~ Utility First + デザインシステムの構築 ~i
:(コロン) でブレークポイントや擬似クラスの指定ができる
lg:inline-block hover:text-white でブレークポイントや擬似クラスへの指定をしています。1つのスタイルを使い回せるの便利だな〜。
<a href="#responsive-header" class="block mt-4 lg:inline-block lg:mt-0 text-teal-200 hover:text-white">Blog</a>
@apply
組み合わせて自由に見た目を作れるのが利点とはいえ、何度も同じクラスを並べるのは苦痛ですよね。@apply で、utilityの組み合わせをカスタムコンポーネントのクラスとしてまとめることができます。
@tailwind base;
@tailwind components;
/* Extracting Components */
.btn-teal {
  @apply bg-teal-500 text-white py-2 px-4 rounded w-full;
}
.btn-teal:hover {
  @apply bg-teal-700 transition-colors transition-250 transition-linear;
}
@tailwind utilities;
カスタムコンポーネントのクラスは、utilitiesの前に読み込まないとダメだそうです。
カスタマイズが簡単
tailwindcssで定義されているスタイルは、 tailwind.config.js でカスタマイズできます。
npx tailwind init //tailwind.config.jsファイルを作成するコマンド
module.exports = {
  theme: {
    extend: {}
  },
  variants: {},
  plugins: []
}
作成された tailwind.config.js にカスタマイズしたいプロパティや追加したいプロパティを記載していきます。
tailwindcssでは現状 transition のようなアニメーションに関するプロパティが定義されていません。
そういうものの追加にも便利そうですね。拡張が簡単なのは嬉しい ![]()
(今回はtransitionのutilityクラスを定義するのにtailwindcss-transitionsを使用しました。)
PurgeCSSで使ってないCSSを削除
さて、なんだかスマートに感じるtailwindcssですが、ファイル容量は実は結構重いです。
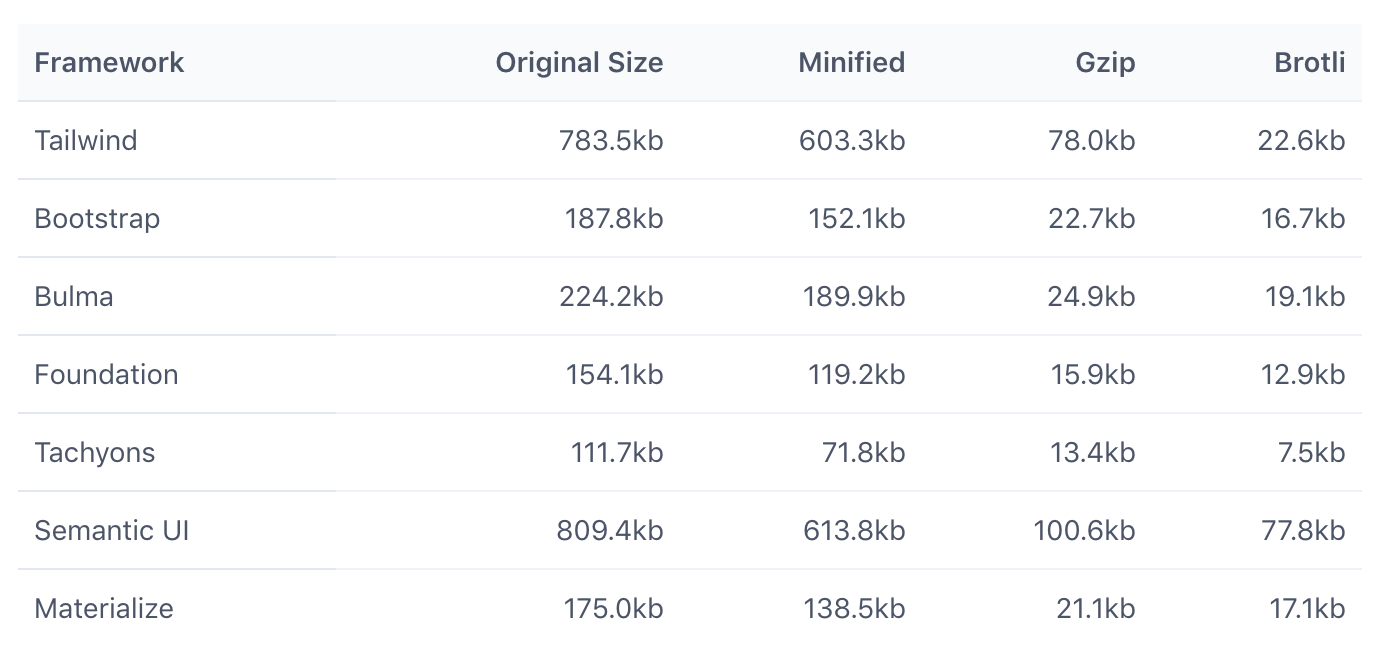
PurgeCSSで、使ってないCSSを削除していきましょう。
- PurgeCSSをインストール
npm install @fullhuman/postcss-purgecss --save-dev
-
postcss.config.jsにプラグイン設定- tailwindcssとVue.jsのそれぞれの特徴を踏まえ適切にパージするように
defaultExtractorとwhitelistPatternsを設定します。詳細はこちら →
https://medium.com/@kyis/vue-tailwind-purgecss-the-right-way-c70d04461475
- tailwindcssとVue.jsのそれぞれの特徴を踏まえ適切にパージするように
const autoprefixer = require('autoprefixer');
const tailwindcss = require('tailwindcss');
const purgecss = require('@fullhuman/postcss-purgecss')({
  // テンプレートファイルへのパス。今回は'./src/**/*.vue'
  content: [
    './src/**/*.vue'
  ],
  // https://medium.com/@kyis/vue-tailwind-purgecss-the-right-way-c70d04461475
  defaultExtractor: (content) => {
    const contentWithoutStyleBlocks = content.replace(/<style[^]+?<\/style>/gi, '')
    return contentWithoutStyleBlocks.match(/[A-Za-z0-9-_/:]*[A-Za-z0-9-_/]+/g) || []
  },
  whitelistPatterns: [ /-(leave|enter|appear)(|-(to|from|active))$/, /^(?!cursor-move).+-move$/, /^router-link(|-exact)-active$/ ],
})

module.exports = {
  plugins: [
    autoprefixer,
    tailwindcss,
    // 開発中はビルド時間がかかってしまうので、productionの時のみ実行
    ...process.env.NODE_ENV === 'production'
    ? [purgecss]
    : []
  ]
}
Before/After
npm build して、 dist/css/配下のCSS容量を見て見ます。
Before
 ### After

644KB減!!
すごいぞ!PurgeCSS!! ![]()
今回はサンプルのためスタイリング自体が少ないので、実際のプロジェクトではもっと大きくなるんでしょうけれども、いやぁしかし気持ち良いですね ![]()
まとめ
以上、初めてのtailwindcss (Vue.js + PurgeCSS)でした!
個人的にはめちゃくちゃ好きな思想のフレームワークです。
シンプルで良い。自由 is フリーダム。必要なものは自分で作る ![]()
緻密かつ堅牢なCSSフレームワークに疲弊している方、ぜひトライしてみては如何でしょうか?
参考にさせて頂いたものまとめ
- tailwindcss
- CSS Utility Classes and "Separation of Concerns" 翻訳
- TailwindCSS入門 ~ Utility First + デザインシステムの構築 ~i
- tailwindcss/setup-examples
- Setting up Tailwind CSS with Vue.js
- Vue + Tailwind + PurgeCSS — The right way
- React上でtailwindcssを使いたい!
tailwindcssなのかTailwindcssなのか、はたまたTailwindCSSなのか、正しい表記が未だに分かりません ![]()