はじめに
Vue.js 2.x系を利用してカルーセルを作成しました.作り方を記載します.
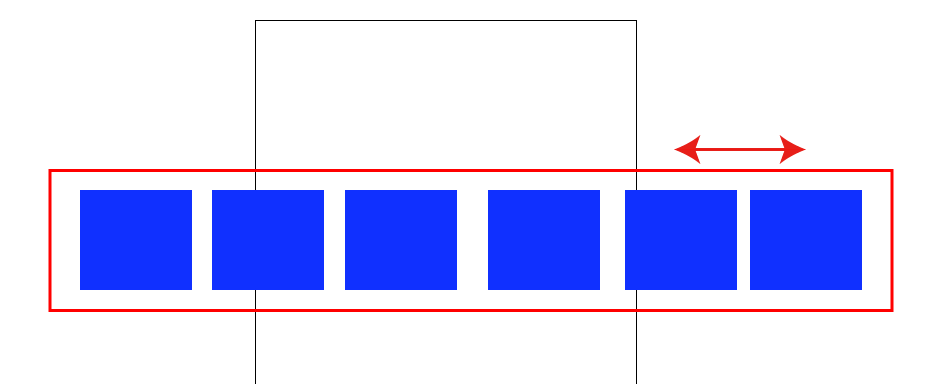
Vue.jsでカルーセルをつくるではクリックイベントで発火した関数が,表示部分の中身自体を変更しています.
本投稿では,表示したい全要素を含んだ大きなコンテナを用意し,横スライドして表示位置を変更していく方法を取りたいと思います.
ちょうど,下図の赤枠の部分が移動することで,表示される内容が変更されるイメージです.
リポジトリ
実装した内容は下記リポジトリにアップロード済みです.ご参考にしていただければ幸いです.
- 本記事執筆時とコードの内容は異なる場合があります.
実装内容
構成
ImageCarousel.vueが今回作成したカルーセルのコンポーネントです.
ここにJavaScript(正確にはTypeScript)のコードを記述しています.また,次の要素は別ファイルとなっています.
- image-carousel.vue.html: コンポーネントのHTMLテンプレート
- image-carousel.vue.scss: コンポーネントのスタイルシート
JavaScript部分(実際はTypeScript)
currentIndexに現在表示する要素のインデックスを保持します.この値が変わることで表示される要素が変わります.実際は,この値が変わることで,marginプロパティの戻り値が変わるからです.
import Vue from "vue";
import {Component, Prop} from "vue-property-decorator";

@Component({})
export default class extends Vue {
    @Prop()
    protected images: string[];
    @Prop()
    protected itemWidth: number;

    currentIndex = 0;

    get imageList(): string[] {
        return this.images;
    }

    get imageRange(): number [] {
        return Array.from({length:this.imageList.length}, (k, v) => v);
    }

    get wholeWidth(): number {
        return this.itemWidth * this.imageList.length;
    }

    get margin(): number {
        return this.currentIndex * -1 * this.itemWidth;
    }

    onPreviousClick() {
        this.displayPrevious();
    }

    onNextClick() {
        this.displayNext();
    }

    protected displayPrevious() {
        if(this.currentIndex > 0) {
            --this.currentIndex;
        }
    }
    protected displayNext() {
        if(this.currentIndex < this.imageRange.length - 1) {
            ++this.currentIndex;
        }
    }
}
HTML部分
transition-groupの内部で,カルーセルの中身の要素をforループで描画しています.もちろん一つ一つHTMLを手書きしても問題ないはずです.今回は,imageListで取得できる画像URL郡をそのまま描画します.
また,「次へ」「前へ」にはクリックイベントを登録しています.このイベントが発火すると上記JSの通り,currentIndexの値が更新されます.
表示位置はtransition-groupのスタイルmarginLeftを調整することで変更します.marginプロパティはcurrentIndexに基づいて余白の値を返します.
<div class="image-carousel">
    <div class="image-carousel__previous" @click="onPreviousClick">前へ</div>
    <div class="image-carousel__next" @click="onNextClick">次へ</div>
    <div class="image-carousel__body" v-bind:style="{width: itemWidth + 'px'}">
        <transition-group name="image-carousel__list" tag="div" class="image-carousel__container" v-bind:style="{width: wholeWidth + 'px', marginLeft: margin + 'px'}">
            <figure v-for="index in imageRange" v-bind:key="index" v-bind:style="{width: itemWidth + 'px'}" class="image-carousel__item">
                <img :src="imageList[index]" class="image-carousel__item__image">
            </figure>
        </transition-group>
    </div>
</div>
スタイル部分
transition: all 500ms linear 0s;にてアニメーションの設定をこなっています.
HTML側のインラインCSSで指定したmarginLeftが変更になったときアニメーションをした上で変更になります.
なお「次へ」「前へ」の装飾は本質から外れるため省略しています.
.image-carousel {
    &__body {
        overflow: hidden;
        margin: 0px auto;
    }
    &__container {
        height: 580px;
        transition: all 500ms linear 0s;
    }
    &__item {
        margin: 0px 0px;
        display: inline-block;
    }
}
コンポーネントの挿入
作成したコンポーネントを導入します.image-carouselとして利用できるようにします.
import ImageCarousel from "./components/ImageCarousel.vue";
import Vue from "vue";

const vue = new Vue({
    el: "#main",
    components: {
        "image-carousel": ImageCarousel
    }
});
下記のようにHTMLに貼り付けます.imagesにカルーセルで表示したい画像を指定します.
また,item-widthにて1つの表示部分の横幅(画像の横幅)をピクセルで指定します.
<main id="main">
<image-carousel item-width="1034" :images='["./images/image1.jpg", "./images/image2.jpg", "./images/image3.jpg", "./images/image4.jpg", "./images/image5.jpg", "./images/image6.jpg"]'></image-carousel>
</main>
スマートフォン対応.スワイプで表示遷移
「次へ」「前へ」のクリック・タップイベントに加え,スワイプ移動でも表示位置が遷移するように改修します.
ライブラリ導入
vue-touch@nextというライブラリを導入します.vue2.x系は2018年5月22日現在nextブランチであるため注意してください.
$ npm install --save-dev "vue-touch@next"
コードの改修
import Vue from "vue";
import VueTouch from "vue-touch";                  // 追記
Vue.use(VueTouch, {name: 'v-touch'});              // 追記

@Component({})
export default class extends Vue {
//

// 以下を追加,左右それぞれのスワイプイベントリスナ
    onSwipeLeft() {
        this.displayNext();
    }

    onSwipeRight() {
        this.displayPrevious();
    }
//
}
v-touch要素でスワイプさせたい場所を囲ってやります.
swipeleft, swiperightのイベントを登録しています.
:swipe-options="{direction: 'horizontal'}"で水平方向のみ検知するように明示しています.これを指定しないとカルーセルの部分だけ縦スクロールができなくなってしまいます.
<!-- v-touch要素を追加 -->
<v-touch @swipeleft="onSwipeLeft" @swiperight="onSwipeRight"  :swipe-options="{direction: 'horizontal'}">
    <transition-group name="image-carousel__list" tag="div" class="image-carousel__container" v-bind:style="{width: wholeWidth + 'px', marginLeft: margin + 'px'}">
        <figure v-for="index in imageRange" v-bind:key="index" v-bind:style="{width: itemWidth + 'px'}" class="image-carousel__item">
            <img :src="imageList[index]" class="image-carousel__item__image">
        </figure>
     </transition-group>
</v-touch>
まとめ
Vue.jsを利用したカルーセルを作成しました.