WWDC19で発表されたContext Menusという新しいUIについて紹介します。
なお、下記の情報は19.6.24時点のbeta2時点のものであり、iOS13正式リリースまでに変更の可能性があります。
Context Menusとは?
iOS13~登場する3D Touch、ロングプレスなどのジェスチャーで表示できるメニューのことです。
今まで3D Touchで表示できたPeek and Popのメニューと似ていますが、大きく2つの違いがあります。
Peek and Popとの2つの違い
- iOS13~対応の端末であれば3D Touchに対応していない端末でも利用できる。Peek and Popは3D Touchのサポートが必要
- コンテキストに関連するメニューがすぐ表示される(上の画像参照)Peek and Popはスワイプアップが必要
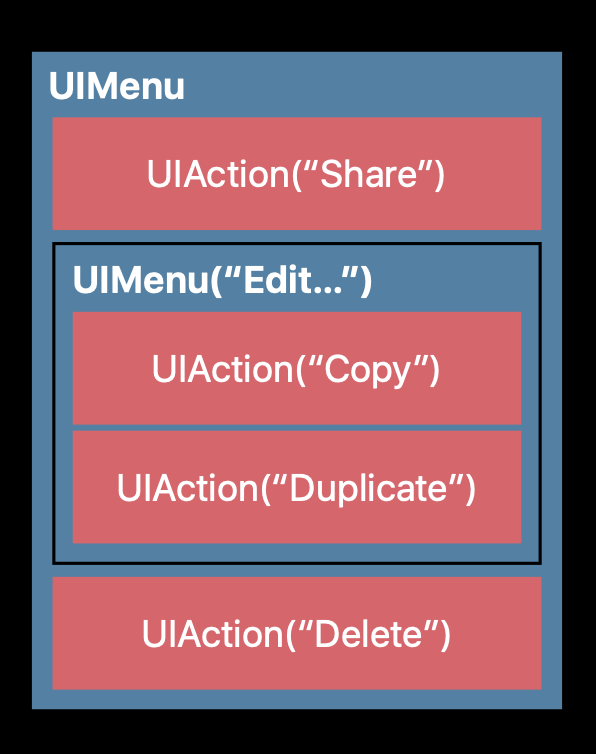
メニューをネストできる
例えば上の画像のように写真をロングプレスしたメニューの場合、下記のように、最初の表示はシェアと編集と削除ボタンだけを出しておいて、編集ボタンを押したときにコピー・複製のサブメニューを表示する。などといったことができます
ジェスチャに対する一貫した動作が担保される
下記のジェスチャで一貫してメニューが表示されます
- 3D Touch
- Haptic Touch
- Long press
- Secondary click
実装について
GitHubにデモアプリのソースをUPしたので、Xcode11(beta2~)でビルドして挙動を確認してみてください。
https://github.com/hirothings/Context-Menus-Demo
実装方法については大きく、UIViewにインタラクションを追加した場合と、TableView・CollectionViewのDelegateを使う2パターンがあります。
TableView・CollectionViewのDelegateを使うパターン
iOS13~利用できる新しいDelegateメソッドを1つ呼ぶだけで実装できます。
CollectionViewの場合、
collectionView(_:contextMenuConfigurationForItemAt:point:)
extension CollectionViewController: UICollectionViewDataSource, UICollectionViewDelegate {

// <中略>

func collectionView(_ collectionView: UICollectionView, contextMenuConfigurationForItemAt
    indexPath: IndexPath, point: CGPoint) -> UIContextMenuConfiguration? {

    // ①プレビューの定義
    let previewProvider: () -> PreviewViewController? = { [unowned self] in
        return PreviewViewController(image: self.images[indexPath.row])
    }

    // ②メニューの定義
    let actionProvider: ([UIMenuElement]) -> UIMenu? = { _ in
        let share = UIAction(__title: "Share", image: UIImage(systemName: "square.and.arrow.up")) { _ in
            // some action
        }
        let editMenu: UIMenu = {
            let copy = UIAction(__title: "Copy", image: nil) { _ in
                // some action
            }
            let delete = UIAction(__title: "Delete", image: UIImage(systemName: "trash"), options: [.destructive]) { _ in
                // some action
            }
            return UIMenu(__title: "Edit..", image: nil, identifier: nil, children: [copy, delete])
        }()

        return UIMenu(__title: "Edit..", image: nil, identifier: nil, children: [share, editMenu])
    }

    return UIContextMenuConfiguration(identifier: nil,
                                      previewProvider: previewProvider,
                                      actionProvider: actionProvider)
}

// <中略>
}
補足
①プレビューの定義
UIContextMenuContentPreviewProvider (実態はクロージャのtypealias)を指定。
プレビュー表示用に準備したViewControllerを返している
ちなみにプレビュー用のViewControllerにボタンを置いて反応するか試したが、ボタンのアクションは制御されていた
②メニューの定義
UIContextMenuActionProvider (実態はクロージャのtypealias)を指定。
UIMenuをネストして返している
UIViewにインタラクションを追加するパターン
1.UIViewに addInteraction
imageView.isUserInteractionEnabled = true
let interaction = UIContextMenuInteraction(delegate: self)
imageView.addInteraction(interaction)
2.UIContextMenuInteractionDelegate に準拠し、Delegateメソッド内でContextMenuの設定をする
extension SampleViewController: UIContextMenuInteractionDelegate {
  func contextMenuInteraction(_ interaction: UIContextMenuInteraction, configurationForMenuAtLocation location: CGPoint) -> UIContextMenuConfiguration? {
    // 先述のCollectionViewのDelegate内の実装と一緒
  }
}
Human Interface Guidelines抜粋
Human Interface Guidelinesを読むと下記のようなことが書いてありました。
- 一貫してコンテキストメニューを採用すること
- もっとも一般的に使用されるコマンドだけメニューに含めること
- サブメニューを活用してメニューの複雑さを管理すること
- サブメニューの階層は1レベルにすること
詳しくは、Context MenusのHIGを読んでください
参考URL
official video [Modernizing Your UI for iOS 13]
https://developer.apple.com/videos/play/wwdc2019/224/
Human Interface Guidelines
https://developer.apple.com/design/human-interface-guidelines/ios/controls/context-menus/
実装してみたデモアプリ
https://github.com/hirothings/Context-Menus-Demo

