目的
PoCなどで、証明書を用意する手間なくhttps通信を実装する方法を調べました。
初学者のため、内容に誤りや適切ではない情報があればご指摘いただけると嬉しいです。
概要
CloudFrontのデフォルト証明書を使うことで、 *.cloudfront.net でブラウザ公的信頼のHTTPS通信を実現することができます。ただし、URLが xxxxx.cloudfront.net となるため本番環境などでは使用できません。
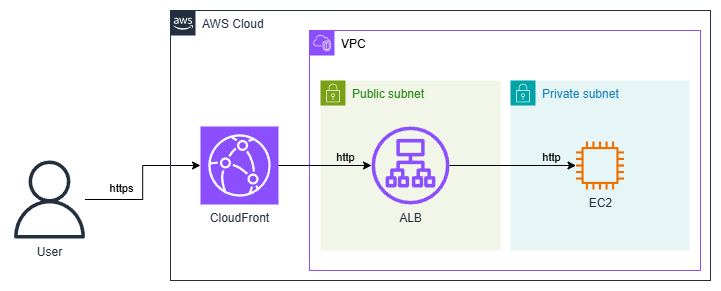
構成
今回はALB経由でEC2のWebサーバーに接続する構成とします。
ALBはセキュリティグループとカスタムヘッダーを使用して、CloudFrontからのアクセスのみ許可するよう設定します。
※CloudFrontのVPCオリジン機能を使うことで、ALBをPrivate Subnetに配置する構成も可能です。
手順
※VPCは事前に作成済みの想定です。
1. セキュリティグループ作成
EC2用
aws ec2 create-security-group --group-name ec2-sg --description "Security group for EC2" --vpc-id $VPC_ID
aws ec2 authorize-security-group-ingress --group-id $SG_EC2_ID --protocol tcp --port 80 --cidr 10.0.0.0/16
ALB用
CloudFrontが使用するIPアドレスのリスト(マネージドプレフィックスリスト)のIDを取得して、該当アドレスからの通信のみを許可することで、CloudFront以外からのアクセスを拒否します。
PL_ID=$(aws ec2 describe-managed-prefix-lists --query "PrefixLists[?PrefixListName=='com.amazonaws.global.cloudfront.origin-facing'].PrefixListId" --output text)

aws ec2 create-security-group --group-name alb-sg --description "Security group for ALB" --vpc-id $VPC_ID
aws ec2 authorize-security-group-ingress \
    --group-id $SG_ALB_ID \
    --ip-permissions "IpProtocol=tcp,FromPort=80,ToPort=80,PrefixListIds=[{PrefixListId=$PL_ID}]"
2. EC2(WEBサーバー)作成
※「$」で始まる変数は適切に設定が必要です
aws ec2 run-instances \
    --image-id $AMI_ID \
    --instance-type t2.micro \
    --security-group-ids $SG_EC2_ID \
    --subnet-id $SN_PRV \
    --user-data '#!/bin/bash
                 yum update -y
                 yum install -y httpd
                 systemctl start httpd
                 systemctl enable httpd
                 echo "<h1>Success! Hello via HTTPS</h1>" > /var/www/html/index.html'
3. ALB作成
※「$」で始まる変数は適切に設定が必要です
ターゲットグループ・リスナー・ALBの作成と合わせて、カスタムヘッダーに指定した文字列が含まれない場合の通信を拒否するよう設定します。そうすることで、自身が作成したCloudFront以外からのアクセスを防ぎます。
# ターゲットグループ & 登録
aws elbv2 create-target-group --name my-targets --protocol HTTP --port 80 --vpc-id $VPC_ID
aws elbv2 register-targets --target-group-arn $TG_ARN --targets Id=$INSTANCE_ID

# ALB & リスナー作成
aws elbv2 create-load-balancer --name my-alb --subnets $SN_PUB_1 $SN_PUB_2 --security-groups $SG_ALB_ID
aws elbv2 create-listener --load-balancer-arn $ALB_ARN --protocol HTTP --port 80 --default-actions Type=forward,TargetGroupArn=$TG_ARN

# カスタムヘッダーが正しくなければ拒否するよう設定
aws elbv2 create-rule \
    --listener-arn $LISTENER_ARN \
    --priority 1 \
    --conditions '{"Field":"http-header","HttpHeaderConfig":{"HttpHeaderName":"X-Custom-Header","Values":["MySecret123"]}}' \
    --actions Type=forward,TargetGroupArn=$TG_ARN
aws elbv2 modify-listener \
    --listener-arn $LISTENER_ARN \
    --default-actions '{"Type":"fixed-response","FixedResponseConfig":{"MessageBody":"Access Denied","StatusCode":"403","ContentType":"text/plain"}}'
4. CloudFront Distribution作成
カスタムヘッダーに、ALBで許可している文字列を入れるよう設定しています。
# 作成用のJSONを生成(一意のCallerReferenceが必要なのでdateコマンドを使用)
DIST_CONFIG=$(jq -n \
  --arg dns "$ALB_DNS" \
  --arg ref "ref-$(date +%s)" \
  --arg header_name "X-Custom-Header" \
  --arg header_value "MySecret123" \
  '{
    "CallerReference": $ref,
    "Aliases": {"Quantity": 0},
    "DefaultRootObject": "index.html",
    "Origins": {
      "Quantity": 1,
      "Items": [
        {
          "Id": "ALB-Origin",
          "DomainName": $dns,
          "CustomHeaders": {
            "Quantity": 1,
            "Items": [
              {
                "HeaderName": $header_name,
                "HeaderValue": $header_value
              }
            ]
          },
          "CustomOriginConfig": {
            "HTTPPort": 80,
            "HTTPSPort": 443,
            "OriginProtocolPolicy": "http-only"
          }
        }
      ]
    },
    "DefaultCacheBehavior": {
      "TargetOriginId": "ALB-Origin",
      "ForwardedValues": {
        "QueryString": false,
        "Cookies": {"Forward": "none"}
      },
      "TrustedSigners": {"Enabled": false, "Quantity": 0},
      "ViewerProtocolPolicy": "redirect-to-https",
      "MinTTL": 0
    },
    "CacheBehaviors": {"Quantity": 0},
    "Comment": "Created via CLI with Custom Header",
    "Enabled": true
  }')

# 作成
aws cloudfront create-distribution --distribution-config "$DIST_CONFIG"
5. アクセス確認
CloudFrontのURLにアクセスすると、https通信でEC2のWebサーバーにアクセスできていることがわかります。

まとめ
ドメインや証明書の用意が難しい状況でhttps接続が必要だったため、このような構成を試してみました。素直にドメイン・証明書を用意するのがベターかと思いますが、このような方法もあるのだと学ぶことができました。
(続き)CloudFrontへの最低限の認証の実装
https://qiita.com/hirotaka_s/items/cbd72b0f72f4d48dccb1
(続き)Cognito認証を連携させる
https://qiita.com/hirotaka_s/items/d3a88e11c40b7515f014