00. 初めに
本記事は、Firebaseでアプリをデプロイする手順をまとめたものです。
自己学習の一環でアプリを作ったのですが、折角なのでデプロイすることに。その際にFirebaseを利用したので、手順を備忘録にしてみました。
Firebase使ったことないけど、気になっている、使ってみたい . . . そんなあなたのお役に立てれば幸いです。
そもそもFirebaseとは何か、という説明のほかの記事1に譲り、ここでは手順のみを紹介したいと思います。
尚、適切でない表現や誤字・脱字などありましたら、ご指摘いただけると嬉しいです。
01. ツールをインストールしよう
以下の環境で期待通り動作することを確認しています。(2019/11現在)
OS : Windows10 Home
Node : v11.13.0
npm : v6.11.3
Nodeのインストールはこちらから(Nodeを入れる段階でnpmも付いてきます)。
02. ディレクトリを用意しよう
用意するファイル:
・index.html(デプロイしたいhtmlファイル)
・その他
ファイルはお好みで色々用意してOKですが、とりあえずindex.htmlだけあれば大丈夫です。
適当なところに「public」というディレクトリを作ったら、その中にindex.htmlを入れます。publicと同じ場所にもう一つ、好きな名前でディレクトリを作って、そこにpublicを放り込みます(ここでは、deployと名付けておきます)。
それが終わったら、インストールしたnpmを早速使っていきましょう!コマンドプロンプトを起動して、作成したディレクトリまで移動してから、npm init -yと打ち込みます。
~/Desktop/deploy > npm init -y
Wrote to C:\Users\username\Desktop\deploy\package.json:

{
  "name": "deploy",
  "version": "1.0.0",
  "description": "",
  "main": "index.js",
  "scripts": {
    "test": "echo \"Error: no test specified\" && exit 1"
  },
  "keywords": [],
  "author": "",
  "license": "ISC"
}
以上の説明までで、ディレクトリ構造は ↓ みたいな感じになればOKです!★が付いているファイルが必須のものです(package.jsonは、上記のコマンドを入力すると作成されます)。
deploy/
     ┣━ package.json ★
     ┗━ public/ ┳ index.html ★
                ┠ styles.css
                ┗ others/
03. Firebaseのプロジェクトを作ろう
お次は、Firebaseの公式サイトからプロジェクトの作成を行います。
コンソールへ移動をクリック!
↓ プロジェクトを追加を選択して、新規プロジェクトを作成してきます。

↓ プロジェクト名を入力します。今回は、「my-first-deploy」と名付けました。
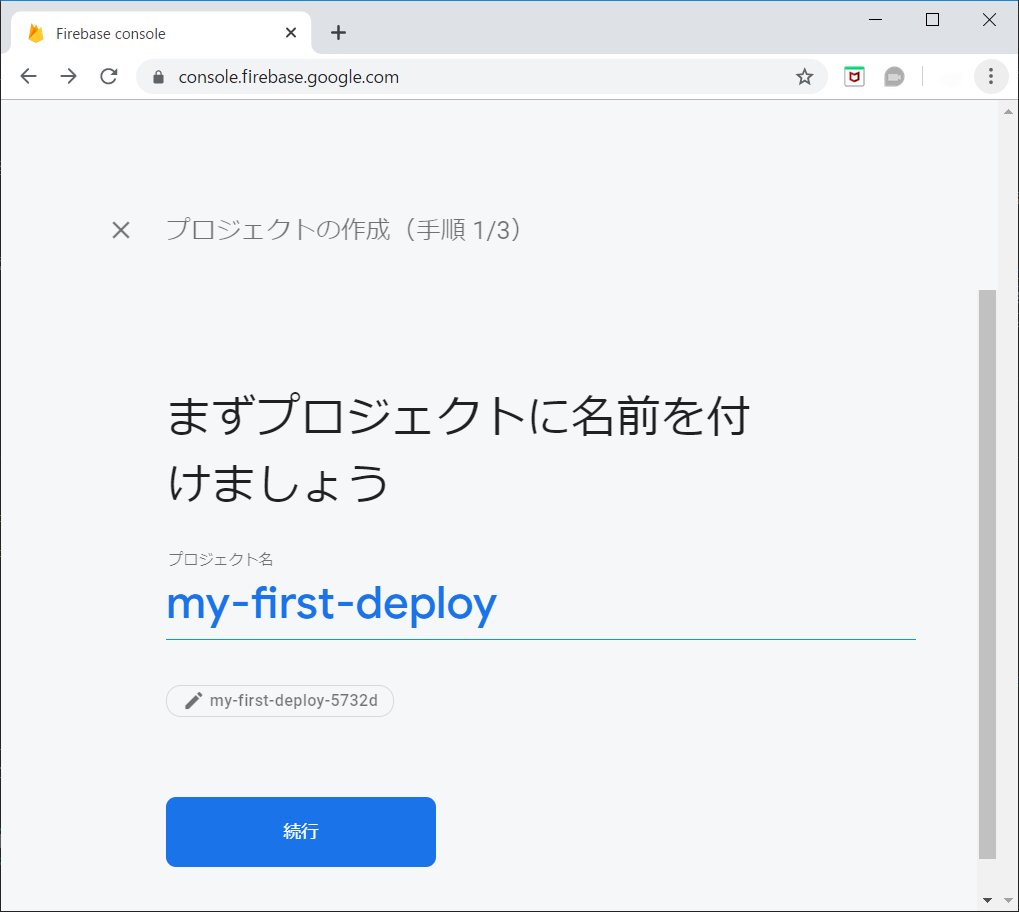
↓ 「続行」をクリック。
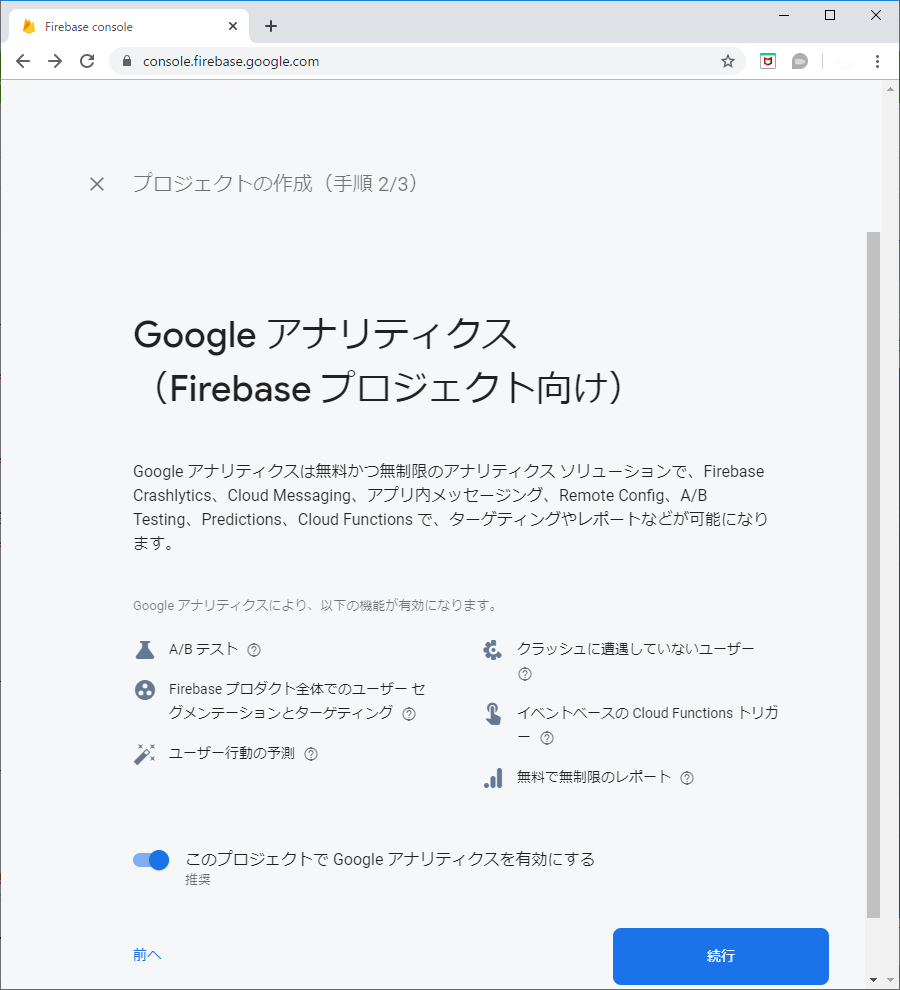
↓ 「Default Account For firebase」を選択して、「プロジェクトを作成」をクリック。
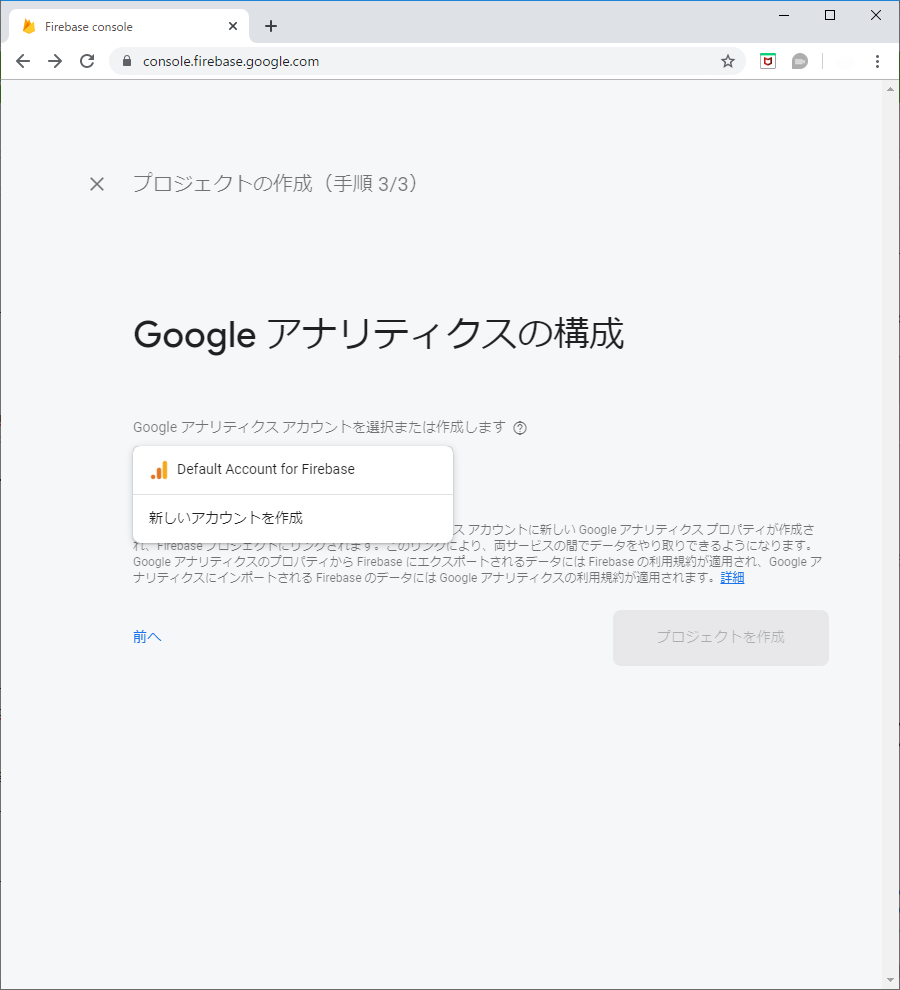
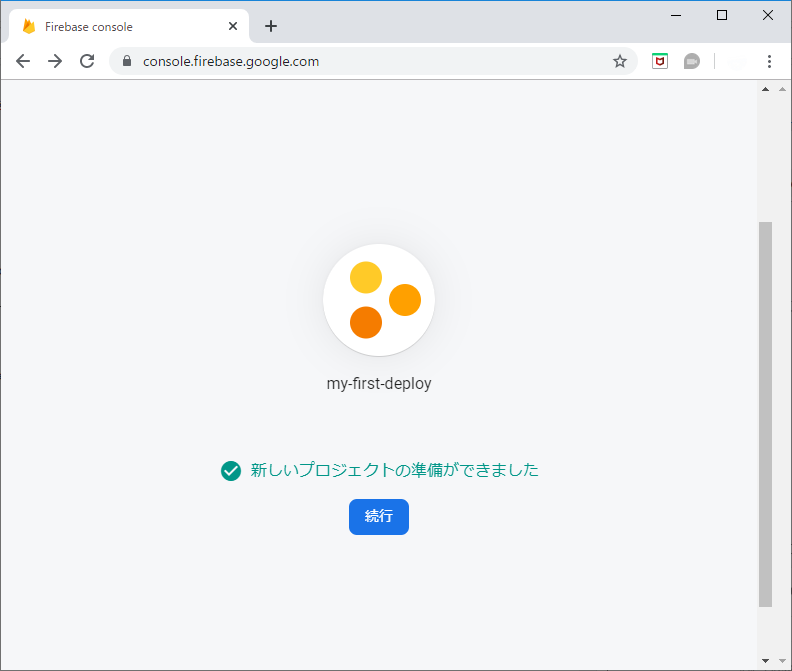
↓ の画面が出れば、無事プロジェクトを作成できてます!ひとまず「続行」を押して下さい。リダイレクト後の画面にまた戻ってくるので、開いたままにしておきましょう。
04. パッケージをインストールしよう
以下の作業は、先ほど作成したディレクトリの中で行いましょう。
まずは、プロジェクトでFirebaseを扱うためのパッケージをインストールします。
~/Desktop/deploy > npm install --save firebase
特に拘りが無い場合は、--saveオプションを付けてローカルインストールして下さい。ただし、npmのバージョンが 5.0.0以上なら--saveは不要です2。
お次は、firebase-toolsをインストールします(こちらはグローバルインストールしないと上手くインストールできなかったので、-gオプションを付けました)。
~/Desktop/deploy > npm install -g firebase-tools
必要なパッケージが入れ終わったら、ログイン(Firebaseの起動?)をします。
プライバシーポリシーに則って、匿名で情報を収集していいか聞かれていますね、多分。yesでもnoでもどちらでも大丈夫なので、お好きな方で!
~/Desktop/deploy > firebase login
i  Firebase optionally collects CLI usage and error reporting information to help improve our products. Data is collected in accordance with Google's privacy policy (https://policies.google.com/privacy) and is not used to identify you.

? Allow Firebase to collect CLI usage and error reporting information? (Y/n)
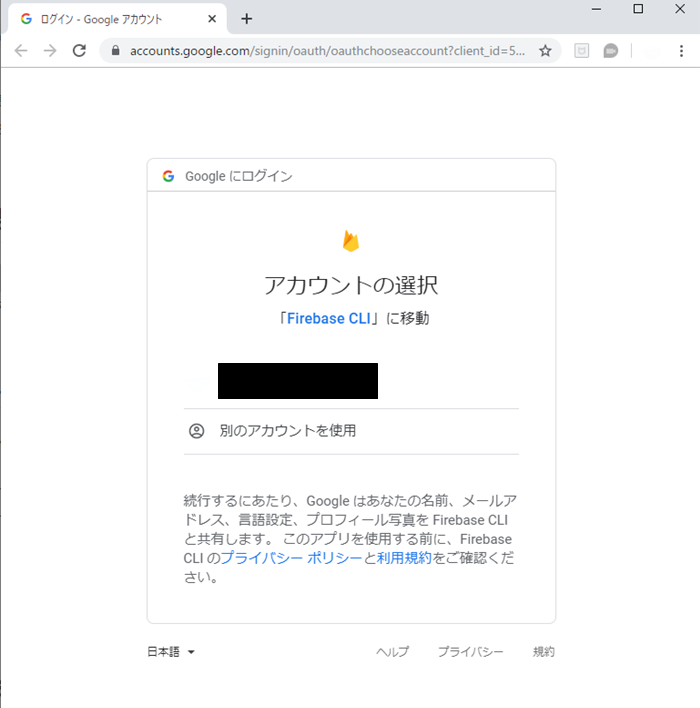
↓ 入力すると、おもむろにブラウザが立ち上がってGoogleアカウントへのアクセスの要求をされます。
Firebaseのプロジェクトを作るGoogleアカウントを選択します。
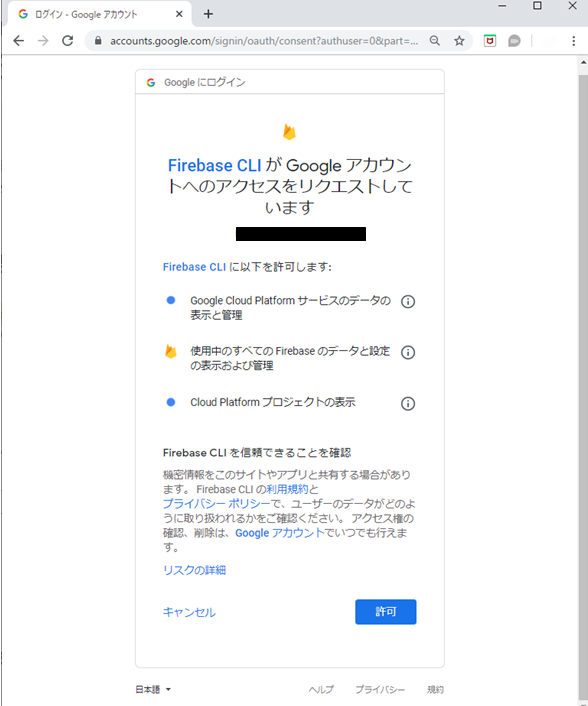
↓ 「許可」をクリック。
↓ 下記の画面が出れば、ログイン成功!この画面は閉じてもらって大丈夫です。

コンソールにも、下記のようなSuccess!の文言が出ているかと思います!
Visit this URL on this device to log in:
https://accounts.google.com/(中略)
Waiting for authentication...

+  Success! Logged in as ***@gmail.com
05. プロジェクトを初期化しよう
ではコンソールに戻って、プロジェクトをFirebaseプロジェクトとして、初期化しましょう!
コンソールにfirebase initと打つと、「FIREBASE」というイカした(死語)AAと、my-react-app内でFirebaseプロジェクトを初期化していいか聞かれます。(勿論yesで!)
~/Desktop/deploy > firebase init

     ######## #### ########  ######## ########     ###     ######  ########
     ##        ##  ##     ## ##       ##     ##  ##   ##  ##       ##
     ######    ##  ########  ######   ########  #########  ######  ######
     ##        ##  ##    ##  ##       ##     ## ##     ##       ## ##
     ##       #### ##     ## ######## ########  ##     ##  ######  ########

You're about to initialize a Firebase project in this directory:

  C:\Users\username\Desktop\deploy

? Are you ready to proceed? (Y/n)
今回は、デプロイだけを目的にしているので、Hostingを選びます。
矢印キーでカーソルを移動させて、スペースキーで「Hosting」を選択して、Enter!
? Are you ready to proceed? Yes
? Which Firebase CLI features do you want to set up for this folder? Press Space to select features, then Enter to confirm your choices. (Press <space> to select, <a> to toggle all, <i> to invert selection)
>( ) Database: Deploy Firebase Realtime Database Rules
 ( ) Firestore: Deploy rules and create indexes for Firestore
 ( ) Functions: Configure and deploy Cloud Functions
 ( ) Hosting: Configure and deploy Firebase Hosting sites
 ( ) Storage: Deploy Cloud Storage security rules
↓ 続いて、対象のFirebaseのサイト側で作成したプロジェクトを選択します。既存のプロジェクトを使うので「Use an existing project」を選択。
=== Project Setup

First, let's associate this project directory with a Firebase project.
You can create multiple project aliases by running firebase use --add,
but for now we'll just set up a default project.

? Please select an option: (Use arrow keys)
> Use an existing project
  Create a new project
  Add Firebase to an existing Google Cloud Platform project
  Don't set up a default project
↓ 先ほど作成した「my-first-deploy」を選んで下さい。(プロジェクト名の後に付いている文字列は無視して大丈夫です)
? Please select an option: Use an existing project
? Select a default Firebase project for this directory: (Use arrow keys)
> my-first-deploy-5732d (my-first-deploy)
  sample-project01-9cf12 (sample-project01)
  sample-project02 (sample-project02)
  sample-project03-96663 (sample-project03)
(Move up and down to reveal more choices)
↓ デプロイするディレクトリを選択します。デフォルトのpublicディレクトリを使用するので、そのままEnter。
=== Hosting Setup

Your public directory is the folder (relative to your project directory) that
will contain Hosting assets to be uploaded with firebase deploy. If you
have a build process for your assets, use your build's output directory.

? What do you want to use as your public directory? (public)
↓ SPA3として設定するかを選択できます4。何かしらフレームワークを使っていれば別ですが、基本はNoでいいと思います。
? Configure as a single-page app (rewrite all urls to /index.html)? (y/N)
↓ 既に存在しているindex.htmlを上書きするか選択できます。当然Noです。上書き、ダメ、ゼッタイ。
+  Wrote public/404.html
? File public/index.html already exists. Overwrite? (y/N)
i  Skipping write of public/index.html

i  Writing configuration info to firebase.json...
i  Writing project information to .firebaserc...
i  Writing gitignore file to .gitignore...

+  Firebase initialization complete!
最終的にディレクトリの中身は、こんな感じになっていると思います。
先ほどと比べて追加されたのは、●の付いた4~5コのファイルやディレクトリですね。
(.で始まるファイルは隠しファイルなので、設定によっては見えないようになっているかもしれません。)
deploy/
     ┣━ package.json
     ┣━ package-lock.json ● (無い場合もあります)
     ┣━ firebase.json ●
     ┣━ public/ ┳ index.html
     ┣          ┠ styles.css
     ┣          ┗ others/
     ┣━ node_modules/ ● ━ ...
     ┣━ .firebase ●
     ┗━ .firebase ●
     ┗━ .gitignore ●
06. デプロイしよう
いよいよ作業も大詰めです!先ほどログインをしたサイトに戻りましょう。
↓ Project Overviewを選択して </>のマークをクリック
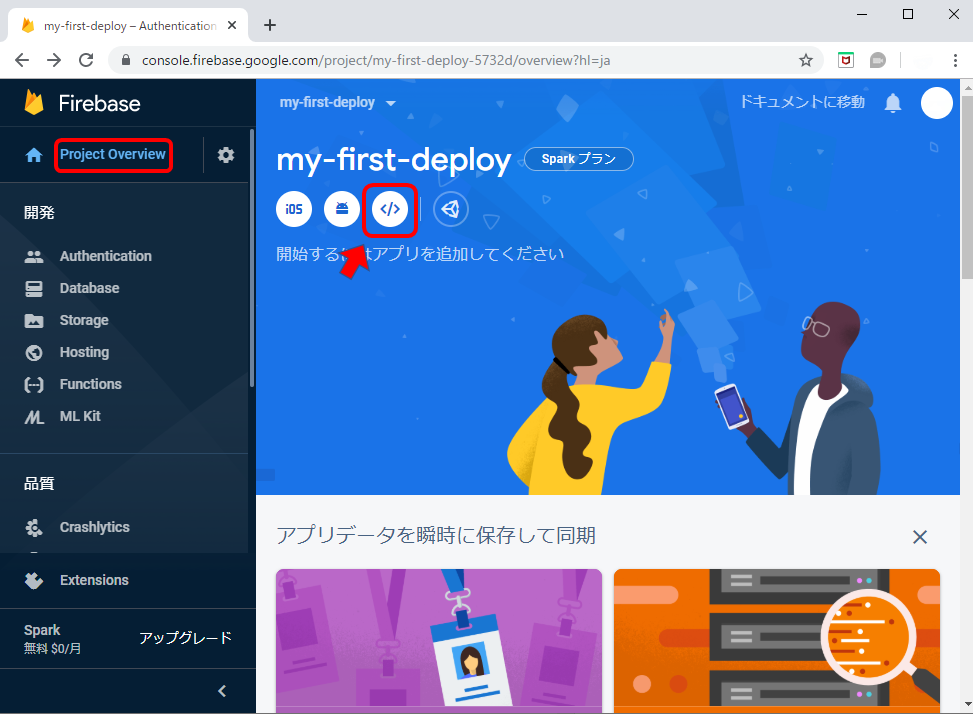
↓ 今回作ったFirebaseプロジェクトに登録するアプリの名前を入力します。イイ感じの名前をつけてみましょう!
入力がおわったら、「アプリを登録」をクリック。

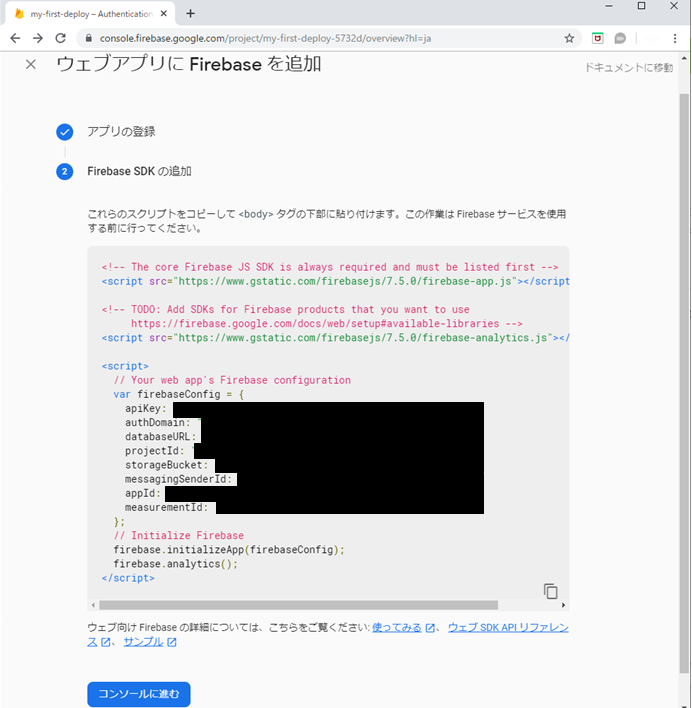
↓ 表示されたJavaScriptのコードをコピーして、 public/index.htmlの</body>の直前に貼り付け、「コンソールに進む」を選択。
それでは最後に、下記コマンドでアプリをデプロイしましょう!!
~/Desktop/deploy > firebase deploy
$ firebase deploy

=== Deploying to 'my-first-deploy-5732d'...

i  deploying hosting
i  hosting[my-first-deploy-5732d]: beginning deploy...
i  hosting[my-first-deploy-5732d]: found 15 files in public
+  hosting[my-first-deploy-5732d]: file upload complete
i  hosting[my-first-deploy-5732d]: finalizing version...
+  hosting[my-first-deploy-5732d]: version finalized
i  hosting[my-first-deploy-5732d]: releasing new version...
+  hosting[my-first-deploy-5732d]: release complete

+  Deploy complete!

Project Console: https://console.firebase.google.com/project/*****/overview
Hosting URL: https://*****.firebaseapp.com
Deploy complete! が表示されれば、成功です!
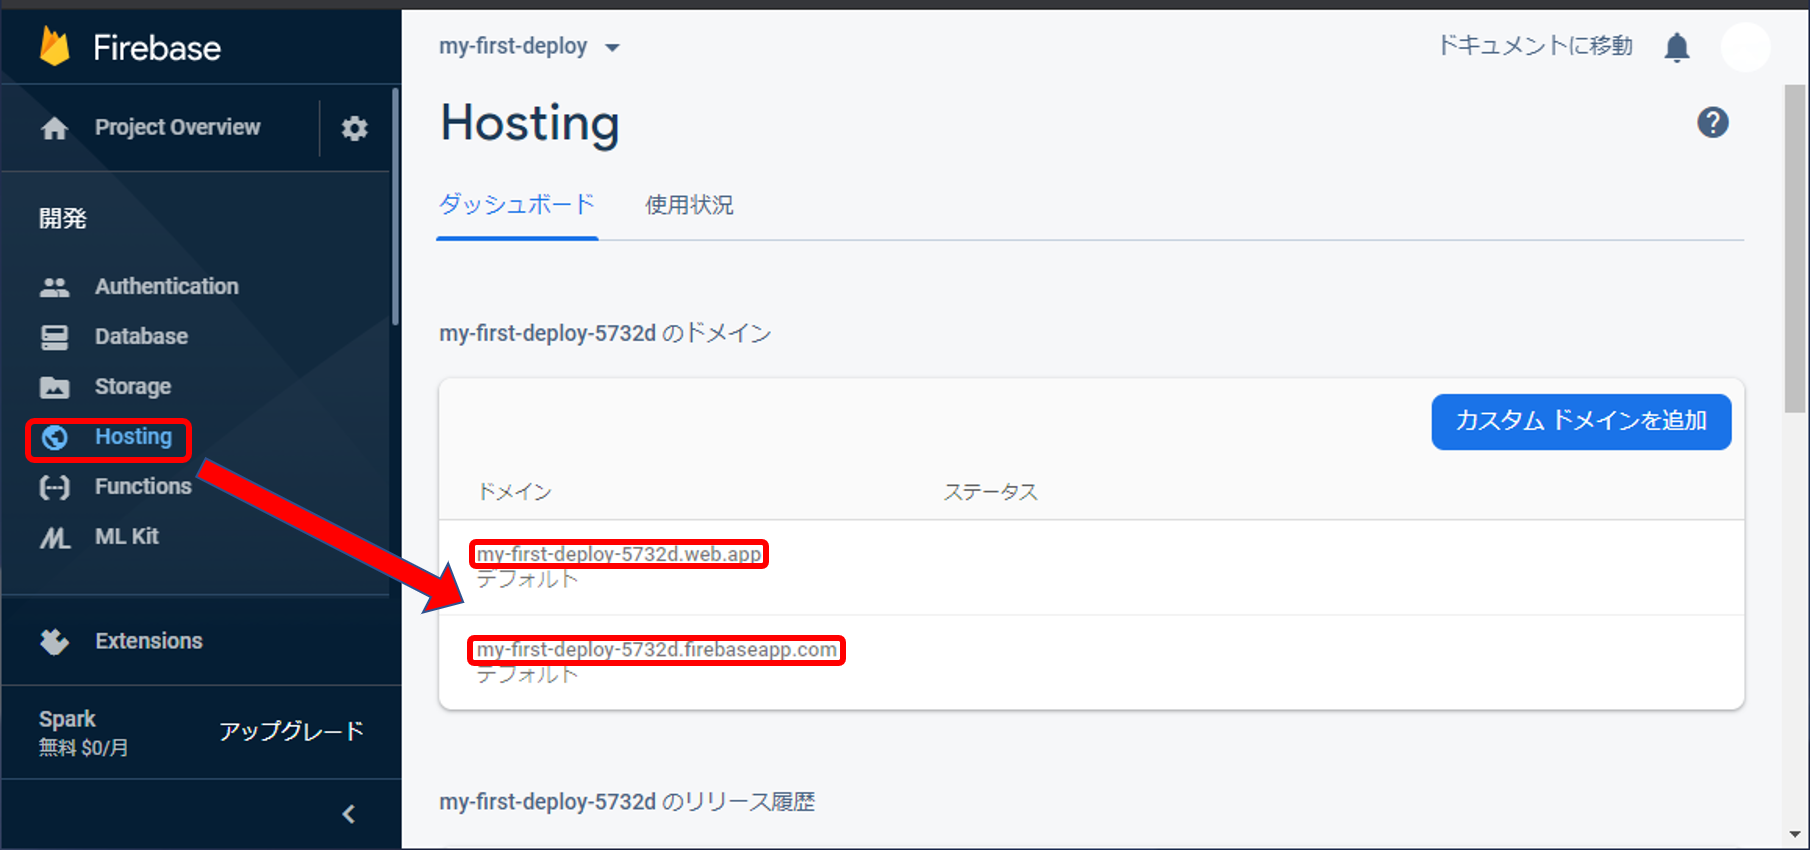
早速 Hosting URL からデプロイしたサイトを見てみましょう!
また、サイトはプロジェクトからも確認できます。「Hosting」を選択して表示されるURLからもアクセス可能です。
07. デプロイを取り消してみよう
公開したアプリを放置するのはオススメできません。何かしら作業を続けるのでなければ、一旦デプロイを取り消しましょう5。
取り消しはサクッとできるので、面倒くさがらず、下記のコマンドを実行してみましょう!
~/Desktop/deploy > firebase hosting:disable
? Are you sure you want to disable Firebase Hosting?
  This will immediately make your site inaccessible! (Y/n) Yes
+  Hosting has been disabled for my-first-deploy. Deploy a new version to re-enable.
↑ Firebase Hostingを使えなくして良いか聞かれます。yを入力すると、デプロイは取り消されますが、暫くは見ることが出来るようです。仮に取り消しても、もう一度
~/Desktop/deploy > firebase deploy
とやれば、再びデプロイできます!ほんと便利!!
08. もっとFirebaseを使ってみよう
Firebaseにはもっと様々な機能があります。今回はホスティングという機能を使ってデプロイしましたが、通知やログインなどのバックエンドの処理をサポートする機能が満載です。詳しくは参考に載せた記事をご覧下さい。
最後までお読みいただき、ありがとうございました。
参考
この記事を書くにあたり、下記の内容を参考にしました。
投稿者の方にこの場を借りて感謝申し上げます。