WeScanとは
WeScan makes it easy to add scanning functionalities to your iOS app! It's modelled after UIImagePickerController, which makes it a breeze to use.
https://github.com/WeTransfer/WeScan
このように、カメラやローカルの画像を取り込んで書類っぽい部分をcropできるライブラリ。例えばEvernote Scannableの撮影機能に近い。
2020年に入っても活発に開発されており、いまは紹介映像よりもう少しリッチになっている。
使い方
インストール
Podfileにpod 'WeScan'を追加してpod install。
カメラを起動してスキャン
ImageScannerControllerのインスタンスを作ってDelegateを設定、presentすると紹介映像のような画面が出てくる。
import UIKit
import WeScan // ←忘れずに
class MyViewController: UIViewController {
    @IBOutlet weak var imageView: UIImageView!
    func startCamera() {
        let scannerViewController = ImageScannerController()
        scannerViewController.imageScannerDelegate = self
        present(scannerViewController, animated: true)
    }
}
ImageScannerControllerDelegateを使ってスキャンの結果を取得できる。
extension MyViewController: ImageScannerControllerDelegate {
    func imageScannerController(_ scanner: ImageScannerController, didFailWithError error: Error) {
        print(error)
    }
    func imageScannerController(_ scanner: ImageScannerController, didFinishScanningWithResults results: ImageScannerResults) {
        let croppedImage = results.croppedScan.image // UIImage
        imageView.image = croppedImage
        scanner.dismiss(animated: true)
    }
    func imageScannerControllerDidCancel(_ scanner: ImageScannerController) {
        scanner.dismiss(animated: true)
    }
}
ライブラリ等から画像を渡してクロッピング
インスタンス作成時に画像を渡すだけ
ImageScannerControllerのインスタンス作成時に画像を渡すと、カメラは起動せずに渡した画像の編集画面となる。
let scannerViewController = ImageScannerController(image: image, delegate: self) // どこかから画像を渡す。ついでにdelegateも設定
present(scannerViewController, animated: true)
すっごい使いやすい…
iOS標準のUIImagePickerControllerで画像を持ってきて渡す例
class MyViewController: UIViewController {
    func openLibrary() {
        let imagePicker = UIImagePickerController()
        imagePicker.delegate = self
        imagePicker.sourceType = .photoLibrary
        present(imagePicker, animated: true)
    }
}
extension MyViewController: UIImagePickerControllerDelegate, UINavigationControllerDelegate {
    func imagePickerControllerDidCancel(_ picker: UIImagePickerController) {
        picker.dismiss(animated: true)
    }

    func imagePickerController(_ picker: UIImagePickerController, didFinishPickingMediaWithInfo info: [UIImagePickerController.InfoKey: Any]) {
        picker.dismiss(animated: true)

        guard let image = info[.originalImage] as? UIImage else { return }
        let scannerViewController = ImageScannerController(image: image, delegate: self) //❗️選んだ画像をWeScanに渡す
        present(scannerViewController, animated: true)
    }
}

extension MyViewController: ImageScannerControllerDelegate { //❗️ここは前と同じ
    func imageScannerController(_ scanner: ImageScannerController, didFailWithError error: Error) {
        print(error)
    }
    func imageScannerController(_ scanner: ImageScannerController, didFinishScanningWithResults results: ImageScannerResults) {
        let croppedImage = results.croppedScan.image
        imageView.image = croppedImage
        scanner.dismiss(animated: true)
    }
    func imageScannerControllerDidCancel(_ scanner: ImageScannerController) {
        scanner.dismiss(animated: true)
    }
}
日本語化とカスタマイズ
すごく良いライブラリなのだが、ちょっと変更したいところもあって…
日本語がない。
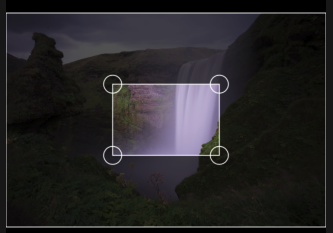
また、今回の用途だとクロップ設定の初期範囲が少し狭いのが気になった。
Fork
なので、Forkしてカスタマイズします。
ForkしたリポジトリをPodfileに登録して使う方法は以下に単体で記事を作りました。
【CocoaPods】iOSのライブラリをForkして使う
ちなみにWeScanはMITライセンス。
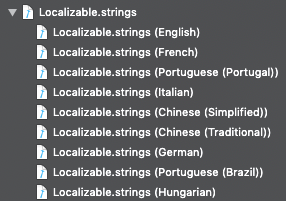
日本語化
ForkしたWeScanをXcodeで開く。

↓選択
↓選択
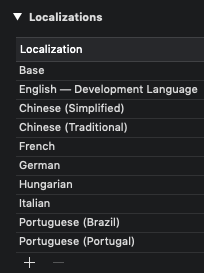
↓+を押す

↓選択

↓チェック

↓選択

WeScan/Localizable.strings以下にJapaneseが追加されるので、例えば以下のように編集。
"wescan.edit.button.next" = "次へ";
"wescan.edit.title" = "切り取り";

"wescan.review.title" = "プレビュー";

"wescan.scanning.cancel" = "キャンセル";
"wescan.scanning.auto" = "オート";
"wescan.scanning.manual" = "マニュアル";
初期クロップ範囲を変更する
このあたりを
    /// Generates a `Quadrilateral` object that's centered and one third of the size of the passed in image.
    private static func defaultQuad(forImage image: UIImage) -> Quadrilateral {
        let topLeft = CGPoint(x: image.size.width / 3.0, y: image.size.height / 3.0)
        let topRight = CGPoint(x: 2.0 * image.size.width / 3.0, y: image.size.height / 3.0)
        let bottomRight = CGPoint(x: 2.0 * image.size.width / 3.0, y: 2.0 * image.size.height / 3.0)
        let bottomLeft = CGPoint(x: image.size.width / 3.0, y: 2.0 * image.size.height / 3.0)

        let quad = Quadrilateral(topLeft: topLeft, topRight: topRight, bottomRight: bottomRight, bottomLeft: bottomLeft)

        return quad
    }
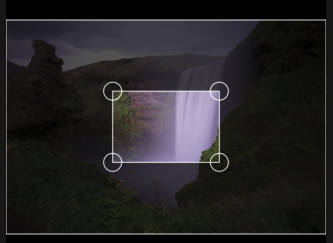
このように変更すると、
        let topLeft = CGPoint(x: 0, y: 0)
        let topRight = CGPoint(x: image.size.width, y: 0)
        let bottomRight = CGPoint(x: image.size.width, y: image.size.height)
        let bottomLeft = CGPoint(x: 0, y: image.size.height)
画像全体が選択された状態から始まる。
Podfile
コードを書き換えたらpushし、自分のアプリに戻ってPodfileを編集。
repoとbranchを指定してpod installすれば完了。
pod 'WeScan', :git => 'git@github.com:{{ your name }}/WeScan.git', :branch => '{{ your branch }}'