以前の投稿で、アプリケーション認証を ADFS から Azure AD へ移行する際の簡単なシミュレーションのために GitHub 上に公開されたサンプルアプリケーションを紹介した。
当時は SAML プロトコルに対応していることによって Azure AD へ切り替えを素早く行えることを実践したが、GitHub に OIDC 対応するための追加のデモ手順があったので、ここで取りあげていく。
- (A) Web アプリケーションの認証に OpenID Connect を使用するように変更
- (B) Azure AD を使用したユーザーのサインオン動作を確認
(A) Web アプリケーションの認証に OpenID Connect を使用するように変更
デモ環境は、Visual Studio 2019 と .NET Framework 4.7.2 を使用した。
GitHub の手順とおりに進めればよく、下記のステップを行う。
- ① OWIN ミドルウェア NuGet パッケージを追加
Install-Package Microsoft.Owin.Security.OpenIdConnect
Install-Package Microsoft.Owin.Security.Cookies
- ②Web アプリケーションの構成ファイルの編集
    <add key="ida:ClientId" value="{Client_Id}" />
    <add key="ida:TenantId" value="{TenantId}" />
    <add key="ida:AADInstance" value="https://login.microsoftonline.com/" />
    <add key="ida:RedirectUri" value="https://localhost:44347/" />
Client_Id および TenantId は後述する Azure AD の構成情報から取ってくると良い。
- ③サンプルコードの一部を編集
using System;
using System.Collections.Generic;
using System.Configuration;
using System.Globalization;
using System.Linq;
using System.Web;
using Microsoft.Owin.Security;
using Microsoft.Owin.Security.Cookies;
using Microsoft.Owin.Security.WsFederation;
using Microsoft.Owin.Security.OpenIdConnect;
using Owin;

namespace WebApp_SAML
{
    public partial class Startup
    {
        private static string clientId = ConfigurationManager.AppSettings["ida:ClientId"];
        private static string aadInstance = EnsureTrailingSlash(ConfigurationManager.AppSettings["ida:AADInstance"]);
        private static string tenantId = ConfigurationManager.AppSettings["ida:TenantId"];
        private static string redirectUri = ConfigurationManager.AppSettings["ida:RedirectUri"];
        private static string authority = String.Concat(aadInstance, tenantId, "/v2.0");

        private static string EnsureTrailingSlash(string value)
        {
            if (value == null)
            {
                value = string.Empty;
            }

            if (!value.EndsWith("/", StringComparison.Ordinal))
            {
                return value + "/";
            }

            return value;
        }

        public void ConfigureAuth(IAppBuilder app)
        {
            app.SetDefaultSignInAsAuthenticationType(CookieAuthenticationDefaults.AuthenticationType);

            app.UseCookieAuthentication(new CookieAuthenticationOptions());

            app.UseOpenIdConnectAuthentication(
                new OpenIdConnectAuthenticationOptions
                {
                    Authority = authority,
                    ClientId = clientId,
                    RedirectUri = redirectUri,
                    PostLogoutRedirectUri = redirectUri,
                    MetadataAddress = $"https://login.microsoftonline.com/{tenantId}/.well-known/openid-configuration?appid={clientId}"
                });
        }
    }
}
using System;
using System.Collections.Generic;
using System.Linq;
using System.Web;
using System.Web.Mvc;
using Microsoft.Owin.Security.Cookies;
using Microsoft.Owin.Security.WsFederation;
using Microsoft.Owin.Security.OpenIdConnect;
using Microsoft.Owin.Security;

namespace WebApp_SAML.Controllers
{
    public class AccountController : Controller
    {
        public void SignIn()
        {
            if (!Request.IsAuthenticated)
            {
                HttpContext.GetOwinContext().Authentication.Challenge(new AuthenticationProperties { RedirectUri = "/" },
                    OpenIdConnectAuthenticationDefaults.AuthenticationType);
            }
        }

        public void SignOut()
        {
            string callbackUrl = Url.Action("SignOutCallback", "Account", routeValues: null, protocol: Request.Url.Scheme);

            HttpContext.GetOwinContext().Authentication.SignOut(
                new AuthenticationProperties { RedirectUri = callbackUrl },
                OpenIdConnectAuthenticationDefaults.AuthenticationType, CookieAuthenticationDefaults.AuthenticationType);
        }

        public ActionResult SignOutCallback()
        {
            if (Request.IsAuthenticated)
            {
                // Redirect to home page if the user is authenticated.
                return RedirectToAction("Index", "Home");
            }

            return View();
        }
    }
}
あわせて、下記のチュートリアルを参照することで更に理解が深まった。
(B) Azure AD を使用したユーザーのサインオン動作を確認
アプリケーションのユーザー認証を行う Azure AD へアプリの登録を行い、必要な情報の取得と認証の構成を行う。
アプリ認証用の Azure AD は、アプリ開発用の (Visual Studio の環境にログオンするための) Azure AD テナントと同じでなくても良い。
事前に SAML ベースのシングルサインオン構成のためエンタープライズ アプリケーションの登録を行っていたので、アプリの登録は実施済みの状態であった。
Azure ADの「エンタープライズ アプリ」と「アプリの登録」は目的に応じて使い分けるが、登録したアプリによっては両方で設定を行うことができる点に留意する。(下記のブログで詳しく解説されている)
- ①テナント ID、クライアント IDの取得
Azure AD のアプリの登録画面から取得する。この情報を Web アプリケーションの構成ファイルへ転記する。

- ②認証の構成
下記の Azure AD 設定を行い、設定を保存する。
| 設定項目 | 設定値 |
|---|---|
| リダイレクト URI | https://localhost:44347/ |
| 発行するトークン | ID トークン |
| サインオン可能なユーザーの範囲 | テナント内ユーザーのみ シングルテナント |
- ③API のアクセス許可
Microsoft Graph の委任されたアクセス許可 User.Read を追加する。
- ④動作確認
(B)-①で取得したテナント ID 情報などを (A)-②の Web アプリケーション構成ファイルへ指定したら、再ビルドしアプリを実行する。
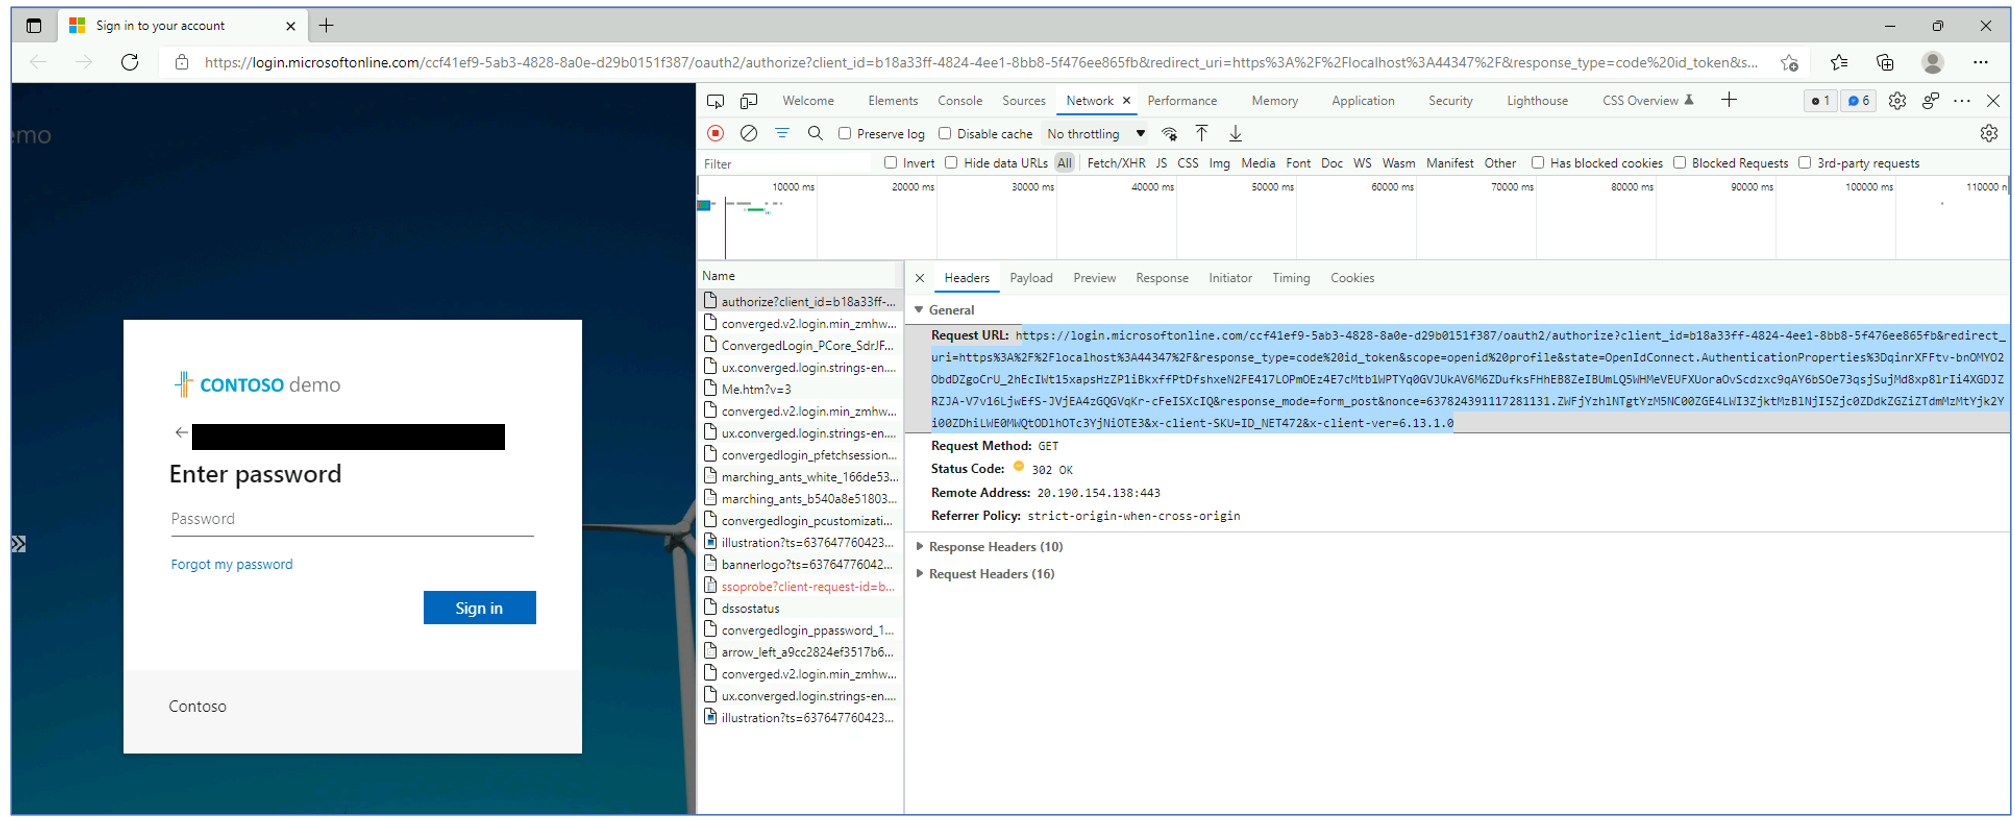
ユーザーサインオン画面が表示されるタイミングで、Microsoft Edge DeveTools (F12 で起動)を使うと、Azure AD のエンドポイントに対するリクエスト URL を確認できた。
OpenID Connect の認証フローで ID トークンを要求していることが分かる。
Request URL (改行アリ)
https://login.microsoftonline.com/{TENANT_ID}/oauth2/authorize?
client_id={CLIENT_ID}&redirect_uri=https%3A%2F%2Flocalhost%3A44347%2F
&response_type=code%20id_token&scope=openid%20profile
&state=OpenIdConnect.AuthenticationProperties%3DqinrXFFtv-bnOMYO2ObdDZgoCrU_2hEcIWt15xapsHzZP1iBkxffPtDfshxeN2FE417LOPmOEz4E7cMtb1WPTYq0GVJUkAV6M6ZDufksFHhEB8ZeIBUmLQ5WHMeVEUFXUoraOvScdzxc9qAY6bSOe73qsjSujMd8xp8lrIi4XGDJZRZJA-V7v16LjwEfS-JVjEA4zGQGVqKr-cFeISXcIQ
&response_mode=form_post
&nonce=637824391117281131.ZWFjYzhlNTgtYzM5NC00ZGE4LWI3ZjktMzBlNjI5Zjc0ZDdkZGZiZTdmMzMtYjk2Yi00ZDhiLWE0MWQtODlhOTc3YjNiOTE3&x-client-SKU=ID_NET472&x-client-ver=6.13.1.0
ユーザーサインオンが完了した後は、アプリケーションによってユーザーのクレーム情報が表示され、ID トークンに含まれる情報が確認できた。ID トークンに含まれる情報は、公開文書内の記載があるためこちらも参考にした。

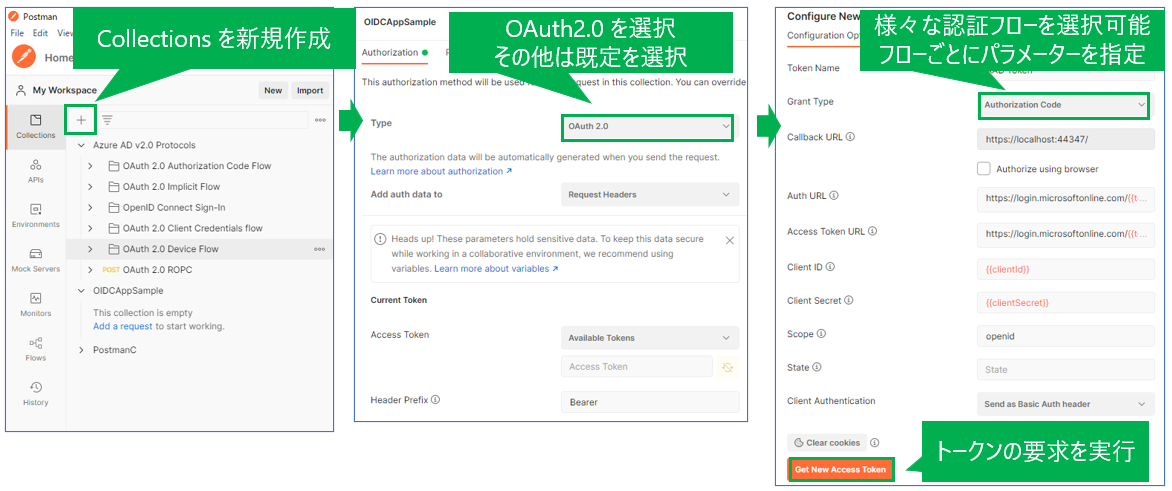
アプリを実行せず、もっと簡単に ID トークンに含まれる情報を確認したい場合は、Postman を使ってトークンの要求を実行することができる。
上記(B)でアプリ登録した Azure AD のエンドポイントへ、Postman から実際にリクエストした時の結果は以下のようになる。


まとめ
- OpenID Connect を Web アプリケーションの認証で利用するサンプルアプリケーションのデモ
- OWIN のライブラリを使った実装サンプルの紹介
- Azure AD を使用したユーザーのサインインから OpenID Connect の認証フローが動作していることを確認


