ちょっとしたコードや設定などですが、忘れがちであらためて調べるのも面倒なので、忘備録的なものです。
順不同で、気づいたものから順にSwift4で使えるコードを載せていきます。
Documentsまでのパス取得
ドキュメントパスはインストールされるたびに変更になるため必ずこの関数で取得する
// /Documentsまでのパス取得
    let documentsPath = NSSearchPathForDirectoriesInDomains(.documentDirectory, .userDomainMask, true)[0] as String
    let liblaryPath = NSSearchPathForDirectoriesInDomains(.libraryDirectory, .userDomainMask, true)[0] as String
設定の読み書き
・userDefaultsへの読み書き
・Keyを定義しておくこと
・UIColorを保存するためのextension
    let KEY_A_NAME = "Key_A_Name"
    let userDefaults = UserDefaults.standard

    // read
    let Key_A = userDefaults.string(forKey: KEY_A_NAME)
    // write
    userDefaults.set(Name_A, forKey: KEY_A_NAME)

extension UserDefaults {

    func colorForKey(_ key: String) -> UIColor? {
        var color: UIColor?
        if let colorData = data(forKey: key) {
            color = NSKeyedUnarchiver.unarchiveObject(with: colorData) as? UIColor
        }
        return color
    }

    func setColor(_ color: UIColor?, forKey key: String) {
        var colorData: Data?
        if let color = color {
            colorData = NSKeyedArchiver.archivedData(withRootObject: color)
        }
        set(colorData, forKey: key)
    }

}
日付の読み出し
ローカルな日付をYYYYMMDD形式の文字列で読み出す
    func getLocalDateTimeString(_ date:Date? = Date() )->String {
        if date == nil {return "----/--/--"}
        let dateFormatter = DateFormatter()
        dateFormatter.locale = Locale.autoupdatingCurrent
        dateFormatter.dateFormat = "yyyy/MM/dd"
        return dateFormatter.string(from: date!) as String
    }
おまけ:年月日時分秒のプリフィクスを作る
    func createFileID()->String {
        let dateFormatter = DateFormatter()
        dateFormatter.locale = Locale.autoupdatingCurrent
        dateFormatter.dateFormat = "yyyyMMddHHmmss_"
        let dateString =  dateFormatter.string(from: Date()) as String
        return dateString
    }
Jsonの読み出し
jsonDecoderでJsonファイルのデータを構造体に読み出し
・Codableな構造体を定義しておくこと
・おまけ:texts配列をCSVに変換する関数texts2CSV()
・初期状態では読み出し元ファイルがないのでデフォルトの設定から作る
・Audioフォルダに音声ファイルを管理するJsonの例
struct Entry: Codable {
    var date:Date
    var title:String
    var memo:String
    var audioFilePath:String
    var audioFileName:String
    var texts:[TextPhrase]

    /// カンマ区切りの文字列に変換
    func texts2CSV() -> String {
        var rtnStr = ""
        for i in 0 ..< texts.count {
            let time:String = "\"" + texts[i].time2hhmmss() + "\",\""
            let speaker:String = texts[i].speaker  + "\",\""
            rtnStr += time + speaker + texts[i].text  + "\"\r\n"
        }
        return rtnStr
    }
}

struct TextPhrase: Codable {
    var top:TimeInterval
    var end:TimeInterval?
    var speaker:String
    var text:String
    var comment:String

    func time2hhmmss() -> String {
        let formatter = DateComponentsFormatter()
        formatter.unitsStyle = .positional
        formatter.allowedUnits = [.minute,.hour,.second]
        formatter.zeroFormattingBehavior = .pad
        return formatter.string(from: top) ?? ""
    }
}
    var entries: [Entry] = []

    func readSavedJson() {
        let jsonPath = liblaryPath + "/" + jsonFileName
        // jasonをファイルから読み出す
        let fm = FileManager()
        let jsonDecoder = JSONDecoder()
        let jsonStr:String


        // ファイルの有無をチェック
        if fm.fileExists(atPath: jsonPath) {
            do {
                jsonStr = try String(contentsOfFile: jsonPath, encoding: .utf8)
            } catch _ {
                return
            }
        } else {
            print("No File : \(jsonPath)")
            //entries = []
            // 初期状態では何もないのでリソースから作る
            if let assetJson = NSDataAsset(name: "originJson") {
                jsonStr = String(data: assetJson.data, encoding: .utf8) ?? ""
                // サンプルファイルをAudioフォルダにコピー
                if let assetAudio = NSDataAsset(name: "sampleAudio") {
                    let audioData = assetAudio.data as NSData
                    let audioFilePath = documentsPath + "/Audio/sample.mp3"
                    let audioFolderPath = documentsPath + "/Audio"
                    //Audioフォルダが無ければ作る
                    var isDirExists : ObjCBool = false
                    fm.fileExists(atPath: audioFolderPath, isDirectory:&isDirExists)
                    if !isDirExists.boolValue {
                        do {
                            try fm.createDirectory(atPath: audioFolderPath, withIntermediateDirectories: true, attributes: nil)
                        } catch let error1 {
                            print("Error createDirectory : \(audioFolderPath) : " + error1.localizedDescription  )
                            return
                        }
                    }
                    // ファイルを書き込む
                    audioData.write(toFile: audioFilePath, atomically: true)
                }

            } else {
                entries = [Entry(date:Date(),title:"No Date",memo:"",audioFilePath:"NoAudio.mp4",audioFileName:"NoAudio.mp4",texts:[TextPhrase(top:0,end:nil,speaker:"No One",text:"say something",comment:"no comment")])]
                return
            }
        }

        entries = try! jsonDecoder.decode([Entry].self, from: jsonStr.data(using: .utf8)!)

    }
読み書きするjsonはこんな感じ
[
  {
    "memo" : "",
    "title" : "このアプリの使い方",
    "audioFileName" : "sample.mp3",
    "texts" : [
      {
        "speaker" : "編集部",
        "top" : 0,
        "end" : 7.0,
        "comment" : "Repeat After YOU!",
        "text" : "このアプリは文字起こしを超高速に行うことに特化したアプリです。"
      },
      {
        "speaker" : "編集部",
        "top" : 7.0,
        "end" : 18.0,
        "comment" : "",
        "text" : "録音音声から聞き取った内容を、オウム返しで話して音声認識させることで、キーボードを使わずに超高速に文字起こしができます。"
      }
   ],
    "audioFilePath" : "sample.mp3",
    "date" : 531674816.56146502
  }
]
Json書き込み
JSONEncoderで構造体をエンコードして書き込み
・構造体は上で定義したもの
    func saveEntriesToJson() {
        let jsonPath = liblaryPath + "/" + jsonFileName

        let jsonEncoder = JSONEncoder()
        jsonEncoder.outputFormatting = .prettyPrinted

        let data = try! jsonEncoder.encode(entries)
        let dataStr = String(data:data,encoding:.utf8)

        if dataStr?.isEmpty ?? true { return }
        do {
            // Stringデータをファイルに書き出し
            try dataStr!.write(toFile: jsonPath, atomically: true, encoding: .utf8)
        } catch _ {
            print("Write Error!  File : \(jsonPath)")
        }
    }
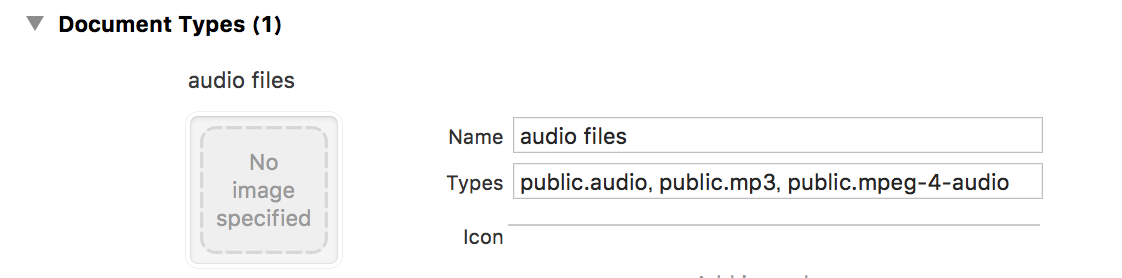
他のアプリからファイルを受け取る
・受け取るファイルの形式をinfo.plistに設定
・受け取る処理をAppDelegeteに記述
    func application(_ app: UIApplication, open url: URL, options: [UIApplicationOpenURLOptionsKey : Any] = [:]) -> Bool {
        if let currentVc = window?.rootViewController?.presentedViewController {
            print(NSStringFromClass(currentVc.classForCoder))
            if NSStringFromClass(currentVc.classForCoder) == "RepeatAfterYou.ControlVC" {
                (currentVc as! ControlVC).busyMessage()
                return false
            }

        }
        // ファイルのURLを受け取る
        print("URL of recieved file = \(url)")
        // ファイルパスに変換
        let sourcePath:String = url.path
        let fileName = url.lastPathComponent
        let destPath = fileMoveToArchive(sourcePath)
        if destPath != nil {
           // ココで再生入力画面に遷移したい
            let storyboard:UIStoryboard = UIStoryboard(name: "Main", bundle: nil)
            let ioVc:ControlVC = storyboard.instantiateViewController(withIdentifier: "ControlVC") as! ControlVC
            ioVc.entry = Entry(date:Date(),title:"",memo:"",audioFilePath:destPath!,audioFileName:fileName,texts:[TextPhrase(top:0,end:nil,speaker:"",text:"",comment:"")])
            ioVc.isNewEntry = true
            self.window?.rootViewController?.present(ioVc, animated: true, completion: nil)
        }

        return true

    }
・受け取ったファイルはInboxにあるので、管理するフォルダに移動して、Inboxのファイルは消す
    /// 受信したファイルをローカルアーカイブに移動
    ///
    @objc func fileMoveToArchive(_ fromPath:String)->String? {
        let fm = FileManager()

        let documentsPath = NSSearchPathForDirectoriesInDomains(.documentDirectory, .userDomainMask, true)[0] as String
        let audioFolderPath = documentsPath + "/Audio"
        //Audioフォルダが無ければ作る
        var isDirExists : ObjCBool = false
        fm.fileExists(atPath: audioFolderPath, isDirectory:&isDirExists)
        if !isDirExists.boolValue {
            do {
                try fm.createDirectory(atPath: audioFolderPath, withIntermediateDirectories: true, attributes: nil)
            } catch let error1 {
                print("Error createDirectory : \(audioFolderPath) : " + error1.localizedDescription  )
                return nil
            }
        }
        let id = createFileID()
        let fileName = id + URL(fileURLWithPath: fromPath).lastPathComponent
        let destPath = audioFolderPath + "/" + fileName
        currentAudioFileName = destPath
        sourceAudioFileName = fromPath
        //異動先のファイルの有無をチェック
        if fm.fileExists(atPath: destPath) { // ファイル有りの場合は先に削除
            do {
                try fm.removeItem(atPath: destPath)
            } catch let error1 {
                print("Error move file : \(destPath) : " + error1.localizedDescription  )
                return nil
            }
        }
        //ファイルを移動
        do {
            try fm.moveItem(atPath: fromPath as String, toPath: destPath)
        } catch let error1 {
            print("Error move file : \(destPath) : " + error1.localizedDescription  )
            //return nil
        }

        // Inboxの余分なファイルは消す
        let inboxPath:String = documentsPath + "/Inbox/"
        var contents:[String] = []
        do {
            contents = try fm.contentsOfDirectory(atPath: inboxPath) as [String]
        } catch let error1 {
            print("Error serch file : \(inboxPath) : " + error1.localizedDescription  )
            return nil
        }

        for filePath in contents {
            let targetFilePath = inboxPath + filePath
            do {
                print(targetFilePath)
                try fm.removeItem(atPath: targetFilePath)
            } catch let error1 {
                print("Error remove file : \(filePath) : " + error1.localizedDescription  )
                return nil
            }
        }


        return fileName
    }
・おまけ:ローカルアーカイブからファイルを削除
    @objc func removeAudioFile(_ filename:String) {
        let fm = FileManager()
        let documentsPath = NSSearchPathForDirectoriesInDomains(.documentDirectory, .userDomainMask, true)[0] as String
        let audioFolderPath = documentsPath + "/Audio/" + filename

        if fm.fileExists(atPath: audioFolderPath) {
            do {
                try fm.removeItem(at: URL(fileURLWithPath: audioFolderPath))
            } catch let error1 {
                print("Error file delete : \(audioFolderPath) : " + error1.localizedDescription  )
                return
            }
        }
    }
UIColorをrgbで設定
・UIColorのextension
extension UIColor {
    convenience init(rgb: UInt, alpha: CGFloat = 1.0) {
        let red: CGFloat = CGFloat((rgb & 0xFF0000) >> 16) / 255.0
        let green: CGFloat = CGFloat((rgb & 0x00FF00) >> 8) / 255.0
        let blue: CGFloat = CGFloat(rgb & 0x0000FF) / 255.0
        self.init(red: red, green: green, blue: blue, alpha: alpha)
    }
}

let NC_001_NADESHIKO = UIColor(rgb:0xDC9FB4) //撫子, NADESHIKO
UITableview関連
カスタムセルの部品に値を設定
・部品にTagを設定(Storyboard)
・Tagの部品を割り当て
・値を設定
    func tableView(_ tableView: UITableView, cellForRowAt indexPath: IndexPath) -> UITableViewCell {
        let cell = tableView.dequeueReusableCell(withIdentifier: "CellIdentifier", for: indexPath)
        let imageIcon = cell.viewWithTag(1) as! UIImageView
        let dateLabel = cell.viewWithTag(2) as! UILabel
        let titleLabel = cell.viewWithTag(3) as! UILabel

        imageIcon.image = #imageLiteral(resourceName: "icoMic")
        dateLabel.text  = ""
        titleLabel.text = "No Entry"

        cell.backgroundColor = UIColor.clear

        // 選択された背景色を白に設定
        let cellSelectedBgView = UIView()
        cellSelectedBgView.backgroundColor = ROW_COL_SELECTED
        cell.selectedBackgroundView = cellSelectedBgView

        return cell
    }
スワイプして削除を有効に
    func tableView(_ tableView: UITableView, canEditRowAt indexPath: IndexPath) -> Bool {
        return true
    }

    // スワイプ時に表示する文字列を設定
    func tableView(_ tableView: UITableView, titleForDeleteConfirmationButtonForRowAt indexPath: IndexPath) -> String? {
        return NSLocalizedString("Delete", tableName: "Message", comment: "削除")
    }

    func removeEntry(_ index:Int) {
        appDl.removeAudioFile(appDl.entries[index].audioFilePath)
        appDl.entries.remove(at: index)
        appDl.saveEntriesToJson()
        tvMainList.reloadData()
    }

    func removeConfirm(_ index:Int) {
        let alertController = UIAlertController(
            title: NSLocalizedString("Delete entry", tableName: "Message", comment: "エントリーの削除"),
            message: NSLocalizedString("delete-confirm-message", tableName: "Message",value: "Delete the data completely. Is it OK?", comment: "データを完全に削除します。よろしいですか?"),
            preferredStyle: .alert)

        let defaultAction:UIAlertAction = UIAlertAction(title: "OK",
                                                        style: UIAlertActionStyle.destructive,
                                                        handler:{
                                                            (action:UIAlertAction!) -> Void in
                                                            self.removeEntry(index)
        })
        alertController.addAction(defaultAction)

        let cancelAction = UIAlertAction(
            title: NSLocalizedString("Cancel", tableName: "Message", comment: "キャンセル"),
            style: .cancel, handler:nil)

        alertController.addAction(cancelAction)
        alertController.popoverPresentationController?.sourceView = view
        alertController.popoverPresentationController?.sourceRect = view.frame

        present(alertController, animated: true, completion: nil)
    }
スワイプ時に削除以外にも動作を設定
・メール送信 (MFMailComposeViewControllerDelegate追加)
・他のアプリにデータを渡す(UIDocumentInteractionControllerDelegate追加)
    var documentInteraction:UIDocumentInteractionController? = nil


    // スワイプ時に削除以外にも動作を設定
    func tableView(_ tableView: UITableView, editActionsForRowAt indexPath: IndexPath) -> [UITableViewRowAction]? {
        let mailTitle:String = NSLocalizedString("Mail", tableName: "Message", comment: "メール")
        let mail: UITableViewRowAction = UITableViewRowAction(style: .normal, title: mailTitle) { (action, index) -> Void in
            self.exportByMail(indexPath.row)
        }
        mail.backgroundColor = NC_173_KAMENOZOKI
        let exportTitle:String = NSLocalizedString("Export", tableName: "Message", comment: "エキスポート")
        let export: UITableViewRowAction = UITableViewRowAction(style: .normal, title: exportTitle) { (action, index) -> Void in
            self.exportEntry(indexPath.row)
        }
        export.backgroundColor = NC_186_SORA

        let deleteTitle:String = NSLocalizedString("Delete", tableName: "Message", comment: "削除")
        let delete: UITableViewRowAction = UITableViewRowAction(style: .normal, title: deleteTitle) { (action, index) -> Void in
            self.removeConfirm(indexPath.row)
        }
        delete.backgroundColor = NC_014_KARAKURENAI

        return [export, mail, delete]
    }

    func exportByMail(_ index:Int) {
        if !MFMailComposeViewController.canSendMail() { // メール送信不可
            print("Mail can't be send")
            return
        }
        let csvString:String = appDl.entries[index].texts2CSV()
        let mailVC = MFMailComposeViewController()
        let toRecipients:[String] = [""] //Toのアドレス指定

        mailVC.mailComposeDelegate = self
        mailVC.setSubject("Repeat after YOU!: Data export(テキストデータエクスポート)")
        mailVC.setToRecipients(toRecipients)
        let mailMessage = "テキストデータをCSV形式で添付します。\nExport the data with csv format.\n \n -- Repeat after YOU! --"
        mailVC.setMessageBody(mailMessage, isHTML: false)

        mailVC.addAttachmentData(csvString.data(using: String.Encoding.shiftJIS, allowLossyConversion: false)!, mimeType: "text/csv", fileName: "Export_output.csv" )
        self.present(mailVC, animated: true, completion:nil)

    }

    func exportEntry(_ index:Int) {
        let csvString:String = appDl.entries[index].texts2CSV()
        //let documentsPath = NSSearchPathForDirectoriesInDomains(.documentDirectory, .userDomainMask, true)[0] as String
        let tempPath = NSTemporaryDirectory() as String
        let filePath = tempPath + "output.csv"
        print(filePath)
        print(csvString)
        let tmpUrl = URL(fileURLWithPath: filePath)

        do {
            try csvString.write(to: tmpUrl, atomically: true, encoding: .shiftJIS)
        } catch {
            print("File write error:",filePath)
            return
        }

        documentInteraction = UIDocumentInteractionController(url: tmpUrl)
        documentInteraction!.delegate = self
        documentInteraction!.uti = "public.text"
        if !documentInteraction!.presentOpenInMenu(from: self.view.frame, in: self.view, animated: true) {
            print("File send error")
            // 送信できるアプリが見つからなかった時の処理
            let alert = UIAlertController(
                title: NSLocalizedString("Alert!", tableName: "Message",comment: "注意!"),
                message: NSLocalizedString("send-fail-message", tableName: "Message",value: "Failed to send.", comment: "ファイルを送れるアプリが見つかりません"),
                preferredStyle: .alert)
            alert.addAction(UIAlertAction(title: "OK", style: .default, handler: nil))
            self.present(alert, animated: true, completion: nil)
        }

    }
    @objc func documentInteractionController(_ controller: UIDocumentInteractionController, willBeginSendingToApplication application: String?) {
        print("Start file sending to ",application ?? "")
    }
    @objc func documentInteractionController(_ controller: UIDocumentInteractionController,
                                       didEndSendingToApplication application: String?) {
        print("Complete file sending to ",application ?? "")

    }
unwindSegue
・戻り先のControllerにunwindXXXXXを定義する
・戻り先ごとにXXXXXの名称を変える
・storyboardで戻りたいunwindXXXXXを選択してsegueを繋ぐ
    @IBAction func unwindToMain(_ segue: UIStoryboardSegue) {
     // 戻った時にデータ更新などを実施
       print("Return to main")
       self.tableview.reloadData()
    }