この投稿で行っている内容
-
1. 「Office展開ツール」で「Microsoft 365 Apps for business」を任意に選択してインストール出来るようにする(htmlメニューでxml生成とcmdスクリプト作成)
-
2. 用意した「Office展開ツール」を「IExpress」で 自己展開exe にしてユーザーに配布準備をする
-
3. 元パソコンがそれぞれ「Office 2013」の 32bit環境 および 64bit環境 に この 自己展開exe を実行した様子
※前回 「Office展開ツールを自己解凍exeにして「Outlook」だけをインストール(Outlook 2013 → Microsoft 365 Apps for business)」 (削除済み)ではOutlookだけをインストール対象にしましたが、
アプリの選択をHTMLでメニュー化して任意の「Microsoft 365 Apps for business」をインストールできるようにしました。
1. 「Office展開ツール」で「Microsoft 365 Apps for business」を任意に選択してインストール出来るようにする(htmlメニューでxml生成とcmdスクリプト作成)
1.1. 構成オプション選択メニュー( Office365アプリ選択.html )
→ 選択したアプリの内容で OfficeConfig.xml を生成します。
画面イメージはこちら(クリックして展開)
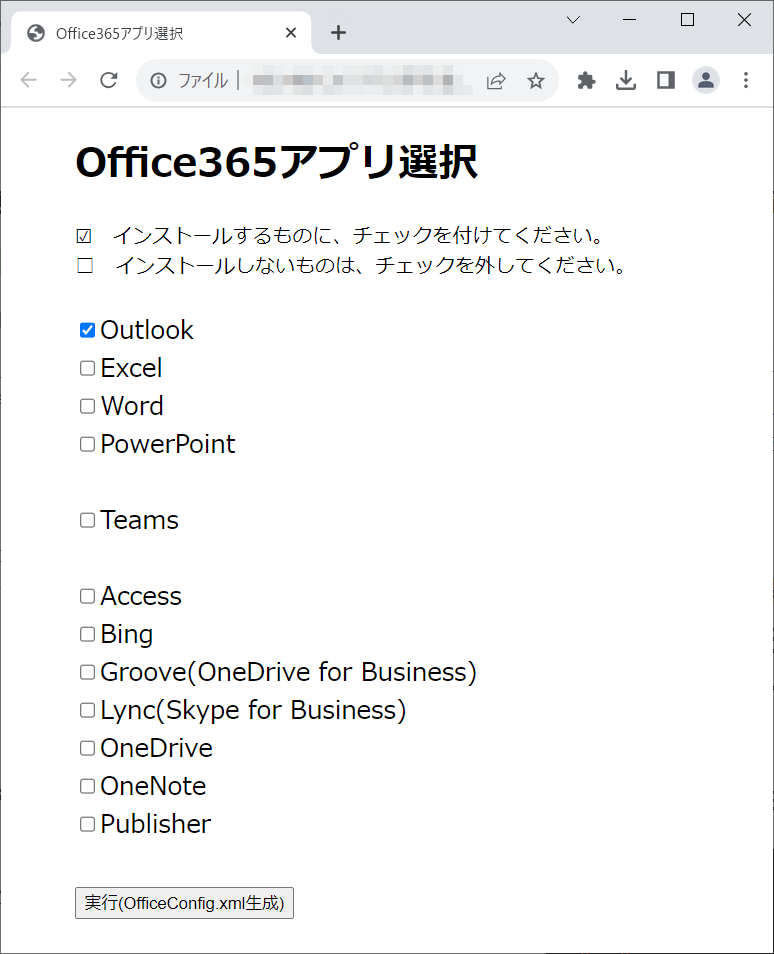
既にインストール済みのアプリにも必ず☑を入れておいてください。
→チェックを外したものは削除対象になってしまいます。
<!DOCTYPE html>
<html>
<head>
<title>Office365アプリ選択</title>
</head>
<body>
<div style="margin: auto; width: 500px;">
<h1>Office365アプリ選択</h1>
☑ インストールするものに、チェックを付けてください。<br>
□ インストールしないものは、チェックを外してください。<br>
</div>
<br>
<form style="margin: auto; width: 500px;font-size: 20px;">
<label><input type="checkbox" name="outlook" value="Outlook" checked>Outlook</label><br>
<label><input type="checkbox" name="excel" value="Excel">Excel</label><br>
<label><input type="checkbox" name="word" value="Word">Word</label><br>
<label><input type="checkbox" name="powerpoint" value="PowerPoint">PowerPoint</label><br>
<br>
<label><input type="checkbox" name="teams" value="Teams">Teams</label><br>
<br>
<label><input type="checkbox" name="access" value="Access">Access</label><br>
<label><input type="checkbox" name="bing" value="Bing">Bing</label><br>
<label><input type="checkbox" name="groove" value="Groove">Groove(OneDrive for Business)</label><br>
<label><input type="checkbox" name="lync" value="Lync">Lync(Skype for Business)</label><br>
<label><input type="checkbox" name="onedrive" value="OneDrive">OneDrive</label><br>
<label><input type="checkbox" name="onenote" value="OneNote">OneNote</label><br>
<label><input type="checkbox" name="publisher" value="Publisher">Publisher</label><br>
<br>
<input type="button" value="実行(OfficeConfig.xml生成)" onclick="generateOfficeConfig()">
</form>
<script>
function generateOfficeConfig() {
var xml = '<?xml version="1.0" encoding="UTF-8" standalone="yes"?>\n';
xml += '<Configuration>\n';
xml += ' <Add OfficeClientEdition="64" Channel="Current">\n';
xml += ' <Product ID="O365BusinessRetail">\n';
xml += ' <Language ID="ja-jp" />\n';
var checkboxes = document.querySelectorAll('input[type="checkbox"]');
var selectedApps = [];
for (var i = 0; i < checkboxes.length; i++) {
if (checkboxes[i].checked) {
selectedApps.push(checkboxes[i].value);
// xml += '\t<Product ID="' + checkboxes[i].value + '">\n';
// xml += '\t\t<Language ID="ja-jp" />\n';
// xml += '\t</Product>\n';
}
}
// Add excluded apps
var allApps = ["Access", "Bing", "Excel", "Groove", "Lync", "OneDrive", "OneNote", "Outlook", "PowerPoint", "Publisher", "Teams", "Word"];
var excludedApps = allApps.filter(function(app) {
return selectedApps.indexOf(app) === -1;
});
for (var j = 0; j < excludedApps.length; j++) {
xml += '\t<ExcludeApp ID="' + excludedApps[j] + '" />\n';
}
xml += ' </Product>\n';
xml += ' </Add>\n';
xml += ' <Display Level="Full" AcceptEULA="TRUE" />\n';
xml += '</Configuration>';
var blob = new Blob([xml], {type: "text/xml;charset=utf-8"});
saveAs(blob, "OfficeConfig.xml");
}
function saveAs(blob, filename) {
if (window.navigator.msSaveOrOpenBlob) {
window.navigator.msSaveOrOpenBlob(blob, filename);
} else {
var a = document.createElement("a");
var url = URL.createObjectURL(blob);
a.href = url;
a.download = filename;
document.body.appendChild(a);
a.click();
setTimeout(function() {
document.body.removeChild(a);
window.URL.revokeObjectURL(url);
}, 0);
}
}
</script>
</body>
</html>
1.2. 実行ファイル( M365_multi-x64_Setup.cmd )
chcp 65001
cd %~dp0
@echo off
cls

echo "「Office365アプリ選択.html」を起動します。"
echo "※生成した「OfficeConfig.xml」は、「デスクトップ」または「ダウンロード」フォルダに置いてください。"
echo.
Timeout /T 5
start "" /wait "%~dp0Office365アプリ選択.html"


if exist "%USERPROFILE%\Desktop\OfficeConfig.xml" (
 move "%USERPROFILE%\Desktop\OfficeConfig.xml" "%~dp0"
 setup.exe /configure OfficeConfig.xml
 del OfficeConfig.xml
 goto END
)

if exist "%USERPROFILE%\Downloads\OfficeConfig.xml" (
 move "%USERPROFILE%\Downloads\OfficeConfig.xml" "%~dp0"
 setup.exe /configure OfficeConfig.xml
 del OfficeConfig.xml
 goto END
)

:ERR
echo "エラー:「OfficeConfig.xml」が「デスクトップ」または「ダウンロード」フォルダに見つかりませんでした。"
pause


:END
exit
2. 用意した「Office展開ツール」を「IExpress」で 自己展開exe にしてユーザーに配布準備をする
ほぼ このサイトや このサイト に記載しただいている通りに実施しました。
- [Create new SelfExtraction Directiive file] → 次へ
- [Extract files and run an installation command] → 次へ
- [Packege Title] → 「Office365Outlookインストール(Office展開ツール)」と入力 → 次へ
- [No prompt] → 次へ
- [Do not display a license] → 次へ
- [Packeged files] - Add は次のものを選択 → 次へ
- M365_multi-x64_Setup.cmd
- Office365アプリ選択.html
- setup.exe
- [Install Program] → 「M365_multi-x64_Setup.cmd」と直接入力(選択には出てきません) → 次へ
- [Show Window] → 「Default」を選択 → 次へ
- [No message.] → 次へ
- [Packege Name and Options]は次の様に入力および選択 → 次へ
- (任意の保管先フォルダと)「Office365汎用インストール(Office展開ツール).exe」
- 「Store files using Long File Name inside Package」にチェック
- [No restart] → 次へ
- [Save Self Extraction] →「Don't save」 → 次へ
- 次へ → 完了
⇒「Office365汎用インストール(Office展開ツール).exe」が生成される。
3. 元パソコンがそれぞれ「Office 2013」の 32bit環境 および 64bit環境 に この 自己展開exe を実行した様子
元のOfficeが32bit版の場合

元のOfficeが64bit版の場合

![]() 32bit環境の場合「Office365Outlookインストール(Office展開ツール).exe」起動後に、
32bit環境の場合「Office365Outlookインストール(Office展開ツール).exe」起動後に、
「Install 32-bit」の確認ボタンが表示されるので押下して進めます。
![]() なおコンフィグ.xmlには
なおコンフィグ.xmlにはMigrateArch="TRUE"オプションも用意されていて、
諸条件はあるようですが、Microsoft365を強制的に64bitでインストールする方法もあるようですね。(本投稿では未実装)
Microsoft 365 Appsインストールを 32 ビットから 64 ビットに変更する - Deploy Office | Microsoft Learn
関連情報
Microsoft社関連サイト
- Office展開ツール:
- Office 展開ツールの概要 - Deploy Office _ Microsoft Learn
- クイック実行用の Office 展開ツールでサポートされる製品 ID - Office 365 | Microsoft Learn
- Office 展開ツールのオプションの構成 - Deploy Office | Microsoft Learn
-
 前提となる「Office Deployment Tool」(setup.exe)は こちら にあるようです。
- IExpress:
- こちらはいまいちMicrosoft関連サイトを見つけることが出来ませんでした。
(元々はIE配布用の自己解凍ツール?)
Windows10環境にも標準で用意されていました。
- こちらはいまいちMicrosoft関連サイトを見つけることが出来ませんでした。
参考にさせて頂いたサイト等
以上