Gateway APIとは
背景
Ingress はL7(アプリケーション層)での高度なルーティングを、1つの外部 IPで実現できるという利点から長らく使用されてきた。Ingress が登場する以前は、LoadBalancer タイプの Service リソースが使われていたが、サービスごとに高価なロードバランサーをプロビジョニングする必要があり課題とされていた。一方でIngress は、単一のロードバランサーで複数のサービスへルーティングを振り分けることを可能にした。しかし、Ingressには以下のような問題点が挙げられていた。
1. アノテーション地獄による標準化の難しさ
Ingress リソース自体は非常にシンプルであるため、リライトやタイムアウトなどの高度な制御は各ベンダが独自アノテーションで実装していた。結果として、環境を移行する際にマニフェストの互換性がなくなる問題が生じていた。
2. 単一リソースによる権限分離の難しさ
Ingress は1つのリソースにドメイン設定からパスのルーティングまで全てを書き込む。大規模組織ではインフラと開発で役割が分かれているが、Ingress では 1 つのファイルを奪い合う形になり、思わぬバグに繋がっていた。
3. L4(TCP/UDP)への未対応
Ingress は基本的に L7(HTTP/S)専用であり、L4 レベルの制御が必要な場合、標準的な方法がなかった。
これらの課題を解決するため、Gateway APIが生まれた。以下にIngressとGateway APIの主な違いを示す。
| 機能・特性 | Ingress | Gateway API |
|---|---|---|
| 設計思想 | 単一リソースによる簡易設定 | 役割分離による高度な制御 |
| プロトコル | 主に HTTP/S | L4/L7両対応 |
| 標準化 | アノテーション依存 | 共通API |
| 高度な制御 | 外部ツール(Istio等)が必要なことが多い | 標準で重み付けなどが可能 |
| 拡張性 | 低い | フィルタ機能による柔軟な拡張 |
※Gateway APIはKubernets1.24以上を使用することで最新版を利用することが可能である。
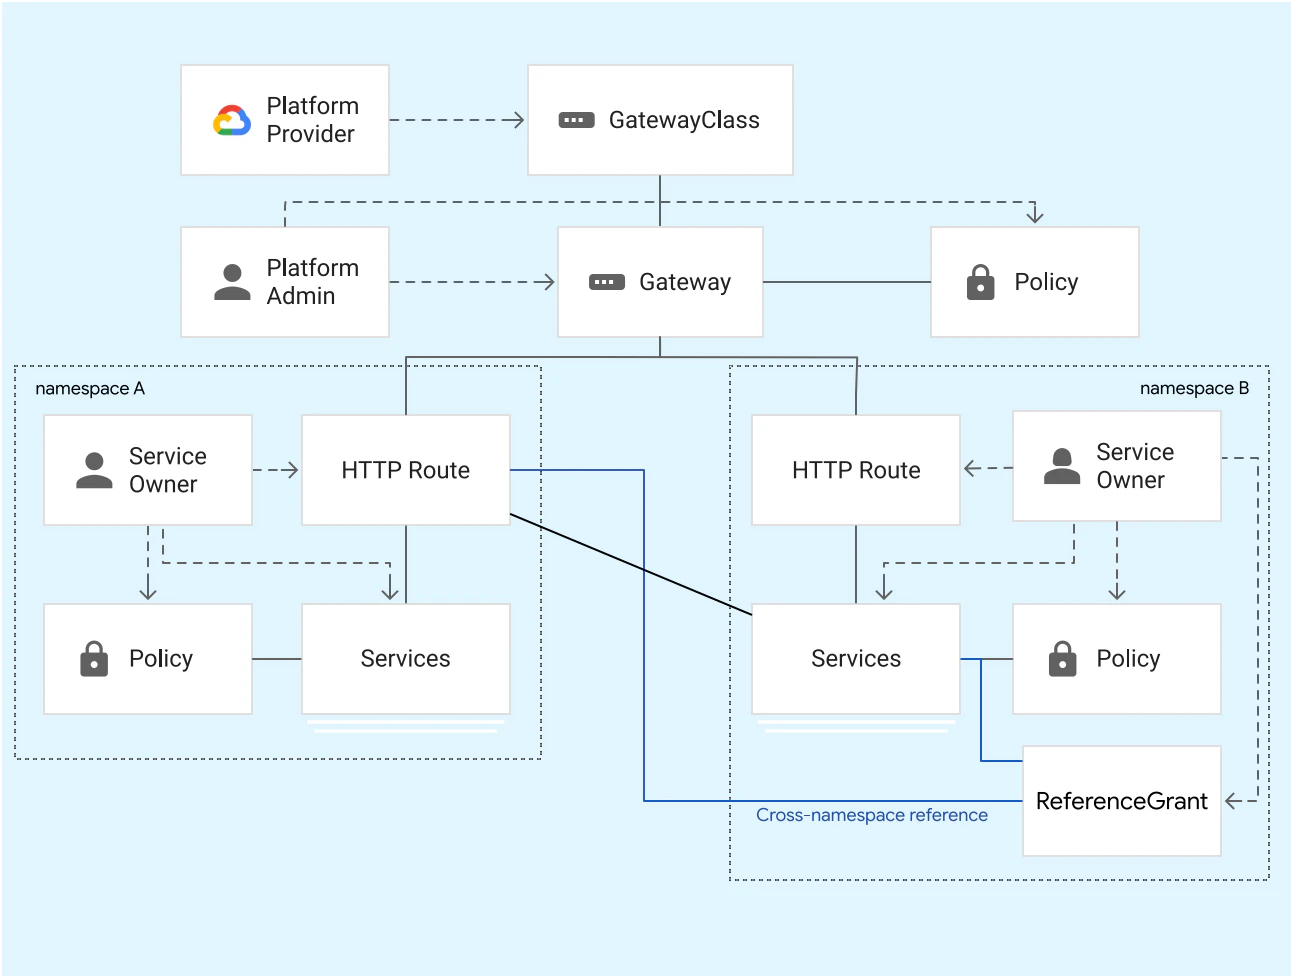
以下にGateway APIの構成図を示す。リソースを階層化し、責任範囲を明確に分離していることが主な特徴である。
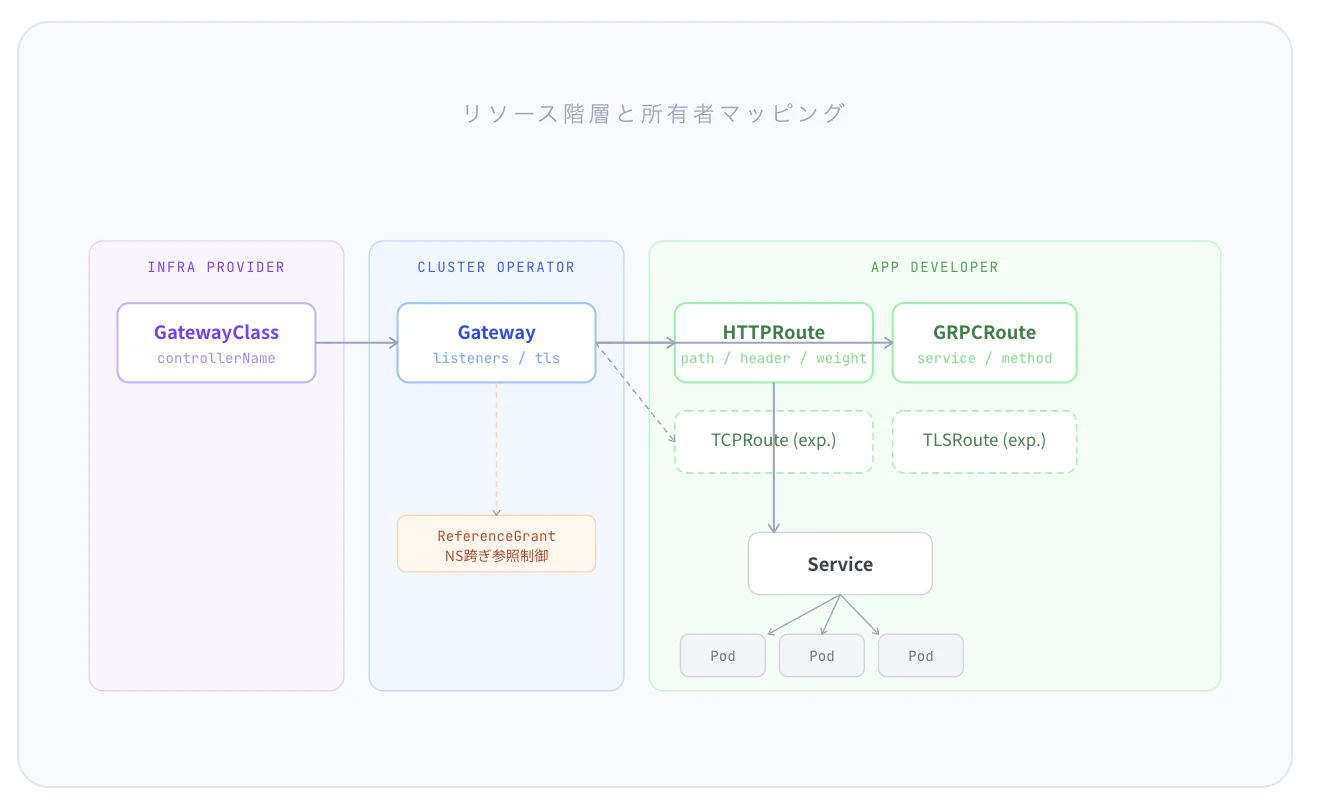
GatewayAPIの強み
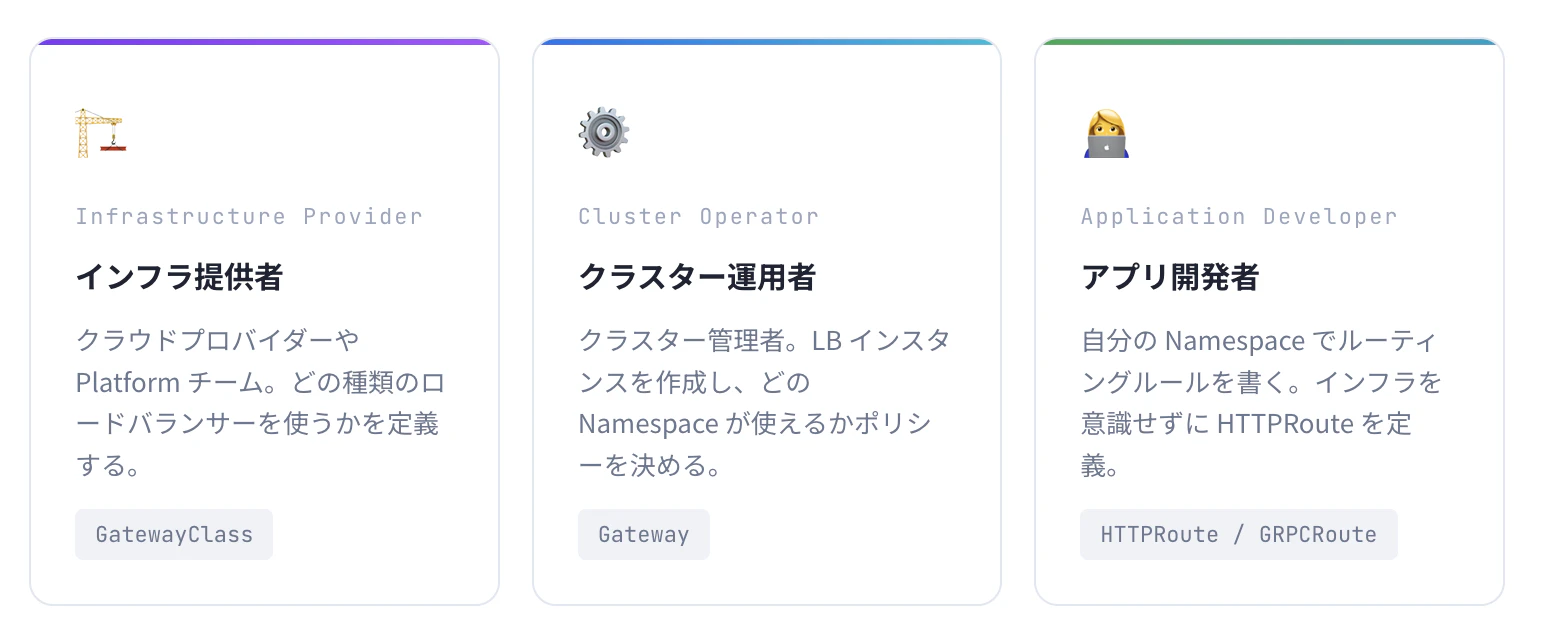
ロール指向による役割分担
- GatewayAPIでは3つのロールで役割を分担している
重み付けによるルーティング
Ingressでは、カナリアリリース(新旧バージョンの混合)を行う際、独自のアノテーションを書く必要があり、ベンダーごとに書き方が異なっていた。しかし、Gateway APIでは重みの設定が標準仕様として組み込まれている。
spec:
  rules:
  - matches:
    - path: { type: PathPrefix, value: /api }
    backendRefs:
    - name: my-service-v1
      port: 8080
      weight: 90  # 90% のトラフィック
    - name: my-service-v2
      port: 8080
      weight: 10  # 10% のトラフィック(カナリアテスト)
GCPでの全体像
GCPでの実装手順
- GKEクラスターの作成
gcloud container clusters create-auto gw-cluster \
  --location=asia-northeast1

# Gateway API CRD 確認
kubectl get crd | grep gateway.networking.k8s.io
※Gateway APIをdefaultで有効化
GKE Autopilotを使用している場合、Gateway APIは最初から有効化されており、CRDのインストールは不要である
2.マネージド証明書の作成
# Gateway 管理用 Namespace
kubectl create namespace gateway-infra

# Certificate Manager でマネージド証明書を作成
cat <<EOF | kubectl apply -f -
apiVersion: networking.gke.io/v1
kind: ManagedCertificate
metadata:
  name: my-managed-cert
  namespace: gateway-infra
spec:
  domains:
  - api.example.com
  - www.example.com
EOF

# 証明書ステータス確認
kubectl get managedcertificate -n gateway-infra
3.静的IPの取得(LoadBalancer用)
# グローバル静的 IP (Global LB の場合)
gcloud compute addresses create gw-static-ip \
  --global \
  --ip-version=IPV4

# IP アドレスを確認して DNS に登録する
gcloud compute addresses describe gw-static-ip --global
4.Gatewayの作成
apiVersion: gateway.networking.k8s.io/v1
kind: Gateway
metadata:
  name: external-https-gateway
  annotations:
    networking.gke.io/certmap: "my-cert-map"  # 作成した証明書マップの名前
spec:
  gatewayClassName: gke-l7-global-external-managed  # グローバル外部アプリケーションロードバランサーを使用
  listeners:
  - name: https-listener
    protocol: HTTPS
    port: 443
5.アプリケーションのデプロイ
# deployment.yaml
apiVersion: apps/v1
kind: Deployment
metadata:
  name: nginx-deployment
spec:
  replicas: 2
  selector:
    matchLabels:
      app: nginx-server
  template:
    metadata:
      labels:
        app: nginx-server
    spec:
      containers:
      - name: nginx
        image: nginx:latest
        ports:
        - containerPort: 80

---

apiVersion: v1
kind: Service
metadata:
  name: nginx-service
spec:
  selector:
    app: nginx-server
  ports:
  - protocol: TCP
    port: 80
    targetPort: 80
6.DNSレコードの設定
DNSにロードバランサーの外部アドレスを追加する
7.HTTPRouteのデプロイ
apiVersion: gateway.networking.k8s.io/v1
kind: HTTPRoute
metadata:
  name: nginx-http-route
spec:
  parentRefs:
  - name: external-https-gateway
  hostnames:
  - "api.example.com"
  rules:
  - matches:
    - path:
        type: PathPrefix
        value: /
    backendRefs:
    - name: nginx-service
      port: 80
AWSでの実装手順
前提条件
以下をインストールしていること
AWS CLI
kubectl
helm
eksctl
準備
- クラスターの作成
eksctl create cluster --name ${EKS_CLUSTER_NAME} --region $AWS_REGION
※クラスター作成には時間がかかります。
2. VPC Latticeと通信するすべてのPodがVPC Latticeからのトラフィックを許可する
CLUSTER_SG=$(aws eks describe-cluster --name ${EKS_CLUSTER_NAME} --output json | jq -r '.cluster.resourcesVpcConfig.clusterSecurityGroupId')

PREFIX_LIST_ID=$(aws ec2 describe-managed-prefix-lists --query "PrefixLists[?PrefixListName=='com.amazonaws.$AWS_REGION.vpc-lattice'].PrefixListId" | jq -r '.[]')
aws ec2 authorize-security-group-ingress --group-id $CLUSTER_SG --ip-permissions "PrefixListIds=[{PrefixListId=${PREFIX_LIST_ID}}],IpProtocol=-1"
PREFIX_LIST_ID_IPV6=$(aws ec2 describe-managed-prefix-lists --query "PrefixLists[?PrefixListName=='com.amazonaws.$AWS_REGION.ipv6.vpc-lattice'].PrefixListId" | jq -r '.[]')
aws ec2 authorize-security-group-ingress --group-id $CLUSTER_SG --ip-permissions "PrefixListIds=[{PrefixListId=${PREFIX_LIST_ID_IPV6}}],IpProtocol=-1"
3.IAM権限の設定
(指定した特定のPodのみがVPC Latticeを操作できるようにするため)
curl https://raw.githubusercontent.com/aws/aws-application-networking-k8s/main/files/controller-installation/recommended-inline-policy.json -o recommended-inline-policy.json

aws iam create-policy \
    --policy-name VPCLatticeControllerIAMPolicy \
    --policy-document file://recommended-inline-policy.json

export VPCLatticeControllerIAMPolicyArn=$(aws iam list-policies --query 'Policies[?PolicyName==`VPCLatticeControllerIAMPolicy`].Arn' --output text)
4.IRSAの設定
(IAMロールとService Accountを結びつける仕組み)
eksctl utils associate-iam-oidc-provider \
    --cluster=${EKS_CLUSTER_NAME} \
    --region=$AWS_REGION \
    --approve

eksctl create iamserviceaccount \
    --cluster=${EKS_CLUSTER_NAME} \
    --namespace=aws-application-networking-system \
    --name=gateway-api-controller \
    --attach-policy-arn=$VPCLatticeControllerIAMPolicyArn \
    --override-existing-serviceaccounts \
    --region $AWS_REGION \
    --approve
5.コントローラーのインストール
# login
aws ecr-public get-login-password --region us-east-1 | helm registry login --username AWS --password-stdin public.ecr.aws

# Gateway API CRD をインストール
kubectl apply -f https://github.com/kubernetes-sigs/gateway-api/releases/download/v1.2.0/standard-install.yaml

# VPC Lattice Controller をインストール
helm install gateway-api-controller \
    oci://public.ecr.aws/aws-application-networking-k8s/aws-gateway-controller-chart \
    --version=v1.1.0 \
    --namespace aws-application-networking-system \
    --set serviceAccount.create=false \
    --set serviceAccount.name=gateway-api-controller \
    --set log.level=info \
    --set defaultServiceNetwork=my-service-network \
    --set clusterName=$EKS_CLUSTER_NAME

# コントローラーの確認
kubectl get po -n aws-application-networking-system
GatewayとHTTPRouteのデプロイ
# GatewayClass
kubectl apply -f https://raw.githubusercontent.com/aws/aws-application-networking-k8s/main/files/controller-installation/gatewayclass.yaml

# Gateway
# gateway.yamlを作成して以下を記載
apiVersion: gateway.networking.k8s.io/v1beta1
kind: Gateway
metadata:
  name: my-lattice-gateway
  namespace: aws-application-networking-system
spec:
  gatewayClassName: amazon-vpc-lattice
  listeners:
    - name: http
      protocol: HTTP
      port: 80
カナリアリリースの検証のためのテストアプリ
# canary-verification.yaml
apiVersion: apps/v1
kind: Deployment
metadata:
  name: nginx-v1
  namespace: aws-application-networking-system
spec:
  replicas: 1
  selector:
    matchLabels:
      app: nginx
      version: v1
  template:
    metadata:
      labels:
        app: nginx
        version: v1
    spec:
      containers:
      - name: nginx
        image: nginxdemos/hello:plain-text # バージョンが判別しやすいイメージ
---
apiVersion: v1
kind: Service
metadata:
  name: nginx-v1-service
  namespace: aws-application-networking-system
spec:
  selector:
    app: nginx
    version: v1
  ports:
    - port: 80
---
apiVersion: apps/v1
kind: Deployment
metadata:
  name: nginx-v2
  namespace: aws-application-networking-system
spec:
  replicas: 1
  selector:
    matchLabels:
      app: nginx
      version: v2
  template:
    metadata:
      labels:
        app: nginx
        version: v2
    spec:
      containers:
      - name: nginx
        image: nginxdemos/hello:plain-text
---
apiVersion: v1
kind: Service
metadata:
  name: nginx-v2-service
  namespace: aws-application-networking-system
spec:
  selector:
    app: nginx
    version: v2
  ports:
    - port: 80
---
apiVersion: gateway.networking.k8s.io/v1beta1
kind: HTTPRoute
metadata:
  name: nginx-canary-route
  namespace: aws-application-networking-system
spec:
  parentRefs:
    - name: my-service-network # さきほど確認したGateway名と一致させる
      sectionName: http
  rules:
    - backendRefs:
        - name: nginx-v1-service
          port: 80
          weight: 90
        - name: nginx-v2-service
          port: 80
          weight: 10
# 検証
 DNS_NAME=$(kubectl get httproute nginx-canary-route -n aws-application-networking-system -o jsonpath='{.metadata.annotations.application-networking\.k8s\.aws/lattice-assigned-domain-name}')

echo $DNS_NAME

kubectl run curl-check -n aws-application-networking-system --image=curlimages/curl -i --tty --rm -- \
  sh -c "for i in \$(seq 1 20); do curl -s http://$DNS_NAME | grep 'Server name'; done"

# 重みを50%:50%に変更
kubectl patch httproute nginx-canary-route -n aws-application-networking-system --type='json' -p='[
  {"op": "replace", "path": "/spec/rules/0/backendRefs/0/weight", "value": 50},
  {"op": "replace", "path": "/spec/rules/0/backendRefs/1/weight", "value": 50}
]'
GCPとAWSでの比較
Kubernetes Gateway API 比較
| 比較項目 | 🟦 Google Cloud (GKE) | 🔶 AWS (EKS) |
|---|---|---|
| コントローラー構成 |
GKE Gateway Controller (単一・コントロールプレーン内蔵) |
ALB Controller + Lattice Controller (役割に応じた2種類を運用) |
| セットアップ難易度 | 低 Autopilot等はデフォルト有効 |
中〜高 IAM/IRSA/SG等の個別設定が必要 |
| North-South (外部) | Cloud LBを自動プロビジョン。 グローバルエニーキャスト対応。 |
ALB/NLBを自動プロビジョン。 リージョン単位の構成。 |
| East-West (内部) | Traffic Director との統合 | VPC Lattice (専用マネージドサービス) |
| GatewayClass 数 |
7種類以上 (gke-l7-gxlb等、細かく選択可能) |
3種類 (alb / nlb / amazon-vpc-lattice) |
| TLS 証明書管理 |
ManagedCertificate CRD (自動更新・宣言的) |
ACM ARN をアノテーションで指定。 |
| マルチクラスター | GKE Fleet + Multi-Cluster GatewayClass |
VPC Lattice による クロスVPC/アカウント接続。 |
AWS = Service Mesh寄りであり、内部での通信に重きを置いており、
GCP = L7 Load Balancer寄りで外部との通信に特化しているという違いが見られた。
まとめ
- 重み付け分散を容易に実装できる
新バージョンに少しずつユーザーを移すカナリアリリースなどを実装しやすい - パスベースの指定によるルーティングが可能
- 内部での通信か外部での通信のどちらに重きを置いているかという点で、AWSとGCPには大きな違いがある
参考
https://www.gateway-api-controller.eks.aws.dev/latest/guides/deploy/
https://docs.cloud.google.com/kubernetes-engine/docs/concepts/gateway-api?hl=ja
https://docs.cloud.google.com/kubernetes-engine/docs/concepts/gateway-api?hl=ja