概要
CodeProjectへ投稿した英語の記事を日本語に訳してQiitaでも共有します。
https://www.codeproject.com/Articles/5275388/HigLabo-Mapper-Creating-Fastest-Object-Mapper-in-t
HigLaboMapperというオブジェクトマッパーを作ってみました。せっかく作るならということで世界最速を目標に作ってみました。
ExpressionTreeを使用して既存のマッパーライブラリであるAutoMapper,ExpressMapper,AgileMapper,FastMapper,Mapsterよりもはるかに高速な実装になっています。その結果、BenchmarkDotNetによるテスト結果で現在世界最速です。
また初期設定が不要で利用できるので無駄な設定コードを書く必要がありません。マッピングルールのカスタマイズも直感的な方法で自由にできるようになっています。
イントロダクション
4年前にオブジェクトマッパーをilコードにて作成しました。7月に思い立って実装しなおしてみようと思い、HigLabo.MapperをExpression Treeで書き直してみました。その結果、パフォーマンスを大幅に向上できました。パフォーマンステストの結果、2020年8月現在、世界最速です。作成はだいたい10日間くらいでできました。10日間のコミットログは
https://github.com/higty/higlabo.netstandard/tree/master/HigLabo.Mapper.
にあります。
せっかく作って埋もれさせておくのもアレなので共有してC#と.NETコミュニティに貢献しようかと思います。
ソースコードは
https://github.com/higty/higlabo/tree/master/NetStandard/HigLabo.Mapper.
にあります。
またNugetからHigLabo.Mapperで取得できます。
使い方
HigLabo.MapperをNugetからインストールします。バージョン3.0以降をインストールしてください。
名前空間をインポートします。
using HigLabo.Core
これでMap拡張メソッドが利用可能になります。
var a1 = new Address(); //your POCO class.
var a2 = a1.Map(new Address());
HigLabo.MapperはDictionary to Objectのマッピングもサポートしています。
var d = new Dictionary<String, String>();
d["Name"] = "Bill";
var person = d.Map(new Person());
//person.Name is "Bill"
Object to Dictionaryのマッピングも同様にサポートしています。
var p = new Person();
p.Name = "Bill";
var d = p.Map(new Dictionary<String, String>);
//d["Name"] is "Bill"
HigLabo.Mapperは直感的に使いやすいようにデザインされています。
他のマッパーとの比較
このセクションでは他のマッパーとの違いを解説していきます。目次は以下になります。
- パフォーマンス
- 初期設定
- カスタマイズ
- 複数の設定
パフォーマンス
マッパーライブラリではパフォーマンスが非常に重要です。マッピング処理はループの内部などホットコードパスで実行されることが多いのでパフォーマンスへの影響が大きくなりがちな傾向があります。
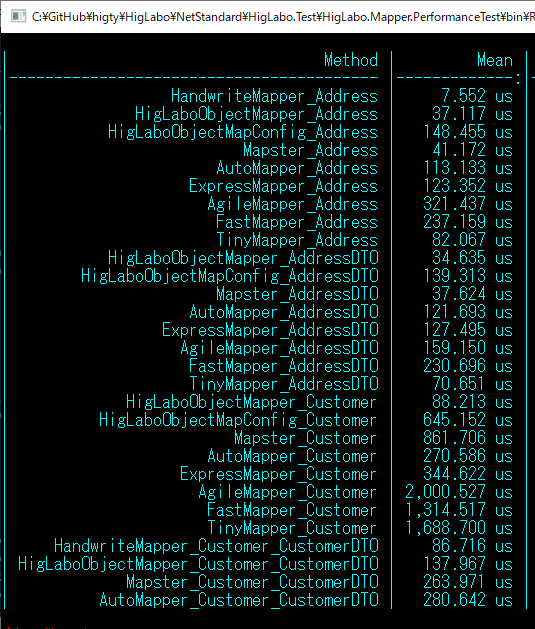
パフォーマンステスト結果のサマリーは以下になります。
・AutoMapperよりも3倍―4倍高速(コレクションプロパティの無いPOCOオブジェクト)
・Mapsterよりも10%-20%高速(コレクションプロパティの無いPOCOオブジェクト)
・AgileMapper, FastMapper, TinyMapperよりも7倍―10倍高速(コレクションプロパティの無いPOCOオブジェクト)
・AutoMapperよりも3倍高速(コレクションプロパティのあるPOCOオブジェクト)
・Mapsterよりも10倍高速(コレクションプロパティのあるPOCOオブジェクト)
・AgileMapper, FastMapper, TinyMapperよりも10倍―20倍高速(コレクションプロパティのあるPOCOオブジェクト)
テスト結果は以下のようになります。HigLaboObjectMapper_XXXが新しく作ったバージョン、HigLaboObjectMapConfig_XXXが古いバージョンになります。
テストに使用したPOCOクラスは以下のようなクラスです。
public class Address
{
    public int Id { get; set; }
    public string Street { get; set; }
    public string City { get; set; }
    public string Country { get; set; }
    public AddressType AddressType { get; set; }
}

public class AddressDTO
{
    public int Id { get; set; }
    public string City { get; set; }
    public string Country { get; set; }
    public AddressType AddressType { get; set; } = AddressType.House;
}
public struct GpsPosition
{
    public double Latitude { get; private set; }
    public double Longitude { get; private set; }

    public GpsPosition(double latitude, double longitude)
    {
        this.Latitude = latitude;
        this.Longitude = longitude;
    }
}

public class Customer
{
    public Int32? Id { get; set; }
    public String Name { get; set; }
    public Address Address { get; set; }
    public Address HomeAddress { get; set; }
    public Address[] AddressList { get; set; }
    public IEnumerable<Address> WorkAddressList { get; set; }
}

public class CustomerDTO
{
    public Int32? Id { get; set; }
    public string Name { get; set; }
    public Address Address { get; set; }
    public AddressDTO HomeAddress { get; set; }
    public AddressDTO[] AddressList { get; set; }
    public List<AddressDTO> WorkAddressList { get; set; }
    public String AddressCity { get; set; }
}
4つのパターンでテストをしてみました。
// 1. POCO class without collection property to same class.
XXX.Map(new Address(), new Address());
// 2. POCO class without collection property to other class.
XXX.Map(new Address(), new AddressDTO());
// 3. POCO class that has collection property map to same class.
XXX.Map(new Customer(), new Customer());
// 4. POCO class that has collection property map to other class.
XXX.Map(new Customer(), new CustomerDTO());
添付した画像の結果のとおり全ての場合でHigLabo.Mapperが最速です。
テストコードはこちらになります。
https://github.com/higty/higlabo/tree/master/NetStandard/HigLabo.Test/HigLabo.Mapper.PerformanceTest
初期設定
いくつかのマッパーは使用前に初期設定が必要だったりします。
var configuration = new AutoMapper.MapperConfiguration(config => {
    config.CreateMap<Building, Building>();
    config.CreateMap<TreeNode, TreeNode>();
});
これはAutoMapperの設定コードです。もしマッピングするクラスが1000とかになってくるとこの作業は非常に退屈な作業で工数がかかります。
同様にTinyMapperも以下のような設定用のコードが必要です。
TinyMapper.Bind<Park, Park>();
TinyMapper.Bind<Customer, CustomerDTO>();
TinyMapper.Bind<Dictionary<String, String>, Building>();
HigLabo.Mapperでは上記の設定コードは不要です。設定コードを記述する工数をゼロにできます。
カスタマイズ
マッパーライブラリでは時々マッピングのルールをカスタマイズしたい時があります。AutoMapperのカスタマイズは非常に複雑で分かりずらい記述が必要です。
例えばこのページのマッピングルールで比較をしてみます。
https://stackoverflow.com/questions/50964757/delegating-member-mapping-to-child-object-with-automapper
AutoMapperでは
class Source {
  public int Id {get;set;}
  public int UseThisInt {get;set;}
  public InnerType Inner {get;set;}
  // other properties that the Destination class is not interested in
}
class InnerType {
  public int Id {get;set;}
  public int Height {get;set;}
  // more inner properties
}
class Destination {
  public int Id {get;set;}
  public int UseThisInt {get;set;}
  public int Height {get;set;}
  // more inner properties that should map to InnerType
}

//So many configuration and complicated....
Mapper.Initialize(cfg => {
    cfg.CreateMap<source, destination="">();
    cfg.CreateMap<innertype, destination="">();
});
var dest = Mapper.Map<destination>(src);
Mapper.Map(src.Inner, dest);
Mapper.Initialize(cfg => {
        cfg.CreateMap<source, destination="">()AfterMap
                     ((src, dest) => Mapper.Map(src.Inner, dest));
        cfg.CreateMap<innertype, destination="">();
    });
var dest = Mapper.Map<destination>(src);
という感じで書く必要があり、AutoMapperのルール(Mapper.Initialize, ForMember, CreateMap, AfterMapなど)に精通する必要があります。
HigLabo.Mapperでのカスタマイズは非常に簡単です。
c.AddPostAction<Source, Destination>((s, d) =>
{
    d.Id = s.Inner.Id;
    //Set Inner object property to Destination object
    s.Inner.Map(d);
});
HigLabo.Mapperではこのラムダ式がデフォルトのマップ処理が終わった後に呼ばれます。これにより既定のマッピングを上書きすることが可能です。
マッピング処理を完全に置き換えたい場合、ReplaceMapメソッドを利用します。
c.ReplaceMap<Source, Destination>((s, d) =>
{
    //Set all map with your own.
    d.Id = s.Inner.Id;
    //Set Inner object property to Destination object
    s.Inner.Map(d);
});
//You can call Map method.
var source = new Source();
var destination = new Destination();
source.Map(distination); //Above lambda will be called.
この方式はとてもシンプルで直感的に理解しやすいです。C#のラムダの知識があれば使用できます。C#をある程度使用しているならばラムダ式の知識は既にあるので追加の知識が必要とされることもありません。
コンバート処理も簡単に追加することが可能です。
c.AddPostAction<Person, PersonVM>((s, d) =>
{
    d.BMI = CalculateBMI(s.Height, s.Weight);
});
条件分岐によるマッピングも簡単です。
c.AddPostAction<Employee, EmployeeVM>((s, d) =>
{
    if (s.EmployeeType == EmployeeType.Contract)
    {
        d.Property1 = someValue1;
    }
    else
    {
        d.Property1 = someValue2;
    }
});
もう一つ便利な点としてはデバッグが非常に容易という事が挙げられます。AddPostAction,ReplaceMapメソッドに渡したラムダ式の内部にブレイクポイントをセットしてデバッグが可能です。
プロパティのマッピングをカスタマイズすることも可能です。
class Person
{
    public string Name { get; set; }
    public string Position_Name { get; set; }
}
class PersonModel
{
    public string Name { get; set; }
    public string PositionName { get; set; }
}

var mapper = HigLabo.Core.ObjectMapper.Default;
mapper.CompilerConfig.PropertyMatchRule =
       (sourceType, sourceProperty, targetType, targetProperty)
{
    if (sourceType == typeof(Person) && targetType == typeof(PersonModel))
    {
        return sourceProperty.Name.Replace("_", "") == targetProperty.Name;
    }
    return false;
};
複数の設定
HigLabo.MapperではObjectMapperクラスのインスタンスを複数作成することが可能です。
var om1 = new ObjectMapper();
om1.AddPostAction<Address, Address>((s, d) =>
{
    //Custom map rule
});

var om2 = new ObjectMapper();
om2.AddPostAction<Address, Address>((s, d) =>
{
   //Another Custom map rule
});

var a = new Address();
var a1 = om1.Map(a, new Address());
var a2 = om1.Map(a, new Address());
ObjectMapperExtensionsクラスで宣言されているMap拡張メソッドは実際にはObjectMapper.Defaultプロパティのインスタンスを使用しています。
using System;

namespace HigLabo.Core
{
    public static class ObjectMapperExtensions
    {
        public static TTarget Map<TSource, TTarget>(this TSource source, TTarget target)
        {
            return ObjectMapper.Default.Map(source, target);
        }
        public static TTarget MapOrNull<TSource, TTarget>
               (this TSource source, Func<TTarget> targetConstructor)
            where TTarget : class
        {
            return ObjectMapper.Default.MapOrNull(source, targetConstructor);
        }
        public static TTarget MapOrNull<TSource, TTarget>(this TSource source, TTarget target)
            where TTarget : class
        {
            return ObjectMapper.Default.MapOrNull(source, target);
        }
        public static TTarget MapFrom<TTarget, TSource>(this TTarget target, TSource source)
        {
            return ObjectMapper.Default.Map(source, target);
        }
    }
}
複数のインスタンスを作成し、それぞれでマッピングのルールを設定して利用できます。アプリケーションのマッピングのルールをカプセル化することも可能です。
public static class ObjectMapperExtensions
{
    public static void Initialize(this ObjectMapper mapper)
    {
        mapper.AddPostAction<Address, Address>((s, d) =>
        {
            //Your mapping rule.
        });
        mapper.AddPostAction<Address, Address>((s, d) =>
        {
            //Another your mapping rule.
        });
    }
}

//And call it on Application initialization process.
ObjectMapper.Default.Initialize();
マッピングのテストケースについて
マッピングのテストケースは以下にあります。
https://github.com/higty/higlabo/tree/master/NetStandard/HigLabo.Test/HigLabo.Mapper.Test
1つのテストケースを除き、以前のバージョンの全てのテストケースをパスしてあります。
(※Dictionaryのカスタムマッピングは新しいバージョンでは未対応)
Deep Dive into エクスプレッションツリー
テストケースは以下にあります。
https://github.com/higty/higlabo/tree/master/NetStandard/HigLabo.Test/HigLabo.Mapper.Test
この中でObjectMapper_Map_ValueType_ValueTypeのテストケースで生成されるエクスプレッションツリーのコードは以下のような形になります。
.Lambda #Lambda1<System.Func`3[System.Object,System.Object,HigLabo.Mapper.Test.Vector2]>(
    System.Object $sourceParameter,
    System.Object $targetParameter) {
    .Block(
        HigLabo.Mapper.Test.Vector2 $source,
        HigLabo.Mapper.Test.Vector2 $target) {
        $source = .Unbox($sourceParameter);
        $target = .Unbox($targetParameter);
        .Call $target.set_X($source.X);
        .Call $target.set_Y($source.Y);
        $target
    }
}
AddressからAddressDTOへのマッピングでは以下のようなMapActionのFuncが生成されます。
.Lambda #Lambda1<System.Func`4[System.Object,System.Object,HigLabo.Core.ObjectMapper+MapContext,HigLabo.Mapper.PerformanceTest.AddressDTO]>(
    System.Object $sourceParameter,
    System.Object $targetParameter,
    HigLabo.Core.ObjectMapper+MapContext $context) {
    .Block(
        HigLabo.Mapper.PerformanceTest.Address $source,
        HigLabo.Mapper.PerformanceTest.AddressDTO $target) {
        $source = $sourceParameter .As HigLabo.Mapper.PerformanceTest.Address;
        $target = $targetParameter .As HigLabo.Mapper.PerformanceTest.AddressDTO;
        .Call $target.set_Id($source.Id);
        .Call $target.set_City($source.City);
        .Call $target.set_Country($source.Country);
        .Call $target.set_AddressType($source.AddressType);
        $target
    }
}
ほぼ無駄のないコードが生成されているのがわかると思います。コードを見てもわかる通りHigLabo.Mapperよりも最速なコードは生成しづらいでしょう。Spanなどを利用すればもっと早くなる可能性はあるかもしれません。
これらのエクスプレッションツリーのコードブロックはコンパイルされてFuncに変換され、プライベートな_MapActionListフィールドに保存されます。2回目以降はコンパイル済みのFuncが使用されるのでコンパイルのオーバーヘッドはありません。AddPostActionで渡したラムダはこのFunc後に呼び出されるように新しいFuncが生成されます。ReplaceMapメソッドを使用するとこのFuncを置き換えることになります。
まとめ
C#でマッピング処理を高速化したい、設定用のコードを削減したい、もっと簡単にカスタマイズしたいという人にこのライブラリが役に立つと嬉しいです。不具合などあれば気軽にGitHubにコメントください。
おまけ
ハイパフォーマンスなアプリケーション作成に興味がある人は以下の記事も参考になると思います。
タスク管理を作ってみた ~初級からレベルアップするためのツールとサービスたち~
パフォーマンス向上で知っておくべきコンピューターサイエンスの基礎知識とその実践
WEBアプリケーションのパフォーマンスをUPするために知っておくべき技術と知識
C#で世界最速のMapperライブラリを作ってみた(AutoMapperなどよりも3倍-10倍ほど高速)
プログラマのための機能のUIデザイン
世界で通用するエンジニアになるための高度な技術記事(英語)
Azure アプリケーション アーキテクチャ ガイド
元記事です↓
パフォーマンス向上で知っておくべきコンピューターサイエンスの基礎知識とその実践
またこういった知識を使ってSaasアプリを作る方法をこちらの記事で紹介しています。