Stripeには、ダッシュボードのカスタマイズや独自のワークフローを実現するためのアプリ機能「Stripe Apps」が用意されています。公開されているアプリをアカウントにインストールして利用することもできますし、自社サービスとStripeを連携させるアプリを公開して、ユーザーがStripeとの連携をよりシンプルに実現できるようにも使えます。
公開しているアプリの利用状況やインストール・アンインストール数、そしてアプリ紹介ページのページビューなどは、Stripeダッシュボードから確認することができます。この情報を使って、アプリの改善やプロモーション施策の検討などを行うことができます。
もしこれらの情報を、自社の分析基盤で利用したい場合や、Slackやメールでレポートしたい場合は、Stripe APIやWebhookイベントを利用してデータを連携することができます。
この記事では、Reports APIとWebhookを利用して、Stripe Appsのレポート情報を取得する方法を紹介します。
Reporting APIを利用して、任意のレポートを作成するジョブを開始する
JavaScript (Node.js) を用いたReports APIの実装方法を見ていきましょう。まず、Stripeモジュールをプロジェクトにインストールして、APIキーを設定します。
// Stripe モジュールのインポート
const stripe = require('stripe')('YOUR_STRIPE_SECRET_KEY');
次にReports APIを利用して、レポートを作成します。このAPIは、「レポートの種類」と「レポートを生成する期間」の2つを設定します。Stripe Appsの情報を取得する場合は、apps.install_events.1をreport_typeへ設定しましょう。
// レポートの生成
const report = await stripe.reporting.reportRuns.create({
    report_type: 'apps.install_events.1',
    parameters: {
        interval_start: new Date(2023, 0, 1).getTime() / 1000, // 2023年1月1日の Unix Timestamp
        interval_end: new Date(2023, 11, 31).getTime() / 1000 // 2023年12月31日の Unix Timestamp
    },
})
Reports APIでレポートを生成すると、レポートの作成状況やファイルのダウンロードURLなどを含むレスポンスが返却されます。年単位などの長い期間を指定した場合、レポートの作成に時間がかかることもあります。そのため、ワークフローを実装する場合は、statusがsucceededになっていることを確認するように実装しましょう。
{
  id: 'frr_xxxx',
  object: 'reporting.report_run',
  created: 1712295747,
  error: null,
  livemode: true,
  parameters: { interval_end: 1703948400, interval_start: 1672498800 },
  report_type: 'apps.install_events.1',
  result: {
    id: 'file_xxxx',
    object: 'file',
    created: 1712295738,
    expires_at: 1743831738,
    filename: 'frr_xxxx.csv',
    links: {
      object: 'list',
      data: [],
      has_more: false,
      url: '/v1/file_links?file=file_1xxxx'
    },
    purpose: 'finance_report_run',
    size: 10968,
    title: 'FinanceReportRun xxxx',
    type: 'csv',
    url: 'https://files.stripe.com/v1/files/file_xxxx/contents'
  },
  status: 'succeeded',
  succeeded_at: 1712295747
}
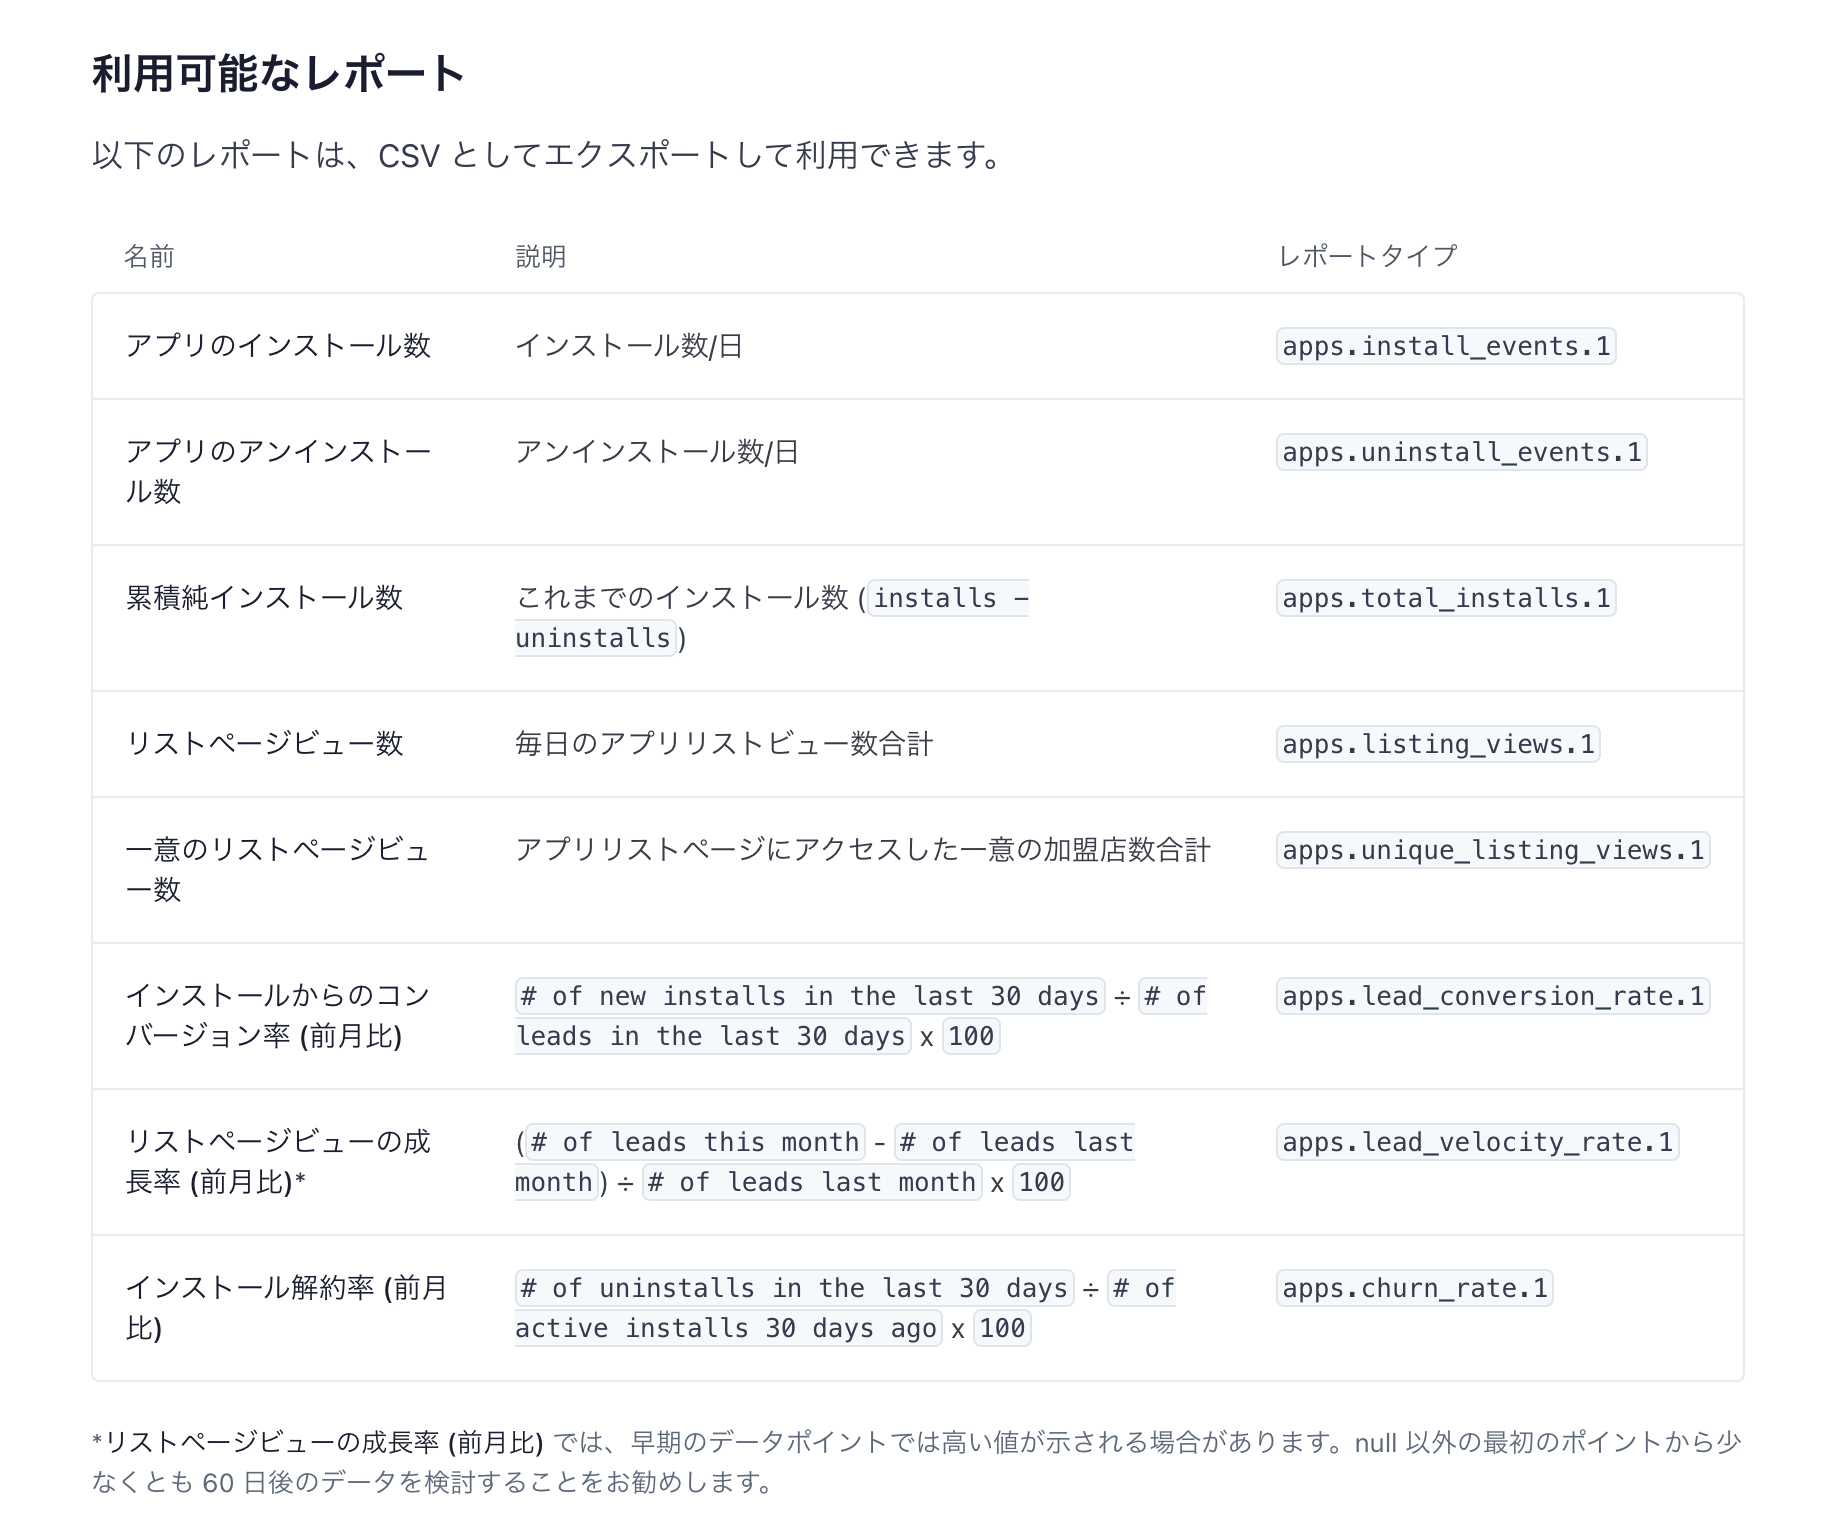
利用できるレポートの種類
この他にも、Reports APIのreport_typeを変更することで、アプリのインストール数やページビューなどのレポートも作成できます。必要な情報がどのレポートで取得できるかをドキュメントでご確認ください。
作成したレポートの情報を取得する
Report APIを利用したレポート作成リクエストのレスポンスには、レポート結果のダウンロードURLがresult.urlとして含まれています。このURLを直接呼び出すことで、レポートの生成が完了している場合、CSVファイルをダウンロードすることができます。URLはStripeのシークレットキーを利用したBASIC認証で保護されていますので、fetchを利用して実装しましょう。
// CSVファイルをダウンロードする
const response = await fetch(report.result.url, {
    headers: {
        Authorization: `Bearer ${stripeSecretAPIKey}`
    }
})
const csvData = await response.text()
ダウンロードしたファイルには、日毎のインストール数がCSV形式で含まれています。この情報を利用してレポートを作成しましょう。
"time","installs"
"2022-12-31 00:00:00.000","3"
"2023-01-01 00:00:00.000","4"
"2023-01-02 00:00:00.000","0"
"2023-01-03 00:00:00.000","1"
"2023-01-04 00:00:00.000","0"
"2023-01-05 00:00:00.000","2"
"2023-01-06 00:00:00.000","0"
"2023-01-07 00:00:00.000","1"
"2023-01-08 00:00:00.000","2"
Webhookでレポートが出来次第、ワークフローを自動実行する
長期間のデータを取得する場合や、レポートデータの量が多い場合、レポートの生成に時間がかかることもあります。そのため、レポートデータを利用するワークフローを実装する場合は、レポートの作成が完了したことを通知するWebhookイベントを利用しましょう。
次に紹介するコードは、Stripe Webhookを作成するクイックスタートコードをベースに、レポートの作成完了後の処理を追加したものです。
event.typeが'reporting.report_run.succeeded'として送信されます。そしてevent.data.object.report_typeにレポートの種類が含まれていますので、これらを利用してどのレポートが完成したかを判断しましょう。その後、CSVファイルをダウンロードしてレポートの処理や同期を実施します。
const stripeSecretAPIKey = 'sk_xxx'
const stripe = require('stripe')(stripeSecretAPIKey);
// Replace this endpoint secret with your endpoint's unique secret
// If you are testing with the CLI, find the secret by running 'stripe listen'
// If you are using an endpoint defined with the API or dashboard, look in your webhook settings
// at https://dashboard.stripe.com/webhooks
const endpointSecret = 'whsec_...';
const express = require('express');
const app = express();

app.post('/webhook', express.raw({type: 'application/json'}), async (request, response) => {
  let event = request.body;
  // Only verify the event if you have an endpoint secret defined.
  // Otherwise use the basic event deserialized with JSON.parse
  if (endpointSecret) {
    // Get the signature sent by Stripe
    const signature = request.headers['stripe-signature'];
    try {
      event = stripe.webhooks.constructEvent(
        request.body,
        signature,
        endpointSecret
      );
    } catch (err) {
      console.log(`⚠️  Webhook signature verification failed.`, err.message);
      return response.sendStatus(400);
    }
  }

  // Handle the event
+  if (event.type !== 'reporting.report_run.succeeded') {
+    return response.sendStatus(201);
+  }

+  switch (event.data.object.report_type) {
+    case 'apps.install_events.1': {
+      const response = await fetch(report.result.url, {
+        headers: {
+          Authorization: `Bearer ${stripeSecretAPIKey}`
+        }
+      })
+      const csvData = await response.text()
+      //
+      break;
+    }
+    default: {
+      // Unexpected event type
+      console.log(`Unhandled report type ${event.type}.`);
+    }
+  }

  // Return a 200 response to acknowledge receipt of the event
  response.send();
});

app.listen(4242, () => console.log('Running on port 4242'));
レポートデータの活用
取得したレポートデータは、ダッシュボードに組み込んだり、CSV形式でレポートを生成するために使用することができます。データは実際のビジネスの判断材料として非常に重要であり、アプリの成長分析やユーザーの行動傾向を理解するのに役立ちます。
まとめ
Reports APIを活用すれば、Stripeのデータを自在に扱うことが可能になり、ビジネスの意思決定をより迅速に行うことができます。APIを利用することで、開発者やデータアナリストは重要な情報に素早くアクセスし、ビジネスの洞察を深めることができるでしょう。
-
カスタムレポートの作成: Stripe Reporting APIでは、特定のユースケースに合わせてレポートを作成できます。Custom Reports with Reports API ドキュメントを参照してください
-
レポートの設定について: レポートの構成方法を学び、適切なデータを見つけるためのフィルターやその他の設定について知ることができます。Configuring reports セクションをチェックしてください
-
レポートタイプの参照: 利用可能なCSVレポートタイプ、パラメータ、利用可能なカラムの完全なリストが提供されています。Report types reference セクションを確認してください

