この記事は、Stripe Apps を25日間紹介し続ける Advent Calendar 2022 15日目の記事です。
Stripe Appsでアプリを作成する際、さまざまな状態を表現するUIコンポーネントを作成します。
独自のUIフレームワークを利用するため、「読み込み中の表示」や「データがない場合・初期状態の画面表示」などについても、新しく構築する必要があります。
Docsにて、「UI設計パターン」を公開中
Stripe Appsでのアプリ開発においては、ドキュメントサイトの「設計パターン」からUI実装の例を見ることができます。
このページでは、さまざまな場面・状況に応じた画面設計の例と、推奨される構築方法のTipsが紹介されています。

https://stripe.com/docs/stripe-apps/patterns/demo
サンプルコードがあるものも複数存在しますので、画面設計を始める前に、まずは一度設計パターンを確認してみましょう。
設計パターンに沿ったUI実装の例
ここでは、「請求書を一覧表示するアプリ」を例に、ドキュメントで紹介されている画面設計の例を3つ紹介します。
初期状態では、次のようなコードで実装されています。
import { ContextView, List, ListItem } from "@stripe/ui-extension-sdk/ui"
import type { ExtensionContextValue } from "@stripe/ui-extension-sdk/context"
import BrandIcon from "./brand_icon.svg"
import { FC, useEffect, useState} from 'react'

type DummyInvoice = {
  id: number
  name: string
}
const App = ({ environment }: ExtensionContextValue) => {
  const [items, setItems] = useState<Array<DummyInvoice>>([])
  useEffect(() => {
    setTimeout(() => {
      setItems([{
        id: 1,
        name: "Dummy1"
      }, {
        id: 2,
        name: "Dummy2"
      }])
    }, 1000)
  }, [])
  return (
    <ContextView
      title="Hello World"
      brandColor="#F6F8FA" // replace this with your brand color
      brandIcon={BrandIcon} // replace this with your brand icon
    >
      <List>
        {items.map((item) => {
          return (
            <ListItem
              title={`#${item.id}: ${item.name}`}
              key={item.id}
            />
          )
        })}
      </List>
    </ContextView>
  )
}

export default App
読み込みが完了すると、次のような画面が表示されます。
データが存在しない状態を表現する
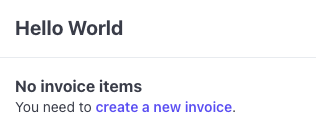
アプリをインストールしたばかりの状態など、表示すべきデータが全くないケースでは、「データがないこと」と「次に何をやるべきかの案内」の表示が推奨されています。
配列データの場合、次のように配列の長さで表示コンテンツを分岐できます。
-import { ContextView, List, ListItem } from "@stripe/ui-extension-sdk/ui"
+import { ContextView, List, ListItem, Box, Link } from "@stripe/ui-extension-sdk/ui"

...

  return (
    <ContextView
      title="Hello World"
      brandColor="#F6F8FA" // replace this with your brand color
      brandIcon={BrandIcon} // replace this with your brand icon
    >
+      {items.length < 1 ? (
+        <Box>
+          <Box
+            css={{
+              font: 'heading'
+            }}
+          >
+            No invoice items
+          </Box>
+          <Box>
+            You need to create a new invoice.
+          </Box>
+        </Box>
+      ) : (
        <List>
          {items.map((item, i) => {
            return (
              <ListItem
                title={`#${item.id}: ${item.name}`}
                key={item.id}
              />
            )
          })}
        </List>
+      ) }
    </ContextView>
  );
};
さらに1歩踏み込んで、内部リンクを設定することもできます。
ダッシュボード内部のリンクを設定する場合、environment.modeを利用して、/test/をつける必要があるか否かを判定できます。
  const [items, setItems] = useState([])
+  const createInvoiceLink = [
+    environment.mode === "test" ? "test" : null,
+    "invoices/create"
+  ].filter(Boolean).join("/")
  return (

...


          <Box>
-            You need to create a new invoice.
+            You need to <Link href={`/${createInvoiceLink}`}>create a new invoice</Link>.
          </Box>
とてもシンプルですが、「請求書の作成を促す」初期画面ができあがりました。
読み込み中の画面を追加する
先ほどのサンプルコードでは、APIからのデータ取得中にも初期画面が表示されます。
「読み込みが完了していない状態」と「読み込みした結果、データがない状態」の2つはそれぞれ異なる画面を用意しましょう。
Stripe Appsの場合、Spinner要素を利用します。
+import { ContextView, List, ListItem, Box, Link, Spinner } from "@stripe/ui-extension-sdk/ui"
-import { ContextView, List, ListItem, Box, Link } from "@stripe/ui-extension-sdk/ui"

...

+  const [fetchStatus, setFetchStatus] = useState<'' | 'loading' | 'complete'>('')
  const [items, setItems] = useState<Array<DummyInvoice>>([])
  const createInvoiceLink = [
    environment.mode === "test" ? "test" : null,
    "invoices/create"
  ].filter(Boolean).join("/")

  useEffect(() => {
+    setFetchStatus("loading")
    setTimeout(() => {
      setItems([{
        id: 1,
        name: "Dummy1"
      }, {
        id: 2,
        name: "Dummy2"
      }])
+      setFetchStatus("complete")
    }, 1000)
  }, [])
  return (
    <ContextView
      title="Hello World"
      brandColor="#F6F8FA" // replace this with your brand color
      brandIcon={BrandIcon} // replace this with your brand icon
    >
+      {fetchStatus === "loading" ? (
+        <Spinner size="large" />
+      ) : (
+        <>
            {items.length < 1 ? (
            <Box>
              <Box
                css={{
                  font: 'heading'
                }}
              >
                No invoice items
              </Box>
              <Box>
                You need to <Link href={`/${createInvoiceLink}`}>create a new invoice</Link>.
              </Box>
            </Box>
          ) : (
            <List>
              {items.map((item) => {
                return (
                  <ListItem
                    title={`#${item.id}: ${item.name}`}
                    key={item.id}
                  />
                )
              })}
            </List>
          ) }
+        </>
+      )}
    </ContextView>
これで読み込みが完了するまでの間の画面が追加できました。
アクションボタンを、わかりやすい場所に配置する
請求書の一覧画面ですが、画面内で請求書の作成に移動できるUIを追加することもできます。
ContextViewにactionsプロパティを追加して、追加ページに移動するUIを追加しましょう。
-import { Box, ContextView, List, ListItem, Link, Spinner } from "@stripe/ui-extension-sdk/ui"
+import { Box, ContextView, List, ListItem, Link, Spinner, Button, Inline, Icon } from "@stripe/ui-extension-sdk/ui"
import type { ExtensionContextValue } from "@stripe/ui-extension-sdk/context"

...

    <ContextView
      title="Hello World"
      brandColor="#F6F8FA" // replace this with your brand color
      brandIcon={BrandIcon} // replace this with your brand icon
+      actions={(
+        <Button
+          type="primary"
+          css={{
+            width: "fill",
+            alignX: "center"
+          }}
+          href={`/${createInvoiceLink}`}
+        >
+          <Icon name="add" size="xsmall" />
+          <Inline>Create Invoice</Inline></Button>
+      )}
    >
これで画面に新規追加用のアクションボタンが配置できました。
更なる実装アイディアと参考になる設計パターン
今回の記事では、3パターンのみ紹介しました。
しかしこの例に絞っても、まだまだ設計パターンを参考にしたアップデートは可能です。
例えば、FocusViewを利用して、カスタマイズした請求書作成画面が追加できます。
API呼び出しに失敗した時のエラーメッセージと、再接続のためのボタンUIはこのパターンが参考になります。
また、リストで表示している請求書をカスタマイズするためのヒントは、リストの設計パターンからヒントを得ることができます。
このように、実装したUIをより便利に使いやすくするために、ドキュメントサイトで公開している設計パターンをご活用ください。
Stripe Appsひとりアドベントカレンダー 2022
今年ベータリリースされたばかりのStripe Appsは、まだ日本語の情報が多くありません。
そこでQiita Advent Calendar 2022にて、毎日Stripe Appsについての情報を投稿します。
ノーコードで利用する方法や、開発するためのTipsなども紹介予定ですので、ぜひ購読をお願いします。


