はじめに
- 本記事では UiPath Automation Suite 2.2510.2 をAzure Kubernetes Service (AKS) 環境 (東日本リージョン) にて、Terraformを利用してリソースをデプロイし、インストールを実行する手順をまとめたものです。
- Automation Suiteのシステム要件は こちらのページ をご参照ください。かなりハイスペックなマシンが必要となりますので、Azureの利用料金にはご注意ください。
v2.2510.2はマイナーバージョンアップですが、 Maestro や Agent Builder などエージェント関連の新機能が追加されていますので、これらの製品の利用手順を中心に説明します。
Automation Suiteとは?
- UiPathの各製品サービスをひとまとめにしてユーザーが所有する環境に展開できる全部入りの製品です。
- v2.2510.2では 次の製品サービス がサポートされています。(太字が新規追加機能)
- Action Center
- Agents
- AI Center
- AI Trust Layer
- LLM Gateway
- LLM Observability
- Context Grounding
- Apps
- Automation Hub
- Automation Ops
- Autopilot for Everyone
- Autopilot for Developers
- Autopilot for Testers
- Data Service
- Document Understanding
-
Healing Agent
- Semantic Proxy
- Insights
- Integration Service
- GenAI アクティビティ
-
Maestro
- Temporal as a Service (TaaS)
- Orchestrator
- Automation Suite ロボット
- コード化されたエージェント
- Process Mining
-
ScreenPlay
- Semantic Proxy
- ソリューション
- Studio Web
- Test Manager
Maestroはワークフローエンジンとしてオープンソース Temporal を利用していますが、TemporalはデータベースとしてPostgreSQLを利用しています。
つまりMaestroを利用するにはPostgreSQLが必要となります。
Automation Cloudとの使い分け
-
SaaS型のAutomation Cloud利用にあたり、次のような課題がある場合にAutomation Suiteを選択肢として検討します。
- 企業のセキュリティポリシーとして個人情報を扱う業務などではSaaS利用に制約があり、Automation Cloudがセンシティブな業務の自動化には適さない場合がある。
- Automation Cloudはインターネット経由でのアクセスのみ許可されており、専用線やVPNのみに接続を限定することはできません。
- ソースIPの制限 を設けることはできますが、インターネット経由でのアクセスという点では変わりはありません。
- Automation CloudはUiPath社が管理するAzure基盤にマルチテナントで展開されております。専有型のオプションも提供されています が、利用条件があるため詳細はUiPath社までお問い合わせください。
-
Automation SuiteとAutomation Cloudの機能比較の詳細は 製品の提供状況 をご覧ください。
Automation Suiteの構成
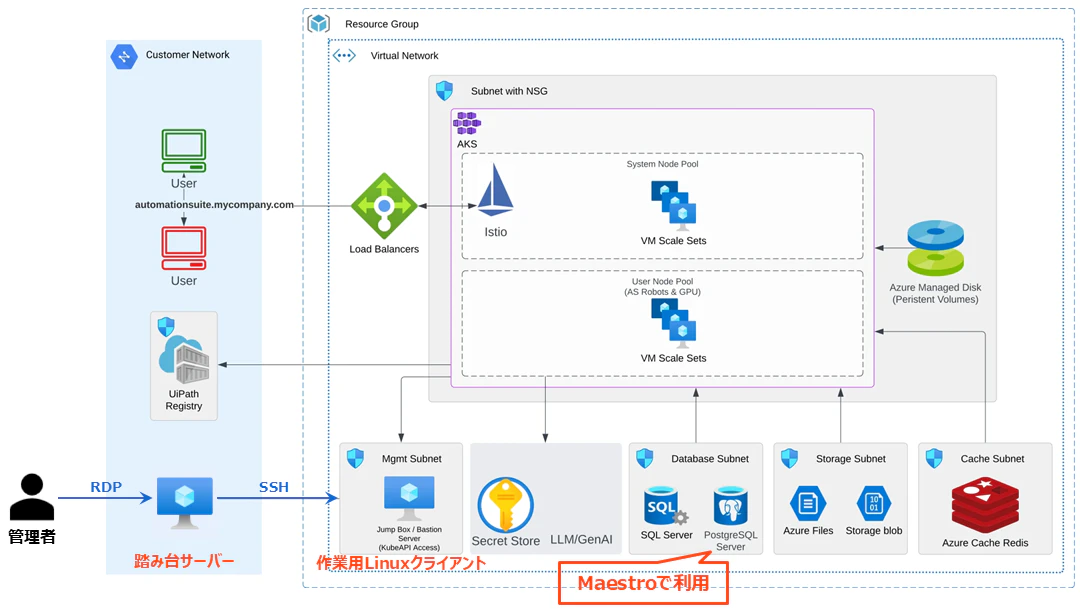
AKS環境における構成図
-
構成図は次の通りです。(※ 参照: デプロイのシナリオ)
-
この構成において利用するAzureサービスと用途は次の通りです。
| Azureサービス | 用途 |
|---|---|
| VM (Windows) | 踏み台サーバー。管理者がRDPで接続 |
| VM (Linux) | 作業用Linuxマシン。管理者が踏み台サーバーからSSHで接続kubectl コマンドなどを実行してAKSクラスターを操作 |
| AKS | Automation SuiteをインストールするKubernetesクラスター 管理プレーンとワーカーノードから構成 |
| Load Balancer | クライアントからのHTTPSトラフィックを適切なサービスに振り分け、複数ノードでの負荷分散と高可用性を確保 |
| Azure SQL Server | Automation Suiteの各製品サービスが使用するデータベース |
| Azure Database for PostgreSQL | MaestroのワークフローエンジンであるTemporalが使用するデータベース |
| Azure Cache for Redis | ワーカーノードから読み書きされ、キャッシュを保持するためのインメモリデータベース |
| Azure Files | Automation Suiteのバックアップファイルを格納するためのファイルサーバー |
| ストレージアカウント (コンテナ) | Automation Suiteの各製品サービスのアプリケーションデータを格納するストレージ。オブジェクトストアと呼ばれる |
| ストレージアカウント (キュー) | Integration ServiceのイベントやWebhookで利用するキュー |
| Private DNS Zone | Automation Suiteによって使用されるDNSレコードを作成 ※ 今回は検証用に lab.test というローカルドメインを使用 |
- 各マシンとワーカーノードからはアウトバウンドへのインターネットアクセスは可能とします。
- ワーカーノードからAzure SQL Server、Azure Database for PostgreSQL、Azure Cache for Redisおよびストレージアカウントへのアクセスにはそれぞれプライベート接続を使用します。
サイジング
-
AKSワーカーノードは利用するUiPath製品によってインスタンスタイプとノード数を選定します。詳細は 要件算出ツール で試算します。
-
今回は次のサービスを利用する想定で ツールの算出結果 を元に Standard_F32s_v2 x1台 (AS Robot専用) + Standard_F32s_v2 x4台 (AS Robot以外) のノード構成で進めてゆきます。
- Orchestrator
- AITL
- LLM Gateway
- LLM Observability
- Context Grounding
- Autopilot for Everyone
- Automation Solutions
- Automation Suite Robots (AS Robot)
- Studio Web
- Agent Hub
- Agents
- Maestro
- Automation Ops
- A4D
- AI Center
- Integration Service
- Insights
- Semantic Proxy
Automation Suite 環境構築手順
Azureリソース作成
-
上の構成図に記載したAzureリソースを手作業で作成するには少々骨が折れるため、本記事ではTerraformにて展開します。Terraformの使い方に慣れていない方は こちらの記事 を参照してTerraformの実行環境をセットアップしてください。
- AKSリソースをTerraformにて作成するためには Azure CLI をインストールします。
- az loginコマンド にてAzureにサインインします。
az login -
Automation Suite用のTerraformはGitHubに公開しています。
- ローカルにコピーするには作業ディレクトリに移動し、次のコマンドを実行します。(Windows環境ではあらかじめ Git for Windows をインストールします)
git clone https://github.com/hidecha/uipath-automation-suite.git
- 変数定義ファイルを作成しエディターで開きます。
cd uipath-automation-suite/aks
cp terraform.tfvars.template terraform.tfvars # or copy command
- 主な設定項目は次の通りです。
| 変数名 | 用途 |
|---|---|
| res_prefix | 各Azureリソースのプレフィックス名 |
| location | Azureリージョン (既定値: Japan East) |
| tags | リソースグループに付けるタグ (省略可) |
| vnet_address | VNetアドレス範囲 |
| sql_username | Azure SQL Serverの管理者ユーザー名 |
| sql_password | Azure SQL Serverの管理者パスワード |
| aks_fqdn | Automation SuiteのFQDN |
| enable_public_access | Automation Suiteへのパブリックアクセス許可 閉域網では false に設定 |
| aks_node_size | AKSワーカーノードのインスタンスサイズ 要件算出ツール により決定 |
| number_of_cpu_nodes | AKSワーカーノードのインスタンス数 |
| number_of_asrobot_nodes | AKSワーカーノード(AS Robot用)のインスタンス数 利用しない場合は 0 に設定 |
| kubernetes_version | AKSクラスターのKubernetesバージョン 対応バージョンは Kubernetes の相互運用性 を参照 |
| my_ip | 踏み台サーバーにRDPアクセスを許可するIPアドレス 作業マシンが インターネット接続しているグローバルIPアドレスを確認 して指定します |
| postgres_username | Azure Database for PostgreSQLの管理者ユーザー名 |
| postgres_password | Azure Database for PostgreSQLの管理者パスワード |
こちらのTerraformはAzure CacheとAzure DatabaseをシングルAZでデプロイしています。マルチAZによる冗長化が必要な場合など、ご要件や環境に応じて変更を行ってください。
- 準備が整いましたらmain.tfが配置されたディレクトリに移動し、次のコマンドを一行ずつ実行し、Automation Suiteに必要なAzureリソースを展開します。
terraform init
terraform plan -out main.tfplan
terraform apply main.tfplan
- Terraformによるリソース作成が成功することを確認します。
- Azureポータルにアクセスし、各リソースが作成されていることを確認します。
- Terraformを用いずに手動でAzureリソースを作成することもできます。詳細な手順は 前提条件の一覧 をご参照ください。
前提条件コンポーネントのインストールなど
Automation Suiteインストールに必要な前提条件のコンポーネントのインストールや設定などを行います。
SSH接続
まず踏み台サーバーにRDPログインし、そこから作業用LinuxクライアントマシンにSSHで接続します。
以降Linuxマシンにて順次コマンド実行します。
環境変数定義
- 変数定義 (環境に応じて変更)
AS_VER=2.2510.2                     # インストールするAutomation Suiteバージョン
PREFIX=myaksprefix                  # Terraformのres_prefix (リソースプレフィックス)
RESOURCE_GROUP_NAME=myaksprefix-rg  # Terraformのrg_name (リソースグループ名)
CLUSTER_NAME=${PREFIX}-cluster      # AKS
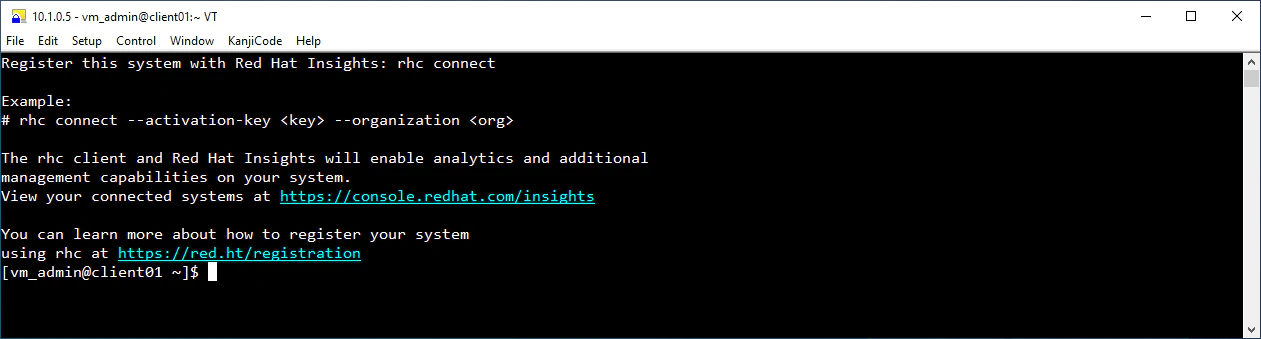
Azure CLI
-
Azure CLIをインストールします。
sudo rpm --import https://packages.microsoft.com/keys/microsoft.asc sudo dnf install -y https://packages.microsoft.com/config/rhel/9.0/packages-microsoft-prod.rpm echo -e "[azure-cli] name=Azure CLI baseurl=https://packages.microsoft.com/yumrepos/azure-cli enabled=1 gpgcheck=1 gpgkey=https://packages.microsoft.com/keys/microsoft.asc" | sudo tee /etc/yum.repos.d/azure-cli.repo sudo dnf install -y azure-cli -
az loginコマンド にてAzureにサインインします。(サインイン方法はAzure環境に合わせてください)
az login --use-device-code
kubectl
- kubectlインストール
curl -LO "https://dl.k8s.io/release/$(curl -L -s https://dl.k8s.io/release/stable.txt)/bin/linux/amd64/kubectl" sudo install -o root -g root -m 0755 kubectl /usr/local/bin/kubectl - kubeconfigファイルを作成
az aks get-credentials --resource-group ${RESOURCE_GROUP_NAME} --name ${CLUSTER_NAME} - Kubernetesクラスタのすべてのリソース確認
kubectl get all -A
Metrics Server
-
Metrics Serverインストール
cat << EOF > metrics-server-config.yaml
apiVersion: v1
kind: ConfigMap
metadata:
  name: metrics-server-config
  namespace: kube-system
  labels:
    kubernetes.io/cluster-service: "true"
    addonmanager.kubernetes.io/mode: EnsureExists
data:
  NannyConfiguration: |-
    apiVersion: nannyconfig/v1alpha1
    kind: NannyConfiguration
    baseCPU: 100m
    cpuPerNode: 1m
    baseMemory: 100Mi
    memoryPerNode: 8Mi
EOF
kubectl apply -f metrics-server-config.yaml
uipathctl
-
uipathctl インストール
curl https://download.uipath.com/uipathctl/${AS_VER}/uipathctl-${AS_VER}-linux-amd64.tar.gz -o uipathctl.tar.gz
tar xzvf uipathctl.tar.gz
chmod +x uipathctl
sudo mv ./uipathctl /usr/local/bin
uipathctl version
versions.json
- versions.jsonダウンロード
curl https://download.uipath.com/automation-suite/${AS_VER}/versions.json -o versions.json
input.json作成
-
Automation Suiteの環境設定およびインストールされるUiPath製品の定義として
input.jsonのファイルを作成します。パラメーター定義 を参照して手動で作成することもできますが、設定項目が非常に多いため ウィザード を利用して主要なパラメーター設定を行い、手作業で詳細設定を行います。 -
ウィザードを起動するには次のコマンドを実行します。(一時的にFWを開放します)
sudo firewall-cmd --add-port=8080/tcp uipathctl config generate --port 8080 -
ブラウザーで
http://<Linux-IP>:8080にアクセスします。

- I accept the license agreement をオンにして Nextをクリックします。
-
Platform:
-
Automation Suite on AKS を選択して、Nextをクリックします。

-
Automation Suite on AKS を選択して、Nextをクリックします。
-
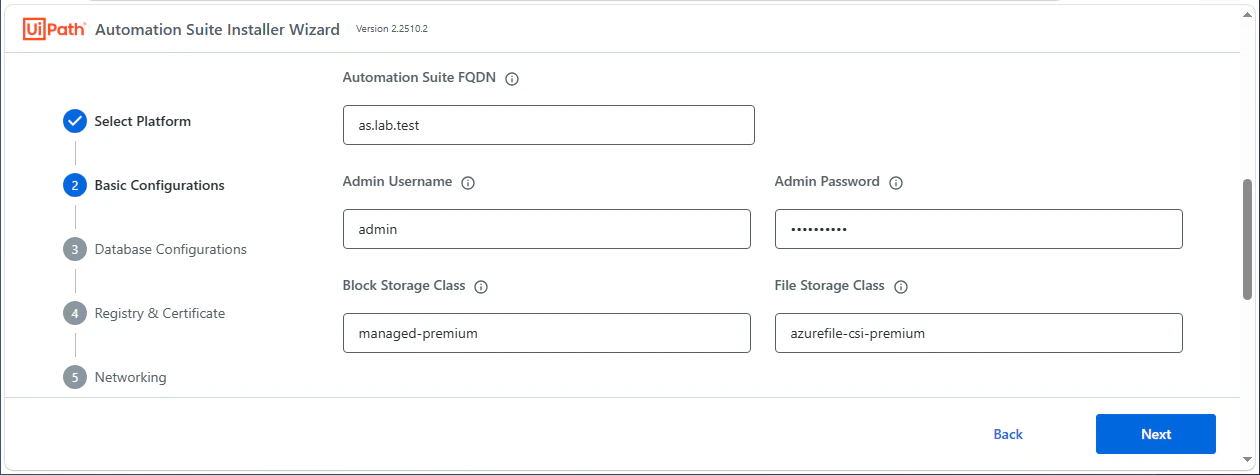
Basic Configuration
-
Deployment mode: Online を選択
-
Deployment type: Highly Available を選択
-
Istio Minimum Protocol Version: TLSV1_3 を選択

-
Automation Suite FQDN:
as.lab.testなどと指定 -
Admin Username:
adminを指定 -
Admin Password: Automation Suite管理画面ログイン時のパスワードを指定
-
Storage Class:
managed-premiumを指定 -
File Storage Class:
azurefile-csi-premiumを指定
-
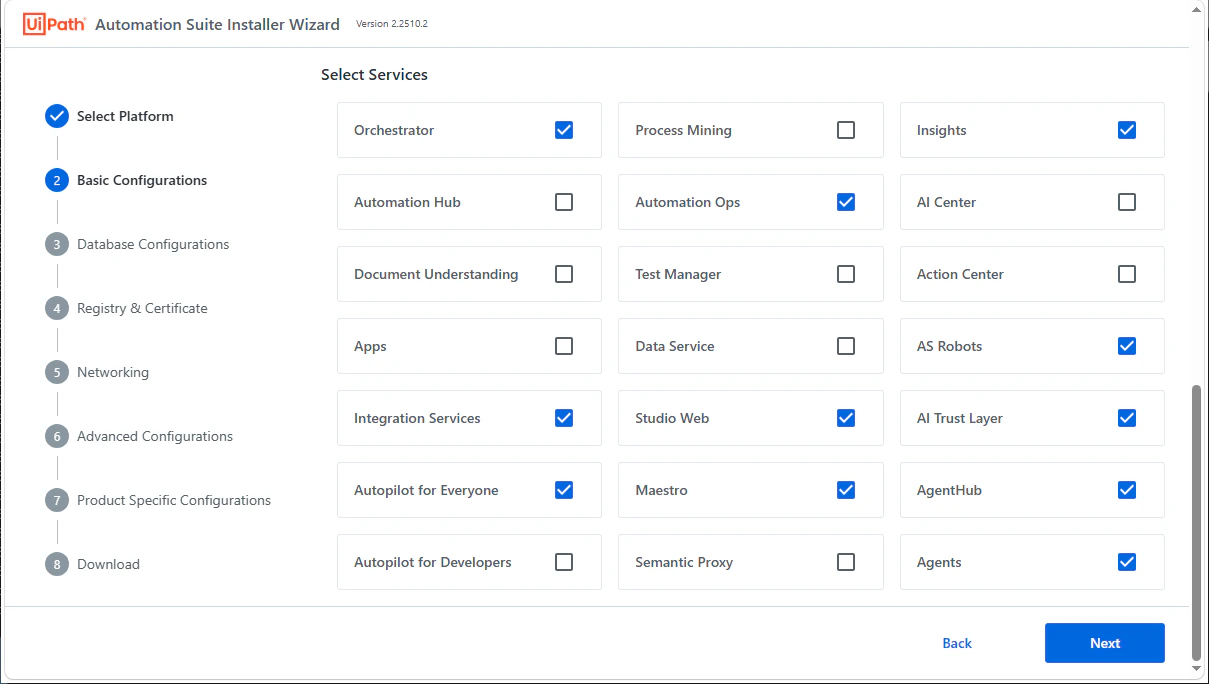
Select Services: 利用するUiPath製品を選択します。今回は
Orchestrator,Insights,Automation Ops,AS Robots,Integration Services,Studio Web,AI Trust Layer,Autopilot for Everyone,Maestro,AgentHub,Agentsを選択し、Nextをクリックします。
-
-
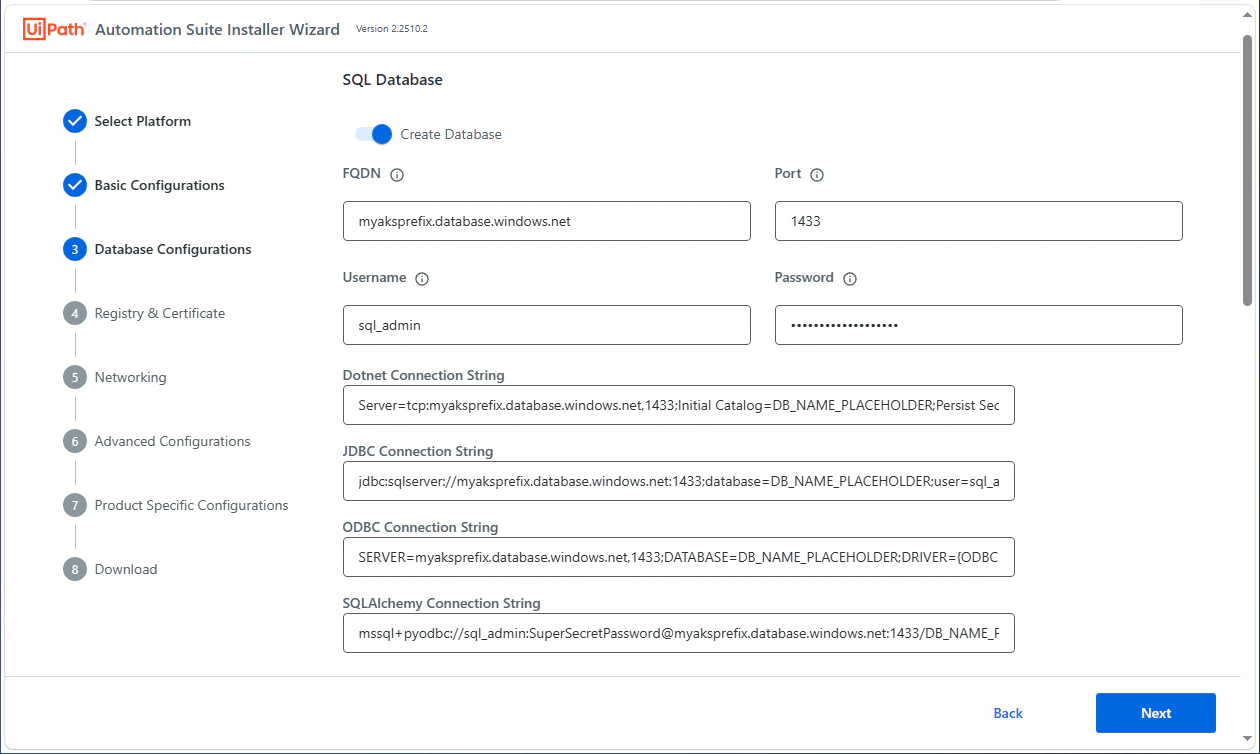
Database Configurations
-
SQL Database
- Create Database: オン
- FQDN: Azure SQL Serverのエンドポイントを指定
- Port:
1433を指定 - Username:
sql_adminなどSQL Serverの管理者を指定 - Password: SQL Server管理者パスワードを指定
- ※ Dotnet, JDBC, ODBC, SQLAlchemy Connect Stringは自動設定されるため編集不要
-
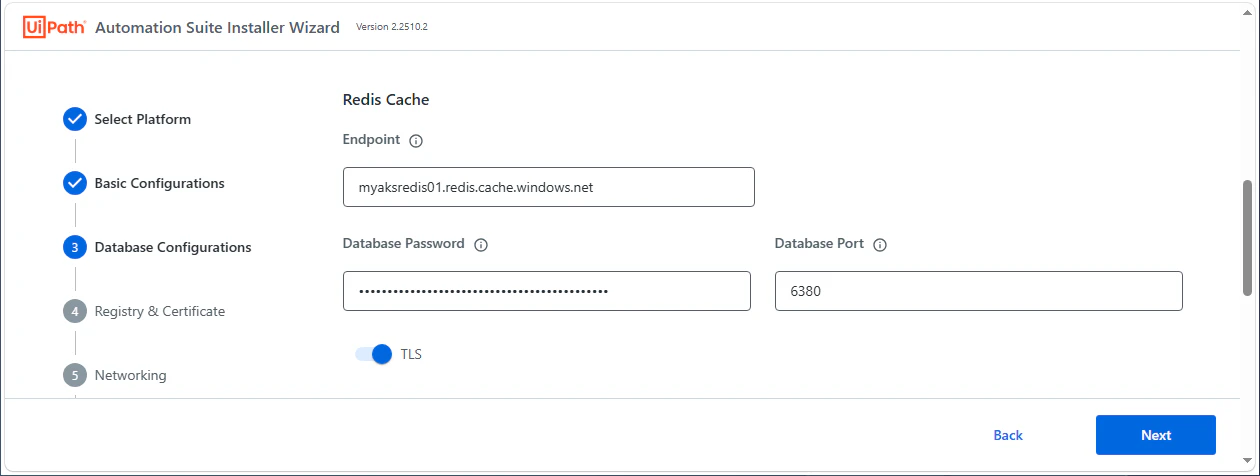
Redis Cache
- Endpoint: Azure Cache for Redisのエンドポイントを指定
- Database Password: Azure Cache for RedisのアクセスキーをAzureポータルより取得してペースト
- Database Port:
6380を指定 - TLS: オン
-
Object Store
- Storage Type: Azure Blob を選択
- Create Buckets: オン
- Disable Presigned URL: オフ
- Managed Identity: オフ
- Storage Account Name: ストレージアカウント名を指定 (Terraformの
storage_account) - Azure FQDN Suffix:
core.windows.net - Storage Account Key: ストレージアカウントのアクセスキーをAzureポータルより取得してペースト

-
-
Registry & Certificate
- サーバー証明書の設定を行います。サーバー証明書はインストール後に置き換えることもできるため、ここでは何も入力せずにNextをクリックします。
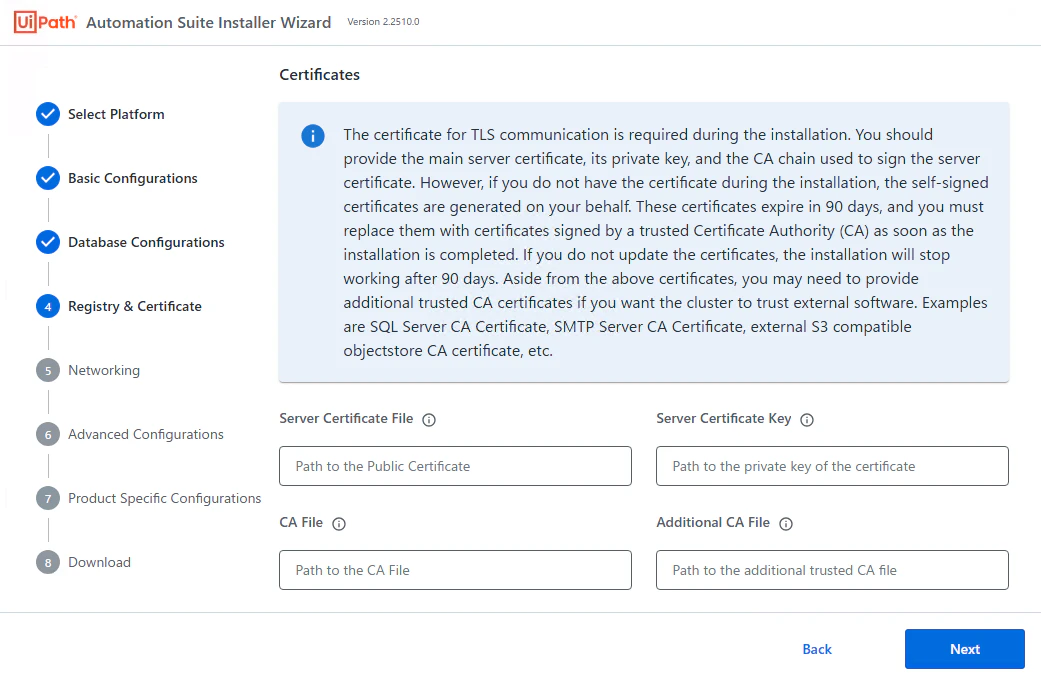
- サーバー証明書の設定を行います。サーバー証明書はインストール後に置き換えることもできるため、ここでは何も入力せずにNextをクリックします。
-
Networking
-
Load Balancerの設定を行います。接続方式によって設定内容が異なりますが、ここではプライベートサブネットで固定IPアドレスにてLoad Balancerを作成・利用する場合を想定した設定を行います。
- "service.beta.kubernetes.io/azure-load-balancer-internal":
"true"に変更
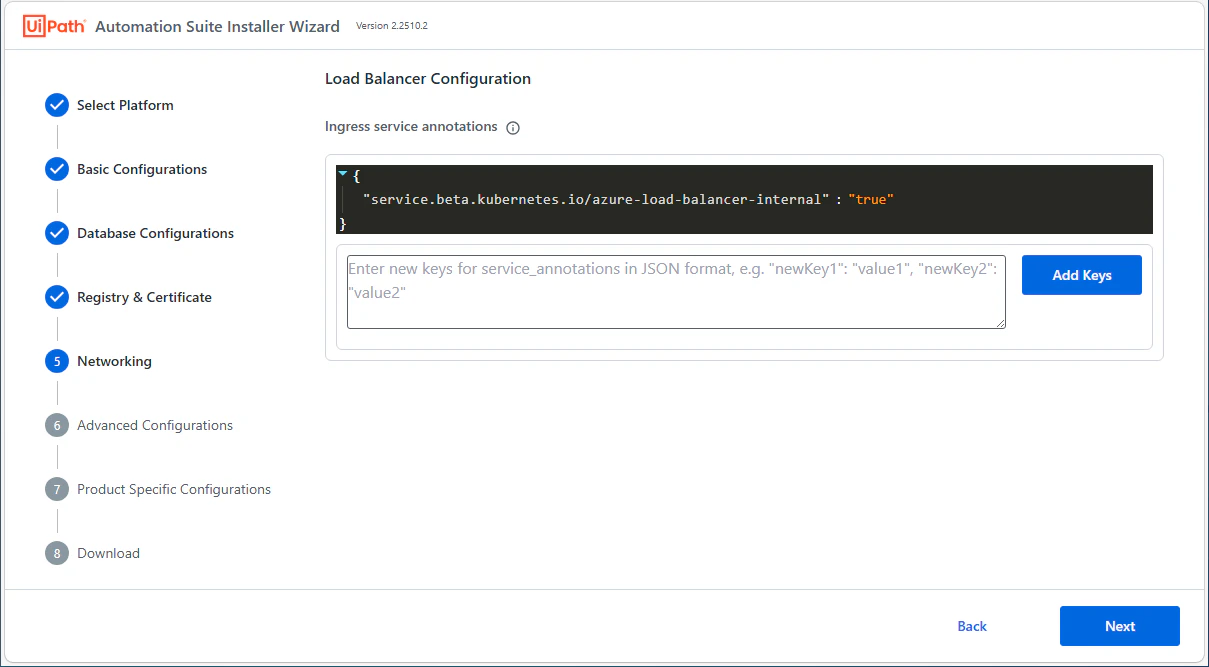
- "service.beta.kubernetes.io/azure-load-balancer-internal":
-
-
Advanced Configurations
- そのままNextをクリックします。
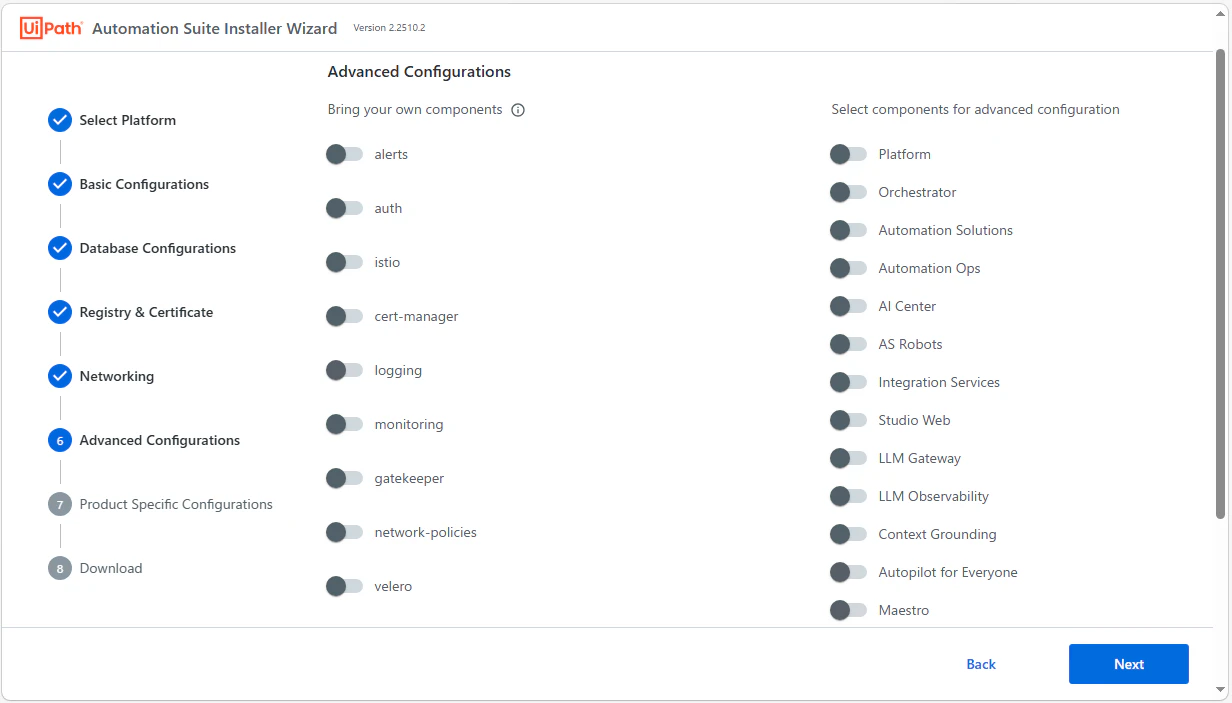
- そのままNextをクリックします。
-
Product Specific Configuration
-
Download をクリックし、input.jsonファイルをローカルにダウンロードします。
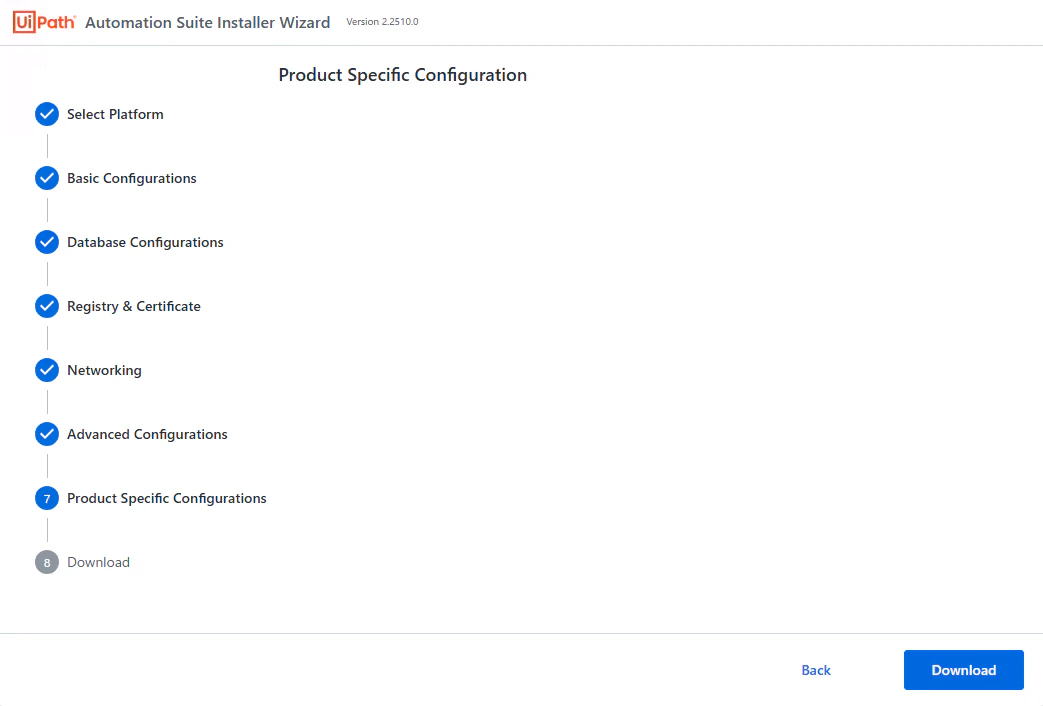
-
Download をクリックし、input.jsonファイルをローカルにダウンロードします。
-
ダウンロードしたinput.jsonをエディターで開き、2点修正します。
-
"storage_class_single_replica": "azurefile-csi-premium",の後に次の行を追加:"storage_class_name_with_rwx_support": "azurefile-csi-premium",

-
taasセクションを次のように設定:"taas": { "enabled": true, "temporal": { "postgresql_connection_str": "postgresql+psycopg2://postgres_admin:{PostgreSQL管理者パスワード}@{Azure Database for PostgreSQLホスト}:5432/AutomationSuite_Taas" } }※ PostgreSQL管理者パスワードの記号文字を含む場合にはパーセントエンコードします。(例
!→%21)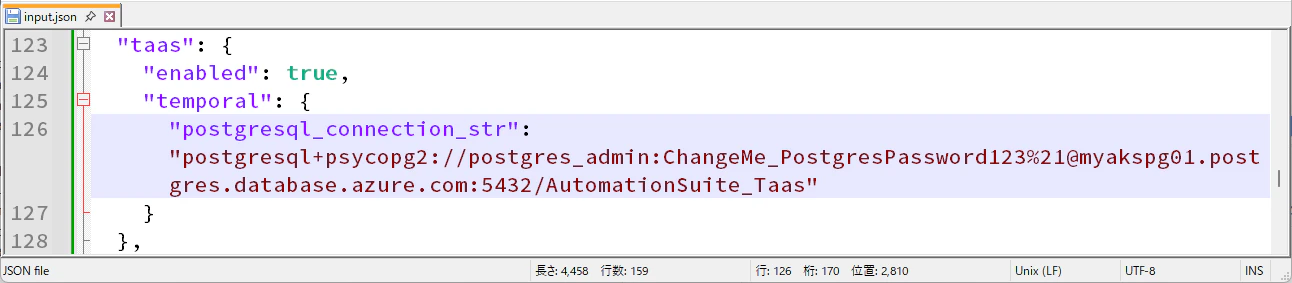
-
-
LinuxマシンにてCtrl+Cでウィザードを終了します。
-
vi input.jsonを実行し、内容をコピー&ペーストして保存します。
Automation Suiteインストール
input.json が作成できましたら、いよいよAutomation Suiteインストールを実行します。
データベース / Blobコンテナ作成
- 次のコマンドでSQL Serverデータベースとストレージアカウントのコンテナを作成します。
uipathctl prereq create input.json --versions versions.json
- ただしPostgreSQLのデータベースは手動で作成する必要があるため、次のコマンドを実行します。
sudo dnf install -y postgresql-server
PGPASSWORD='{postgres_adminパスワード}' psql -h {PostgreSQLホスト} -p 5432 -U postgres_admin -d postgres -c 'CREATE DATABASE "AutomationSuite_Taas";'
ロードバランサー作成
uipathctl manifest apply input.json --versions versions.json --override=gateway
-
Azureポータル > リソースグループ
MC_*-cluster_japaneastのロードバランサーにて新しいLoad Balancerとしてkubernetes-internalが作成されていることを確認し、フロントエンドIPアドレスを取得します。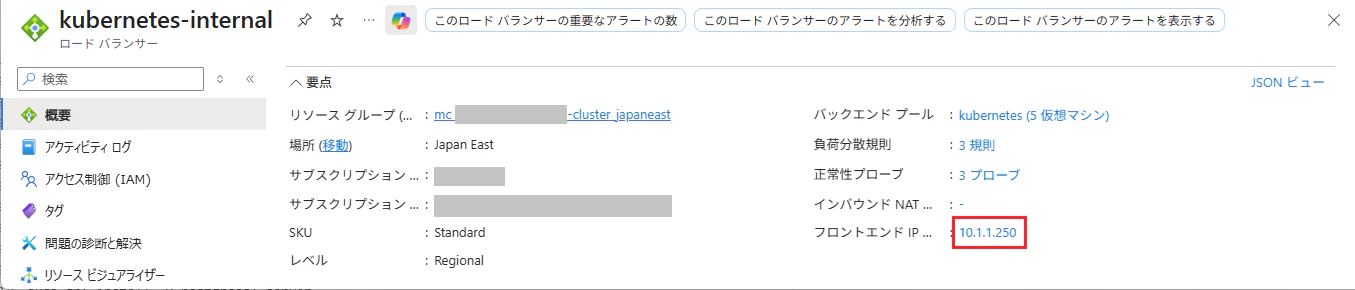
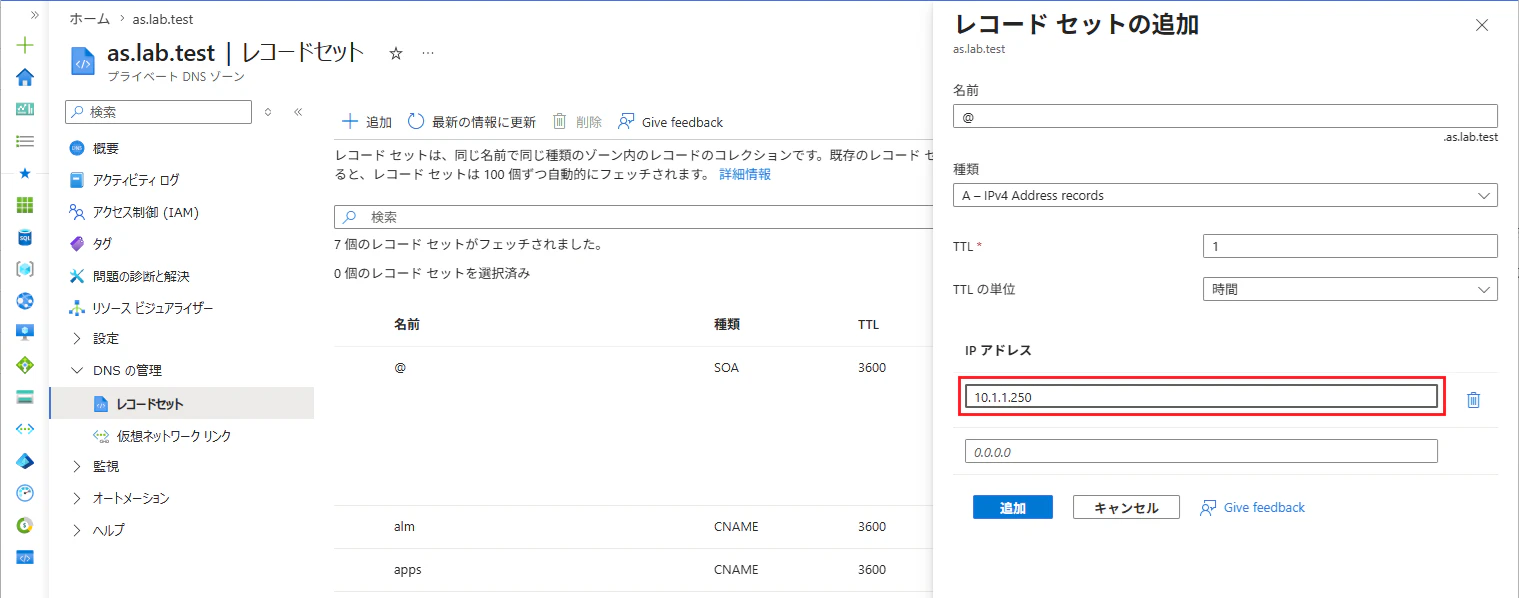
DNSレコード作成
-
Terraformによって作成された元のリソースグループ > プライベートDNSゾーン
as.lab.test> DNSの管理 > レコードセット > 追加 をクリックし、次の通り設定します。- 名前:
@ - 種類:
A - TTL:
1時間 - IPアドレス:
{先ほど取得したフロントエンドIPアドレス}
- 名前:
前提条件チェック
uipathctl prereq run input.json --versions versions.json
Automation Suiteインストール実行
uipathctl manifest apply input.json --versions versions.json
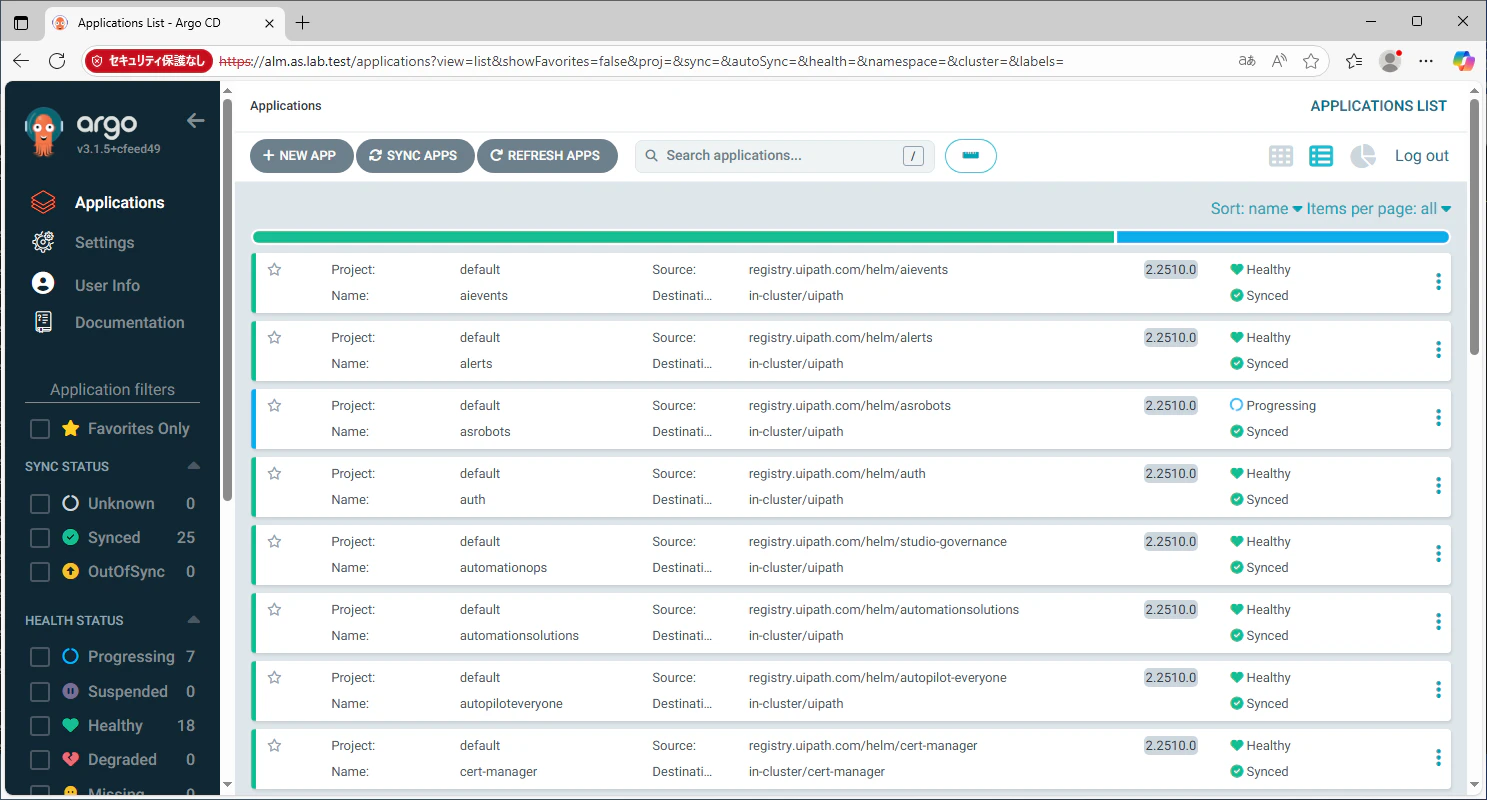
- インストール完了までに約30分程度かかります。インストール時のPodの状態はArgoCDで監視することができます。
ArgoCDアクセス
- インストールの進捗状況はArgoCDで確認できます。
-
SSHクライアントにて別ターミナルを開き、次のコマンドにてArgoCDパスワードを取得します。
kubectl -n argocd get secret argocd-initial-admin-secret -o jsonpath="{.data.password}" | base64 -d -
ブラウザーにて
https://alm.{AS-FQDN}(例:https://alm.as.lab.test) を開き、adminユーザー/先ほど取得したパスワードにてログインします。

-
各アプリケーションのインストール状況が色分けして表示されます。
- 緑(Synced): インストール済み
- 青(Progressing): インストール中
- 赤(Degraded): インストール失敗
-
サポートバンドル取得方法
- インストール完了時にはすべて緑で表示されますが、2~3時間経過しても青や赤が残る場合にはインストールが失敗している可能性があります。次のコマンドにて サポートバンドル を取得し、UiPath カスタマーサポートへのお問い合わせの際に添付します。
uipathctl health bundle input.json --versions versions.json
インストール後の作業など
管理画面へのログイン
-
ブラウザーにて https://{AS-FQDN} (例:
https://as.lab.test) を開き、Automation Suiteのログイン画面が表示されることを確認します。
- host組織にログインするには
organization: host, Username: admin, Password: {ウィザードで指定したパスワード}にてログインします。 - default組織にログインするには
organization: default, Username: orgadmin, Password: {ウィザードで指定したパスワード}にてログインします。初回ログイン時にパスワードを変更します。
- host組織にログインするには
サーバー証明書の入れ替え
- Automation Suiteのインストール時に自動作成される自己署名証明書の有効期限は 90日間 です。有効期限が切れる前に別のサーバー証明書を準備し、入れ替えを行う必要があります。詳細な手順は 証明書を管理する をご参照ください。
製品の追加
インストール後に製品を追加するには input.json を編集して変更インストールを実行します。ここではAutopilot for DevelopersとSemantic Proxyおよび依存関係のあるAI Centerを追加する手順を示します。
-
vi input.jsonを実行し、次の箇所を修正して保存します。"aicenter": { "enabled": true }"a4d": { "enabled": true, "sqlalchemy_asyncpg_postgresql_connection_str": "postgresql+asyncpg://postgres_admin:{PostgreSQL管理者パスワード}@{Azure Database for PostgreSQLホスト}:5432/AutomationSuite_A4D" }"semanticproxy": { "enabled": true } -
A4D用のPostgreSQLデータベースを作成します。
PGPASSWORD='{postgres_adminパスワード}' psql -h {PostgreSQLホスト} -p 5432 -U postgres_admin -d postgres -c 'CREATE DATABASE "AutomationSuite_A4D";' -
Automation Suiteの変更インストールのために次のコマンドを実行します。
uipathctl prereq create input.json --versions versions.jsonuipathctl manifest apply --dry-run input.json --versions versions.jsonuipathctl manifest apply input.json --versions versions.json --skip-helm
エージェント関連サービスの設定
- 本記事が長くなりましたので、Agent BuilderやMaestroなどエージェント関連サービスの設定手順は別記事にて投稿しましたので合わせてご覧ください。
おわりに
- 今回はAutomation Suite 2.2510.2のインストールをAKS環境にて実行する手順を説明しました。
- エージェント関連のサービスを含めUiPathの主要な製品を自前の環境で展開できるのがAutomation Suiteの大きなメリットです。ご関心のある方はぜひAutomation Suiteのインストールにチャレンジしていただけると幸いです!