はじめに
ラスベガスで開催中のAWSグローバルイベント「re:Invent 2018」において、ARMプロセッサーベースの新しいEC2インスタンスタイプ「A1」シリーズが発表されました。
<引用>
the A1 instances are optimized for performance and cost.
They are a great fit for scale-out workloads where you can share the load across a group of smaller instances.
This includes containerized microservices, web servers, development environments, and caching fleets.
引用>
コンテナ化されたマイクロサービスなどに最適?
「こ、これは・・・ ECSやEKSのコンテナ実行ホストとして使えるってことなのか?!」
と思ってECSやEKSを確認しに行きましたが・・・まだ対応していないようです(悲)
という訳で、素振りとして(?)、とりあえずDockerで単体のコンテナを動かしてみました。
2018/12/04追記
ECSは対応していることを確認しましたので、記事を書きました。
AWS EC2の新インスタンス「A1」("Graviton"/ARM64)をECSで使ってみた
A1インスタンスを立ち上げる
ARMアーキテクチャだからと言って特別なところは何もありません。
マネジメントコンソールからでも、CLIからでも、x86アーキテクチャの場合と同様にインスタンスが起動できます。
参考までに、CloudFormationのスタックを置いておきます。(キーペアは事前に作成しておいて下さいね)
CloudFormationスタック
---
AWSTemplateFormatVersion: "2010-09-09"
Description: "Stack for creating a single EC2 instance with VPC network"

Parameters:
  ResourceNamePrefix:
    Type: String

  CidrBlockVpc:
    Type: String
    Default: 10.0.0.0/16

  CidrBlockSubnet:
    Type: String
    Default: 10.0.0.0/24

  RemoteAccessAllowIpAddress:
    Type: String

  Ec2ImageId:
    Type: AWS::EC2::Image::Id
    Default: ami-0f8c82faeb08f15da  # Amazon Linux 2 LTS Arm64 AMI 2.0.20181114.1 arm64 HVM gp2 (@us-east-1)

  Ec2SnapshotId:
    Type: String
    Default: snap-01bc08de2b998636d  # Amazon Linux 2 LTS Arm64 AMI 2.0.20181114.1 arm64 HVM gp2 (@us-east-1)

  Ec2KeyName:
    Type: AWS::EC2::KeyPair::KeyName

  Ec2InstanceType:
    Type: String
    Default: a1.medium

  Ec2VolumeType:
    Type: String
    Default: gp2

  Ec2VolumeSize:
    Type: String
    Default: 8

Metadata:
  AWS::CloudFormation::Interface:
    ParameterGroups:
    - Label:
        default: "General Information"
      Parameters:
      - ResourceNamePrefix
    - Label:
        default: "Network Configuration"
      Parameters:
      - CidrBlockVpc
      - CidrBlockSubnet
      - RemoteAccessAllowIpAddress
    - Label:
        default: "EC2 Instance Configuration"
      Parameters:
      - Ec2ImageId
      - Ec2SnapshotId
      - Ec2KeyName
      - Ec2InstanceType
      - Ec2VolumeType
      - Ec2VolumeSize

Resources:
  VPC:
    Type: AWS::EC2::VPC
    Properties:
      CidrBlock:  !Ref CidrBlockVpc
      EnableDnsSupport: true
      EnableDnsHostnames: true
      InstanceTenancy: default
      Tags:
      - Key: Name
        Value: !Sub "${ResourceNamePrefix}-VPC"

  InternetGateway:
    Type: AWS::EC2::InternetGateway
    Properties:
      Tags:
      - Key: Name
        Value: !Sub "${ResourceNamePrefix}-IGW"

  VPCGatewayAttachment:
    Type: AWS::EC2::VPCGatewayAttachment
    Properties:
      InternetGatewayId: !Ref InternetGateway
      VpcId: !Ref VPC

  Subnet:
    Type: AWS::EC2::Subnet
    Properties:
      VpcId: !Ref VPC
      AvailabilityZone: !Select
      - 0
      - Fn::GetAZs: !Ref AWS::Region
      CidrBlock: !Ref CidrBlockSubnet
      MapPublicIpOnLaunch: false
      Tags:
      - Key: Name
        Value: !Sub "${ResourceNamePrefix}-Subnet"

  RouteTable:
    Type: AWS::EC2::RouteTable
    Properties:
      VpcId: !Ref VPC
      Tags:
      - Key: Name
        Value: !Sub "${ResourceNamePrefix}-RTB"

  RouteIGW:
    DependsOn: VPCGatewayAttachment
    Type: AWS::EC2::Route
    Properties:
      RouteTableId: !Ref RouteTable
      DestinationCidrBlock: 0.0.0.0/0
      GatewayId: !Ref InternetGateway

  SubnetRouteTableAssociation:
    Type: AWS::EC2::SubnetRouteTableAssociation
    Properties:
      SubnetId: !Ref Subnet
      RouteTableId: !Ref RouteTable

  SecurityGroup:
    Type: AWS::EC2::SecurityGroup
    Properties:
      GroupName: !Sub "${ResourceNamePrefix}-SG"
      GroupDescription: "Security Group for EC2"
      VpcId: !Ref VPC
      SecurityGroupIngress:
      - IpProtocol: tcp
        FromPort: 22
        ToPort: 22
        CidrIp: !Ref RemoteAccessAllowIpAddress
      - IpProtocol: tcp
        FromPort: 80
        ToPort: 80
        CidrIp: 0.0.0.0/0
      Tags:
      - Key: Name
        Value: !Sub "${ResourceNamePrefix}-SG"

  EC2Instance:
    Type: AWS::EC2::Instance
    Properties:
      ImageId: !Ref Ec2ImageId
      InstanceType: !Ref Ec2InstanceType
      KeyName: !Ref Ec2KeyName
      BlockDeviceMappings:
      - DeviceName: /dev/xvda
        Ebs:
          SnapshotId: !Ref Ec2SnapshotId
          VolumeSize: !Ref Ec2VolumeSize
          VolumeType: !Ref Ec2VolumeType
      NetworkInterfaces:
      - DeviceIndex: 0
        Description: "Primary network interface"
        SubnetId: !Ref Subnet
        AssociatePublicIpAddress: true
        GroupSet:
        - !Ref SecurityGroup
      Tags:
      - Key: Name
        Value: !Sub "${ResourceNamePrefix}-EC2"

Outputs:
  VpcId:
    Value: !Ref VPC

  SubnetId:
    Value: !Ref Subnet

  SecurityGroupId:
    Value: !Ref SecurityGroup

  Ec2InstanceId:
    Value: !Ref EC2Instance

  Ec2InstancePublicIp:
    Value: !GetAtt EC2Instance.PublicIp
「やだやだ!全自動がいい!」という人のために、スクリプトも置いておきます。
全自動スクリプト
# !/bin/sh

# デフォルトリージョンを「バージニア北部」に設定
aws configure set region us-east-1

# 操作PCのグローバルIPアドレスを取得
MY_IP=$(curl https://checkip.amazonaws.com/ | tr -d "\n\r")

# キーペアを作成
KEYPAIR_NAME=arm64test-KeyPair
aws ec2 create-key-pair \
  --key-name ${KEYPAIR_NAME} \
  --query "KeyMaterial" \
  --output text > ~/.ssh/${KEYPAIR_NAME}.pem
chmod 400 ~/.ssh/${KEYPAIR_NAME}.pem

# ARM64版AmazonLinux2のAMI/EBSスナップショット(us-east-1)
EC2_AMAZONLINUX2_IMAGE_ID=ami-0f8c82faeb08f15da
EC2_AMAZONLINUX2_SNAPSHOT_ID=snap-01bc08de2b998636d

# EC2インスタンスタイプ (a1.medium, a1.large, a1.xlarge, a1.x2large, a1.x4largeのいずれか)
EC2_INSTANCE_TYPE=a1.medium

# CloudFormationスタックを作成
RESOURCE_NAME_PREFIX=arm64test
STACK_NAME=arm64test-stack
aws cloudformation create-stack \
  --stack-name ${STACK_NAME} \
  --template-body file://cfn-arm64-ec2-with-vpc.yaml \
  --parameters ParameterKey=ResourceNamePrefix,ParameterValue=${RESOURCE_NAME_PREFIX} \
               ParameterKey=CidrBlockVpc,ParameterValue=10.0.0.0/16 \
               ParameterKey=CidrBlockSubnet,ParameterValue=10.0.0.0/24 \
               ParameterKey=RemoteAccessAllowIpAddress,ParameterValue=${MY_IP}/32 \
               ParameterKey=Ec2ImageId,ParameterValue=${EC2_AMAZONLINUX2_IMAGE_ID} \
               ParameterKey=Ec2SnapshotId,ParameterValue=${EC2_AMAZONLINUX2_SNAPSHOT_ID} \
               ParameterKey=Ec2KeyName,ParameterValue=${KEYPAIR_NAME} \
               ParameterKey=Ec2InstanceType,ParameterValue=${EC2_INSTANCE_TYPE} \
               ParameterKey=Ec2VolumeType,ParameterValue=gp2 \
               ParameterKey=Ec2VolumeSize,ParameterValue=8

# スタック作成完了を待ち合わせ
aws cloudformation wait stack-create-complete --stack-name ${STACK_NAME}

# 起動したEC2インスタンスのパブリックIPアドレスを取得
EC2_INSTANCE_PUBLICIP=$( \
  aws cloudformation describe-stacks \
    --stack-name ${STACK_NAME} \
    --query "Stacks[].Outputs[?OutputKey=='Ec2InstancePublicIp'].OutputValue" \
    --output text)
echo $EC2_INSTANCE_PUBLICIP
Dockerをインストールする
ARMアーキテクチャだからと言って特別なところは何もありません。(再)
x64アーキテクチャの場合と同様にインストールして行きます。
起動したA1インスタンスへSSH接続します:
$ ssh -i ~/.ssh/${KEYPAIR_NAME}.pem ec2-user@${EC2_INSTANCE_PUBLICIP}
Dockerをインストールします。
念のため、事前にDockerが未インストールであることを確認しておきましょう("@"が付いていない):
$ yum list docker
Loaded plugins: extras_suggestions, langpacks, priorities, update-motd
Available Packages
docker.aarch64        18.06.1ce-5.amzn2        amzn2extra-docker
Amazon Linux 2では、Dockerのインストールは「Amazon Linux 2 Extras Library」を用いて行います:
$ sudo amazon-linux-extras install docker=latest
(中略)
Installed:
  docker.aarch64 0:18.06.1ce-5.amzn2
Complete!
Dockerデーモンを起動します:
$ sudo systemctl enable docker.service
$ sudo systemctl start docker.service
正常にインストール・起動されたことを確認します:
$ sudo docker version
Client:
 Version:           18.06.1-ce
 API version:       1.38
 Go version:        go1.10.3
 Git commit:        e68fc7a215d7133c34aa18e3b72b4a21fd0c6136
 Built:             Fri Oct 26 23:39:08 2018
 OS/Arch:           linux/arm64
 Experimental:      false

Server:
 Engine:
  Version:          18.06.1-ce
  API version:      1.38 (minimum version 1.12)
  Go version:       go1.10.3
  Git commit:       e68fc7a/18.06.1-ce
  Built:            Fri Oct 26 23:40:26 2018
  OS/Arch:          linux/arm64
  Experimental:     false
Dockerコンテナを動かしてみる
簡単なコードサンプルを用意します。(個人的嗜好からGo言語にしました)
package main
import (
"fmt"
"net/http"
"os"
"runtime"
)
func handler(w http.ResponseWriter, r *http.Request) {
hostname, _ := os.Hostname()
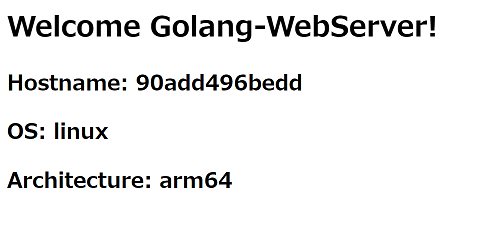
fmt.Fprintf(w, "<h1>Welcome Golang-WebServer!</h1>")
fmt.Fprintf(w, "<h2>Hostname: %s</h2>", hostname)
fmt.Fprintf(w, "<h2>OS: %s</h2>", runtime.GOOS)
fmt.Fprintf(w, "<h2>Architecture: %s</h2>", runtime.GOARCH)
}
func main() {
http.HandleFunc("/", handler)
http.ListenAndServe(":8080", nil)
}
Go言語は、プラットフォームやアーキテクチャが異なるマシン上であっても、環境変数を指定することで特定環境向けのバイナリをビルドすることができます。(例:GOOS=linux GOARCH=arm64 go build hogehoge.go)
この仕組みを使ってx86マシン上でビルドしてもよいのですが、今回はDockerの「マルチステージビルド」の機能を使って実装することにしましょう。
(以下は全てA1インスタンス上で実行)
次のようなDockerfileを用意して、Go言語のソースと同じディレクトリに置きます:
FROM golang:latest AS builder
WORKDIR /tmp
ADD ./go-webserver-sample.go /tmp
RUN GOOS=linux CGO_ENABLED=0 go build -o go-webserver-sample .

FROM alpine:latest
COPY --from=builder /tmp/go-webserver-sample /bin/
CMD ["/bin/go-webserver-sample"]
ビルドを実行してイメージを生成します:
$ sudo docker image build -t go-webserver-arm64 .
(中略)
Successfully built 1d23fc35541e
Successfully tagged go-webserver-arm64:latest
作成されたイメージを確認します:
$ sudo docker image ls
REPOSITORY           TAG                 IMAGE ID            CREATED             SIZE
go-webserver-arm64   latest              1d23fc35541e        53 seconds ago      10.4MB
<none>               <none>              75abbb4e1706        54 seconds ago      704MB
golang               latest              7e47af1fecb4        11 days ago         691MB
alpine               latest              637f35dd3ce4        2 months ago        4.2MB
イメージを起動します:
$ sudo docker container run -p 80:8080 --rm go-webserver-arm64
WebブラウザでA1インスタンスのパブリックDNS名またはパブリックIPアドレスへアクセスします。
(ちなみに・・・)
今回使用した「マルチステージビルド」のDockerfileは環境依存しませんので、そのままx86環境(t2.micro等)でビルド・実行しても動作します。
その場合は「Architecture:」欄に「amd64」と表示されるでしょう。
おわりに
ARMアーキテクチャ環境でDockerを動作させること自体は、組み込み系やRaspberry PI等で既に行われているため、目新しいことではないと思います。
ただ、クラウド環境で使えるというのは、今後の可能性を考えるとワクワクしますね。
願わくば、早くECS/EKSへの対応を・・・